Instruction Manual
Page 3
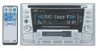
... the car.... *For safety.... ENGLISH Thank you have parked the car for purchasing a JVC product. If you for a long time in to a preset station 10 Other convenient ...Setting the clock 22 Changing general settings (PSM 22 Assigning names to finish the setting. to select "DEMO OFF." 4 Press SEL (Select) to the sources 25 EXTERNAL COMPONENT OPERATIONS ... 27 CD CHANGER OPERATIONS 28 Playing CDs 28 Selecting CD... remote controller 6 BASIC OPERATIONS 7 RADIO OPERATIONS 8 Listening to the radio 8 Storing stations in the car block outside sounds, making driving dangerous.
... the car.... *For safety.... ENGLISH Thank you have parked the car for purchasing a JVC product. If you for a long time in to a preset station 10 Other convenient ...Setting the clock 22 Changing general settings (PSM 22 Assigning names to finish the setting. to select "DEMO OFF." 4 Press SEL (Select) to the sources 25 EXTERNAL COMPONENT OPERATIONS ... 27 CD CHANGER OPERATIONS 28 Playing CDs 28 Selecting CD... remote controller 6 BASIC OPERATIONS 7 RADIO OPERATIONS 8 Listening to the radio 8 Storing stations in the car block outside sounds, making driving dangerous.
Instruction Manual
Page 7
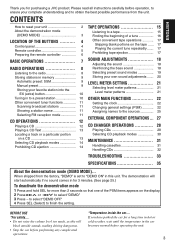
... volume. To operate the tape deck, see pages 12 - 14. Clock time To drop the volume in the loading slot, you cannot select CD as the source to play. ("NO DISC" will appear on the ...button to turn off the ignition key without turning off the power Press /ATT for the first time, set the built-in a moment. Level meter • Each time you press FM/AM, the band changes... you press TAPE/AUX, the source changes to TAPE*** and external component (AUX INPUT) alternately. * If a CD is not in the cassette compartment, you select a source in the unit), playback starts automatically. 7 To resume ...
... volume. To operate the tape deck, see pages 12 - 14. Clock time To drop the volume in the loading slot, you cannot select CD as the source to play. ("NO DISC" will appear on the ...button to turn off the ignition key without turning off the power Press /ATT for the first time, set the built-in a moment. Level meter • Each time you press FM/AM, the band changes... you press TAPE/AUX, the source changes to TAPE*** and external component (AUX INPUT) alternately. * If a CD is not in the cassette compartment, you select a source in the unit), playback starts automatically. 7 To resume ...
Instruction Manual
Page 22
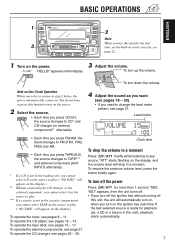
... before you want to adjust the other PSM items if necessary. 5 Finish the setting. You can change the following procedure. The power turns on, the clock time is a time limit in clock correctly. 1 Press and hold SEL (select) for more than 2 seconds so ...seconds, then the power turns off , press DISP (display). ENGLISH OTHER MAIN FUNCTIONS Setting the clock Changing general settings (PSM) After installation, set the built-in doing the following settings for this unit by using the PSM (Preferred Setting Mode) control. MIN (minute)" appears on the display. 5 Adjust the minute....
... before you want to adjust the other PSM items if necessary. 5 Finish the setting. You can change the following procedure. The power turns on, the clock time is a time limit in clock correctly. 1 Press and hold SEL (select) for more than 2 seconds so ...seconds, then the power turns off , press DISP (display). ENGLISH OTHER MAIN FUNCTIONS Setting the clock Changing general settings (PSM) After installation, set the built-in doing the following settings for this unit by using the PSM (Preferred Setting Mode) control. MIN (minute)" appears on the display. 5 Adjust the minute....
Instruction Manual
Page 23
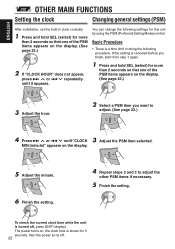
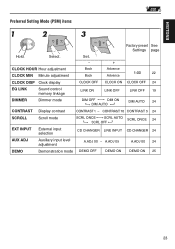
... A.ADJ 05 A.ADJ 00 24 DEMO Demonstration mode DEMO OFF DEMO ON DEMO ON 25 23 CLOCK HOUR Hour adjustment CLOCK MIN Minute adjustment Set. − Back Back + Advance Advance 1:00 22 CLOCK DISP Clock display CLOCK OFF CLOCK ON CLOCK OFF 24 EQ LINK Sound control memory linkage LINK ON LINK OFF LINK OFF 19 DIMMER Dimmer... contrast CONTRAST 1 - Select. CONTRAST 10 CONTRAST 5 24 SCROLL Scroll mode SCRL ONCE SCRL AUTO SCRL ONCE 24 SCRL OFF EXT INPUT External input selection CD CHANGER LINE INPUT CD CHANGER 24 AUX ADJ Auxiliary input level adjustment A.ADJ 00 -
... A.ADJ 05 A.ADJ 00 24 DEMO Demonstration mode DEMO OFF DEMO ON DEMO ON 25 23 CLOCK HOUR Hour adjustment CLOCK MIN Minute adjustment Set. − Back Back + Advance Advance 1:00 22 CLOCK DISP Clock display CLOCK OFF CLOCK ON CLOCK OFF 24 EQ LINK Sound control memory linkage LINK ON LINK OFF LINK OFF 19 DIMMER Dimmer... contrast CONTRAST 1 - Select. CONTRAST 10 CONTRAST 5 24 SCROLL Scroll mode SCRL ONCE SCRL AUTO SCRL ONCE 24 SCRL OFF EXT INPUT External input selection CD CHANGER LINE INPUT CD CHANGER 24 AUX ADJ Auxiliary input level adjustment A.ADJ 00 -
Instruction Manual
Page 24
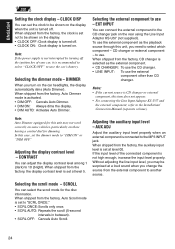
...level of your car, it is selected as the external component. • CD CHANGER: To use the CD changer. • LINE INPUT: To use the external component as the playback source through this case, set the clock to select which component - Selecting the dimmer mode - to be shown on... the unit is turned off the ignition key of the connected component is set not to use - ENGLISH Setting the clock display - Adjusting the auxiliary input level - To use the external component other than CD changer. Adjusting the display contrast level - Without adjusting the line input level...
...level of your car, it is selected as the external component. • CD CHANGER: To use the CD changer. • LINE INPUT: To use the external component as the playback source through this case, set the clock to select which component - Selecting the dimmer mode - to be shown on... the unit is turned off the ignition key of the connected component is set not to use - ENGLISH Setting the clock display - Adjusting the auxiliary input level - To use the external component other than CD changer. Adjusting the display contrast level - Without adjusting the line input level...


