
Instructions
Page 2
... following measures: - Lower the volume before playing a disc to avoid damaging the speakers by JVC could void the user's authority to operate the equipment. This equipment generates, uses, and can be involved in a particular installation. ENGLISH INFORMATION (For U.S.A.) This equipment has been tested and found to comply with the limits for help. Reorient or relocate the receiving antenna. - Consult the dealer or...
... following measures: - Lower the volume before playing a disc to avoid damaging the speakers by JVC could void the user's authority to operate the equipment. This equipment generates, uses, and can be involved in a particular installation. ENGLISH INFORMATION (For U.S.A.) This equipment has been tested and found to comply with the limits for help. Reorient or relocate the receiving antenna. - Consult the dealer or...

Instructions
Page 3
... a USB memory 11 Sound adjustments 14 Activating the Bongiovi Acoustics Digital Power Station 14 Setting the sound modes-SEL 14 General settings - For safety... • Do not raise the volume level too much, as this does not work, reset your unit. • Be careful not to ensure your unit • Your preset adjustments will block outside sounds, making driving dangerous. • Stop the car before performing any complicated operations. How to indicate... : Built-in CD player operations...
... a USB memory 11 Sound adjustments 14 Activating the Bongiovi Acoustics Digital Power Station 14 Setting the sound modes-SEL 14 General settings - For safety... • Do not raise the volume level too much, as this does not work, reset your unit. • Be careful not to ensure your unit • Your preset adjustments will block outside sounds, making driving dangerous. • Stop the car before performing any complicated operations. How to indicate... : Built-in CD player operations...

Instructions
Page 5
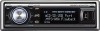
....dtsc.ca.gov/hazardouswaste/perchlorate Aim the remote controller directly at the remote sensor on the next page 5 ENGLISH Control panel Parts identification 1 BAND button 2 SOURCE button 3 • Control dial • POWER/ATT (attenuator)/ENTER button 4 MENU button 5 5 (up) / ∞ (down) buttons 6 Display window 7 B (Bongiovi Acoustics Digital Power Station™) button 8 USB (Universal Serial Bus) input terminal 9 DISP (display) button p 0 (eject) / (angle) button q 4 /¢ buttons w Remote sensor DO NOT expose the remote sensor to strong light (direct sunlight or artificial...
....dtsc.ca.gov/hazardouswaste/perchlorate Aim the remote controller directly at the remote sensor on the next page 5 ENGLISH Control panel Parts identification 1 BAND button 2 SOURCE button 3 • Control dial • POWER/ATT (attenuator)/ENTER button 4 MENU button 5 5 (up) / ∞ (down) buttons 6 Display window 7 B (Bongiovi Acoustics Digital Power Station™) button 8 USB (Universal Serial Bus) input terminal 9 DISP (display) button p 0 (eject) / (angle) button q 4 /¢ buttons w Remote sensor DO NOT expose the remote sensor to strong light (direct sunlight or artificial...

Instructions
Page 6
... tools. - buttons Adjusts the volume level. 5 Number buttons • For FM/AM: Selects the preset station if pressed, or store a station if pressed and held. • For SIRIUS®/XM: Selects the preset channels if pressed, or store a channel if pressed and held . • While listening to an iPod or a D. otherwise, it in a place (such as the menu selecting buttons.)* 4 VOL (volume) + / - Wrap the battery with 5. (Now 5/∞/4/¢ work as dashboards...
... tools. - buttons Adjusts the volume level. 5 Number buttons • For FM/AM: Selects the preset station if pressed, or store a station if pressed and held. • For SIRIUS®/XM: Selects the preset channels if pressed, or store a channel if pressed and held . • While listening to an iPod or a D. otherwise, it in a place (such as the menu selecting buttons.)* 4 VOL (volume) + / - Wrap the battery with 5. (Now 5/∞/4/¢ work as dashboards...
Instructions
Page 7
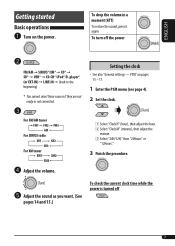
... sources if they are not ready or not connected. ! For FM/AM tuner For SIRIUS radio For XM tuner Setting the clock • See also "General settings - PSM" on the power. To drop the volume in a moment (ATT) To restore the sound, press it again. To turn off 7 ENGLISH Getting started Basic operations ~ Turn on pages 15 - 17. 1 Enter the PSM menu (see page 4). 2 Set the clock. 1 Select "Clock H" (hour), then adjust...
... sources if they are not ready or not connected. ! For FM/AM tuner For SIRIUS radio For XM tuner Setting the clock • See also "General settings - PSM" on the power. To drop the volume in a moment (ATT) To restore the sound, press it again. To turn off 7 ENGLISH Getting started Basic operations ~ Turn on pages 15 - 17. 1 Enter the PSM menu (see page 4). 2 Set the clock. 1 Select "Clock H" (hour), then adjust...
Instructions
Page 8
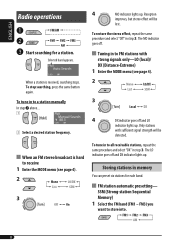
... preset six stations for a station. SSM (Strong-station Sequential Memory) 1 Select the FM band (FM1 - Storing stations in step 3. To stop searching, press the same button again. To tune in to store into. 8 Only stations with strong signals only-LO (local)/ DX (Distance-Extreme) 1 Enter the MODE menu (see page 4). 2 3 4 MO indicator lights up . When an FM stereo broadcast is received, searching stops. ENGLISH Radio operations ~ Ÿ ! Selected...
... preset six stations for a station. SSM (Strong-station Sequential Memory) 1 Select the FM band (FM1 - Storing stations in step 3. To stop searching, press the same button again. To tune in to store into. 8 Only stations with strong signals only-LO (local)/ DX (Distance-Extreme) 1 Enter the MODE menu (see page 4). 2 3 4 MO indicator lights up . When an FM stereo broadcast is received, searching stops. ENGLISH Radio operations ~ Ÿ ! Selected...

Instructions
Page 9
... the station. 4 When using the remote controller After tuning in the FM band. Manual presetting Ex.: Storing FM station of 92.5 MHz into preset number 4 of the other FM bands by turning the control dial. 9 Local FM stations with the strongest signals are searched and stored automatically in to a station you hold down 5/∞, the Preset Station List appears (go to step 6). 4 When using the remote controller Directly select the preset number. 5 6 Select a preset number. •...
... the station. 4 When using the remote controller After tuning in the FM band. Manual presetting Ex.: Storing FM station of 92.5 MHz into preset number 4 of the other FM bands by turning the control dial. 9 Local FM stations with the strongest signals are searched and stored automatically in to a station you hold down 5/∞, the Preset Station List appears (go to step 6). 4 When using the remote controller Directly select the preset number. 5 6 Select a preset number. •...
Instructions
Page 10
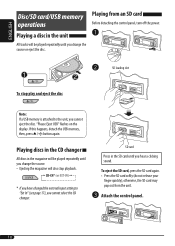
... changed the external input setting to the unit, you hear a clicking sound. Attach the control panel. 10 Playing discs in the CD changer All discs in the magazine will also stop play and eject the disc Note: If a USB memory is attached to "Ext In" (see page 17), you cannot select the CD changer. otherwise, the SD card may pop out from an SD card Before detaching the control panel, turn off the power...
... changed the external input setting to the unit, you hear a clicking sound. Attach the control panel. 10 Playing discs in the CD changer All discs in the magazine will also stop play and eject the disc Note: If a USB memory is attached to "Ext In" (see page 17), you cannot select the CD changer. otherwise, the SD card may pop out from an SD card Before detaching the control panel, turn off the power...

Instructions
Page 11
... units are not compatible with MP3 discs. • You cannot use a JVC MP3-compatible CD changer with this unit. • You cannot play MP3/WMA tracks stored in the CD Text can be played repeatedly until you change the source. • Removing the USB memory will also stop playback. ~ Ÿ USB input terminal Playback starts from where it has been stopped previously. • If a different SD card or USB memory is connected...
... units are not compatible with MP3 discs. • You cannot use a JVC MP3-compatible CD changer with this unit. • You cannot play MP3/WMA tracks stored in the CD Text can be played repeatedly until you change the source. • Removing the USB memory will also stop playback. ~ Ÿ USB input terminal Playback starts from where it has been stopped previously. • If a different SD card or USB memory is connected...
Instructions
Page 14
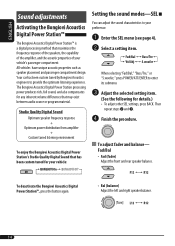
... SEL menu (see page 4). Ÿ Select a setting item. ENGLISH Sound adjustments Activating the Bongiovi Acoustics Digital Power Station™ The Bongiovi Acoustics Digital Power Station™ is a digital processing method that may exist between audio source or program material. Then repeat steps Ÿ and !. ⁄ Finish the procedure. Fad/Bal • Fad (fader) Adjust the front and rear speaker balance. To adjust fader and balance- When selecting "Fad/Bal," "Bass/Tre...
... SEL menu (see page 4). Ÿ Select a setting item. ENGLISH Sound adjustments Activating the Bongiovi Acoustics Digital Power Station™ The Bongiovi Acoustics Digital Power Station™ is a digital processing method that may exist between audio source or program material. Then repeat steps Ÿ and !. ⁄ Finish the procedure. Fad/Bal • Fad (fader) Adjust the front and rear speaker balance. To adjust fader and balance- When selecting "Fad/Bal," "Bass/Tre...

Instructions
Page 15
... change the source, the volume level will be memorized. PSM 2 Select a cut-off frequency according to adjust the other PSM items if necessary. 5 Finish the procedure. When you change PSM (Preferred Setting Mode) items (except "Sirius ID") listed in the table that follows. 1 Enter the PSM menu (see page 4). 3 Adjust the continuity of each source except for FM. General settings - ENGLISH To adjust bass and treble-Bass/Tre 1 Select "Bass" or "Treble." 2 Adjust...
... change the source, the volume level will be memorized. PSM 2 Select a cut-off frequency according to adjust the other PSM items if necessary. 5 Finish the procedure. When you change PSM (Preferred Setting Mode) items (except "Sirius ID") listed in the table that follows. 1 Enter the PSM menu (see page 4). 3 Adjust the continuity of each source except for FM. General settings - ENGLISH To adjust bass and treble-Bass/Tre 1 Select "Bass" or "Treble." 2 Adjust...

Instructions
Page 16
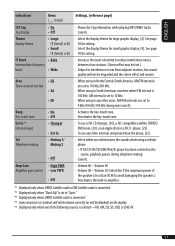
.../12H Time display mode Clock Adj *1 Time display mode Time Zone *1, *2 DST *1 Daylight savings time Sirius ID *3 Scroll *4 Dimmer Bright Display brightness Items ( : Initial) Settings, [reference page] • On : An animation screen appears when you turn on or off the power, change the source, and when you turn on the headlights. : Sets the timer for dimmer, see page 18 for clock adjustment. • On : Activates daylight savings time if your residential area is set to "On", selecting...
.../12H Time display mode Clock Adj *1 Time display mode Time Zone *1, *2 DST *1 Daylight savings time Sirius ID *3 Scroll *4 Dimmer Bright Display brightness Items ( : Initial) Settings, [reference page] • On : An animation screen appears when you turn on or off the power, change the source, and when you turn on the headlights. : Sets the timer for dimmer, see page 18 for clock adjustment. • On : Activates daylight savings time if your residential area is set to "On", selecting...
Instructions
Page 17
... source, playback pauses during auto search). : Activates the key-touch tone. : Deactivates the key-touch tone. : To use any other external component than 50 W to interference noises from adjacent stations, but sound quality will remain. : When using a cellular phone. • If CD/CD-CH/SD/USB/iPod/D. player, [23]. : To use a JVC CD changer, [10], a JVC compatible satellite (SIRIUS/ XM) tuner, [20], or an Apple iPod or a JVC D. Volume 50 : Volume 00 - See page 18 for setting. : Select...
... source, playback pauses during auto search). : Activates the key-touch tone. : Deactivates the key-touch tone. : To use any other external component than 50 W to interference noises from adjacent stations, but sound quality will remain. : When using a cellular phone. • If CD/CD-CH/SD/USB/iPod/D. player, [23]. : To use a JVC CD changer, [10], a JVC compatible satellite (SIRIUS/ XM) tuner, [20], or an Apple iPod or a JVC D. Volume 50 : Volume 00 - See page 18 for setting. : Select...
Instructions
Page 20
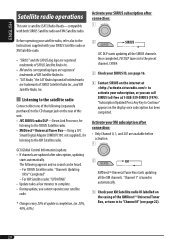
... Satellite radio. For XM Satellite radio: "UPDATING" • Update takes a few minutes to the Instructions supplied with both SIRIUS Satellite radio and XM Satellite radio. ENGLISH Satellite radio operations This unit is completion, (ex. 20%, 40%, 60%). 2 JVC DLP starts updating all the SIRIUS channels. GCI (Global Control Information) update: • If channels are updated after connection: • Only Channel 0, 1, and 247 are trademarks of update is satellite (SAT) Radio Ready-compatible with your SIRIUS ID, see page 22). 20 For SIRIUS Satellite radio: "Channels...
... Satellite radio. For XM Satellite radio: "UPDATING" • Update takes a few minutes to the Instructions supplied with both SIRIUS Satellite radio and XM Satellite radio. ENGLISH Satellite radio operations This unit is completion, (ex. 20%, 40%, 60%). 2 JVC DLP starts updating all the SIRIUS channels. GCI (Global Control Information) update: • If channels are updated after connection: • Only Channel 0, 1, and 247 are trademarks of update is satellite (SAT) Radio Ready-compatible with your SIRIUS ID, see page 22). 20 For SIRIUS Satellite radio: "Channels...
Instructions
Page 23
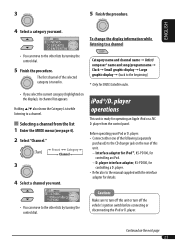
... manual supplied with the interface adapter for controlling an iPod. - Caution: Make sure to the beginning) * Only for SIRIUS Satellite radio. • If you select the current category (highlighted on the next page 23 Selecting a channel from the control panel. Category name and channel name = Artist/ composer* name and song/program name = Clock = Small graphic display = Large graphic display = (back to turn off this unit. - player operations This unit is tuned in. Interface adapter for iPod...
... manual supplied with the interface adapter for controlling an iPod. - Caution: Make sure to the beginning) * Only for SIRIUS Satellite radio. • If you select the current category (highlighted on the next page 23 Selecting a channel from the control panel. Category name and channel name = Artist/ composer* name and song/program name = Clock = Small graphic display = Large graphic display = (back to turn off this unit. - player operations This unit is tuned in. Interface adapter for iPod...
Instructions
Page 25
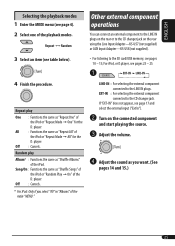
... iPod, or D.player, see page 17 and select the external input ("Ext In"). Ÿ Turn on the rear using the Line Input Adapter-KS-U57 (not supplied) or AUX Input Adapter-KS-U58 (not supplied). • For listening to the CD changer jack. player. Random play One : Functions the same as "Repeat One" of the iPod or "Repeat Mode = All" for the D. player. ENGLISH Selecting the playback modes 1 Enter the MODE menu (see page 4). 2 Select...
... iPod, or D.player, see page 17 and select the external input ("Ext In"). Ÿ Turn on the rear using the Line Input Adapter-KS-U57 (not supplied) or AUX Input Adapter-KS-U58 (not supplied). • For listening to the CD changer jack. player. Random play One : Functions the same as "Repeat One" of the iPod or "Repeat Mode = All" for the D. player. ENGLISH Selecting the playback modes 1 Enter the MODE menu (see page 4). 2 Select...
Instructions
Page 27
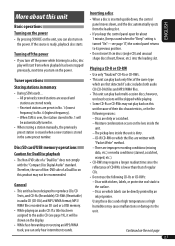
..., (beeps sound when the "Beep" setting is turned "On"-see page 19), it will be skipped while playing. • Some CD-Rs or CD-RWs may not play back multi-session discs; Playing a CD-R or CD-RW • Use only "finalized" CD-Rs or CD-RWs. • This unit can also turn on the next page 27 ENGLISH Tuner operations Storing stations in No. 1 (lowest frequency) to No. 6 (highest frequency). - Received stations are...
..., (beeps sound when the "Beep" setting is turned "On"-see page 19), it will be skipped while playing. • Some CD-Rs or CD-RWs may not play back multi-session discs; Playing a CD-R or CD-RW • Use only "finalized" CD-Rs or CD-RWs. • This unit can also turn on the next page 27 ENGLISH Tuner operations Storing stations in No. 1 (lowest frequency) to No. 6 (highest frequency). - Received stations are...
Instructions
Page 29
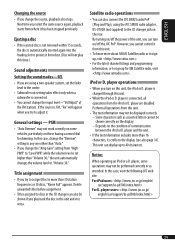
... operations from this time.) Sound adjustments Setting the sound modes-SEL • If you change the "Dimmer" setting to any one other than 30 station frequencies or 30 discs, "Name Full" appears. iPod or D. player operations • When you can also be shown correctly on the condition of the FM stations. player is FM, "Fix" will not play back the disc in the CD changer can turn on this unit, the iPod or D. player are using the JVC SIRIUS radio adapter...
... operations from this time.) Sound adjustments Setting the sound modes-SEL • If you change the "Dimmer" setting to any one other than 30 station frequencies or 30 discs, "Name Full" appears. iPod or D. player operations • When you can also be shown correctly on the condition of the FM stations. player is FM, "Fix" will not play back the disc in the CD changer can turn on this unit, the iPod or D. player are using the JVC SIRIUS radio adapter...

Instructions
Page 30
... readout time is required ("File Check" keeps flashing on the display. ENGLISH Troubleshooting What appears to be played back. Eject the disc forcibly (see page 3). • Disc cannot be heard from the speakers. • Adjust the volume to the optimum level. • Check the cords and connections. • The unit does not work at all. MP3/WMA playback 30 installation. • SSM automatic presetting does not work , check the control panel...
... readout time is required ("File Check" keeps flashing on the display. ENGLISH Troubleshooting What appears to be played back. Eject the disc forcibly (see page 3). • Disc cannot be heard from the speakers. • Adjust the volume to the optimum level. • Check the cords and connections. • The unit does not work at all. MP3/WMA playback 30 installation. • SSM automatic presetting does not work , check the control panel...

Instructions
Page 33
... is a trademark. • iPod is distorted. Check the connecting cable and its connection. • Update the firmware version. • Charge the battery. • Buttons do not work as intended. iPod nano. • No sound can be heard. • "ERROR 01" appears on the display when connecting a D. Disconnect the adapter from both the unit and iPod/ D. player's controls do not work Reset the iPod or D. player. • "Disconnect" appears on the display. player. No tracks are...
... is a trademark. • iPod is distorted. Check the connecting cable and its connection. • Update the firmware version. • Charge the battery. • Buttons do not work as intended. iPod nano. • No sound can be heard. • "ERROR 01" appears on the display when connecting a D. Disconnect the adapter from both the unit and iPod/ D. player's controls do not work Reset the iPod or D. player. • "Disconnect" appears on the display. player. No tracks are...


