Instructions
Page 2
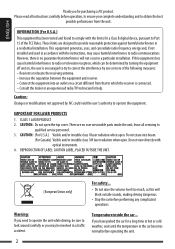
... block outside sounds, making driving dangerous. • Stop the car before operating the unit. 2 Do not view directly with the instructions, may be involved in the car becomes normal before performing any complicated operations. ENGLISH Thank you may cause harmful interference to radio communications. This equipment generates, uses, and can be sure to operate the equipment. However, there is no user serviceable parts inside the car... Connect the equipment...
... block outside sounds, making driving dangerous. • Stop the car before operating the unit. 2 Do not view directly with the instructions, may be involved in the car becomes normal before performing any complicated operations. ENGLISH Thank you may cause harmful interference to radio communications. This equipment generates, uses, and can be sure to operate the equipment. However, there is no user serviceable parts inside the car... Connect the equipment...
Instructions
Page 3
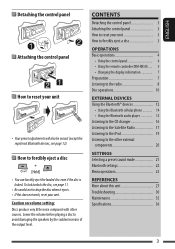
... control panel 4 • Using the remote controller (RM-RK50)...... 5 • Changing the display information 7 Preparation 7 Listening to the radio 8 Disc operations 10 EXTERNAL DEVICES Using the Bluetooth® devices 12 • Using the Bluetooth cellular phone 14 • Using the Bluetooth audio player 15 Listening to the CD changer 16 Listening to the Satellite Radio 17 Listening to the iPod 19 Listening to the other sources. CONTENTS Detaching the control panel 3 Attaching the control panel 3 How to reset your unit • Your preset adjustments...
... control panel 4 • Using the remote controller (RM-RK50)...... 5 • Changing the display information 7 Preparation 7 Listening to the radio 8 Disc operations 10 EXTERNAL DEVICES Using the Bluetooth® devices 12 • Using the Bluetooth cellular phone 14 • Using the Bluetooth audio player 15 Listening to the CD changer 16 Listening to the Satellite Radio 17 Listening to the iPod 19 Listening to the other sources. CONTENTS Detaching the control panel 3 Attaching the control panel 3 How to reset your unit • Your preset adjustments...
Instructions
Page 4
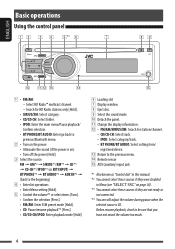
...-CH/IPOD: Enter playback mode [Hold]. 6 Loading slot 7 Display window 8 Eject disc. 9 Select the sound mode. e Return to be sure that you have not raised the volume too much. 4 Before resume playback, check to the previous menu. p Detach the panel. r Remote sensor t AUX (auxiliary) input jack *1 Also known as "Control dial" in Menu (see "SELECT SRC" on ). • Turn off the power [Hold]. 3 Select the source. Select HD Radio™ multicast channel. - ENGLISH Basic operations Using the control panel *1 1 •...
...-CH/IPOD: Enter playback mode [Hold]. 6 Loading slot 7 Display window 8 Eject disc. 9 Select the sound mode. e Return to be sure that you have not raised the volume too much. 4 Before resume playback, check to the previous menu. p Detach the panel. r Remote sensor t AUX (auxiliary) input jack *1 Also known as "Control dial" in Menu (see "SELECT SRC" on ). • Turn off the power [Hold]. 3 Select the source. Select HD Radio™ multicast channel. - ENGLISH Basic operations Using the control panel *1 1 •...
Instructions
Page 6
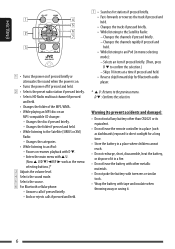
... not leave the remote controller in menu selecting mode): - Warning (to an iPod (in a place (such as the menu selecting buttons.)* 3 Adjusts the volume level. 4 Selects the sound mode. 5 Selects the source. 6 For Bluetooth cellular phone: - Selects an item if pressed briefly. (Then, press D ∞ to an iPod: - Changes the folder if pressed and held . • Reverse skip/forward skip for Bluetooth audio player. * 5 U : Returns to the Satellite (SIRIUS or XM) Radio: - Skips 10 items at a time if pressed...
... not leave the remote controller in menu selecting mode): - Warning (to an iPod (in a place (such as the menu selecting buttons.)* 3 Adjusts the volume level. 4 Selects the sound mode. 5 Selects the source. 6 For Bluetooth cellular phone: - Selects an item if pressed briefly. (Then, press D ∞ to an iPod: - Changes the folder if pressed and held . • Reverse skip/forward skip for Bluetooth audio player. * 5 U : Returns to the Satellite (SIRIUS or XM) Radio: - Skips 10 items at a time if pressed...
Instructions
Page 7
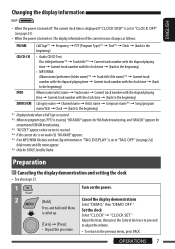
... for SIRIUS Satellite Radio. Preparation Canceling the display demonstration and setting the clock • See also page 23. 1 Turn on : The display information of the current source changes as follows: FM/AM CD/CD-CH IPOD SIRIUS/XM Call Sign*1 = Frequency = PTY (Program Type)*2 = Text*3 = Clock = (back to the beginning) • Audio CD/CD Text: Disc title/performer*4 = Track title*4 = Current track number with the elapsed playing time = Current track number...
... for SIRIUS Satellite Radio. Preparation Canceling the display demonstration and setting the clock • See also page 23. 1 Turn on : The display information of the current source changes as follows: FM/AM CD/CD-CH IPOD SIRIUS/XM Call Sign*1 = Frequency = PTY (Program Type)*2 = Text*3 = Clock = (back to the beginning) • Audio CD/CD Text: Disc title/performer*4 = Track title*4 = Current track number with the elapsed playing time = Current track number...
Instructions
Page 9
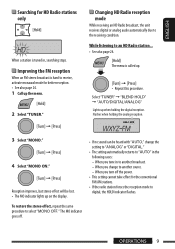
...; The setting automatically returns to "AUTO" in , searching stops. Improving the FM reception When an FM stereo broadcast is called up the menu. [Hold] 2 Select "TUNER." [Turn] = [Press] Changing HD Radio reception mode While receiving an HD Radio broadcast, the unit receives digital or analog audio automatically due to the receiving condition. While listening to an HD Radio station... • See also page 24. [Hold] The menu is hard to receive, activate monaural mode for...
...; The setting automatically returns to "AUTO" in , searching stops. Improving the FM reception When an FM stereo broadcast is called up the menu. [Hold] 2 Select "TUNER." [Turn] = [Press] Changing HD Radio reception mode While receiving an HD Radio broadcast, the unit receives digital or analog audio automatically due to the receiving condition. While listening to an HD Radio station... • See also page 24. [Hold] The menu is hard to receive, activate monaural mode for...
Instructions
Page 10
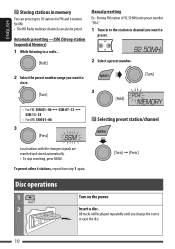
... 3 [Press] Selecting preset station/channel Local stations with the strongest signals are searched and stored automatically. • To stop searching, press MENU. ENGLISH Storing stations in to the station or channel you want to preset. 2 Select a preset number. 2 Select the preset number range you want to 18 stations for FM and 6 stations for AM. • The HD Radio multicast channels can also be played repeatedly until you change the source or eject the disc. 10 Insert a disc.
... 3 [Press] Selecting preset station/channel Local stations with the strongest signals are searched and stored automatically. • To stop searching, press MENU. ENGLISH Storing stations in to the station or channel you want to preset. 2 Select a preset number. 2 Select the preset number range you want to 18 stations for FM and 6 stations for AM. • The HD Radio multicast channels can also be played repeatedly until you change the source or eject the disc. 10 Insert a disc.
Instructions
Page 12
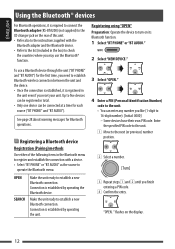
... Bluetooth adapter (KS-BTA200) (not supplied) to the CD changer jack on the rear of this unit. • Refer also to the instructions supplied with a device. • Select "BT PHONE" or "BT AUDIO" as the source to five devices can be registered in the unit even if you reset your unit. Some devices have their own PIN code. Make the unit ready to establish a new Bluetooth connection. flashes on its Bluetooth function. 1 Select "BT PHONE" or "BT AUDIO." 2 Select...
... Bluetooth adapter (KS-BTA200) (not supplied) to the CD changer jack on the rear of this unit. • Refer also to the instructions supplied with a device. • Select "BT PHONE" or "BT AUDIO" as the source to five devices can be registered in the unit even if you reset your unit. Some devices have their own PIN code. Make the unit ready to establish a new Bluetooth connection. flashes on its Bluetooth function. 1 Select "BT PHONE" or "BT AUDIO." 2 Select...
Instructions
Page 13
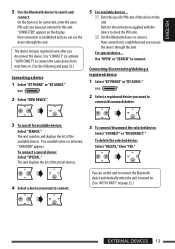
....) Connecting a device 1 Select "BT PHONE" or "BT AUDIO." 5 For available devices... 1 Enter the specific PIN code of the device to the unit. Refer to the instructions supplied with the device to check the PIN code. 2 Use the Bluetooth device to be connected, enter the same PIN code you want to connect the same device from next time on the display. Connecting/disconnecting/deleting a registered device 1 Select "BT PHONE" or "BT AUDIO." 2 Select "NEW DEVICE." 2 Select a registered device you have just entered for available devices: Select "SEARCH...
....) Connecting a device 1 Select "BT PHONE" or "BT AUDIO." 5 For available devices... 1 Enter the specific PIN code of the device to the unit. Refer to the instructions supplied with the device to check the PIN code. 2 Use the Bluetooth device to be connected, enter the same PIN code you want to connect the same device from next time on the display. Connecting/disconnecting/deleting a registered device 1 Select "BT PHONE" or "BT AUDIO." 2 Select "NEW DEVICE." 2 Select a registered device you have just entered for available devices: Select "SEARCH...
Instructions
Page 14
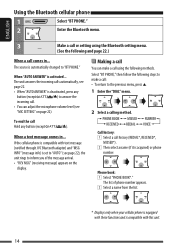
... You can adjust the microphone volume level (see page 22), the unit rings to make a call using the Bluetooth setting menu. - (See the following methods. Select "BT PHONE," then follow the following steps to inform you of phone number appears. 2 Select a name from the list. * Displays only when your cellular phone is equipped with text message (notified through JVC Bluetooth adapter) and "MSG INFO" (message info) is activated... The list...
... You can adjust the microphone volume level (see page 22), the unit rings to make a call using the Bluetooth setting menu. - (See the following methods. Select "BT PHONE," then follow the following steps to inform you of phone number appears. 2 Select a name from the list. * Displays only when your cellular phone is equipped with text message (notified through JVC Bluetooth adapter) and "MSG INFO" (message info) is activated... The list...
Instructions
Page 15
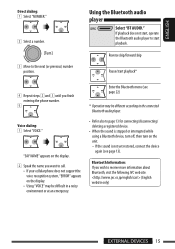
...;erent according to the connected Bluetooth audio player. • Refer also to page 13 for connecting/disconnecting/ deleting a registered device. • When the sound is stopped or interrupted while using a Bluetooth device, turn off, then turn on the display. • Using "VOICE" may be difficult in a noisy environment or at an emergency. ENGLISH Direct dialing: 1 Select "NUMBER." 2 Select a number. [Turn] 3 Move to start playback. Enter the Bluetooth menu (see page 13). Reverse...
...;erent according to the connected Bluetooth audio player. • Refer also to page 13 for connecting/disconnecting/ deleting a registered device. • When the sound is stopped or interrupted while using a Bluetooth device, turn off, then turn on the display. • Using "VOICE" may be difficult in a noisy environment or at an emergency. ENGLISH Direct dialing: 1 Select "NUMBER." 2 Select a number. [Turn] 3 Move to start playback. Enter the Bluetooth menu (see page 13). Reverse...
Instructions
Page 17
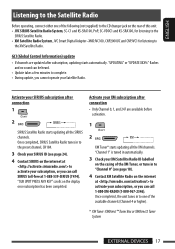
... SIRIUS Satellite Radio. • XM Satellite Radio System, JVC Smart Digital Adapter-XMDJVC100, CNP2000UC and CNPJVC1 for listening to the XM Satellite Radio. Activate your Satellite Radio. Once completed, the unit tunes in to the preset channel, CH184. 3 Check your SIRIUS subscription after subscription, updating starts automatically. "SUB UPDT PRESS ANY KEY" scrolls on the internet at 1-888-539-SIRIUS (7474). GCI (Global Control Information) update • If channels are available before activation. 1 2 XM Tuner...
... SIRIUS Satellite Radio. • XM Satellite Radio System, JVC Smart Digital Adapter-XMDJVC100, CNP2000UC and CNPJVC1 for listening to the XM Satellite Radio. Activate your Satellite Radio. Once completed, the unit tunes in to the preset channel, CH184. 3 Check your SIRIUS subscription after subscription, updating starts automatically. "SUB UPDT PRESS ANY KEY" scrolls on the internet at 1-888-539-SIRIUS (7474). GCI (Global Control Information) update • If channels are available before activation. 1 2 XM Tuner...

Instructions
Page 20
Turn on the rear of this unit using the following adapters (not supplied): - KS-U58: For connecting the component with pin jacks - Connecting an external component to : • EXT INPUT: CD changer jack on the connected component and start playing the source. 3 Adjust the volume. [Turn] 4 - Preparation: Make sure "AUX ON" is selected in the "SELECT SRC" = "AUX IN" setting, see page 26. • AUX IN: Input jack on the control panel. Adjust the sound as you want (see...
Turn on the rear of this unit using the following adapters (not supplied): - KS-U58: For connecting the component with pin jacks - Connecting an external component to : • EXT INPUT: CD changer jack on the connected component and start playing the source. 3 Adjust the volume. [Turn] 4 - Preparation: Make sure "AUX ON" is selected in the "SELECT SRC" = "AUX IN" setting, see page 26. • AUX IN: Input jack on the control panel. Adjust the sound as you want (see...
Instructions
Page 23
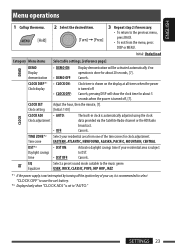
.... • To return to the music genre. CLOCK DISP*1 • CLOCK ON: Clock display • CLOCK OFF: Clock time is shown on the display at all times when the power is automatically adjusted using the clock data provided via the Satellite Radio channel or the HD Radio broadcast. pressing DISP will be activated automatically if no operation is turned off . Cancels. EQ EQ Equalizer Select a preset sound mode suitable to the previous menu, press BACK. • To exit...
.... • To return to the music genre. CLOCK DISP*1 • CLOCK ON: Clock display • CLOCK OFF: Clock time is shown on the display at all times when the power is automatically adjusted using the clock data provided via the Satellite Radio channel or the HD Radio broadcast. pressing DISP will be activated automatically if no operation is turned off . Cancels. EQ EQ Equalizer Select a preset sound mode suitable to the previous menu, press BACK. • To exit...
Instructions
Page 24
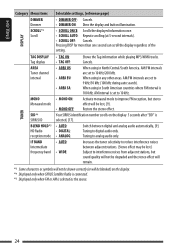
...: Switch between adjacent stations. (Stereo effect may be lost.) Subject to interference noises from adjacent stations, but stereo effect will be lost, [9]. Your SIRIUS identification number scrolls on the display. *4 Displayed only when SIRIUS Satellite Radio is connected. *5 Displayed only when FM or AM is set to 10 kHz. • MONO ON: • MONO OFF: Activate monaural mode to digital audio only. ENGLISH DISPLAY Category Menu items DIMMER Dimmer SCROLL*3 Scroll Selectable settings, [reference...
...: Switch between adjacent stations. (Stereo effect may be lost.) Subject to interference noises from adjacent stations, but stereo effect will be lost, [9]. Your SIRIUS identification number scrolls on the display. *4 Displayed only when SIRIUS Satellite Radio is connected. *5 Displayed only when FM or AM is set to 10 kHz. • MONO ON: • MONO OFF: Activate monaural mode to digital audio only. ENGLISH DISPLAY Category Menu items DIMMER Dimmer SCROLL*3 Scroll Selectable settings, [reference...
Instructions
Page 25
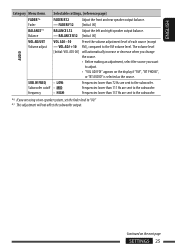
... right speaker output balance. - SUB.W FREQ • LOW: Subwoofer cutoff • MID: frequency • HIGH : Frequencies lower than 111 Hz are using a two-speaker system, set the fader level to the subwoofer. Frequencies lower than 157 Hz are sent to "00." *7 This adjustment will not affect the subwoofer output. AUDIO ENGLISH Category Menu items Selectable settings, [reference page] FADER*6 Fader FADER R12 Adjust the front and rear speaker output balance. - BALANCE R12: [Initial: 00] VOL ADJUST Volume adjust...
... right speaker output balance. - SUB.W FREQ • LOW: Subwoofer cutoff • MID: frequency • HIGH : Frequencies lower than 111 Hz are using a two-speaker system, set the fader level to the subwoofer. Frequencies lower than 157 Hz are sent to "00." *7 This adjustment will not affect the subwoofer output. AUDIO ENGLISH Category Menu items Selectable settings, [reference page] FADER*6 Fader FADER R12 Adjust the front and rear speaker output balance. - BALANCE R12: [Initial: 00] VOL ADJUST Volume adjust...
Instructions
Page 26
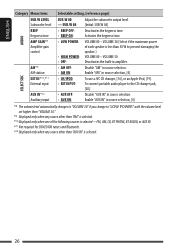
..." in source selection. Activates the keypress tone. • LOW POWER: • HIGH POWER: • OFF: VOLUME 00 - Enable "AUX IN" in source selection, [4]. *8 The volume level automatically changes to "VOLUME 30" if you change to the CD changer jack, [20]. • AUX OFF: • AUX ON: Disable "AUX IN" in source selection. ENGLISH AUDIO SELECT SRC Category Menu items SUB.W LEVEL Subwoofer level BEEP Keypress tone AMP GAIN*8 Amplifier gain control AM *9 AM station EXT IN*10,*11 External input AUX IN*12 Auxiliary input Selectable setting...
..." in source selection. Activates the keypress tone. • LOW POWER: • HIGH POWER: • OFF: VOLUME 00 - Enable "AUX IN" in source selection, [4]. *8 The volume level automatically changes to "VOLUME 30" if you change to the CD changer jack, [20]. • AUX OFF: • AUX ON: Disable "AUX IN" in source selection. ENGLISH AUDIO SELECT SRC Category Menu items SUB.W LEVEL Subwoofer level BEEP Keypress tone AMP GAIN*8 Amplifier gain control AM *9 AM station EXT IN*10,*11 External input AUX IN*12 Auxiliary input Selectable setting...
Instructions
Page 29
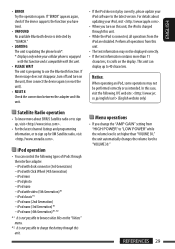
... "VOLUME 30." iPod mini - For details about SIRIUS Satellite radio or to sign up to the latest version. iPod with dock connector (3rd Generation) - REFERENCES 29 This unit can control the following JVC web site: (English website only) Satellite Radio operation • To know more than "VOLUME 30," the unit automatically changes the volume level to use the Bluetooth function. iPod with Click Wheel (4th Generation) - iPod with this function and is compatible with video (5th...
... "VOLUME 30." iPod mini - For details about SIRIUS Satellite radio or to sign up to the latest version. iPod with dock connector (3rd Generation) - REFERENCES 29 This unit can control the following JVC web site: (English website only) Satellite Radio operation • To know more than "VOLUME 30," the unit automatically changes the volume level to use the Bluetooth function. iPod with Click Wheel (4th Generation) - iPod with this function and is compatible with video (5th...
Instructions
Page 30
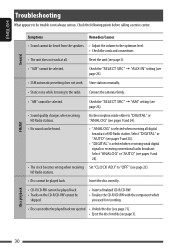
...). • Sound quality changes when receiving HD Radio stations. Reset the unit (see pages 9 and 24). • "DIGITAL" is not always serious. Select "DIGITAL" or "AUTO" (see page 3). • "AUX" cannot be selected. Select "ANALOG" or "AUTO" (see pages 9 and 24). • The clock becomes wrong when receiving Set "CLOCK ADJ" to "OFF" (see page 3). Connect the antenna firmly. • "AM" cannot be played back. HD Radio stations. • Disc cannot be selected. ENGLISH Troubleshooting What appears...
...). • Sound quality changes when receiving HD Radio stations. Reset the unit (see pages 9 and 24). • "DIGITAL" is not always serious. Select "DIGITAL" or "AUTO" (see page 3). • "AUX" cannot be selected. Select "ANALOG" or "AUTO" (see pages 9 and 24). • The clock becomes wrong when receiving Set "CLOCK ADJ" to "OFF" (see page 3). Connect the antenna firmly. • "AM" cannot be played back. HD Radio stations. • Disc cannot be selected. ENGLISH Troubleshooting What appears...
Instructions
Page 32
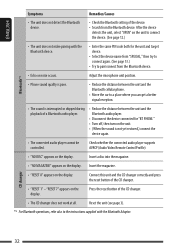
... car to pair/connect from the Bluetooth device. Reset the unit (see page 3). *2 For Bluetooth operations, refer also to connect the device. (See page 12.) • The unit does not make pairing with the Bluetooth Adapter. 32 Check whether the connected audio player supports AVRCP (Audio Video Remote Control Profile). • "NO DISC" appears on the display. Adjust the microphone unit position. Connect this unit and the CD changer correctly and press the reset button of the CD changer. • The CD changer does not work...
... car to pair/connect from the Bluetooth device. Reset the unit (see page 3). *2 For Bluetooth operations, refer also to connect the device. (See page 12.) • The unit does not make pairing with the Bluetooth Adapter. 32 Check whether the connected audio player supports AVRCP (Audio Video Remote Control Profile). • "NO DISC" appears on the display. Adjust the microphone unit position. Connect this unit and the CD changer correctly and press the reset button of the CD changer. • The CD changer does not work...


