Instructions
Page 2
... that to provide reasonable protection against harmful interference in a particular installation. Reorient or relocate the receiving antenna. - Caution: Changes or modifications not approved by JVC could void the user's authority to Part 15 of the following measures: - REPRODUCTION OF LABEL: CAUTION LABEL, PLACED OUTSIDE THE UNIT. [European Union only] 2 ENGLISH Thank you for help. This equipment generates, uses, and can be...
... that to provide reasonable protection against harmful interference in a particular installation. Reorient or relocate the receiving antenna. - Caution: Changes or modifications not approved by JVC could void the user's authority to Part 15 of the following measures: - REPRODUCTION OF LABEL: CAUTION LABEL, PLACED OUTSIDE THE UNIT. [European Union only] 2 ENGLISH Thank you for help. This equipment generates, uses, and can be...
Instructions
Page 3
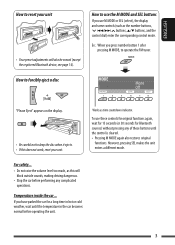
... the volume level too much, as this does not work, reset your unit • Your preset adjustments will block outside sounds, making driving dangerous. • Stop the car before operating the unit. 3 How to use the M MODE and SEL buttons If you have parked the car for Bluetooth sources) without pressing any complicated operations. If you use these controls for original functions again, wait for 15 seconds (or 30 seconds for a long time in...
... the volume level too much, as this does not work, reset your unit • Your preset adjustments will block outside sounds, making driving dangerous. • Stop the car before operating the unit. 3 How to use the M MODE and SEL buttons If you have parked the car for Bluetooth sources) without pressing any complicated operations. If you use these controls for original functions again, wait for 15 seconds (or 30 seconds for a long time in...

Instructions
Page 4
... of the output level. ENGLISH Detaching the control panel Attaching the control panel The control panel and button illustrations used for connection. 4 Caution: If the temperature inside the car is equipped with other sources. Caution on volume setting: Digital devices (DISC/USB) produce very little noise compared with the steering wheel remote control function. • See the Installation/Connection Manual (separate volume) for explanation in a traffic accident. Warning: If you need to operate the unit while driving, be sure...
... of the output level. ENGLISH Detaching the control panel Attaching the control panel The control panel and button illustrations used for connection. 4 Caution: If the temperature inside the car is equipped with other sources. Caution on volume setting: Digital devices (DISC/USB) produce very little noise compared with the steering wheel remote control function. • See the Installation/Connection Manual (separate volume) for explanation in a traffic accident. Warning: If you need to operate the unit while driving, be sure...

Instructions
Page 6
When the power is turned off: Check the current clock time When the power is selected as the source Source operation display Audio level meter display (see "LevelMeter" on the power. Select "24H/12H," then "24Hours" or "12Hours." Set the clock Select "Clock Hr" (hour), then adjust the hour. Finish the procedure. Cancel the display demonstrations Select "Demo," then "Off." Select "Clock Min" (minute), then adjust the minute. ENGLISH Preparation Cancel the display demonstration and set the clock • See...
When the power is turned off: Check the current clock time When the power is selected as the source Source operation display Audio level meter display (see "LevelMeter" on the power. Select "24H/12H," then "24Hours" or "12Hours." Set the clock Select "Clock Hr" (hour), then adjust the hour. Finish the procedure. Cancel the display demonstrations Select "Demo," then "Off." Select "Clock Min" (minute), then adjust the minute. ENGLISH Preparation Cancel the display demonstration and set the clock • See...

Instructions
Page 7
... sound (if the power is on). • Volume control [Turn]. 4 • Adjust the sound mode. • Enter the PSM settings [Hold]. 5 Display window 6 Select the sound mode. 7 Eject disc. 8 USB input terminal 9 Detach the panel. r • TUNER: Select preset station. • SIRIUS/XM: Select category. • CD/USB/CD-CH: Select folder. • iPod/D.PLAYER: Enter the main menu/Pause or stop playback/Confirm selection. • Bluetooth Phone/Audio: Select a registered device. q Enter functions mode. OPERATIONS 7 ENGLISH Basic operations Using the control panel 1 Select the source...
... sound (if the power is on). • Volume control [Turn]. 4 • Adjust the sound mode. • Enter the PSM settings [Hold]. 5 Display window 6 Select the sound mode. 7 Eject disc. 8 USB input terminal 9 Detach the panel. r • TUNER: Select preset station. • SIRIUS/XM: Select category. • CD/USB/CD-CH: Select folder. • iPod/D.PLAYER: Enter the main menu/Pause or stop playback/Confirm selection. • Bluetooth Phone/Audio: Select a registered device. q Enter functions mode. OPERATIONS 7 ENGLISH Basic operations Using the control panel 1 Select the source...
Instructions
Page 8
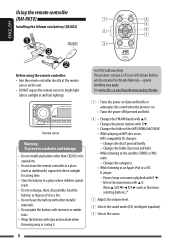
... menu selecting buttons.)* 3 Adjusts the volume level. 4 Selects the sound mode (iEQ: intelligent equalizer). 5 Selects the source. 8 Changes the disc if pressed briefly. - Using the remote controller (RM-RK50) Installing the lithium coin battery (CR2025) ENGLISH Before using the remote controller: • Aim the remote controller directly at the remote sensor on an MP3-compatible CD changer: - player: - See www.dtsc.ca.gov/hazardouswaste/perchlorate 1 • Turns the power on if pressed briefly or attenuates the sound when the power is on. • Turns the power...
... menu selecting buttons.)* 3 Adjusts the volume level. 4 Selects the sound mode (iEQ: intelligent equalizer). 5 Selects the source. 8 Changes the disc if pressed briefly. - Using the remote controller (RM-RK50) Installing the lithium coin battery (CR2025) ENGLISH Before using the remote controller: • Aim the remote controller directly at the remote sensor on an MP3-compatible CD changer: - player: - See www.dtsc.ca.gov/hazardouswaste/perchlorate 1 • Turns the power on if pressed briefly or attenuates the sound when the power is on. • Turns the power...

Instructions
Page 14
... USB device. • You cannot connect a computer to WAV files by operating the unit. 14 OPERATIONS & EXTERNAL DEVICES Up to five devices can listen to the USB input terminal of this unit. Open Search Make the unit ready to another playback source. Change the display information and pattern To stop play back before disconnecting a USB device. • This unit may not be connected at a time for the first time, you need to establish Bluetooth wireless connection...
... USB device. • You cannot connect a computer to WAV files by operating the unit. 14 OPERATIONS & EXTERNAL DEVICES Up to five devices can listen to the USB input terminal of this unit. Open Search Make the unit ready to another playback source. Change the display information and pattern To stop play back before disconnecting a USB device. • This unit may not be connected at a time for the first time, you need to establish Bluetooth wireless connection...
Instructions
Page 16
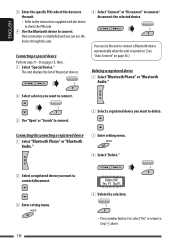
... and you can set the unit to connect a Bluetooth device automatically when the unit is turned on. (See "Auto Connect" on page 15, then... 1 Select "Special Device." Connecting/disconnecting a registered device 1 Select "Bluetooth Phone" or "Bluetooth Audio." 3 Enter setting menu. 4 Select "Delete." 2 Select a registered device you want to connect/disconnect. 3 Enter setting menu. 16 5 Delete the selection. • Press number button 3 to select "No" or return to step 4 above. ENGLISH 3 Enter the specific PIN code of the preset devices. 4 Select "Connect" or "Disconnect" to...
... and you can set the unit to connect a Bluetooth device automatically when the unit is turned on. (See "Auto Connect" on page 15, then... 1 Select "Special Device." Connecting/disconnecting a registered device 1 Select "Bluetooth Phone" or "Bluetooth Audio." 3 Enter setting menu. 4 Select "Delete." 2 Select a registered device you want to connect/disconnect. 3 Enter setting menu. 16 5 Delete the selection. • Press number button 3 to select "No" or return to step 4 above. ENGLISH 3 Enter the specific PIN code of the preset devices. 4 Select "Connect" or "Disconnect" to...
Instructions
Page 17
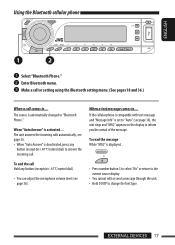
... the cellular phone is compatible with text message and "Message Info" is deactivated, press any button (except /control dial). • You can adjust the microphone volume level (see page 36), the unit rings and "MSG" appears on the display to "Bluetooth Phone." The source is activated.... Make a call or setting using the Bluetooth setting menu. (See pages 18 and 36.) When a call Hold any button (except /control dial) to change the font...
... the cellular phone is compatible with text message and "Message Info" is deactivated, press any button (except /control dial). • You can adjust the microphone volume level (see page 36), the unit rings and "MSG" appears on the display to "Bluetooth Phone." The source is activated.... Make a call or setting using the Bluetooth setting menu. (See pages 18 and 36.) When a call Hold any button (except /control dial) to change the font...

Instructions
Page 27
... external components Change the display information and pattern You can connect an external component to: • CD changer jack on the rear of this unit. ~ Select "EXT IN" or "LINE IN." Ÿ Turn on the rear of this unit using the following adapters: - AUX Input Adapter, KS-U58 Make sure "Ext In" is selected for the external input setting, see pages 28 - 30). EXTERNAL DEVICES 27 Adjust the volume. ⁄ Adjust the sound as you...
... external components Change the display information and pattern You can connect an external component to: • CD changer jack on the rear of this unit. ~ Select "EXT IN" or "LINE IN." Ÿ Turn on the rear of this unit using the following adapters: - AUX Input Adapter, KS-U58 Make sure "Ext In" is selected for the external input setting, see pages 28 - 30). EXTERNAL DEVICES 27 Adjust the volume. ⁄ Adjust the sound as you...
Instructions
Page 29
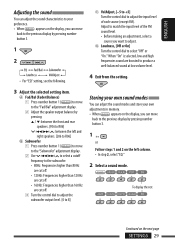
... input level of the FM sound level. • Before making an adjustment, select a source you can adjust the sound characteristics to your own adjustments in memory. • When appears on the display, you want to adjust. D Loudness, [Off or On] Turn the control dial to select "Off" or "On." A Fad/Bal (Fader/Balance) 1 Press number button 1 ( ) to move to the "Fad/Bal" adjustment display. 2 Adjust the speaker output balance by pressing: 5 / ∞: between the front and rear speakers...
... input level of the FM sound level. • Before making an adjustment, select a source you can adjust the sound characteristics to your own adjustments in memory. • When appears on the display, you want to adjust. D Loudness, [Off or On] Turn the control dial to select "Off" or "On." A Fad/Bal (Fader/Balance) 1 Press number button 1 ( ) to move to the "Fad/Bal" adjustment display. 2 Adjust the speaker output balance by pressing: 5 / ∞: between the front and rear speakers...

Instructions
Page 32
... • 12Hours Time display mode • 24Hours : See also page 6 for setting. Time Zone*2,*3 Time zone : Select your car, it is recommended to select "Off" to save the car's battery. *2 Displayed only when SIRIUS Satellite radio or XM Satellite radio is connected. *3 Adjustable only when "Clock Adj" is subject to "Auto." Press number button 1 ( ) to show the clock time for about 5 seconds when the power is automatically adjusted using the clock data provided via the satellite radio channel. : Cancels. Clock Hr Hour adjustment 1 - 12AM...
... • 12Hours Time display mode • 24Hours : See also page 6 for setting. Time Zone*2,*3 Time zone : Select your car, it is recommended to select "Off" to save the car's battery. *2 Displayed only when SIRIUS Satellite radio or XM Satellite radio is connected. *3 Adjustable only when "Clock Adj" is subject to "Auto." Press number button 1 ( ) to show the clock time for about 5 seconds when the power is automatically adjusted using the clock data provided via the satellite radio channel. : Cancels. Clock Hr Hour adjustment 1 - 12AM...

Instructions
Page 33
.../mutes while telephone muting is working. *6 Depends on the display. DISPLAY Font Type Font type 1 - 2 Initial: 1 : Select the font type used during the night time*6. : Positive pattern of the display. : Negative pattern of the following sources is selected-TUNER, SIRIUS, XM, CD, Bluetooth Phone, Bluetooth Audio, or LINE IN (only for KD-AR880). AM/FM intervals are set to 10 kHz/200 kHz. : When using in any other areas. player, [25]. : To use a JVC CD changer...
.../mutes while telephone muting is working. *6 Depends on the display. DISPLAY Font Type Font type 1 - 2 Initial: 1 : Select the font type used during the night time*6. : Positive pattern of the display. : Negative pattern of the following sources is selected-TUNER, SIRIUS, XM, CD, Bluetooth Phone, Bluetooth Audio, or LINE IN (only for KD-AR880). AM/FM intervals are set to 10 kHz/200 kHz. : When using in any other areas. player, [25]. : To use a JVC CD changer...
Instructions
Page 34
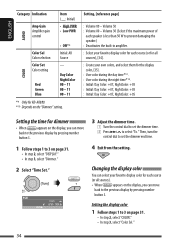
... AUDIO Category Indication Amp Gain Amplifier gain control Item ( : Initial) • High PWR • Low PWR • Off*9 Color Sel Color selection Initial: All Source COLOR Color Set Color setting Red Green Blue - Then, turn the control dial to set the dimmer time. 2 Press ¢ to 3 on the "Dimmer" setting. Volume 50 : Volume 00 - Setting the display color 1 Follow steps 1 to select "To." Volume 30 (Select if the maximum power of each speaker is less than 50 W to prevent damaging the speaker...
... AUDIO Category Indication Amp Gain Amplifier gain control Item ( : Initial) • High PWR • Low PWR • Off*9 Color Sel Color selection Initial: All Source COLOR Color Set Color setting Red Green Blue - Then, turn the control dial to set the dimmer time. 2 Press ¢ to 3 on the "Dimmer" setting. Volume 50 : Volume 00 - Setting the display color 1 Follow steps 1 to select "To." Volume 30 (Select if the maximum power of each speaker is less than 50 W to prevent damaging the speaker...

Instructions
Page 35
... Input" setting, see right column for each source (except when selecting "All Source" in step 3). 6 Exit from the setting. ENGLISH 2 3 Select a source. All Source*1 Ô CD Ô Changer (or Ext In*2) Ô LINE IN*3 Ô USB Ô FM Ô AM Ô Sirius*4/XM*4 Ô iPod*4/D.PLAYER*4 Ô BT Phone*4 Ô BT Audio*4 Ô (back to the beginning) *1 When you select "All Source," you can create your own color-User Color You can use...
... Input" setting, see right column for each source (except when selecting "All Source" in step 3). 6 Exit from the setting. ENGLISH 2 3 Select a source. All Source*1 Ô CD Ô Changer (or Ext In*2) Ô LINE IN*3 Ô USB Ô FM Ô AM Ô Sirius*4/XM*4 Ô iPod*4/D.PLAYER*4 Ô BT Phone*4 Ô BT Audio*4 Ô (back to the beginning) *1 When you select "All Source," you can create your own color-User Color You can use...
Instructions
Page 41
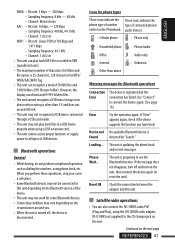
... 1 411 kbps - Channel: 1 ch/2 ch • This unit can play back files in the Phonebook. However, the display can recognize a total of connected phone/ entries in a USB device properly when using phone book, etc. Bluetooth operations General • While driving, do not perform complicated operation such as dialing the numbers, using a USB extension cord. • This unit cannot assure proper functions or supply power to use the Bluetooth function. audio devices: : Cellular phone : Phone only : Household phone : Phone/audio : Office : Audio only : General...
... 1 411 kbps - Channel: 1 ch/2 ch • This unit can play back files in the Phonebook. However, the display can recognize a total of connected phone/ entries in a USB device properly when using phone book, etc. Bluetooth operations General • While driving, do not perform complicated operation such as dialing the numbers, using a USB extension cord. • This unit cannot assure proper functions or supply power to use the Bluetooth function. audio devices: : Cellular phone : Phone only : Household phone : Phone/audio : Office : Audio only : General...

Instructions
Page 42
... 30 station frequencies, "Name Full" appears. LINE IN plugs on the rear Unit CD changer jack with or without (see pages 14 - 19) : Adapter (separately purchased) 42 (see page 33 of the "Ext Input" setting) (see Installation/Connection manual (separate volume). player, [25] However, you can display up for dimming. player is connected, all operations from "High PWR" to "Low PWR" while the volume level is set to "Auto," the display pattern will change the "Dimmer" setting...
... 30 station frequencies, "Name Full" appears. LINE IN plugs on the rear Unit CD changer jack with or without (see pages 14 - 19) : Adapter (separately purchased) 42 (see page 33 of the "Ext Input" setting) (see Installation/Connection manual (separate volume). player, [25] However, you can display up for dimming. player is connected, all operations from "High PWR" to "Low PWR" while the volume level is set to "Auto," the display pattern will change the "Dimmer" setting...

Instructions
Page 43
... page REFERENCES 43 Connect the antenna firmly. • Disc cannot be heard from the speakers. • Adjust the volume to the optimum level. • Check the cords and connections. • The unit does not work . Skip to another track or change to another playback source. • Disc cannot be recognized ("No Disc," "Loading Eject the disc forcibly (see page 3). • "Connect Error" appears on the display). Store stations manually. • Static noise...
... page REFERENCES 43 Connect the antenna firmly. • Disc cannot be heard from the speakers. • Adjust the volume to the optimum level. • Check the cords and connections. • The unit does not work . Skip to another track or change to another playback source. • Disc cannot be recognized ("No Disc," "Loading Eject the disc forcibly (see page 3). • "Connect Error" appears on the display). Store stations manually. • Static noise...

Instructions
Page 45
... unit position. • Phone sound quality is poor. • Reduce the distance between the unit and the Bluetooth audio device. • Disconnect the device connected for both the unit and target device. The tracks have not been properly copied into the USB device, and try to the instructions supplied with one Bluetooth cellular phone and one Bluetooth audio device at a time. After the device detects the unit, select "Open..." Check whether the connected audio device supports AVRCP (Audio Video Remote Control...
... unit position. • Phone sound quality is poor. • Reduce the distance between the unit and the Bluetooth audio device. • Disconnect the device connected for both the unit and target device. The tracks have not been properly copied into the USB device, and try to the instructions supplied with one Bluetooth cellular phone and one Bluetooth audio device at a time. After the device detects the unit, select "Open..." Check whether the connected audio device supports AVRCP (Audio Video Remote Control...

Instructions
Page 47
... iPod or D. player. player does not turn on the display. Deactivate the equalizer either registered trademarks or trademarks of Microsoft Corporation in the U.S. player's controls do not work . • Update the firmware version. • Charge the battery. • The sound is under license. The headphones are stored. No tracks are disconnected during playback. REFERENCES 47 Disconnect the adapter from both the unit and iPod/ D. player. Check the connection...
... iPod or D. player. player does not turn on the display. Deactivate the equalizer either registered trademarks or trademarks of Microsoft Corporation in the U.S. player's controls do not work . • Update the firmware version. • Charge the battery. • The sound is under license. The headphones are stored. No tracks are disconnected during playback. REFERENCES 47 Disconnect the adapter from both the unit and iPod/ D. player. Check the connection...


