
Instructions
Page 3
Thank you for more details. Please read all instructions carefully before operation, to ensure your unit with system upgrades. CD changer (P.16,17) Satellite radio (P.20) Digital Audio player (P.22) • Refer to obtain the best possible performance from the unit. MD player, etc. (P.23) 2 Get more ! Enjoy more out of your complete understanding and to the Installation/ Connection Manual for purchasing this JVC product.
Thank you for more details. Please read all instructions carefully before operation, to ensure your unit with system upgrades. CD changer (P.16,17) Satellite radio (P.20) Digital Audio player (P.22) • Refer to obtain the best possible performance from the unit. MD player, etc. (P.23) 2 Get more ! Enjoy more out of your complete understanding and to the Installation/ Connection Manual for purchasing this JVC product.
Instructions
Page 4
... settings • DVD Setups 31 ¶ Adjusting sound Reference 32 ¶ Troubleshooting 37 ¶ Technical information 38 ¶ Specifications 3 Use Reference English Prepare Contents Preparations 4 ¶ Please read carefully 5 ¶ Preparations 6 ¶ Discs that can be played 8 ¶ Basic operations • Main unit/Display window/ Remote controller How to use 12 ¶ Listening to the radio • Suppressing static noise • Automatically presetting FM stations • Manually presetting stations...
... settings • DVD Setups 31 ¶ Adjusting sound Reference 32 ¶ Troubleshooting 37 ¶ Technical information 38 ¶ Specifications 3 Use Reference English Prepare Contents Preparations 4 ¶ Please read carefully 5 ¶ Preparations 6 ¶ Discs that can be played 8 ¶ Basic operations • Main unit/Display window/ Remote controller How to use 12 ¶ Listening to the radio • Suppressing static noise • Automatically presetting FM stations • Manually presetting stations...

Instructions
Page 5
... servicing to beam. CAUTION: Visible and invisible laser radiation when open the top cover. Avoid direct exposure to qualified service personnel. 3. However, there is no guarantee that interference will be displayed if parking brake is connected. - Increase the separation between the equipment and receiver. - Consult the dealer or an experienced radio/TV technician for laser products 1. Important for help. Use...
... servicing to beam. CAUTION: Visible and invisible laser radiation when open the top cover. Avoid direct exposure to qualified service personnel. 3. However, there is no guarantee that interference will be displayed if parking brake is connected. - Increase the separation between the equipment and receiver. - Consult the dealer or an experienced radio/TV technician for laser products 1. Important for help. Use...
Instructions
Page 7
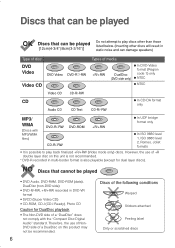
...-border format is possible to play back finalized +R/+RW (Video mode only) discs. Therefore, the use of +R double layer disc on this product may not be played • DVD Audio, DVD-RAM, DVD-ROM (data), DualDisc (non-DVD side) • DVD-R/-RW, +R/+RW recorded in DVD-VR format • SVCD (Super Video CD) • CD-ROM, CD-I (CD-I Ready), Photo CD Caution for dual layer discs). However, the use of...
...-border format is possible to play back finalized +R/+RW (Video mode only) discs. Therefore, the use of +R double layer disc on this product may not be played • DVD Audio, DVD-RAM, DVD-ROM (data), DualDisc (non-DVD side) • DVD-R/-RW, +R/+RW recorded in DVD-VR format • SVCD (Super Video CD) • CD-ROM, CD-I (CD-I Ready), Photo CD Caution for dual layer discs). However, the use of...

Instructions
Page 8
.... Press the 0 (eject) button while holding down the SRC button. (To release this particular time. ¶ DVD Video region codes This unit can be displayed correctly) ¶ To use liquid cleaners, thinners, or benzene. ¶ To play back DVDs whose region codes include the number "1." WMA files which have a higher output level than other sources and high volume may damage speakers) ¶ Some discs require operations that differ from...
.... Press the 0 (eject) button while holding down the SRC button. (To release this particular time. ¶ DVD Video region codes This unit can be displayed correctly) ¶ To use liquid cleaners, thinners, or benzene. ¶ To play back DVDs whose region codes include the number "1." WMA files which have a higher output level than other sources and high volume may damage speakers) ¶ Some discs require operations that differ from...
Instructions
Page 9
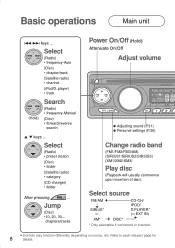
...-Manual (Disc) • forward/reverse search 5 ∞ keys ... chapters/tracks Power On/Off (Hold)/ Attenuate On/Off Adjust volume ¶ Adjusting sound (P.31) ¶ Personal settings (P.26) Change radio band (FM1/FM2/FM3/AM) (SIRIUS1/SIRIUS2/SIRIUS3) (XM1/XM2/XM3) Play disc (Playback will usually commence upon insertion of disc) Select source FM/AM SIRIUS* or CD-CH/ IPOD/ D.PLAYER* (or EXT IN) XM* DISC* * Only selectable if connected or...
...-Manual (Disc) • forward/reverse search 5 ∞ keys ... chapters/tracks Power On/Off (Hold)/ Attenuate On/Off Adjust volume ¶ Adjusting sound (P.31) ¶ Personal settings (P.26) Change radio band (FM1/FM2/FM3/AM) (SIRIUS1/SIRIUS2/SIRIUS3) (XM1/XM2/XM3) Play disc (Playback will usually commence upon insertion of disc) Select source FM/AM SIRIUS* or CD-CH/ IPOD/ D.PLAYER* (or EXT IN) XM* DISC* * Only selectable if connected or...

Instructions
Page 10
... Disc playback device CH: CD changer DISC: Main unit English Prepare Call up 1-6/7-12 (Hold) (Radio) • preset station (Disc) • chapter/title/ folder/track/disc Remove panel Change display (Time, playback information, etc) MODE function Press , then one of these buttons within 5 seconds. : Suppress static noise on FM broadcast (P.13) : Automatically preset FM stations (P.13) : Repeat play (P.25) : Random play : Disc : Folder Disc information : Tag : Folder : Track Time, menu, playback information Source display Sound mode LOUD (Loudness) Volume...
... Disc playback device CH: CD changer DISC: Main unit English Prepare Call up 1-6/7-12 (Hold) (Radio) • preset station (Disc) • chapter/title/ folder/track/disc Remove panel Change display (Time, playback information, etc) MODE function Press , then one of these buttons within 5 seconds. : Suppress static noise on FM broadcast (P.13) : Automatically preset FM stations (P.13) : Repeat play (P.25) : Random play : Disc : Folder Disc information : Tag : Folder : Track Time, menu, playback information Source display Sound mode LOUD (Loudness) Volume...
Instructions
Page 12
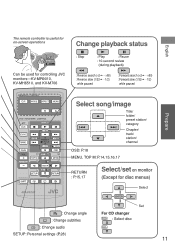
English The remote controller is useful for on-screen operations Can be used for controlling JVC monitors-KV-MR9010, KV-MH6510, and KV-M706 Change playback status : Stop : Play : Pause : 10-second review (during playback) : Reverse search (×2=ʜ×60) : Reverse slow (1/32=ʜ1/2) while paused : Forward search (×2=ʜ×60) : Forward slow (1/32=ʜ1/2) while paused Prepare Select song/image Title/ folder/ preset station/ category...
English The remote controller is useful for on-screen operations Can be used for controlling JVC monitors-KV-MR9010, KV-MH6510, and KV-M706 Change playback status : Stop : Play : Pause : 10-second review (during playback) : Reverse search (×2=ʜ×60) : Reverse slow (1/32=ʜ1/2) while paused : Forward search (×2=ʜ×60) : Forward slow (1/32=ʜ1/2) while paused Prepare Select song/image Title/ folder/ preset station/ category...

Instructions
Page 15
...With remote controller ¶ Changing playback status ¶ Select chapter/title : Stop : Select title : Play, 10-second review during slow playback *2 In some cases, this can be changed from DVD menu only while paused + Number: Select chapter No. : Forward search, forward slow *1 ¶ Operate DVD menu while paused : Display DVD menu : Change audio language *2 : Display DVD menu : Change subtitles *2 + Number: Select menu item : Change angle *2 ¶ Operate on monitor. Playing a disc DVD Video Preparation: Select appropriate input on -screen bar (P.18) *1 No sound...
...With remote controller ¶ Changing playback status ¶ Select chapter/title : Stop : Select title : Play, 10-second review during slow playback *2 In some cases, this can be changed from DVD menu only while paused + Number: Select chapter No. : Forward search, forward slow *1 ¶ Operate DVD menu while paused : Display DVD menu : Change audio language *2 : Display DVD menu : Change subtitles *2 + Number: Select menu item : Change angle *2 ¶ Operate on monitor. Playing a disc DVD Video Preparation: Select appropriate input on -screen bar (P.18) *1 No sound...

Instructions
Page 22
SIRIUS/XM 1 Select satellite radio-"SIRIUS" or "XM" English Use *1 SIRIUS only 2 Select band ¶ MODE function (P.13) ¶ Change display Time Category name (SIRIUS): SIRIUS1 SIRIUS2 SIRIUS3 (XM): XM1 XM2 XM3 ¶ 6 channels can be preset for each band. (P.13) Channel name Artist name Composer name*1 3 Select channel 5 ∞ : Select category*2 Song/Program/ Title name (On XM, select channel within 15 seconds) 4 ¢...
SIRIUS/XM 1 Select satellite radio-"SIRIUS" or "XM" English Use *1 SIRIUS only 2 Select band ¶ MODE function (P.13) ¶ Change display Time Category name (SIRIUS): SIRIUS1 SIRIUS2 SIRIUS3 (XM): XM1 XM2 XM3 ¶ 6 channels can be preset for each band. (P.13) Channel name Artist name Composer name*1 3 Select channel 5 ∞ : Select category*2 Song/Program/ Title name (On XM, select channel within 15 seconds) 4 ¢...
Instructions
Page 23
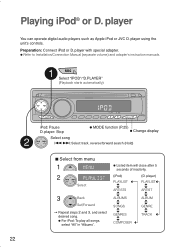
Preparation: Connect iPod or D. player using the unit's controls. player) PLAYLIST PLAYLIST ARTISTS ARTIST ALBUMS ALBUM SONGS GENRE GENRES TRACK COMPOSER 22 player with special adapter. ¶ Refer to Installation/Connection Manual (separate volume) and adapter's instruction manuals. 1 Select "IPOD"/"D.PLAYER" (Playback starts automatically) iPod: Pause D. player: Stop ¶ MODE function (P.25) ¶ Change display 2 Select song 4 ¢: Select track, reverse/forward search (Hold) 7 Select from menu 1 2 Select 3 Back Set/Forward = Repeat steps 2 and 3, and ...
Preparation: Connect iPod or D. player using the unit's controls. player) PLAYLIST PLAYLIST ARTISTS ARTIST ALBUMS ALBUM SONGS GENRE GENRES TRACK COMPOSER 22 player with special adapter. ¶ Refer to Installation/Connection Manual (separate volume) and adapter's instruction manuals. 1 Select "IPOD"/"D.PLAYER" (Playback starts automatically) iPod: Pause D. player: Stop ¶ MODE function (P.25) ¶ Change display 2 Select song 4 ¢: Select track, reverse/forward search (Hold) 7 Select from menu 1 2 Select 3 Back Set/Forward = Repeat steps 2 and 3, and ...
Instructions
Page 24
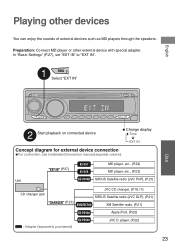
...), set "EXT IN" to "EXT IN". 1 Select "EXT IN" Use 2 Start playback on connected device ¶ Change display Time EXT IN Concept diagram for external device connection ¶ For connection, see Installation/Connection manual (separate volume). (P.27) MD player, etc., (P.23) MD player, etc., (P.23) Unit SIRIUS Satellite radio (JVC PnP), (P.21) CD changer jack (P.27) : Adapter (separately purchased) JVC CD changer, (P.16,17) SIRIUS Satellite radio (JVC DLP), (P.21) XM Satellite radio, (P.21) Apple iPod, (P.22) JVC D. English Playing other external device...
...), set "EXT IN" to "EXT IN". 1 Select "EXT IN" Use 2 Start playback on connected device ¶ Change display Time EXT IN Concept diagram for external device connection ¶ For connection, see Installation/Connection manual (separate volume). (P.27) MD player, etc., (P.23) MD player, etc., (P.23) Unit SIRIUS Satellite radio (JVC PnP), (P.21) CD changer jack (P.27) : Adapter (separately purchased) JVC CD changer, (P.16,17) SIRIUS Satellite radio (JVC DLP), (P.21) XM Satellite radio, (P.21) Apple iPod, (P.22) JVC D. English Playing other external device...

Instructions
Page 27
... change setting for the LCD display, etc. (Preferred Setting Mode: PSM) Option DEMO Display demonstration 4 ¢ SEL Set/adjust 1 Display PSM menu (Hold) 2 Select item 3 Set/adjust 4 Finish Information ¶ PSM menu will close automatically after 15 seconds of inactivity. ¶ If the power to the unit is set to "AUTO") SID SIRIUS ID (Only displayed when connected to their original state. CLOCK H/M Hour/Minute adjustment CLK ADJ Clock adjustment (Only displayed when connected to SIRIUS/XM satellite radio) T-ZONE Time...
... change setting for the LCD display, etc. (Preferred Setting Mode: PSM) Option DEMO Display demonstration 4 ¢ SEL Set/adjust 1 Display PSM menu (Hold) 2 Select item 3 Set/adjust 4 Finish Information ¶ PSM menu will close automatically after 15 seconds of inactivity. ¶ If the power to the unit is set to "AUTO") SID SIRIUS ID (Only displayed when connected to their original state. CLOCK H/M Hour/Minute adjustment CLK ADJ Clock adjustment (Only displayed when connected to SIRIUS/XM satellite radio) T-ZONE Time...

Instructions
Page 28
... your area is FM/AM, ¶ EXT IN : To use JVC CD changer, or JVC External input compatible satellite (SIRIUS/XM) radio, iPod, (Only when D. You can scroll the display regardless of inactivity. ¶ DEMO OFF : Cancels. (P.5) ¶ AUTO : The built-in clock is set to 10 kHz/200 kHz. ¶ AREA SA : When using the unit in South American countries where FM interval is less...
... your area is FM/AM, ¶ EXT IN : To use JVC CD changer, or JVC External input compatible satellite (SIRIUS/XM) radio, iPod, (Only when D. You can scroll the display regardless of inactivity. ¶ DEMO OFF : Cancels. (P.5) ¶ AUTO : The built-in clock is set to 10 kHz/200 kHz. ¶ AREA SA : When using the unit in South American countries where FM interval is less...

Instructions
Page 29
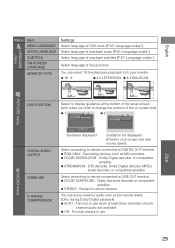
... AUDIO DIGITAL AUDIO OUTPUT DOWN MIX D. RANGE COMPRESSION SPTRCEMAOMN/LPYCM STDEORLEBOY DIGITAL / PCM OSNTREAM / PCM Confirm 28 Personal settings DVD setups You can change the audio or subtitles language of DVD before playing. (Remote controller only) Preparation: Select "DISC" as source, and stop playback SOURCE 1 Open DVD setup screen 2 Select menu Chosen menu picture language audio LANGUAGE MENU LANGUAGE AUDIO LANGUAGE SUBTITLE ON SCREEN LANGUAGE ENGLISH ENGLISH OFF ENGLISH 7 Close setup screen 3 Select item Select AUDIO DIGITAL AUDIO OUTPUT...
... AUDIO DIGITAL AUDIO OUTPUT DOWN MIX D. RANGE COMPRESSION SPTRCEMAOMN/LPYCM STDEORLEBOY DIGITAL / PCM OSNTREAM / PCM Confirm 28 Personal settings DVD setups You can change the audio or subtitles language of DVD before playing. (Remote controller only) Preparation: Select "DISC" as source, and stop playback SOURCE 1 Open DVD setup screen 2 Select menu Chosen menu picture language audio LANGUAGE MENU LANGUAGE AUDIO LANGUAGE SUBTITLE ON SCREEN LANGUAGE ENGLISH ENGLISH OFF ENGLISH 7 Close setup screen 3 Select item Select AUDIO DIGITAL AUDIO OUTPUT...
Instructions
Page 30
... change the position of the setup screen. (Also when you wish to fit your monitor. ¶ 16 : 9 ¶ 4:3 LETTER BOX ¶ 4:3 PAN SCAN PICTURE menu OSD POSITION DIGITAL AUDIO OUTPUT DOWN MIX D. English LANGUAGE menu Menu Item MENU LANGUAGE AUDIO LANGUAGE SUBTITLE ON SCREEN LANGUAGE MONITOR TYPE Settings Select language of playback audio (P.30 "Language codes"). Select language of DVD menu (P.30 "Language codes"). Guidance displayed Guidance not displayed (Position of on -screen...
... change the position of the setup screen. (Also when you wish to fit your monitor. ¶ 16 : 9 ¶ 4:3 LETTER BOX ¶ 4:3 PAN SCAN PICTURE menu OSD POSITION DIGITAL AUDIO OUTPUT DOWN MIX D. English LANGUAGE menu Menu Item MENU LANGUAGE AUDIO LANGUAGE SUBTITLE ON SCREEN LANGUAGE MONITOR TYPE Settings Select language of playback audio (P.30 "Language codes"). Select language of DVD menu (P.30 "Language codes"). Guidance displayed Guidance not displayed (Position of on -screen...
Instructions
Page 33
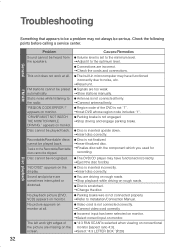
...; Disc is set to noise, etc. =Reset unit. screen. =Select "4:3 LETTER BOX."(P.29) Disc playback 32 Check the following points before calling a service center. General FM/AM Problem Causes/Remedies Sound cannot be recognized. ¶ The DVD/CD player may have functioned incorrectly. =Eject the disc forcibly. FM stations cannot be played back. the radio. =Connect antenna firmly. "DRIVER MUST NOT WATCH ¶ Parking brake is inserted incorrectly. =Insert disc correctly. Recordable/Rewritable discs...
...; Disc is set to noise, etc. =Reset unit. screen. =Select "4:3 LETTER BOX."(P.29) Disc playback 32 Check the following points before calling a service center. General FM/AM Problem Causes/Remedies Sound cannot be recognized. ¶ The DVD/CD player may have functioned incorrectly. =Eject the disc forcibly. FM stations cannot be played back. the radio. =Connect antenna firmly. "DRIVER MUST NOT WATCH ¶ Parking brake is inserted incorrectly. =Insert disc correctly. Recordable/Rewritable discs...
Instructions
Page 34
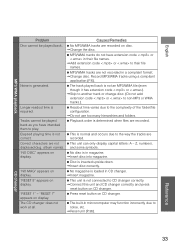
... is generated. ¶ The track played back is inserted upside down. =Insert disc correctly. "RESET 8" appears on CD changer. album name). Record MP3/WMA tracks using a compliant application (P.6). Longer readout time is not connected to CD changer correctly. =Connect this unit and CD changer correctly and press reset button on display. ¶ This unit is required. ¶ Readout time varies due to the complexity...
... is generated. ¶ The track played back is inserted upside down. =Insert disc correctly. "RESET 8" appears on CD changer. album name). Record MP3/WMA tracks using a compliant application (P.6). Longer readout time is not connected to CD changer correctly. =Connect this unit and CD changer correctly and press reset button on display. ¶ This unit is required. ¶ Readout time varies due to the complexity...
Instructions
Page 37
... the connecting cable and its connection. "ERROR 01" appears on D. player. player's controls do not work properly! = Remove panel and reset unit. \ ¶ Your preset adjustments will not eject! = Forcibly eject the disc. + (Hold) 36 player. player does not turn on display of D. Sound is distorted. ¶ Equalizer is played. ("Not Connected" appears on , or ¶ Firmware version needs to D. Then, connect it again. "RESET 8" appears on . ¶ Battery of D. D. player does not turn on display. ¶ Communication failure occurs between adapter and unit...
... the connecting cable and its connection. "ERROR 01" appears on D. player. player's controls do not work properly! = Remove panel and reset unit. \ ¶ Your preset adjustments will not eject! = Forcibly eject the disc. + (Hold) 36 player. player does not turn on display of D. Sound is distorted. ¶ Equalizer is played. ("Not Connected" appears on , or ¶ Firmware version needs to D. Then, connect it again. "RESET 8" appears on . ¶ Battery of D. D. player does not turn on display. ¶ Communication failure occurs between adapter and unit...

Instructions
Page 38
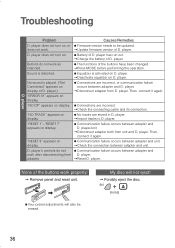
... connected (excluding CH-X99 and CH-X100), but cannot play MP3 discs. ¶ DVD, VCD, or WMA discs inserted in the magazine will be displayed when using JVC SIRIUS radio adapter, KSU100K (not supplied) to the JVC website below. Technical information English Connected devices Satellite radio operations ¶ You can also connect JVC SIRIUS radio PnP (Plug and Play), using a CD text compatible CD changer. player are different depending on the "DIGITAL AUDIO OUTPUT" setting on display. ¶ If iPod...
... connected (excluding CH-X99 and CH-X100), but cannot play MP3 discs. ¶ DVD, VCD, or WMA discs inserted in the magazine will be displayed when using JVC SIRIUS radio adapter, KSU100K (not supplied) to the JVC website below. Technical information English Connected devices Satellite radio operations ¶ You can also connect JVC SIRIUS radio PnP (Plug and Play), using a CD text compatible CD changer. player are different depending on the "DIGITAL AUDIO OUTPUT" setting on display. ¶ If iPod...


