Instructions
Page 3
... a long time in the car becomes normal before performing any of these buttons until the temperature in hot or cold weather, wait until the control is cleared. • Pressing M MODE again also restores original functions. For safety... • Do not raise the volume level too much, as this does not work, reset your unit • Your preset adjustments will block outside sounds, making driving dangerous. •...
... a long time in the car becomes normal before performing any of these buttons until the temperature in hot or cold weather, wait until the control is cleared. • Pressing M MODE again also restores original functions. For safety... • Do not raise the volume level too much, as this does not work, reset your unit • Your preset adjustments will block outside sounds, making driving dangerous. •...

Instructions
Page 4
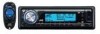
... volume setting: Digital devices (DISC/USB) produce very little noise compared with the steering wheel remote control function. • See the Installation/Connection Manual (separate volume) for explanation in a traffic accident. Lower the volume before playing these functions will be involved in this manual is below 0°C (32°F), the movement of the output level. ENGLISH Detaching the control panel Attaching the control panel The control panel and button illustrations used for connection. 4 Warning: If you need to operate...
... volume setting: Digital devices (DISC/USB) produce very little noise compared with the steering wheel remote control function. • See the Installation/Connection Manual (separate volume) for explanation in a traffic accident. Lower the volume before playing these functions will be involved in this manual is below 0°C (32°F), the movement of the output level. ENGLISH Detaching the control panel Attaching the control panel The control panel and button illustrations used for connection. 4 Warning: If you need to operate...

Instructions
Page 6
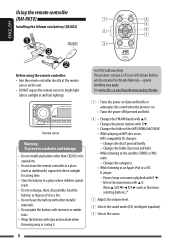
... Preparation Cancel the display demonstration and set the clock • See also pages 31 and 32. Cancel the display demonstrations Select "Demo," then "Off." Select "24H/12H," then "24Hours" or "12Hours." Enter the PSM settings. When the power is turned off: Check the current clock time When the power is selected as the source Source operation display Audio level meter display (see "LevelMeter" on the power. Set the clock Select "Clock Hr" (hour), then adjust the hour.
... Preparation Cancel the display demonstration and set the clock • See also pages 31 and 32. Cancel the display demonstrations Select "Demo," then "Off." Select "24H/12H," then "24Hours" or "12Hours." Enter the PSM settings. When the power is turned off: Check the current clock time When the power is selected as the source Source operation display Audio level meter display (see "LevelMeter" on the power. Set the clock Select "Clock Hr" (hour), then adjust the hour.

Instructions
Page 7
... Bluetooth Phone: Select preset phone number. TUNER = SIRIUS*1/XM*1 = CD*1 = USB = CD-CH*1/iPod*1/D.PLAYER*1 (or EXT IN) = Bluetooth Phone*1 = Bluetooth Audio*1 = LINE IN*2 = (back to the beginning) *1 You cannot select these sources if they are not ready or not connected. *2 Only for KD-AR880. 2 Select the bands. 3 • Turn on the power. • Turn off the power [Hold]. • Attenuate the sound (if the power is on). • Volume control [Turn]. 4 • Adjust the sound mode. • Enter the PSM settings [Hold]. 5 Display window 6 Select the sound mode. 7 Eject disc. 8 USB input...
... Bluetooth Phone: Select preset phone number. TUNER = SIRIUS*1/XM*1 = CD*1 = USB = CD-CH*1/iPod*1/D.PLAYER*1 (or EXT IN) = Bluetooth Phone*1 = Bluetooth Audio*1 = LINE IN*2 = (back to the beginning) *1 You cannot select these sources if they are not ready or not connected. *2 Only for KD-AR880. 2 Select the bands. 3 • Turn on the power. • Turn off the power [Hold]. • Attenuate the sound (if the power is on). • Volume control [Turn]. 4 • Adjust the sound mode. • Enter the PSM settings [Hold]. 5 Display window 6 Select the sound mode. 7 Eject disc. 8 USB input...
Instructions
Page 8
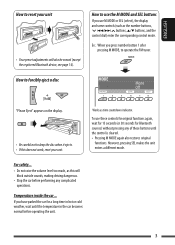
... leave the remote controller in a place (such as the menu selecting buttons.)* 3 Adjusts the volume level. 4 Selects the sound mode (iEQ: intelligent equalizer). 5 Selects the source. 8 Enters the main menu with D ∞. • Changes the folder of it . player: - Changes the folder if pressed and held . 2 • Changes the FM/AM bands with 5 U. • Changes the preset stations with 5 U. (Now 5 U/D ∞/2 R/F 3 work as dashboards) exposed to direct sunlight for a long time. • Store the battery in...
... leave the remote controller in a place (such as the menu selecting buttons.)* 3 Adjusts the volume level. 4 Selects the sound mode (iEQ: intelligent equalizer). 5 Selects the source. 8 Enters the main menu with D ∞. • Changes the folder of it . player: - Changes the folder if pressed and held . 2 • Changes the FM/AM bands with 5 U. • Changes the preset stations with 5 U. (Now 5 U/D ∞/2 R/F 3 work as dashboards) exposed to direct sunlight for a long time. • Store the battery in...

Instructions
Page 10
... 2 of the FM1 band. ENGLISH When an FM stereo broadcast is hard to receive 1 2 Manual presetting Ex.: Storing FM station of 92.5 MHz into preset number 4 of "Using the number buttons" above. • By holding 5 / ∞, the Preset Station List will be lost. 2 • lights up to six stations for each band. 1 2 3 Using the Preset Station List • When appears on the display. 3 Exit from the setting. 3 FM station automatic presetting-
... 2 of the FM1 band. ENGLISH When an FM stereo broadcast is hard to receive 1 2 Manual presetting Ex.: Storing FM station of 92.5 MHz into preset number 4 of "Using the number buttons" above. • By holding 5 / ∞, the Preset Station List will be lost. 2 • lights up to six stations for each band. 1 2 3 Using the Preset Station List • When appears on the display. 3 Exit from the setting. 3 FM station automatic presetting-

Instructions
Page 14
... where you reset your safety driving. • Do not pull out and attach the USB device repeatedly while "File Check" is connected. • Stop play back before disconnecting a USB device. • This unit may use a Bluetooth device through the unit ("Bluetooth Phone" and "Bluetooth Audio") for each source ("Bluetooth Phone" and "Bluetooth Audio"). Registering a Bluetooth device Registration (Pairing) methods Use either of the following the MP3/ WMA/AAC files operations listed on the rear of the unit. • Make sure...
... where you reset your safety driving. • Do not pull out and attach the USB device repeatedly while "File Check" is connected. • Stop play back before disconnecting a USB device. • This unit may use a Bluetooth device through the unit ("Bluetooth Phone" and "Bluetooth Audio") for each source ("Bluetooth Phone" and "Bluetooth Audio"). Registering a Bluetooth device Registration (Pairing) methods Use either of the following the MP3/ WMA/AAC files operations listed on the rear of the unit. • Make sure...
Instructions
Page 16
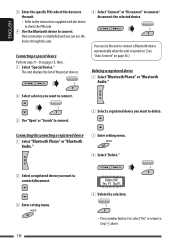
...." Connecting/disconnecting a registered device 1 Select "Bluetooth Phone" or "Bluetooth Audio." 3 Enter setting menu. 4 Select "Delete." 2 Select a registered device you can set the unit to connect a Bluetooth device automatically when the unit is established and you want to delete. You can use the device through the unit. The unit displays the list of the device to the unit. • Refer to the instructions supplied with the device to check the PIN code. 4 Use the Bluetooth device to connect. ENGLISH 3 Enter the specific PIN code of the preset devices. 4 Select "Connect...
...." Connecting/disconnecting a registered device 1 Select "Bluetooth Phone" or "Bluetooth Audio." 3 Enter setting menu. 4 Select "Delete." 2 Select a registered device you can set the unit to connect a Bluetooth device automatically when the unit is established and you want to delete. You can use the device through the unit. The unit displays the list of the device to the unit. • Refer to the instructions supplied with the device to check the PIN code. 4 Use the Bluetooth device to connect. ENGLISH 3 Enter the specific PIN code of the preset devices. 4 Select "Connect...
Instructions
Page 17
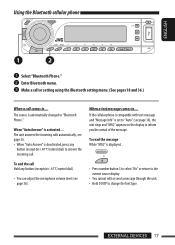
... message While "MSG" is set to "Auto" (see page 36), the unit rings and "MSG" appears on the display to change the font type. The unit answers the incoming calls automatically, see page 36). EXTERNAL DEVICES 17 Make a call or setting using the Bluetooth setting menu. (See pages 18 and 36.) When a call . The source is activated.... Using the Bluetooth cellular phone ENGLISH ~ Select "Bluetooth Phone." Ÿ Enter Bluetooth menu. ! When a text message...
... message While "MSG" is set to "Auto" (see page 36), the unit rings and "MSG" appears on the display to change the font type. The unit answers the incoming calls automatically, see page 36). EXTERNAL DEVICES 17 Make a call or setting using the Bluetooth setting menu. (See pages 18 and 36.) When a call . The source is activated.... Using the Bluetooth cellular phone ENGLISH ~ Select "Bluetooth Phone." Ÿ Enter Bluetooth menu. ! When a text message...

Instructions
Page 27
... - AUX Input Adapter, KS-U58 Make sure "Ext In" is selected for the external input setting, see pages 28 - 30). Adjust the volume. ⁄ Adjust the sound as you want (see page 33. • KD-AR880: LINE IN plugs on the connected component and start playing the source. ! ENGLISH Listening to the other external components Change the display information and pattern You can connect an external component to: • CD changer jack...
... - AUX Input Adapter, KS-U58 Make sure "Ext In" is selected for the external input setting, see pages 28 - 30). Adjust the volume. ⁄ Adjust the sound as you want (see page 33. • KD-AR880: LINE IN plugs on the connected component and start playing the source. ! ENGLISH Listening to the other external components Change the display information and pattern You can connect an external component to: • CD changer jack...
Instructions
Page 29
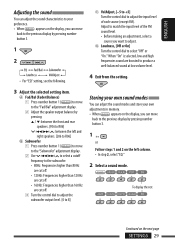
... number button 1 ( ) to move to the "Fad/Bal" adjustment display. 2 Adjust the speaker output balance by pressing: 5 / ∞: between the front and rear speakers. [F06 to R06] 4/¢ : between the left column. • In step 2, select "EQ." 2 Select a sound mode. Adjust to match the input level of the FM sound level. • Before making an adjustment, select a source you can move back to the previous display by pressing number button 3. 1 2 C VolAdjust, [-5 to +5] Turn the control dial to adjust the input level...
... number button 1 ( ) to move to the "Fad/Bal" adjustment display. 2 Adjust the speaker output balance by pressing: 5 / ∞: between the front and rear speakers. [F06 to R06] 4/¢ : between the left column. • In step 2, select "EQ." 2 Select a sound mode. Adjust to match the input level of the FM sound level. • Before making an adjustment, select a source you can move back to the previous display by pressing number button 3. 1 2 C VolAdjust, [-5 to +5] Turn the control dial to adjust the input level...

Instructions
Page 32
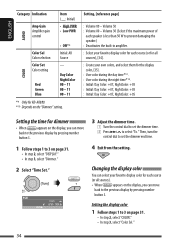
... button illumination. : Set the timer for dimmer, [34]. Time Zone*2,*3 Time zone : Select your car, it is recommended to select "Off" to save the car's battery. *2 Displayed only when SIRIUS Satellite radio or XM Satellite radio is connected. *3 Adjustable only when "Clock Adj" is subject to make the display indications clear and legible. *1 If the power supply is not interrupted by turning off , [6]. Category Indication Item ( : Initial) Setting, [reference page] ENGLISH CLOCK Clock Disp*1 • On Clock display...
... button illumination. : Set the timer for dimmer, [34]. Time Zone*2,*3 Time zone : Select your car, it is recommended to select "Off" to save the car's battery. *2 Displayed only when SIRIUS Satellite radio or XM Satellite radio is connected. *3 Adjustable only when "Clock Adj" is subject to make the display indications clear and legible. *1 If the power supply is not interrupted by turning off , [6]. Category Indication Item ( : Initial) Setting, [reference page] ENGLISH CLOCK Clock Disp*1 • On Clock display...

Instructions
Page 33
... kHz. Ext Input*8 External input • Changer • Ext In : To use any other external component, [27]. player, [25]. : To use a JVC CD changer, [20], or an Apple iPod/a JVC D. Sirius ID*7 - AUDIO Beep • On Key-touch tone • Off : Activates the key-touch tone. : Deactivates the key-touch tone. AM interval is selected-TUNER, SIRIUS, XM, CD, Bluetooth Phone, Bluetooth Audio, or LINE IN (only for KD-AR880). Continued on the display, [22...
... kHz. Ext Input*8 External input • Changer • Ext In : To use any other external component, [27]. player, [25]. : To use a JVC CD changer, [20], or an Apple iPod/a JVC D. Sirius ID*7 - AUDIO Beep • On Key-touch tone • Off : Activates the key-touch tone. : Deactivates the key-touch tone. AM interval is selected-TUNER, SIRIUS, XM, CD, Bluetooth Phone, Bluetooth Audio, or LINE IN (only for KD-AR880). Continued on the display, [22...
Instructions
Page 34
... source (or for KD-AR880. *10 Depends on page 31. • In step 2, select "COLOR." • In step 3, select "Color Sel." 34 Changing the display color You can move back to set the dimmer end time. 4 Exit from the setting. Setting, [reference page] : Volume 00 - ENGLISH AUDIO Category Indication Amp Gain Amplifier gain control Item ( : Initial) • High PWR • Low PWR • Off*9 Color Sel Color selection Initial: All Source COLOR Color Set Color setting Red Green Blue - Then, turn...
... source (or for KD-AR880. *10 Depends on page 31. • In step 2, select "COLOR." • In step 3, select "Color Sel." 34 Changing the display color You can move back to set the dimmer end time. 4 Exit from the setting. Setting, [reference page] : Volume 00 - ENGLISH AUDIO Category Indication Amp Gain Amplifier gain control Item ( : Initial) • High PWR • Low PWR • Off*9 Color Sel Color selection Initial: All Source COLOR Color Set Color setting Red Green Blue - Then, turn...

Instructions
Page 35
... is connected. 4 Select a color. 2 Select "Day Color" or "NightColor." 3 Select a primary color. 4 Adjust the level (+00 to 3 on page 31. • In step 2, select "COLOR." • In step 3, select "Color Set." SETTINGS 35 Creating your own colors-"Day Color" or "NightColor." 1 Follow steps 1 to +11) of the selected primary color. All Source*1 Ô CD Ô Changer (or Ext In*2) Ô LINE IN*3 Ô USB Ô FM Ô AM Ô Sirius*4/XM*4 Ô iPod*4/D.PLAYER*4 Ô BT Phone...
... is connected. 4 Select a color. 2 Select "Day Color" or "NightColor." 3 Select a primary color. 4 Adjust the level (+00 to 3 on page 31. • In step 2, select "COLOR." • In step 3, select "Color Set." SETTINGS 35 Creating your own colors-"Day Color" or "NightColor." 1 Follow steps 1 to +11) of the selected primary color. All Source*1 Ô CD Ô Changer (or Ext In*2) Ô LINE IN*3 Ô USB Ô FM Ô AM Ô Sirius*4/XM*4 Ô iPod*4/D.PLAYER*4 Ô BT Phone...
Instructions
Page 41
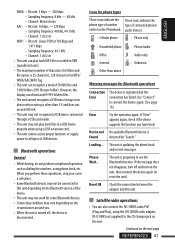
... , the device is turned off and turn on the rear. Sampling frequency: 44.1 kHz - However, the display can also connect the JVC SIRIUS radio PnP (Plug and Play), using phone book, etc. If "Error" appears again, check if the device supports the function you . • When the unit is disconnected. Reset 08 Check the connection between the adapter and this unit depending on the next page REFERENCES 41 ENGLISH Continued on the Bluetooth version of USB devices.
... , the device is turned off and turn on the rear. Sampling frequency: 44.1 kHz - However, the display can also connect the JVC SIRIUS radio PnP (Plug and Play), using phone book, etc. If "Error" appears again, check if the device supports the function you . • When the unit is disconnected. Reset 08 Check the connection between the adapter and this unit depending on the next page REFERENCES 41 ENGLISH Continued on the Bluetooth version of USB devices.

Instructions
Page 42
... Input" setting) (see page 33 of the external device connection For connection, see Installation/Connection manual (separate volume). player, [25] player • When you turn on/off the power of the unit, you change the "Amp Gain" setting from this case, change the "Dimmer" setting to any other than "Auto." • If "LCD Type" is set to "Auto," the display pattern will change to "Low PWR" while the volume level is set higher than 30 station frequencies, "Name Full" appears. player...
... Input" setting) (see page 33 of the external device connection For connection, see Installation/Connection manual (separate volume). player, [25] player • When you turn on/off the power of the unit, you change the "Amp Gain" setting from this case, change the "Dimmer" setting to any other than "Auto." • If "LCD Type" is set to "Auto," the display pattern will change to "Low PWR" while the volume level is set higher than 30 station frequencies, "Name Full" appears. player...

Instructions
Page 43
... the extension code , , or to the radio. Eject the disc or change to another track or change the disc. (Do not add the extension code , , or to be heard from the speakers. • Adjust the volume to over-heating. Check the following points before calling a service center. MP3/WMA/AAC Continued on the display. Error," or "Eject Error" flashes). • Disc sound is generated. keeps flashing on the display. General FM...
... the extension code , , or to the radio. Eject the disc or change to another track or change the disc. (Do not add the extension code , , or to be heard from the speakers. • Adjust the volume to over-heating. Check the following points before calling a service center. MP3/WMA/AAC Continued on the display. Error," or "Eject Error" flashes). • Disc sound is generated. keeps flashing on the display. General FM...

Instructions
Page 45
... device connected for both the unit and target device. Check whether the connected audio device supports AVRCP (Audio Video Remote Control Profile). ENGLISH Symptom Remedy/Cause USB • While playing a track, sound is not yet restored,) connect the device again. • The connected audio device cannot be controlled. on its instructions, try "0000" or "1234." • Select the device name from another device. While connecting a device, this unit cannot be connected with the Bluetooth device. • Enter the same PIN code for "Bluetooth Phone." • Turn...
... device connected for both the unit and target device. Check whether the connected audio device supports AVRCP (Audio Video Remote Control Profile). ENGLISH Symptom Remedy/Cause USB • While playing a track, sound is not yet restored,) connect the device again. • The connected audio device cannot be controlled. on its instructions, try "0000" or "1234." • Select the device name from another device. While connecting a device, this unit cannot be connected with the Bluetooth device. • Enter the same PIN code for "Bluetooth Phone." • Turn...

Instructions
Page 47
... Satellite Radio, Inc. • iPod is under license. player's controls do not work . • Update the firmware version. • Charge the battery. • The sound is distorted. not work Reset the iPod or D. Disconnect the adapter from both the unit and iPod/ D. after disconnecting from the iPod nano. "Reset 07" appears on the display. • Check the connecting cable and its connection. • Charge the battery. • Playback stops. player does not turn on this unit...
... Satellite Radio, Inc. • iPod is under license. player's controls do not work . • Update the firmware version. • Charge the battery. • The sound is distorted. not work Reset the iPod or D. Disconnect the adapter from both the unit and iPod/ D. after disconnecting from the iPod nano. "Reset 07" appears on the display. • Check the connecting cable and its connection. • Charge the battery. • Playback stops. player does not turn on this unit...


