

Instructions
Page 1
... LYT1337-001B Retain this information for details. Basic Edition DIGITAL MEDIA CAMERA GZ-MC100 GETTING STARTED ENGLISH 6 BASIC OPERATIONS (RECORDING & PLAYBACK) 19 MENU SETTINGS 26 REFERENCES 32 To deactivate the demonstration, set "DEMO MODE" to "OFF". (੬ pg. 26) INSTRUCTIONS This instruction manual describes the basic operations of the camera. and Serial No.
... LYT1337-001B Retain this information for details. Basic Edition DIGITAL MEDIA CAMERA GZ-MC100 GETTING STARTED ENGLISH 6 BASIC OPERATIONS (RECORDING & PLAYBACK) 19 MENU SETTINGS 26 REFERENCES 32 To deactivate the demonstration, set "DEMO MODE" to "OFF". (੬ pg. 26) INSTRUCTIONS This instruction manual describes the basic operations of the camera. and Serial No.
Instructions
Page 2
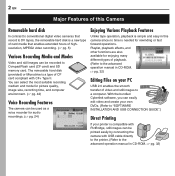
... Modes Video and still images can be printed easily by connecting the camera with USB cable directly to the printer. (Refer to the advanced operation manual in CD-ROM. ੬ pg. 32) Editing Files on your printer is compatible with CF+ Type II. The removable hard disk (provided) or Microdrive is... needed for enjoying many different types of CF card compliant with PictBridge, still images can be recorded to the advanced operation manual in CD-ROM. ੬ pg. 32)
... Modes Video and still images can be printed easily by connecting the camera with USB cable directly to the printer. (Refer to the advanced operation manual in CD-ROM. ੬ pg. 32) Editing Files on your printer is compatible with CF+ Type II. The removable hard disk (provided) or Microdrive is... needed for enjoying many different types of CF card compliant with PictBridge, still images can be recorded to the advanced operation manual in CD-ROM. ੬ pg. 32)

Instructions
Page 5
Copyright © 2001 HI CORPORATION. To fix this is registered trademark of the disk. JVC shall not be pressed on. EN 5 Other cautions ● Condensation can heat up when used for external jolt or stress ● After ...extremely important that is a registered trademark of their respective holders. Removable Hard Disk The removable hard disk is not completely erased. Refer to the instruction manual of erasing data include using a commercial data removal program or using your computer on a regular basis. When recording data is completely dried before usage...
Copyright © 2001 HI CORPORATION. To fix this is registered trademark of the disk. JVC shall not be pressed on. EN 5 Other cautions ● Condensation can heat up when used for external jolt or stress ● After ...extremely important that is a registered trademark of their respective holders. Removable Hard Disk The removable hard disk is not completely erased. Refer to the instruction manual of erasing data include using a commercial data removal program or using your computer on a regular basis. When recording data is completely dried before usage...

Instructions
Page 6
The top, buttom, left or right sides of the 49rtwe button can be pressed to cover W during shooting. ● Be careful not to operate like a lever. The explanation "pressing r" in this instruction manual means moving the 49rtwe button in the r direction. 6 EN GETTING STARTED Index ATTENTION: ● Be careful not to cover V, Z, b, c and d during playback.
The top, buttom, left or right sides of the 49rtwe button can be pressed to cover W during shooting. ● Be careful not to operate like a lever. The explanation "pressing r" in this instruction manual means moving the 49rtwe button in the r direction. 6 EN GETTING STARTED Index ATTENTION: ● Be careful not to cover V, Z, b, c and d during playback.

Instructions
Page 7
... media cover) (੬ pg. 16) Z Camera Sensor a Battery Cover (੬ pg. 14) b Lens c Flash Sensor d Flash e Hand Strap Eyelet (੬ pg. 12) f Tripod Mounting Socket Connectors The connectors are located beneath the covers. Do not turn off the power or remove the battery pack/AC adapter while...), (still image), (voice)] (੬ pg. 19) T Access Lamp (Lights up or blinks when you access to change the flash mode. Refer to the advanced operation manual. ੬ pg. 32) C Mode Button [MODE] (੬ pg. 19) D Recording Start/Stop Button (੬ pg. 20) E Zoom Lever [T/W] (੬ pg....
... media cover) (੬ pg. 16) Z Camera Sensor a Battery Cover (੬ pg. 14) b Lens c Flash Sensor d Flash e Hand Strap Eyelet (੬ pg. 12) f Tripod Mounting Socket Connectors The connectors are located beneath the covers. Do not turn off the power or remove the battery pack/AC adapter while...), (still image), (voice)] (੬ pg. 19) T Access Lamp (Lights up or blinks when you access to change the flash mode. Refer to the advanced operation manual. ੬ pg. 32) C Mode Button [MODE] (੬ pg. 19) D Recording Start/Stop Button (੬ pg. 20) E Zoom Lever [T/W] (੬ pg....

Instructions
Page 8
... Control Indicator (੬ pg. 27) H Battery Indicator I Date/Time (੬ pg. 27) J Selected Medium Indicator (੬ pg. 17, 27) K Manual Focus Adjustment Indicator (੬ pg. 31) L Effect Mode Indicator (੬ pg. 31) M Program AE Mode Indicator (੬ pg. 31) N White Balance...pg. 31) o ±: Exposure Adjustment Indicator (੬ pg. 31) : Backlight Compensation Indicator (Appears when backlight compensation is engaged. Refer to the advanced operation manual. ੬ pg. 32) A Mode Indicator (੬ pg. 19) B Wide Mode Indicator (੬ pg. 28) C Wind Cut Indicator (੬ pg...
... Control Indicator (੬ pg. 27) H Battery Indicator I Date/Time (੬ pg. 27) J Selected Medium Indicator (੬ pg. 17, 27) K Manual Focus Adjustment Indicator (੬ pg. 31) L Effect Mode Indicator (੬ pg. 31) M Program AE Mode Indicator (੬ pg. 31) N White Balance...pg. 31) o ±: Exposure Adjustment Indicator (੬ pg. 31) : Backlight Compensation Indicator (Appears when backlight compensation is engaged. Refer to the advanced operation manual. ੬ pg. 32) A Mode Indicator (੬ pg. 19) B Wide Mode Indicator (੬ pg. 28) C Wind Cut Indicator (੬ pg...

Instructions
Page 9
Refer to the advanced operation manual. ੬ pg. 32) F Remaining Number Of Shots (੬ pg. 43) G Continuous Shooting Mode (੬ pg. 22) H Shooting Icon (੬ pg. 22) (Appears during shooting.) I Self-...
Refer to the advanced operation manual. ੬ pg. 32) F Remaining Number Of Shots (੬ pg. 43) G Continuous Shooting Mode (੬ pg. 22) H Shooting Icon (੬ pg. 22) (Appears during shooting.) I Self-...

Instructions
Page 10
..., 27) During Voice Playback A Mode Indicator (੬ pg. 19) B Play List Playback Indicator (Appears when play list is played back. Refer to the advanced operation manual. ੬ pg. 32) C Picture Quality: [U] (ultra fine), [F] (fine), [N] (normal), [E] (economy) (੬ pg. 28) D Playback Mode (੬ pg. 21) U : Playback 9 : Pause 5 : Forward High-Speed Search 3 : Reverse...
..., 27) During Voice Playback A Mode Indicator (੬ pg. 19) B Play List Playback Indicator (Appears when play list is played back. Refer to the advanced operation manual. ੬ pg. 32) C Picture Quality: [U] (ultra fine), [F] (fine), [N] (normal), [E] (economy) (੬ pg. 28) D Playback Mode (੬ pg. 21) U : Playback 9 : Pause 5 : Forward High-Speed Search 3 : Reverse...

Instructions
Page 19
... 3 e( ) Lock Button Power/Charge Lamp Set the appropriate operation mode according to your preference using no special effects or manual adjustments. When manual mode is possible by opening/closing the LCD monitor. Manual mode: Manual recording is selected, the indicator appears on . The selected mode lamp lights up. : Video mode (੬ pg. 20, 21...
... 3 e( ) Lock Button Power/Charge Lamp Set the appropriate operation mode according to your preference using no special effects or manual adjustments. When manual mode is possible by opening/closing the LCD monitor. Manual mode: Manual recording is selected, the indicator appears on . The selected mode lamp lights up. : Video mode (੬ pg. 20, 21...

Instructions
Page 20
... a file size of 4 GB is reached. ● The further you slide the zoom lever, the quicker the zoom action. ● Refer to the advanced operation manual for details. (੬ pg. 32) Deleting Files If you press during recording or playback (video, still image or voice) for 5 minutes when using AC adapter...
... a file size of 4 GB is reached. ● The further you slide the zoom lever, the quicker the zoom action. ● Refer to the advanced operation manual for details. (੬ pg. 32) Deleting Files If you press during recording or playback (video, still image or voice) for 5 minutes when using AC adapter...

Instructions
Page 23
.... NOTES: ● Images shot and stored on the index display Slide the zoom lever to display the previous file. For details, read the advanced operation manual. (੬ pg. 32) Slide Show Deleting Still Image Files Press , then press rt to select [EXECUTE] and press 49. ● You can select the desired...
.... NOTES: ● Images shot and stored on the index display Slide the zoom lever to display the previous file. For details, read the advanced operation manual. (੬ pg. 32) Slide Show Deleting Still Image Files Press , then press rt to select [EXECUTE] and press 49. ● You can select the desired...

Instructions
Page 25
Connecting to the VCR's instruction manual.) 3 To stop dubbing, stop recording on the VCR, then stop playback on the camera. If using a VCR, go to step 4. 3 Connect the VCR output to ... VCR as shown in the illustration. To AV connector S-Video/Audio/Video Cable (provided) TV VCR A Black to S-VIDEO IN (Connect when your VCR's instruction manual. 4 Turn on . ● To connect the camera to a PC, refer to step 3. BASIC OPERATIONS In this case, it is turned on the camera, the VCR...
Connecting to the VCR's instruction manual.) 3 To stop dubbing, stop recording on the VCR, then stop playback on the camera. If using a VCR, go to step 4. 3 Connect the VCR output to ... VCR as shown in the illustration. To AV connector S-Video/Audio/Video Cable (provided) TV VCR A Black to S-VIDEO IN (Connect when your VCR's instruction manual. 4 Turn on . ● To connect the camera to a PC, refer to step 3. BASIC OPERATIONS In this case, it is turned on the camera, the VCR...

Instructions
Page 26
... switch. BEEP: The beep sounds when the power is turned on or off operation sound. te 1 Select the operation mode. Refer to the advanced operation manual in the CD-ROM for the full descriptions. (੬ pg. 32) INFO MODE Common Menus for All Modes wr MENU Lock Button Power Switch 49...
... switch. BEEP: The beep sounds when the power is turned on or off operation sound. te 1 Select the operation mode. Refer to the advanced operation manual in the CD-ROM for the full descriptions. (੬ pg. 32) INFO MODE Common Menus for All Modes wr MENU Lock Button Power Switch 49...

Instructions
Page 29
CONTINUOUS SHOOTING [OFF] / ON ੬ "Continuous Shooting" (੬ pg. 22) GAIN [80] / 160 Select the ISO sensitivity to the advanced operation manual. [ ] = Factory-preset PLAY LIST PLAY LIST CONTENTS / EDIT / RENAME / DELETE You can create a play list and view your original video clips. DELETE [CURRENT] / FILE SELECT / ...
CONTINUOUS SHOOTING [OFF] / ON ੬ "Continuous Shooting" (੬ pg. 22) GAIN [80] / 160 Select the ISO sensitivity to the advanced operation manual. [ ] = Factory-preset PLAY LIST PLAY LIST CONTENTS / EDIT / RENAME / DELETE You can create a play list and view your original video clips. DELETE [CURRENT] / FILE SELECT / ...

Instructions
Page 30
... on page 29. 30 EN MENU SETTINGS Still Image Playback Menus [ ] = Factory-preset Voice Playback Menus [ ] = Factory-preset DPOF ੬ Advanced operation manual DIRECT PRINT ੬ Advanced operation manual EFFECT [OFF] / SEPIA / MONOTONE You can view still images with special image effects. NOTE: The menu items of the quality) [FINE] STANDARD ECONOMY...
... on page 29. 30 EN MENU SETTINGS Still Image Playback Menus [ ] = Factory-preset Voice Playback Menus [ ] = Factory-preset DPOF ੬ Advanced operation manual DIRECT PRINT ੬ Advanced operation manual EFFECT [OFF] / SEPIA / MONOTONE You can view still images with special image effects. NOTE: The menu items of the quality) [FINE] STANDARD ECONOMY...

Instructions
Page 31
... If the flash is used, 1/500 is possible depending on the shooting condition. * For video recording ** For still image recording FOCUS [AUTO] / (manual) If correct focus may not be obtained depending on the switch. 2 Press MODE to the normal screen, press t ( SET). [ ] = Factory-...OFF] / SEPIA / MONOTONE / CLASSIC FILM / STROBE Creative effects can select the shutter speed depending on the subject and shooting condition. * Not available for Manual Recording (MSET Menu) MODE wr Lock Button Power Switch 49 t ( SET) e ( ) 1 Set the power switch to while pressing down the lock...
... If the flash is used, 1/500 is possible depending on the shooting condition. * For video recording ** For still image recording FOCUS [AUTO] / (manual) If correct focus may not be obtained depending on the switch. 2 Press MODE to the normal screen, press t ( SET). [ ] = Factory-...OFF] / SEPIA / MONOTONE / CLASSIC FILM / STROBE Creative effects can select the shutter speed depending on the subject and shooting condition. * Not available for Manual Recording (MSET Menu) MODE wr Lock Button Power Switch 49 t ( SET) e ( ) 1 Set the power switch to while pressing down the lock...

Instructions
Page 32
... the CD-ROM icon in the CD-ROM for more information. 32 EN REFERENCES For Advanced Operations Cleaning the Camera Read the advanced operation manual provided as benzine or alcohol. ● Cleaning should be done only after the battery pack has been removed or other power units have ...strong cleaning agents such as HTML format in the [My Computer] window, then click [Open]. 3 Double-click the [Docs] folder, then double-click the [Manual] folder. 4 Double click "start.html". 5 Select the language by clicking the language button. 6 Now you can see menus on the left side and instructions....
... the CD-ROM icon in the CD-ROM for more information. 32 EN REFERENCES For Advanced Operations Cleaning the Camera Read the advanced operation manual provided as benzine or alcohol. ● Cleaning should be done only after the battery pack has been removed or other power units have ...strong cleaning agents such as HTML format in the [My Computer] window, then click [Open]. 3 Double-click the [Docs] folder, then double-click the [Manual] folder. 4 Double click "start.html". 5 Select the language by clicking the language button. 6 Now you can see menus on the left side and instructions....
Instructions
Page 33
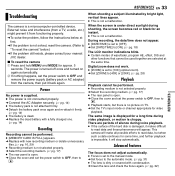
...read data and these phenomena will stop automatically. HTo solve the problem, follow the Instructions below .) HIf the problem still exists, please consult your nearest JVC dealer. 8 To reset the camera A Press and hold MENU and MODE for a long time during voice playback. ● If the surface of... panel is no picture on again automatically. This camera will make all possible efforts to read data, but there is open . HSet focus to the manual mode. Digital zoom does not work. ● [ZOOM] is not connected properly. Power No power is supplied. ● The power is set...
...read data and these phenomena will stop automatically. HTo solve the problem, follow the Instructions below .) HIf the problem still exists, please consult your nearest JVC dealer. 8 To reset the camera A Press and hold MENU and MODE for a long time during voice playback. ● If the surface of... panel is no picture on again automatically. This camera will make all possible efforts to read data, but there is open . HSet focus to the manual mode. Digital zoom does not work. ● [ZOOM] is not connected properly. Power No power is supplied. ● The power is set...

Instructions
Page 34
...These spots are not recorded on the LCD monitor. ● The LCD monitor's brightness setting is open. HTry backlight compensation. (Refer to the advanced operation manual in places with a temperature of the screen. ● This is erased. HIf you want the lighting to 95°F). (੬ pg. 37) ●... large number of light (red, green or blue) may appear constantly on or the mode is changed. ● There is activated. HConsult your nearest JVC dealer. AE] to light when [GAIN UP] is switched on the LCD monitor. However, black spots or bright spots of still images (approx. 1,...
...These spots are not recorded on the LCD monitor. ● The LCD monitor's brightness setting is open. HTry backlight compensation. (Refer to the advanced operation manual in places with a temperature of the screen. ● This is erased. HIf you want the lighting to 95°F). (੬ pg. 37) ●... large number of light (red, green or blue) may appear constantly on or the mode is changed. ● There is activated. HConsult your nearest JVC dealer. AE] to light when [GAIN UP] is switched on the LCD monitor. However, black spots or bright spots of still images (approx. 1,...

Separate volume2
Page 1
...● If [CHECK SETTINGS] is selected to confirm the DPOF setting, it is a number), within the [SD_VIDEO] folder. GZ-MC200 MENU Power Switch r 49 GZ-MC100 wr MENU Lock Button Power Switch 49 te 8 Take care to hold MENU and MODE simultaneously for approx. 5 seconds to reset ... memory card (6) Press rt to handle the Digital Media Camera - Power supply 8 When a certain length of the instruction manual (printed edition). 8 Bring your dealer or JVC service center, be sure to format newlypurchased CF cards (removable hard disk/CompactFlash card) and SD cards with this camera can...
...● If [CHECK SETTINGS] is selected to confirm the DPOF setting, it is a number), within the [SD_VIDEO] folder. GZ-MC200 MENU Power Switch r 49 GZ-MC100 wr MENU Lock Button Power Switch 49 te 8 Take care to hold MENU and MODE simultaneously for approx. 5 seconds to reset ... memory card (6) Press rt to handle the Digital Media Camera - Power supply 8 When a certain length of the instruction manual (printed edition). 8 Bring your dealer or JVC service center, be sure to format newlypurchased CF cards (removable hard disk/CompactFlash card) and SD cards with this camera can...


