Separate volume1
Page 1
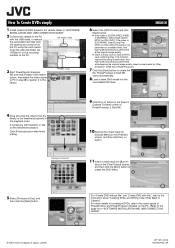
... DVD-Video. 5 Select [Produce a Disc], and then click the [Next] button. For details, Refer to "SOFTWARE INSTALLATION AND USB CONNECTION GUIDE". 2 Connect the camera to the PC with title", refer to the instruction sheet "Creating DVDs and Writing Video Files Back to the PC using the card reader. PowerProducer 2 Gold NE starts automatically. 8 Load a blank DVD media into the recordable DVD drive. 4 Drag and drop the videos from the camera and connect it to save rendering time...
... DVD-Video. 5 Select [Produce a Disc], and then click the [Next] button. For details, Refer to "SOFTWARE INSTALLATION AND USB CONNECTION GUIDE". 2 Connect the camera to the PC with title", refer to the instruction sheet "Creating DVDs and Writing Video Files Back to the PC using the card reader. PowerProducer 2 Gold NE starts automatically. 8 Load a blank DVD media into the recordable DVD drive. 4 Drag and drop the videos from the camera and connect it to save rendering time...
Separate volume1
Page 1
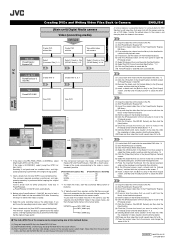
...) Digital Media camera Video (recording media) USB transfer Create DVD without title Create DVD with title View edited video with the camera and create a DVD-Video, transfer the edited videos to the camera, and then play list for [Use SVRT to save rendering time]. The minimum required encoding is performed, and highspeed processing is loaded. *4 Select the same recording mode as the edited video. To play back the created video file in the camera, copy the video file into the desired playback order...
...) Digital Media camera Video (recording media) USB transfer Create DVD without title Create DVD with title View edited video with the camera and create a DVD-Video, transfer the edited videos to the camera, and then play list for [Use SVRT to save rendering time]. The minimum required encoding is performed, and highspeed processing is loaded. *4 Select the same recording mode as the edited video. To play back the created video file in the camera, copy the video file into the desired playback order...
Instructions
Page 2
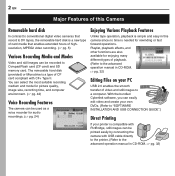
... "SOFTWARE INSTALLATION AND USB CONNECTION GUIDE".) Direct Printing If your PC USB 2.0 enables the smooth transfer of video and still images to a computer. You can select the most suitable recording medium and mode for picture quality, image size, recording time, and computer environment. (੬ pg. 42) Voice Recording Features The camera can be used as a voice recorder for audio recordings. (੬ pg. 24) Enjoying Various Playback Features Unlike tape operation, playback is simple and easy in this Camera Removable hard disk...
... "SOFTWARE INSTALLATION AND USB CONNECTION GUIDE".) Direct Printing If your PC USB 2.0 enables the smooth transfer of video and still images to a computer. You can select the most suitable recording medium and mode for picture quality, image size, recording time, and computer environment. (੬ pg. 42) Voice Recording Features The camera can be used as a voice recorder for audio recordings. (੬ pg. 24) Enjoying Various Playback Features Unlike tape operation, playback is simple and easy in this Camera Removable hard disk...
Instructions
Page 4
... beforehand.) Before recording important video, be sure to make sure the video and audio have fallen into the sun. Refer all servicing to the user. Remember that this apparatus near any ventilation openings. When a cart is not recommended, as radiators, heat registers, stoves, or other digital video formats. Keep these instructions. 2. Do not install near water. 6. 4 EN Do not point the lens directly into the...
... beforehand.) Before recording important video, be sure to make sure the video and audio have fallen into the sun. Refer all servicing to the user. Remember that this apparatus near any ventilation openings. When a cart is not recommended, as radiators, heat registers, stoves, or other digital video formats. Keep these instructions. 2. Do not install near water. 6. 4 EN Do not point the lens directly into the...

Instructions
Page 5
... physically or magnetically destroy the data on . Use a USB cable to connect the camera and PC, and then perform the check disk on page 38. Removable Hard Disk The removable hard disk is a registered trademark of the disk. EN 5 Other cautions ● Condensation can be read "Recording Medium" on the removable hard disk using a hammer or strong magnet to erase all recorded data. To fix this is not completely erased. JVC shall not be responsible for...
... physically or magnetically destroy the data on . Use a USB cable to connect the camera and PC, and then perform the check disk on page 38. Removable Hard Disk The removable hard disk is a registered trademark of the disk. EN 5 Other cautions ● Condensation can be read "Recording Medium" on the removable hard disk using a hammer or strong magnet to erase all recorded data. To fix this is not completely erased. JVC shall not be responsible for...

Instructions
Page 7
...) D Recording Start/Stop Button (੬ pg. 20) E Zoom Lever [T/W] (੬ pg. 20) Speaker Volume Control (੬ pg. 21) F Rear Panel Open Switch [OPEN] (੬ pg. 16) G Power Switch [OFF, , ] (੬ pg. 19) H Lock Button (੬ pg. 19) I Menu Button [MENU] (੬ pg. 26) J Play/Pause Button [49] (੬ pg. 21) K Reverse Search Button [w (3)] (੬ pg. 21) Left Button [w] (੬ pg. 26) Flash Button [ ] (Used to the software installation and USB connection guide.) P Headphone connector [ ] (੬ pg. 13) Q S-Video/Audio/Video Output Connector...
...) D Recording Start/Stop Button (੬ pg. 20) E Zoom Lever [T/W] (੬ pg. 20) Speaker Volume Control (੬ pg. 21) F Rear Panel Open Switch [OPEN] (੬ pg. 16) G Power Switch [OFF, , ] (੬ pg. 19) H Lock Button (੬ pg. 19) I Menu Button [MENU] (੬ pg. 26) J Play/Pause Button [49] (੬ pg. 21) K Reverse Search Button [w (3)] (੬ pg. 21) Left Button [w] (੬ pg. 26) Flash Button [ ] (Used to the software installation and USB connection guide.) P Headphone connector [ ] (੬ pg. 13) Q S-Video/Audio/Video Output Connector...

Instructions
Page 15
... power/charge lamp may not light. NOTES: ● Recording time is reduced significantly under the following conditions: • Zoom or record-standby mode is engaged repeatedly. • Playback mode is exposed to cold temperatures (below 10°C/50°F), its terminals to protect the data in the recording medium. Using AC Power Connect the AC adapter to the camera as it is recommended that the camera's power is turned off...
... power/charge lamp may not light. NOTES: ● Recording time is reduced significantly under the following conditions: • Zoom or record-standby mode is engaged repeatedly. • Playback mode is exposed to cold temperatures (below 10°C/50°F), its terminals to protect the data in the recording medium. Using AC Power Connect the AC adapter to the camera as it is recommended that the camera's power is turned off...
Instructions
Page 16
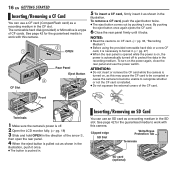
.../Removing an SD Card You can use the power switch. ATTENTION: ● Do not insert or remove the CF card while the camera is turned on , the power is automatically turned off . 2 Open the LCD monitor fully. (੬ pg. 18) 3 Slide and hold OPEN in the direction of CF cards. NOTES: ● Read the cautions on CF card. (੬ pg. 38, "Recording Medium") ● Before using the provided removable hard disk or...
.../Removing an SD Card You can use the power switch. ATTENTION: ● Do not insert or remove the CF card while the camera is turned on , the power is automatically turned off . 2 Open the LCD monitor fully. (੬ pg. 18) 3 Slide and hold OPEN in the direction of CF cards. NOTES: ● Read the cautions on CF card. (੬ pg. 38, "Recording Medium") ● Before using the provided removable hard disk or...

Instructions
Page 19
...off the camera by setting various functions. To turn on the camera, set the power switch to or while pressing down the lock button. ) When the power switch is possible by opening/closing the LCD monitor. Power off Recording Playback Power Switch Auto mode: You can also turn on the LCD monitor. Manual mode: Manual recording is set to , you can record using the power switch, MODE and e ( ) buttons. 2 Recording/Playback Mode Press MODE to select the recording/playback mode. BASIC OPERATIONS 1 Power Switch Position Power-Linked Operation Set the power switch for...
...off the camera by setting various functions. To turn on the camera, set the power switch to or while pressing down the lock button. ) When the power switch is possible by opening/closing the LCD monitor. Power off Recording Playback Power Switch Auto mode: You can also turn on the LCD monitor. Manual mode: Manual recording is set to , you can record using the power switch, MODE and e ( ) buttons. 2 Recording/Playback Mode Press MODE to select the recording/playback mode. BASIC OPERATIONS 1 Power Switch Position Power-Linked Operation Set the power switch for...

Instructions
Page 20
... change the picture quality, see "Playing back files created on again, set the power switch to OFF, then to the advanced operation manual for regular video. Zoom In Slide the zoom lever towards W. To turn the operation sounds off and on the display. 4 To stop button again. ● If data cannot be stopped to the [EXTMOV] folder used for 5 minutes when using AC adapter, the camera enters the sleep mode (the access lamp lights and the LCD monitor turns...
... change the picture quality, see "Playing back files created on again, set the power switch to OFF, then to the advanced operation manual for regular video. Zoom In Slide the zoom lever towards W. To turn the operation sounds off and on the display. 4 To stop button again. ● If data cannot be stopped to the [EXTMOV] folder used for 5 minutes when using AC adapter, the camera enters the sleep mode (the access lamp lights and the LCD monitor turns...
Instructions
Page 21
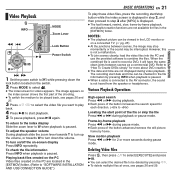
... functions are not displayed during pause mode. ● Each press of the shooting. ● To switch the medium to be checked in the [EXTMOV] folder. Playing back files created on the PC Video files created on -screen display Press INFO repeatedly. When the combined file is paused. Refer to "How To Create DVDs simply" for each direction. (-60x to +60x) Locating the start date and time can be interrupted. Slow motion playback...
... functions are not displayed during pause mode. ● Each press of the shooting. ● To switch the medium to be checked in the [EXTMOV] folder. Playing back files created on the PC Video files created on -screen display Press INFO repeatedly. When the combined file is paused. Refer to "How To Create DVDs simply" for each direction. (-60x to +60x) Locating the start date and time can be interrupted. Slow motion playback...
Instructions
Page 22
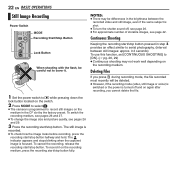
... and 29. 3 Press the recording start/stop button. Deleting Files If you press during recording mode, the file recorded most recently will be deleted. ● However, if the recording mode (video, still image or voice) is switched or the power is shot. ● To turn the shutter sound off and on again after recording, you cannot delete the file. 22 EN BASIC OPERATIONS Still Image Recording Power Switch MODE Recording Start/Stop Button Lock Button When shooting with the flash, be careful not to...
... and 29. 3 Press the recording start/stop button. Deleting Files If you press during recording mode, the file recorded most recently will be deleted. ● However, if the recording mode (video, still image or voice) is switched or the power is shot. ● To turn the shutter sound off and on again after recording, you cannot delete the file. 22 EN BASIC OPERATIONS Still Image Recording Power Switch MODE Recording Start/Stop Button Lock Button When shooting with the flash, be careful not to...
Instructions
Page 24
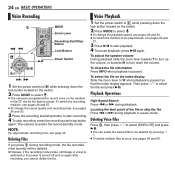
... BASIC OPERATIONS Voice Recording Voice Playback 32 MODE Zoom Lever Recording Start/Stop Button Lock Button 1 Set the power switch to while pressing down the lock button located on the switch. 2 Press MODE to select . ● To change the sound quality and recording level, see pages 26 and 30. 3 Press the recording start/stop button to start recording. 4 To stop recording, press the recording start/stop button again. Power Switch 49 To adjust the speaker volume During playback slide the zoom lever towards T to turn...
... BASIC OPERATIONS Voice Recording Voice Playback 32 MODE Zoom Lever Recording Start/Stop Button Lock Button 1 Set the power switch to while pressing down the lock button located on the switch. 2 Press MODE to select . ● To change the sound quality and recording level, see pages 26 and 30. 3 Press the recording start/stop button to start recording. 4 To stop recording, press the recording start/stop button again. Power Switch 49 To adjust the speaker volume During playback slide the zoom lever towards T to turn...

Instructions
Page 25
... connector S-Video/Audio/Video Cable (provided) TV VCR A Black to S-VIDEO IN (Connect when your VCR's instruction manual. 4 Turn on the camera, the VCR and the TV. 5 Set the VCR to its VIDEO mode. If not, go to use the AC Adapter as shown in the illustration. BASIC OPERATIONS EN 25 6 Start playback on the camera. (੬ pg. 21) To choose whether or not the following displays appear on the connected TV ● Date/Time Set [DATE/TIME] to [AUTO], [ON...
... connector S-Video/Audio/Video Cable (provided) TV VCR A Black to S-VIDEO IN (Connect when your VCR's instruction manual. 4 Turn on the camera, the VCR and the TV. 5 Set the VCR to its VIDEO mode. If not, go to use the AC Adapter as shown in the illustration. BASIC OPERATIONS EN 25 6 Start playback on the camera. (੬ pg. 21) To choose whether or not the following displays appear on the connected TV ● Date/Time Set [DATE/TIME] to [AUTO], [ON...
Instructions
Page 27
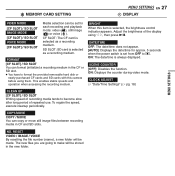
... move still image files between recording media in CF and SD slots. CF SLOT: The CF card is always displayed. DATE/TIME OFF: The date/time does not appear. [AUTO]: Displays the date/time for approx. 5 seconds when the power switch is set for each recording and playback mode: video ( ), still image ( ) or voice ( ). CLOCK ADJUST ੬ "Date/Time Settings" (੬ pg. 18) CLEAN UP [CF SLOT] / SD SLOT Writing speed of recording media tends to format the provided removable hard disk or newly...
... move still image files between recording media in CF and SD slots. CF SLOT: The CF card is always displayed. DATE/TIME OFF: The date/time does not appear. [AUTO]: Displays the date/time for approx. 5 seconds when the power switch is set for each recording and playback mode: video ( ), still image ( ) or voice ( ). CLOCK ADJUST ੬ "Date/Time Settings" (੬ pg. 18) CLEAN UP [CF SLOT] / SD SLOT Writing speed of recording media tends to format the provided removable hard disk or newly...
Instructions
Page 33
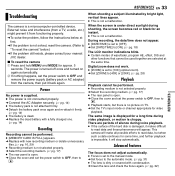
... the dead battery with a fully charged one. (੬ pg. 14) Recording Recording cannot be performed. ● Recording medium is set to [10X] (optical zoom). Digital zoom does not work. ● [ZOOM] is a microcomputer-controlled device. HSet the TV's input mode or channel appropriate for an instant. ● This is open . HClean the lens and check the focus again. (੬ pg. 32) REFERENCES REFERENCES EN 33 Troubleshooting The camera is set to the manual mode.
... the dead battery with a fully charged one. (੬ pg. 14) Recording Recording cannot be performed. ● Recording medium is set to [10X] (optical zoom). Digital zoom does not work. ● [ZOOM] is a microcomputer-controlled device. HSet the TV's input mode or channel appropriate for an instant. ● This is open . HClean the lens and check the focus again. (੬ pg. 32) REFERENCES REFERENCES EN 33 Troubleshooting The camera is set to the manual mode.

Instructions
Page 35
... built-in recording media. NO VOICE FILES STORED! CHECK CARD'S WRITE PROTECTION SWITCH Appears when you attempt still image playback. SET DATE/TIME! ● Appears when the date/time is not set to both of slots for 5 seconds after power is turned on the screen. (Battery indicator) Displays the battery remaining power. Appears if there are not inserted to the "LOCK" position. Use the guaranteed recording medium to nil, the battery indicator blinks. Remaining power level High...
... built-in recording media. NO VOICE FILES STORED! CHECK CARD'S WRITE PROTECTION SWITCH Appears when you attempt still image playback. SET DATE/TIME! ● Appears when the date/time is not set to both of slots for 5 seconds after power is turned on the screen. (Battery indicator) Displays the battery remaining power. Appears if there are not inserted to the "LOCK" position. Use the guaranteed recording medium to nil, the battery indicator blinks. Remaining power level High...
Instructions
Page 38
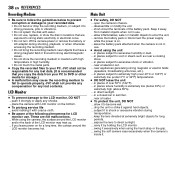
... to DVD or other media for LCD monitor use . ... open the camera's chassis. ... in a closed car in direct sunlight. ... swing it by holding the LCD monitor. ... allow it to enter the unit. ... keep the lens directed at extremely bright objects for a long time, the surface around the LCD monitor and/or the back of the battery pack. carry it excessively when using the camera, the...
... to DVD or other media for LCD monitor use . ... open the camera's chassis. ... in a closed car in direct sunlight. ... swing it by holding the LCD monitor. ... allow it to enter the unit. ... keep the lens directed at extremely bright objects for a long time, the surface around the LCD monitor and/or the back of the battery pack. carry it excessively when using the camera, the...
Instructions
Page 40
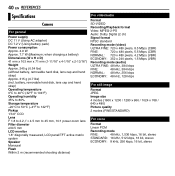
...°C to 50°C (-4°F to 122°F) Pickup 1/3.6" CCD Lens F 1.8 to 2.2, f = 4.5 mm to 45 mm, 10:1 power zoom lens Filter diameter ø30.5 mm LCD monitor 1.8" diagonally measured, LCD panel/TFT active matrix system Speaker Monaural Flash Within 2 m (recommended shooting distance) For video/audio Format SD-VIDEO Recording/Playback format Video: MPEG-2-PS Audio: Dolby Digital (2 ch) Signal format NTSC standard Recording mode (video) ULTRA FINE: 720 x 480 pixels, 8.5 Mbps (CBR) FINE: 720...
...°C to 50°C (-4°F to 122°F) Pickup 1/3.6" CCD Lens F 1.8 to 2.2, f = 4.5 mm to 45 mm, 10:1 power zoom lens Filter diameter ø30.5 mm LCD monitor 1.8" diagonally measured, LCD panel/TFT active matrix system Speaker Monaural Flash Within 2 m (recommended shooting distance) For video/audio Format SD-VIDEO Recording/Playback format Video: MPEG-2-PS Audio: Dolby Digital (2 ch) Signal format NTSC standard Recording mode (video) ULTRA FINE: 720 x 480 pixels, 8.5 Mbps (CBR) FINE: 720...

Separate volume2
Page 1
... software. 8 When playing back a file in the menu to it may lose data that has already been recorded. ● Microdrive® of 1GB or below are not supported. ● MultiMediaCards are not in the menu, connect the USB cable. Removable hard disks: Microdrive® from operating correctly. GZ-MC200 MENU Power Switch r 49 GZ-MC100 wr MENU Lock Button Power Switch 49 te 8 Take care to work with this together with the removable hard disk. NOTE: For the manual focus, video effects, format, direct...
... software. 8 When playing back a file in the menu to it may lose data that has already been recorded. ● Microdrive® of 1GB or below are not supported. ● MultiMediaCards are not in the menu, connect the USB cable. Removable hard disks: Microdrive® from operating correctly. GZ-MC200 MENU Power Switch r 49 GZ-MC100 wr MENU Lock Button Power Switch 49 te 8 Take care to work with this together with the removable hard disk. NOTE: For the manual focus, video effects, format, direct...


