
Catalog
Page 6
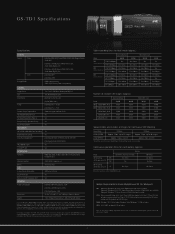
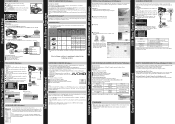
...Use the supplied MediaBrowser software installed on CU-VS100. GS-TD1 Specifications Specifications SYSTEM Format Video Stills Storage Media [3D Mode (MP4 MVC)] Video: MPEG-4 MVC/H.264 (Original format), Audio: AAC [3D Mode (AVCHD)] Video: MPEG-4 AVC/H.264, Audio: Dolby Digital (2ch) [2D Mode (AVCHD)] Video: MPEG-4 AVC/H.264, Audio: Dolby Digital (2ch) [3D Mode] MPF [2D Mode] JPEG 64GB internal memory, SDXC/SDHC Memory Card*1 (not provided) CAMERA Image Sensor Lens Zoom Ratios F Stop Camera Shake Compensation Full Range AF/Manual Focus Full Auto/Manual White Balance Shutter...
...Use the supplied MediaBrowser software installed on CU-VS100. GS-TD1 Specifications Specifications SYSTEM Format Video Stills Storage Media [3D Mode (MP4 MVC)] Video: MPEG-4 MVC/H.264 (Original format), Audio: AAC [3D Mode (AVCHD)] Video: MPEG-4 AVC/H.264, Audio: Dolby Digital (2ch) [2D Mode (AVCHD)] Video: MPEG-4 AVC/H.264, Audio: Dolby Digital (2ch) [3D Mode] MPF [2D Mode] JPEG 64GB internal memory, SDXC/SDHC Memory Card*1 (not provided) CAMERA Image Sensor Lens Zoom Ratios F Stop Camera Shake Compensation Full Range AF/Manual Focus Full Auto/Manual White Balance Shutter...

Catalog
Page 7
... 3D viewing on HDTV • Also compatible with digital still cameras • Dual SD Card slot for data copy over two cards • HDMI®, Audio/Video output • Remote control provided Note: Footage recorded in the THR, TSR, and UXP mode cannot be stored to disc using a PC • DVD burning operation can be played back on your TV/display via HDMI® terminal (CU-VD50) • Uses DVD-R/-RW disc, DVD-R DL disc supported •...
... 3D viewing on HDTV • Also compatible with digital still cameras • Dual SD Card slot for data copy over two cards • HDMI®, Audio/Video output • Remote control provided Note: Footage recorded in the THR, TSR, and UXP mode cannot be stored to disc using a PC • DVD burning operation can be played back on your TV/display via HDMI® terminal (CU-VD50) • Uses DVD-R/-RW disc, DVD-R DL disc supported •...
Catalog
Page 8
... be weak. • It is 80cm (using wide angle). • Be careful not to shake the camera during walking, may result in this catalog may be recorded in the left and right eyes, or astigmatism, it is set the display to re-record pre-recorded tapes, records, or discs without notice. After recording or viewing 3D images, check that it may not be of...
... be weak. • It is 80cm (using wide angle). • Be careful not to shake the camera during walking, may result in this catalog may be recorded in the left and right eyes, or astigmatism, it is set the display to re-record pre-recorded tapes, records, or discs without notice. After recording or viewing 3D images, check that it may not be of...

Basic User Guide
Page 6
... Copying Files 21 Creating Discs with a DVD Writer or External Blu-ray Drive 22 Using a USB External Hard Disk Drive 25 Copying to Computer 26 IFurther Information 29 Operating the Menu 29 Recordable Time/Number of Images 30 Troubleshooting 31 Cautions 34 Specifications 36 . Mini Type B) . CD-ROM . Contents Safety Precautions 2 Precautions on Recording and Playing Back 3D Images 4 Contents 6 Verifying the Accessories 6 Names of Parts and Functions 7 Names of Buttons and Functions on the LCD Monitor 8 Using the Touch Screen 9 IGetting Started 10 Charging...
... Copying Files 21 Creating Discs with a DVD Writer or External Blu-ray Drive 22 Using a USB External Hard Disk Drive 25 Copying to Computer 26 IFurther Information 29 Operating the Menu 29 Recordable Time/Number of Images 30 Troubleshooting 31 Cautions 34 Specifications 36 . Mini Type B) . CD-ROM . Contents Safety Precautions 2 Precautions on Recording and Playing Back 3D Images 4 Contents 6 Verifying the Accessories 6 Names of Parts and Functions 7 Names of Buttons and Functions on the LCD Monitor 8 Using the Touch Screen 9 IGetting Started 10 Charging...
Basic User Guide
Page 20
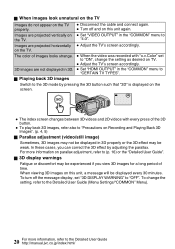
... screen changes between 3D videos and 2D videos with "x.v.Color" set "3D DISPLAY WARNING" to the 3D mode by adjusting the parallax. In these cases, you view 3D images for a long period of the 3D button. 0 To play back 3D images, refer also to the Detailed User Guide http://manual.jvc.co.jp/index.html/ "4:3". The color of images looks strange. 0 When the video was recorded with every press of time. o Playing back 3D images Switch...
... screen changes between 3D videos and 2D videos with "x.v.Color" set "3D DISPLAY WARNING" to the 3D mode by adjusting the parallax. In these cases, you view 3D images for a long period of the 3D button. 0 To play back 3D images, refer also to the Detailed User Guide http://manual.jvc.co.jp/index.html/ "4:3". The color of images looks strange. 0 When the video was recorded with every press of time. o Playing back 3D images Switch...

Basic User Guide
Page 31
... charged. (Replace the battery pack with a new one.) Troubleshooting If you have difficulties operating the unit, refer to the detailed descriptions in the "Detailed User Guide". Getting Started Recording Playback Approximate Recording Time (Using Battery) o 3D Mode (LCD monitor) Battery Pack Actual Recording Time 3D Mode (MP4(MVC)) 3D Mode (AVCHD) Continuous Recording Time 3D Mode (MP4(MVC)) 3D Mode (AVCHD) BN-VF815U 55 m 1 h 1 h 45 m 2 h BN-VF823U 1 h 20 m 1 h 35 m 2 h 40 m 3 h 5 m o 2D Mode (LCD monitor) Actual Recording Time Continuous Recording Time Battery...
... charged. (Replace the battery pack with a new one.) Troubleshooting If you have difficulties operating the unit, refer to the detailed descriptions in the "Detailed User Guide". Getting Started Recording Playback Approximate Recording Time (Using Battery) o 3D Mode (LCD monitor) Battery Pack Actual Recording Time 3D Mode (MP4(MVC)) 3D Mode (AVCHD) Continuous Recording Time 3D Mode (MP4(MVC)) 3D Mode (AVCHD) BN-VF815U 55 m 1 h 1 h 45 m 2 h BN-VF823U 1 h 20 m 1 h 35 m 2 h 40 m 3 h 5 m o 2D Mode (LCD monitor) Actual Recording Time Continuous Recording Time Battery...
Easy Start Guide
Page 1
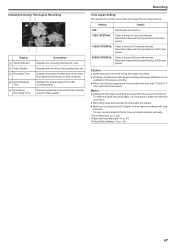
... displayed button (icon) or thumbnail (file) on the touch screen. • Tap ∧ or ∨ to display the main menu. JVC U.S.A. Recording Media AM10:10 Battery Indicator Press to Start Recording • Press again to Stop Recording. 0:00:00 [000:22] 3D/2D Video Quality Mode Intelligent Auto Mode Remaining Recording Time Scene Counter STILL IMAGE RECORDING 3D/2D Mode Shutter Speed Image Size Focus Recording in Progress Press halfway to focus Lights up in progress: Blinks Charging finished: Goes out Battery Type Continuous Recording...
... displayed button (icon) or thumbnail (file) on the touch screen. • Tap ∧ or ∨ to display the main menu. JVC U.S.A. Recording Media AM10:10 Battery Indicator Press to Start Recording • Press again to Stop Recording. 0:00:00 [000:22] 3D/2D Video Quality Mode Intelligent Auto Mode Remaining Recording Time Scene Counter STILL IMAGE RECORDING 3D/2D Mode Shutter Speed Image Size Focus Recording in Progress Press halfway to focus Lights up in progress: Blinks Charging finished: Goes out Battery Type Continuous Recording...
Easy Start Guide
Page 2
... using the provided software. • To save MP4(MVC) to a disc, use the software, refer to the help file of the provided Everio MediaBrowser 3D software. TV AV Cable (Provided) AV To AV Connector Ⅲ Playback Operation After the connection with Using the Provided Software Everio MediaBrowser 3D • Contact Pixela User Support Center at the numbers provided on inexpensive blank DVD-R media. B Select the TV input switch. On the camera: A Turn on the recording formats. Recordings...
... using the provided software. • To save MP4(MVC) to a disc, use the software, refer to the help file of the provided Everio MediaBrowser 3D software. TV AV Cable (Provided) AV To AV Connector Ⅲ Playback Operation After the connection with Using the Provided Software Everio MediaBrowser 3D • Contact Pixela User Support Center at the numbers provided on inexpensive blank DVD-R media. B Select the TV input switch. On the camera: A Turn on the recording formats. Recordings...
Detailed User Guide
Page 2
... Formatting the USB External Hard Disk Drive 87 Importing Files from the USB External Hard Disk Drive 87 Dubbing Files to a VHS Tape Using a VCR 88 Copying Files to an SD Card 89 Moving Files to an SD Card 90 Copying to Windows PC 91 Verifying System Requirements (Guideline 92 Installing the Provided Software 92 Backing Up All Files 93 Organizing Files 94 Recording Videos to Discs 95 Backing Up Files Without Using Provided Software 96 List of Files and Folders 97 JVC Software Licence Agreement 98 Menu Settings Operating...
... Formatting the USB External Hard Disk Drive 87 Importing Files from the USB External Hard Disk Drive 87 Dubbing Files to a VHS Tape Using a VCR 88 Copying Files to an SD Card 89 Moving Files to an SD Card 90 Copying to Windows PC 91 Verifying System Requirements (Guideline 92 Installing the Provided Software 92 Backing Up All Files 93 Organizing Files 94 Recording Videos to Discs 95 Backing Up Files Without Using Provided Software 96 List of Files and Folders 97 JVC Software Licence Agreement 98 Menu Settings Operating...
Detailed User Guide
Page 3
... 106 USER BUTTON SETTING 106 3D SOUND 107 MIC LEVEL 107 MIC LEVEL SETTING 108 HEADPHONE VOL. SHOOTING SPEED 114 IMAGE SIZE 115 USER BUTTON SETTING 115 Main Menu for Video Playback 116 SEARCH DATE 117 PROTECT/CANCEL 117 COPY 117 MOVE 117 TRIMMING 117 UPLOAD SETTINGS 117 PLAYBACK OTHER FILE 117 3D MOTION RELIEF (3D mode only 117 Main Menu for Still Image Recording 110 SCENE SELECT 112 FOCUS 112 FOCUS ASSIST 112 FOCUS ASSIST COLOR 112 BRIGHTNESS ADJUST 112 SHUTTER SPEED 112 APERTURE PRIORITY 112 WHITE BALANCE...
... 106 USER BUTTON SETTING 106 3D SOUND 107 MIC LEVEL 107 MIC LEVEL SETTING 108 HEADPHONE VOL. SHOOTING SPEED 114 IMAGE SIZE 115 USER BUTTON SETTING 115 Main Menu for Video Playback 116 SEARCH DATE 117 PROTECT/CANCEL 117 COPY 117 MOVE 117 TRIMMING 117 UPLOAD SETTINGS 117 PLAYBACK OTHER FILE 117 3D MOTION RELIEF (3D mode only 117 Main Menu for Still Image Recording 110 SCENE SELECT 112 FOCUS 112 FOCUS ASSIST 112 FOCUS ASSIST COLOR 112 BRIGHTNESS ADJUST 112 SHUTTER SPEED 112 APERTURE PRIORITY 112 WHITE BALANCE...

Detailed User Guide
Page 18
...2D. 6 Menu Button "Operating the Menu" (A p. 99) 7 Operation Buttons "Operation Buttons for Video Playback" (A p. 53) 4 Delete Button "Deleting the Currently Displayed File" (A p. 65) 5 LCD Monitor 3D/2D Display Switching Button 0 Switches the display on the touch screen to search for the desired file. Playback Screen (Video) .. . . 0 The touch screen of grouped files (such as still images captured by lightly tapping with a sharp tip or do not disappear. The following screens are displayed on the LCD monitor. "Adjusting Parallax During Playback" (A p. 56) 2 Recording/Playback Mode...
...2D. 6 Menu Button "Operating the Menu" (A p. 99) 7 Operation Buttons "Operation Buttons for Video Playback" (A p. 53) 4 Delete Button "Deleting the Currently Displayed File" (A p. 65) 5 LCD Monitor 3D/2D Display Switching Button 0 Switches the display on the touch screen to search for the desired file. Playback Screen (Video) .. . . 0 The touch screen of grouped files (such as still images captured by lightly tapping with a sharp tip or do not disappear. The following screens are displayed on the LCD monitor. "Adjusting Parallax During Playback" (A p. 56) 2 Recording/Playback Mode...

Detailed User Guide
Page 26
..." is set to "STANDARD". 0 The actual recording time may be shorter if zooming is used as a spare battery pack. It can record for three times the expected recording time.) 0 When the battery life is reached, the recording time becomes shorter even if the battery pack is fully charged. (Replace the battery pack with this unit. Battery Charger 0 AA-VF8 0 Enables the battery pack to a TV. 0 Transmits video, audio, and control signals between devices. Getting...
..." is set to "STANDARD". 0 The actual recording time may be shorter if zooming is used as a spare battery pack. It can record for three times the expected recording time.) 0 When the battery life is reached, the recording time becomes shorter even if the battery pack is fully charged. (Replace the battery pack with this unit. Battery Charger 0 AA-VF8 0 Enables the battery pack to a TV. 0 Transmits video, audio, and control signals between devices. Getting...

Detailed User Guide
Page 33
... turns on the LCD monitor. "QUICK RESTART" (A p. 124) 0 When "AUTO POWER OFF" is set to release the displays. Operation Button Description 1 Parallax Adjustment Adjusts the 3D effect when 3D images are fixed such that often occurs when using the battery pack) "AUTO POWER OFF" (A p. 124) 0 When "TOUCH PRIORITY AE/AF" is set by closing the monitor. "Zooming" (A p. 31) 4 Recording/ Playback Mode Switches between 3D and 2D. "Operating the Menu" (A p. 99) 8 Display Button n Some displays disappear after the power is lighted...
... turns on the LCD monitor. "QUICK RESTART" (A p. 124) 0 When "AUTO POWER OFF" is set to release the displays. Operation Button Description 1 Parallax Adjustment Adjusts the 3D effect when 3D images are fixed such that often occurs when using the battery pack) "AUTO POWER OFF" (A p. 124) 0 When "TOUCH PRIORITY AE/AF" is set by closing the monitor. "Zooming" (A p. 31) 4 Recording/ Playback Mode Switches between 3D and 2D. "Operating the Menu" (A p. 99) 8 Display Button n Some displays disappear after the power is lighted...
Detailed User Guide
Page 35
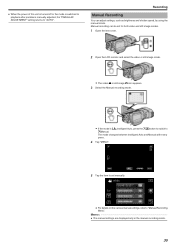
... power of this unit is turned off or the mode is switched to playback after parallax is P Intelligent Auto, press the H/T button to switch to H Manual. Manual recording can adjust settings, such as brightness and shutter speed, by using the manual mode. The mode changes between Intelligent Auto and Manual with every press. 4 Tap "MENU". 5 Tap the item to set for both video and still image modes. 1 Open the lens cover. 2 Open the LCD monitor and select the video or still image mode. 0 The video...
... power of this unit is turned off or the mode is switched to playback after parallax is P Intelligent Auto, press the H/T button to switch to H Manual. Manual recording can adjust settings, such as brightness and shutter speed, by using the manual mode. The mode changes between Intelligent Auto and Manual with every press. 4 Tap "MENU". 5 Tap the item to set for both video and still image modes. 1 Open the lens cover. 2 Open the LCD monitor and select the video or still image mode. 0 The video...
Detailed User Guide
Page 47
... time left to fix the focus and white balance manually. Recording Time-Lapse Setting The greater the number of frames. Displays the actual recorded time of time-lapse recording are not available in units of seconds, the longer the recording interval. Setting Details OFF Deactivates the function. 1SEC INTERVAL Takes a frame at 2 400 times speed. It is started. 0 Make use of the video quality that is stopped with long intervals. Caution : 0 Audio cannot be played...
... time left to fix the focus and white balance manually. Recording Time-Lapse Setting The greater the number of frames. Displays the actual recorded time of time-lapse recording are not available in units of seconds, the longer the recording interval. Setting Details OFF Deactivates the function. 1SEC INTERVAL Takes a frame at 2 400 times speed. It is started. 0 Make use of the video quality that is stopped with long intervals. Caution : 0 Audio cannot be played...

Detailed User Guide
Page 70
... copying according to the recording format. Refer to the help file of the provided Everio MediaBrowser 3D software to Windows PC" (A p. 91) - - * *: When creating a disc with an External Blu-ray Drive" (A p. 78) Blu-ray recorder - - - P Computer "Copying to operate. Device's Internal HDD - If you are played back on AVCHD compatible devices. *2: When creating a disc with 3D images, there may be copied Recording Device DVD writer connected to this unit P P - Memo : 0 When AVCHD files recorded in use. "Creating Discs with 3D images...
... copying according to the recording format. Refer to the help file of the provided Everio MediaBrowser 3D software to Windows PC" (A p. 91) - - * *: When creating a disc with an External Blu-ray Drive" (A p. 78) Blu-ray recorder - - - P Computer "Copying to operate. Device's Internal HDD - If you are played back on AVCHD compatible devices. *2: When creating a disc with 3D images, there may be copied Recording Device DVD writer connected to this unit P P - Memo : 0 When AVCHD files recorded in use. "Creating Discs with 3D images...

Detailed User Guide
Page 71
... p. 72) External Blu-ray drive connected to this unit - "Creating a Disc Using a Connected Blu-ray Recorder" (A p. 83) P P P - P*1 P DVD recorder - P "Using a USB External Hard Disk Drive" (A p. 84) VCR P - - - - P P - - Copying o 2D Files P: Can be copied, -: Cannot be copied Recording Device VHS Tape DVD (DVD-Video) DVD (AVCHD) Blu-ray Disc Device's Internal HDD DVD writer connected to operate. "Creating Discs with an External Blu-ray Drive" (A p. 78) Blu-ray recorder - Refer to the help file of the provided Everio MediaBrowser 3D software to...
... p. 72) External Blu-ray drive connected to this unit - "Creating a Disc Using a Connected Blu-ray Recorder" (A p. 83) P P P - P*1 P DVD recorder - P "Using a USB External Hard Disk Drive" (A p. 84) VCR P - - - - P P - - Copying o 2D Files P: Can be copied, -: Cannot be copied Recording Device VHS Tape DVD (DVD-Video) DVD (AVCHD) Blu-ray Disc Device's Internal HDD DVD writer connected to operate. "Creating Discs with an External Blu-ray Drive" (A p. 78) Blu-ray recorder - Refer to the help file of the provided Everio MediaBrowser 3D software to...
Detailed User Guide
Page 84
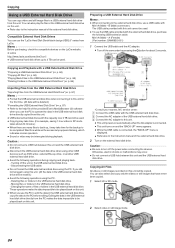
...the access lamp appears blinking, which indicates normal operation. 0 Sound or video may occur. 0 Do not connect a USB hub between this unit cannot be used . 0 To use the USB cable provided with a USB External Hard Disk Drive "Preparing a USB External Hard Disk Drive" (A p. 84) "Copying All Files" (A p. 84) "Playing Back Files in the USB External Hard Disk Drive" (A p. 85) "Deleting Folders in XP mode takes about 2 seconds. A Connect the USB cable with this unit and the USB external hard disk drive. B Connect the AC adapter of the external hard disk drive. Compatible External Hard...
...the access lamp appears blinking, which indicates normal operation. 0 Sound or video may occur. 0 Do not connect a USB hub between this unit cannot be used . 0 To use the USB cable provided with a USB External Hard Disk Drive "Preparing a USB External Hard Disk Drive" (A p. 84) "Copying All Files" (A p. 84) "Playing Back Files in the USB External Hard Disk Drive" (A p. 85) "Deleting Folders in XP mode takes about 2 seconds. A Connect the USB cable with this unit and the USB external hard disk drive. B Connect the AC adapter of the external hard disk drive. Compatible External Hard...

Detailed User Guide
Page 128
... "1080i" is supported by the monitor. 2D OUTPUT Outputs images from the HDMI connector in "AUTO" correctly. 1 Tap "MENU". 2 Tap "Q". 3 Tap "HDMI OUTPUT". ... SIDE-BY-SIDE OUTPUT Outputs images from the HDMI connector in "SIDE-BY-SIDE OUTPUT" (960x1080ix2ch) regardless of your TV, refer to the supported monitor output format. Displaying the Item 128 Recorded 3D Video Format and Display on the settings of the supported monitor output format. CERTAIN TV TYPES Outputs images from the...
... "1080i" is supported by the monitor. 2D OUTPUT Outputs images from the HDMI connector in "AUTO" correctly. 1 Tap "MENU". 2 Tap "Q". 3 Tap "HDMI OUTPUT". ... SIDE-BY-SIDE OUTPUT Outputs images from the HDMI connector in "SIDE-BY-SIDE OUTPUT" (960x1080ix2ch) regardless of your TV, refer to the supported monitor output format. Displaying the Item 128 Recorded 3D Video Format and Display on the settings of the supported monitor output format. CERTAIN TV TYPES Outputs images from the...

Detailed User Guide
Page 140
..., and erase the files from coming into view. (A band or a ball of bright light appears on TV. JVC will not be output properly depending on the display changed. Troubleshooting Screen/Image Other Problems The LCD monitor is dark. "Setting Backlight Compensation" (A p. 41) Use "NIGHTALIVE" in the menu. "GAIN UP" (A p. 103) Set "BRIGHTNESS ADJUST" in the recording menu to the "-" side. "Setting Backlight Compensation" (A p. 41) Set "BRIGHTNESS ADJUST" in the recording menu to "MANUAL". Set "WHITE BALANCE" in the recording menu to...
..., and erase the files from coming into view. (A band or a ball of bright light appears on TV. JVC will not be output properly depending on the display changed. Troubleshooting Screen/Image Other Problems The LCD monitor is dark. "Setting Backlight Compensation" (A p. 41) Use "NIGHTALIVE" in the menu. "GAIN UP" (A p. 103) Set "BRIGHTNESS ADJUST" in the recording menu to the "-" side. "Setting Backlight Compensation" (A p. 41) Set "BRIGHTNESS ADJUST" in the recording menu to "MANUAL". Set "WHITE BALANCE" in the recording menu to...


