
Instruction Manual
Page 2
... power cord from this digital video camera. Be sure to read these colours do not open the cabinet. consult a competent electrician. DO NOT cut off the mains plug from AC outlet. Refer servicing to qualified personnel. ● When you are separated for owners in the U.K.) Connection to the mains supply in the United Kingdom. SAFETY PRECAUTIONS IMPORTANT (for easier reference. No user serviceable parts...
... power cord from this digital video camera. Be sure to read these colours do not open the cabinet. consult a competent electrician. DO NOT cut off the mains plug from AC outlet. Refer servicing to qualified personnel. ● When you are separated for owners in the U.K.) Connection to the mains supply in the United Kingdom. SAFETY PRECAUTIONS IMPORTANT (for easier reference. No user serviceable parts...
Instruction Manual
Page 14
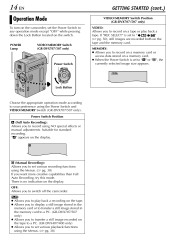
... to transfer a still image recorded on a memory card. ● When the Power Switch is no indication on the switch. 14 EN Operation Mode To turn on the camcorder, set the Power Switch to any operation mode except "OFF" while pressing down the Lock Button located on the display. MEMORY: ● Allows you to record on a memory card or access data stored on the tape to set various recording functions using NO special effects or manual adjustments. P: ● Allows you to a PC. (GR-DVX407...
... to transfer a still image recorded on a memory card. ● When the Power Switch is no indication on the switch. 14 EN Operation Mode To turn on the camcorder, set the Power Switch to any operation mode except "OFF" while pressing down the Lock Button located on the display. MEMORY: ● Allows you to record on a memory card or access data stored on the tape to set various recording functions using NO special effects or manual adjustments. P: ● Allows you to a PC. (GR-DVX407...

Instruction Manual
Page 15
... 15 Date/Time Settings The date/time is recorded onto the tape at all times, but its display can be lost. Rotate the MENU Wheel to an AC outlet using the camcorder. When this occurs, first connect the camcorder to input the day, and press it . When you finish setting the minute and press the MENU Wheel in memory, the clock's rechargeable lithium battery is not highlighted, the camcorder's internal clock...
... 15 Date/Time Settings The date/time is recorded onto the tape at all times, but its display can be lost. Rotate the MENU Wheel to an AC outlet using the camcorder. When this occurs, first connect the camcorder to input the day, and press it . When you finish setting the minute and press the MENU Wheel in memory, the clock's rechargeable lithium battery is not highlighted, the camcorder's internal clock...

Instruction Manual
Page 27
... set to "OFF". (੬ pg. 48) ● To change the Image Size and/or Picture Quality, ੬ pg. 50. Snapshot) You can use your camcorder as a Digital Still Camera for Camera File system). D.S.C. NOTE: Before continuing, perform the procedures listed below: ● Power (੬ pg. 10) ● Loading A Memory Card (੬ pg. 17) ● Remove the lens cap (੬ pg. 7) VIDEO/MEMORY Switch 15 A B C D E DE C B Image Size (੬ pg. 50, 97) Shooting...
... set to "OFF". (੬ pg. 48) ● To change the Image Size and/or Picture Quality, ੬ pg. 50. Snapshot) You can use your camcorder as a Digital Still Camera for Camera File system). D.S.C. NOTE: Before continuing, perform the procedures listed below: ● Power (੬ pg. 10) ● Loading A Memory Card (੬ pg. 17) ● Remove the lens cap (੬ pg. 7) VIDEO/MEMORY Switch 15 A B C D E DE C B Image Size (੬ pg. 50, 97) Shooting...

Instruction Manual
Page 28
... order. Auto Playback Of Images You can view the stored images, one . If the video clip playback (E-MAIL CLIP, (੬ pg. 29)) or the digital sound playback (SOUND, (੬ pg. 29)) screen appears, press SELECT. Press 3 to "MEMORY". To end Auto Playback, press 8. [For Auto Playback] Power Switch OFF A M PLAY MENU Wheel Lock Button 3 [For Normal Playback] To display the next image 1 2 3 4 Load a memory card. (੬ pg. 17) Set the VIDEO/MEMORY Switch to display the previous file. Press 5 to display the next file. ●...
... order. Auto Playback Of Images You can view the stored images, one . If the video clip playback (E-MAIL CLIP, (੬ pg. 29)) or the digital sound playback (SOUND, (੬ pg. 29)) screen appears, press SELECT. Press 3 to "MEMORY". To end Auto Playback, press 8. [For Auto Playback] Power Switch OFF A M PLAY MENU Wheel Lock Button 3 [For Normal Playback] To display the next image 1 2 3 4 Load a memory card. (੬ pg. 17) Set the VIDEO/MEMORY Switch to display the previous file. Press 5 to display the next file. ●...

Instruction Manual
Page 29
Set the Power Switch to "P" while pressing down the Lock Button located on the switch. If the image playback (IMAGE) or the digital sound playback (SOUND) screen appears, press SELECT. The MEMORY SELECT screen appears. Open the LCD monitor fully, or pull out the viewfinder fully. ● The type of file (IMAGE, E-MAIL CLIP or SOUND) which has been played back at the last time is displayed. The MEMORY SELECT screen appears. EN 29 Playback Of Video Clips (GR-DVX707...
Set the Power Switch to "P" while pressing down the Lock Button located on the switch. If the image playback (IMAGE) or the digital sound playback (SOUND) screen appears, press SELECT. The MEMORY SELECT screen appears. Open the LCD monitor fully, or pull out the viewfinder fully. ● The type of file (IMAGE, E-MAIL CLIP or SOUND) which has been played back at the last time is displayed. The MEMORY SELECT screen appears. EN 29 Playback Of Video Clips (GR-DVX707...

Instruction Manual
Page 34
... a memory card. (੬ pg. 17) Set the VIDEO/MEMORY Switch to "MEMORY". Open the LCD monitor fully, or pull out the viewfinder fully. ● The type of file (IMAGE, E-MAIL CLIP or SOUND) which has been played back at the last time is larger by resetting the file name to DVC00001; The Menu Screen appears. The Sub Menu appears. The DPOF screen appears. The image playback screen (IMAGE) appears. RESET", and press it . The MEMORY SELECT screen appears...
... a memory card. (੬ pg. 17) Set the VIDEO/MEMORY Switch to "MEMORY". Open the LCD monitor fully, or pull out the viewfinder fully. ● The type of file (IMAGE, E-MAIL CLIP or SOUND) which has been played back at the last time is larger by resetting the file name to DVC00001; The Menu Screen appears. The Sub Menu appears. The DPOF screen appears. The image playback screen (IMAGE) appears. RESET", and press it . The MEMORY SELECT screen appears...

Instruction Manual
Page 46
... backgrounds. ● Switch off this mode, refer to using this mode when recording with no change in the screen ratio. 46 EN Manual Menu MANUAL RECORDING MENUS (cont.) ( : Factory-preset) Digital Image Stabilisation DIS OFF ON To compensate for shooting in a small room. TELE MACRO OFF ON Disables the function. When set to fit the screen without distortion. Naturally expands the image to "VIDEO". During playback/recording on the zoom position, the lens may not...
... backgrounds. ● Switch off this mode, refer to using this mode when recording with no change in the screen ratio. 46 EN Manual Menu MANUAL RECORDING MENUS (cont.) ( : Factory-preset) Digital Image Stabilisation DIS OFF ON To compensate for shooting in a small room. TELE MACRO OFF ON Disables the function. When set to fit the screen without distortion. Naturally expands the image to "VIDEO". During playback/recording on the zoom position, the lens may not...

Instruction Manual
Page 61
... a memory card. (੬ pg. 17) Set the VIDEO/MEMORY Switch to "VIDEO". Set the Power Switch to "Deleting Files" (੬ pg. 33). The normal screen reappears. 7 8 9 To view video clips stored in the LCD monitor or viewfinder, however, this camcorder are compatible with this camcorder. ● Video noise may appear while viewing video clips in a memory card...Refer to stop video playback. Refer to the instructions of the tape is reached in step 6, the E-Mail Clip Record-Standby mode will be played...
... a memory card. (੬ pg. 17) Set the VIDEO/MEMORY Switch to "VIDEO". Set the Power Switch to "Deleting Files" (੬ pg. 33). The normal screen reappears. 7 8 9 To view video clips stored in the LCD monitor or viewfinder, however, this camcorder are compatible with this camcorder. ● Video noise may appear while viewing video clips in a memory card...Refer to stop video playback. Refer to the instructions of the tape is reached in step 6, the E-Mail Clip Record-Standby mode will be played...
Instruction Manual
Page 78
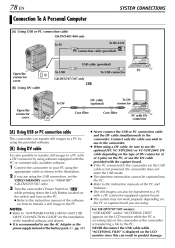
... GR-DVX707/507 owners: "USB MODE" and/or "ACCESSING FILES" appears on the LCD monitor since this can result in the camcorder or the camcorder is not powered, the camcorder does not enter the USB mode. ● The date/time information cannot be captured into the PC. ● Refer to the instruction manuals of the PC and Software. ● The still images can transfer still images to a PC by using the appropriate cable as...
... GR-DVX707/507 owners: "USB MODE" and/or "ACCESSING FILES" appears on the LCD monitor since this can result in the camcorder or the camcorder is not powered, the camcorder does not enter the USB mode. ● The date/time information cannot be captured into the PC. ● Refer to the instruction manuals of the PC and Software. ● The still images can transfer still images to a PC by using the appropriate cable as...

Instruction Manual
Page 79
Open the connector cover. Set the VIDEO/MEMORY Switch to capture video in your PC using Microsoft Windows® NetMeeting® and signing up for web conference by using the USB cable. To USB NOTES: ● It is not powered on, the camcorder does not enter the Web Camera mode. Connect the camcorder to "A" or "M" while pressing down the Lock Button located on the screen. EN 79 Using The Camcorder As A WebCam (GR-DVX707 only...
Open the connector cover. Set the VIDEO/MEMORY Switch to capture video in your PC using Microsoft Windows® NetMeeting® and signing up for web conference by using the USB cable. To USB NOTES: ● It is not powered on, the camcorder does not enter the Web Camera mode. Connect the camcorder to "A" or "M" while pressing down the Lock Button located on the screen. EN 79 Using The Camcorder As A WebCam (GR-DVX707 only...
Instruction Manual
Page 82
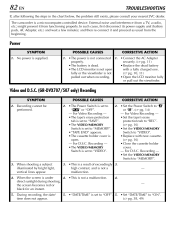
... (from a TV, a radio, etc.) might prevent it and proceed as usual from functioning properly. For Video Recording - • The tape's erase protection tab is set to "SAVE". • The VIDEO/MEMORY Switch is not open . - POSSIBLE CAUSES 2. • The Power Switch is set to "VIDEO". • Replace with a fully charged one. • The LCD monitor is set to "VIDEO". The camcorder is under direct sunlight during shooting, the screen becomes red or black for an instant. 5.
... (from a TV, a radio, etc.) might prevent it and proceed as usual from functioning properly. For Video Recording - • The tape's erase protection tab is set to "SAVE". • The VIDEO/MEMORY Switch is not open . - POSSIBLE CAUSES 2. • The Power Switch is set to "VIDEO". • Replace with a fully charged one. • The LCD monitor is set to "VIDEO". The camcorder is under direct sunlight during shooting, the screen becomes red or black for an instant. 5.
Instruction Manual
Page 85
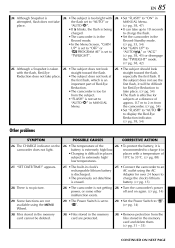
... flash is effective for Red-Eye Reduction to take the flash set date/time is erased. 27. • Connect the camcorder to charge it is set to "A". 30. • Files stored in the memory card are not available using the AC Adapter for over 24 hours to "AUTO C" in camcorder does not light. battery is difficult in MANUAL Menu. Files stored in the Record-Standby mode. Record mode. (੬ pg. 53, 54) • In the Menu Screen, "GAIN • Set...
... flash is effective for Red-Eye Reduction to take the flash set date/time is erased. 27. • Connect the camcorder to charge it is set to "A". 30. • Files stored in the memory card are not available using the AC Adapter for over 24 hours to "AUTO C" in camcorder does not light. battery is difficult in MANUAL Menu. Files stored in the Record-Standby mode. Record mode. (੬ pg. 53, 54) • In the Menu Screen, "GAIN • Set...

Instruction Manual
Page 86
... service life, images on . The memory card will not load properly. 37. • The cassette is in the right position. (੬ pg. 16) • Install a fully charged battery. (੬ pg. 10, 11) 38. • Set it . 32. • The DV cable was plugged/ 32. When the camcorder is not a defect of the camcorder. • When the LCD monitor's fluorescent light reaches the end of the LCD...
... service life, images on . The memory card will not load properly. 37. • The cassette is in the right position. (੬ pg. 16) • Install a fully charged battery. (੬ pg. 10, 11) 38. • Set it . 32. • The DV cable was plugged/ 32. When the camcorder is not a defect of the camcorder. • When the LCD monitor's fluorescent light reaches the end of the LCD...

Instruction Manual
Page 89
... use. If the cassette is used to move the video heads and video tape tend to maintain a clear picture at extremely bright objects for about 20 seconds, it stops automatically. In order to become wet...drop the unit or strike it against hard objects...subject it excessively when using the cleaning cassette, the problems still exist, consult your nearest JVC dealer. During use and store your memory cards...
... use. If the cassette is used to move the video heads and video tape tend to maintain a clear picture at extremely bright objects for about 20 seconds, it stops automatically. In order to become wet...drop the unit or strike it against hard objects...subject it excessively when using the cleaning cassette, the problems still exist, consult your nearest JVC dealer. During use and store your memory cards...
Instruction Manual
Page 92
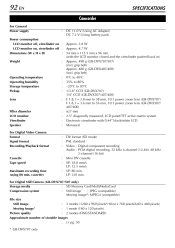
.... cassette) : : : For Digital Still Camera (GR-DVX707/507 only) Storage media : SD Memory Card/MultiMediaCard Compression system : Still image : JPEG (compatible) Moving image*: MPEG4 (compatible) File size Still Image : 3 modes (1280 x 960 pixels*/1024 x 768 pixels/640 x 480 pixels) Moving Image* : 1 mode (160 x 120 pixels) Picture quality : 2 modes (FINE/STANDARD) Approximate number of storable images : ੬ pg. 50 * GR-DVX707 only 92 EN Camcorder For General Power supply : DC 11.0 V (Using AC Adapter) DC 7.2 V (Using battery pack) SPECIFICATIONS Power consumption LCD...
.... cassette) : : : For Digital Still Camera (GR-DVX707/507 only) Storage media : SD Memory Card/MultiMediaCard Compression system : Still image : JPEG (compatible) Moving image*: MPEG4 (compatible) File size Still Image : 3 modes (1280 x 960 pixels*/1024 x 768 pixels/640 x 480 pixels) Moving Image* : 1 mode (160 x 120 pixels) Picture quality : 2 modes (FINE/STANDARD) Approximate number of storable images : ੬ pg. 50 * GR-DVX707 only 92 EN Camcorder For General Power supply : DC 11.0 V (Using AC Adapter) DC 7.2 V (Using battery pack) SPECIFICATIONS Power consumption LCD...

Instruction Manual
Page 95
.... 10 i Cassette Open/Eject Switch [OPEN/EJECT]...੬ pg. 16 j •Play/Pause Button [4/9] ...੬ pg. 22 •Backlight Compensation Button [BACKLIGHT] ...੬ pg. 57 k •Fast-Forward Button [5]...੬ pg. 22 •Night-Scope Button [NIGHT] ...੬ pg. 53 l VIDEO/MEMORY Switch [VIDEO/MEMORY] (GR-DVX707/507 only) ...੬ pg. 14 m •Rewind Button [3] ...੬ pg. 22 •Focus Adjustment Button [FOCUS] ...੬ pg. 55 n •Stop Button [8] ...੬ pg. 22 •Digital Sound Button [D.SOUND] (GR-DVX707 only...
.... 10 i Cassette Open/Eject Switch [OPEN/EJECT]...੬ pg. 16 j •Play/Pause Button [4/9] ...੬ pg. 22 •Backlight Compensation Button [BACKLIGHT] ...੬ pg. 57 k •Fast-Forward Button [5]...੬ pg. 22 •Night-Scope Button [NIGHT] ...੬ pg. 53 l VIDEO/MEMORY Switch [VIDEO/MEMORY] (GR-DVX707/507 only) ...੬ pg. 14 m •Rewind Button [3] ...੬ pg. 22 •Focus Adjustment Button [FOCUS] ...੬ pg. 55 n •Stop Button [8] ...੬ pg. 22 •Digital Sound Button [D.SOUND] (GR-DVX707 only...

Instruction Manual
Page 101
EN Indications Function 101 ● Appears if Insert Editing is attempted on the remote control is pressed when the erase protection tab is set to "SAVE". (੬ pg. 72) INSERT ERROR! (੬ pg. 72) ● Appears if INSERT (I) on a tape recorded in the LP mode.
EN Indications Function 101 ● Appears if Insert Editing is attempted on the remote control is pressed when the erase protection tab is set to "SAVE". (੬ pg. 72) INSERT ERROR! (੬ pg. 72) ● Appears if INSERT (I) on a tape recorded in the LP mode.

Instruction Manual
Page 102
... ...41 - 52 Initialising A Memory Card ...36 Insert Editing ...72 Iris ...57 Iris Lock ...57 J Journalistic Shooting ...20 D Date/Time Display ...49, 52 Settings ...15 Deleting Files ...33 Demonstration Mode (DEMO MODE) ...8, 48 Digital Image Stabilisation (DIS) ...46 Digital Sound Effects ...59 Display setting (ON SCREEN) ...49 DPOF Setting (Digital Print Order Format) ...34, 35 Dubbing ...62 - 65 Dubbing from tape to memory card ( COPY) ...51, 65 L Loading A Cassette ...16 Loading A Memory Card ...17 M Manual Focus ...55 Memory Card ...17, 89 Menu Screen CAMERA ...44, 45 D.S.C.
... ...41 - 52 Initialising A Memory Card ...36 Insert Editing ...72 Iris ...57 Iris Lock ...57 J Journalistic Shooting ...20 D Date/Time Display ...49, 52 Settings ...15 Deleting Files ...33 Demonstration Mode (DEMO MODE) ...8, 48 Digital Image Stabilisation (DIS) ...46 Digital Sound Effects ...59 Display setting (ON SCREEN) ...49 DPOF Setting (Digital Print Order Format) ...34, 35 Dubbing ...62 - 65 Dubbing from tape to memory card ( COPY) ...51, 65 L Loading A Cassette ...16 Loading A Memory Card ...17 M Manual Focus ...55 Memory Card ...17, 89 Menu Screen CAMERA ...44, 45 D.S.C.

Instruction Manual
Page 103
... (REC SELECT) ...50 Recording Mode (REC MODE) ...44, 51 Recording Time Battery Pack ...10 Tape ...16 Record-Standby ...19 Remaining Power Level ...100 Remote Control ...66 Resetting Menu Settings (CAM RESET) ...49 Rewind The Tape ...22 Z Zooming (ZOOM) ...20, 44 S SD Memory Card ...17, 89 Self-Recording ...20 Set Remote/VCR Code ...73 Shuttle Search ...22 Slow-Motion Playback ...68 Snapshot ...27, 53 Snapshot Mode (SNAP MODE) ...45 Sound input (SOUND IN) ...49, 70, 71 Sound Mode (SOUND MODE) ...44, 51 Speaker Volume ...22 Specifications ...92, 93 Still Playback ...22 Synchro adjustment...
... (REC SELECT) ...50 Recording Mode (REC MODE) ...44, 51 Recording Time Battery Pack ...10 Tape ...16 Record-Standby ...19 Remaining Power Level ...100 Remote Control ...66 Resetting Menu Settings (CAM RESET) ...49 Rewind The Tape ...22 Z Zooming (ZOOM) ...20, 44 S SD Memory Card ...17, 89 Self-Recording ...20 Set Remote/VCR Code ...73 Shuttle Search ...22 Slow-Motion Playback ...68 Snapshot ...27, 53 Snapshot Mode (SNAP MODE) ...45 Sound input (SOUND IN) ...49, 70, 71 Sound Mode (SOUND MODE) ...44, 51 Speaker Volume ...22 Specifications ...92, 93 Still Playback ...22 Synchro adjustment...


