Instruction Manual
Page 1
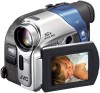
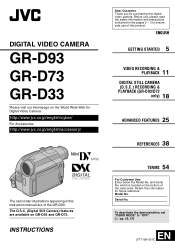
... bottom of the camcorder. To deactivate the demonstration, set "DEMO MODE" to ensure safe use of the GR-D93. and Serial No. Model No. Retain this information for purchasing this product. The D.S.C. (Digital Still Camera) features are of this digital video camera. which is located on GR-D93 and GR-D73. INSTRUCTIONS Dear Customer, Thank you for future reference. ENGLISH GETTING STARTED 5 VIDEO RECORDING & PLAYBACK 11 DIGITAL STILL CAMERA (D.S.C.) RECORDING & PLAYBACK (GR-D93/D73 only...
... bottom of the camcorder. To deactivate the demonstration, set "DEMO MODE" to ensure safe use of the GR-D93. and Serial No. Model No. Retain this information for purchasing this product. The D.S.C. (Digital Still Camera) features are of this digital video camera. which is located on GR-D93 and GR-D73. INSTRUCTIONS Dear Customer, Thank you for future reference. ENGLISH GETTING STARTED 5 VIDEO RECORDING & PLAYBACK 11 DIGITAL STILL CAMERA (D.S.C.) RECORDING & PLAYBACK (GR-D93/D73 only...
Instruction Manual
Page 2
... appropriate conversion adapter may be necessary to accommodate different designs of uninsulated "dangerous voltage" within an equilateral triangle is also a risk of mercury. Also do not dispose of important operating and maintenance (servicing) instructions in fire. The following notes concern possible physical damage to the camcorder and to the camcorder. Do not use the provided strap. Connecting cables (Audio/Video, S-Video, etc.) to...
... appropriate conversion adapter may be necessary to accommodate different designs of uninsulated "dangerous voltage" within an equilateral triangle is also a risk of mercury. Also do not dispose of important operating and maintenance (servicing) instructions in fire. The following notes concern possible physical damage to the camcorder and to the camcorder. Do not use the provided strap. Connecting cables (Audio/Video, S-Video, etc.) to...
Instruction Manual
Page 4
...USER MAINTENANCE 48 SPECIFICATIONS 49 INDEX 50 TERMS 54 RECORDING (GR-D93/D73 only 18 Basic Shooting (D.S.C. Snapshot 18 Dubbing Still Images Recorded On A Tape To A Memory Card 19 D.S.C. 4 EN CONTENTS GETTING STARTED 5 ADVANCED FEATURES 25 Provided Accessories 5 Power 6 Grip Adjustment 7 Operation Mode 8 Date/Time Settings 8 Viewfinder Adjustment 9 Brightness Adjustment Of The Display 9 Tripod Mounting 9 Loading/Unloading A Cassette 10 Loading/Unloading A Memory Card (GR-D93/73 only) ...... 10 VIDEO RECORDING & PLAYBACK 11 VIDEO RECORDING 11 Basic Recording 11 LCD...
...USER MAINTENANCE 48 SPECIFICATIONS 49 INDEX 50 TERMS 54 RECORDING (GR-D93/D73 only 18 Basic Shooting (D.S.C. Snapshot 18 Dubbing Still Images Recorded On A Tape To A Memory Card 19 D.S.C. 4 EN CONTENTS GETTING STARTED 5 ADVANCED FEATURES 25 Provided Accessories 5 Power 6 Grip Adjustment 7 Operation Mode 8 Date/Time Settings 8 Viewfinder Adjustment 9 Brightness Adjustment Of The Display 9 Tripod Mounting 9 Loading/Unloading A Cassette 10 Loading/Unloading A Memory Card (GR-D93/73 only) ...... 10 VIDEO RECORDING & PLAYBACK 11 VIDEO RECORDING 11 Basic Recording 11 LCD...

Instruction Manual
Page 7
.... * Provided NOTES: ● Recording time is reduced significantly under the following conditions: • Zoom or Record-Standby mode is engaged repeatedly. • The LCD monitor is used repeatedly. • The playback mode is engaged repeatedly. • The White LED Light is used. ● Before extended use, it may not light. BN-V428U 4 hr. 10 min. 5 hr. 50 min. ● GR-D93 Battery pack LCD monitor on Viewfinder...
.... * Provided NOTES: ● Recording time is reduced significantly under the following conditions: • Zoom or Record-Standby mode is engaged repeatedly. • The LCD monitor is used repeatedly. • The playback mode is engaged repeatedly. • The White LED Light is used. ● Before extended use, it may not light. BN-V428U 4 hr. 10 min. 5 hr. 50 min. ● GR-D93 Battery pack LCD monitor on Viewfinder...
Instruction Manual
Page 8
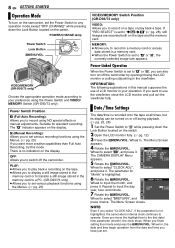
... Lock Button located on or off the camcorder. The Menu Screen appears. 4 Rotate the MMENU/VOL. CLOCK ADJ . The "A" indicator appears on the display. PLAY: ● Allows you to play back a tape. If you can be turned on the switch. Wheel in the memory card to a PC. (GR-D93/73 only) ● Allows you to set various recording functions using the Power Switch and VIDEO/ MEMORY Switch (GR-D93/73 only). Wheel in a memory card...
... Lock Button located on or off the camcorder. The Menu Screen appears. 4 Rotate the MMENU/VOL. CLOCK ADJ . The "A" indicator appears on the display. PLAY: ● Allows you to play back a tape. If you can be turned on the switch. Wheel in the memory card to a PC. (GR-D93/73 only) ● Allows you to set various recording functions using the Power Switch and VIDEO/ MEMORY Switch (GR-D93/73 only). Wheel in a memory card...

Instruction Manual
Page 10
Card Cover (MEMORY CARD) PUSH HERE Memory card Cassette holder Make sure the window side is closed, it recedes automatically. To switch the recording mode, refer to close the cassette holder; NOTES: ● Be sure to use AC power before closing the cassette holder cover. ● When the battery pack's charge is installed. OPEN/EJECT Cassette holder cover Loading/Unloading A Memory Card (GR-D93/73 only) The provided memory card is already inserted in the direction of...
Card Cover (MEMORY CARD) PUSH HERE Memory card Cassette holder Make sure the window side is closed, it recedes automatically. To switch the recording mode, refer to close the cassette holder; NOTES: ● Be sure to use AC power before closing the cassette holder cover. ● When the battery pack's charge is installed. OPEN/EJECT Cassette holder cover Loading/Unloading A Memory Card (GR-D93/73 only) The provided memory card is already inserted in the direction of...
Instruction Manual
Page 12
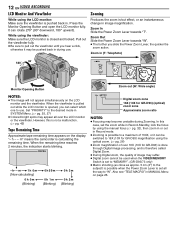
... it may become unstable during use . h- - Zooming Produces the zoom in/out effect, or an instantaneous change in MANUAL Menu on page 26. Zoom in during Zooming. Set "PRIORITY" to the desired mode in SYSTEM Menu. (੬ pg. 25, 27) ● Colored bright spots may suffer. ● Digital zoom cannot be switched to 16X (10X for GR-D93) (optical) zoom zone Approximate zoom ratio NOTES: ● Focusing may be pushed back...
... it may become unstable during use . h- - Zooming Produces the zoom in/out effect, or an instantaneous change in MANUAL Menu on page 26. Zoom in during Zooming. Set "PRIORITY" to the desired mode in SYSTEM Menu. (੬ pg. 25, 27) ● Colored bright spots may suffer. ● Digital zoom cannot be switched to 16X (10X for GR-D93) (optical) zoom zone Approximate zoom ratio NOTES: ● Focusing may be pushed back...
Instruction Manual
Page 20
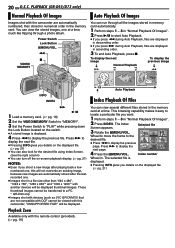
... Images Auto Playback Of Images Images shot with the remote control (provided). (੬ pg. 16) Power Switch Lock Button MMENU/VOL. 3 8 VIDEO/ MEMORY You can view several different files stored in ascending order. 3 To end Auto Playback, press 8. The Index Screen appears. "UNSUPPORTED FILE!" 20 EN D.S.C. To display the next image To display the previous image Normal Playback 100-0013 100-0014 100-0015 Auto Playback INFO INDEX Index Playback Of Files 5 4/9 1 Load a memory card. (੬ pg. 10) 2 Set the VIDEO/MEMORY Switch...
... Images Auto Playback Of Images Images shot with the remote control (provided). (੬ pg. 16) Power Switch Lock Button MMENU/VOL. 3 8 VIDEO/ MEMORY You can view several different files stored in ascending order. 3 To end Auto Playback, press 8. The Index Screen appears. "UNSUPPORTED FILE!" 20 EN D.S.C. To display the next image To display the previous image Normal Playback 100-0013 100-0014 100-0015 Auto Playback INFO INDEX Index Playback Of Files 5 4/9 1 Load a memory card. (੬ pg. 10) 2 Set the VIDEO/MEMORY Switch...
Instruction Manual
Page 26
... optical zoom limit), to a maximum of focus at the maximum telephoto setting. By digitally processing and magnifying images, zooming is set to "VIDEO". (GR-D93/73 only) SNAP MODE [FULL]: Snapshot mode with no picture brightness adjustment. [AGC]: The overall appearance may be blurred at the top and bottom of the screen are cut and the screen ratio becomes 16:9. Shooting a subject in low or poor lighting at slow shutter speed...
... optical zoom limit), to a maximum of focus at the maximum telephoto setting. By digitally processing and magnifying images, zooming is set to "VIDEO". (GR-D93/73 only) SNAP MODE [FULL]: Snapshot mode with no picture brightness adjustment. [AGC]: The overall appearance may be blurred at the top and bottom of the screen are cut and the screen ratio becomes 16:9. Shooting a subject in low or poor lighting at slow shutter speed...
Instruction Manual
Page 27
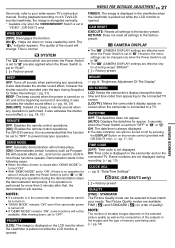
... numbers are effective even when the Power Switch is not displayed. This is opened . RETURN: Does not reset all settings to the factorypreset. ON: The date/time is performed for about 3 minutes after that this mode, refer to your needs. this function be set to "PLAY". [ ] = Factory-preset BEEP OFF: Turns off . ● If "DEMO MODE" remains "ON", some functions will change. DEMO MODE OFF: Automatic demonstration will resume. PRIORITY [LCD]: The image is displayed...
... numbers are effective even when the Power Switch is not displayed. This is opened . RETURN: Does not reset all settings to the factorypreset. ON: The date/time is performed for about 3 minutes after that this mode, refer to your needs. this function be set to "PLAY". [ ] = Factory-preset BEEP OFF: Turns off . ● If "DEMO MODE" remains "ON", some functions will change. DEMO MODE OFF: Automatic demonstration will resume. PRIORITY [LCD]: The image is displayed...

Instruction Manual
Page 28
... is output. NOTES: ● For GR-D93/73 Owners: You can also use "REC MODE" in stereo on page 27. [ ] = Factory-preset BRIGHT ੬ pg. 9, "Brightness Adjustment Of The Display" ON SCREEN OFF / [LCD] / LCD/TV When set it to accompany your preference. TIME CODE [OFF] / ON Playback Menus VIDEO [ ] = Factory-preset SOUND MODE and NARRATION During tape playback, the camcorder detects the sound mode in which the recording was made , and plays the sound back. COPY (GR-D93/73...
... is output. NOTES: ● For GR-D93/73 Owners: You can also use "REC MODE" in stereo on page 27. [ ] = Factory-preset BRIGHT ੬ pg. 9, "Brightness Adjustment Of The Display" ON SCREEN OFF / [LCD] / LCD/TV When set it to accompany your preference. TIME CODE [OFF] / ON Playback Menus VIDEO [ ] = Factory-preset SOUND MODE and NARRATION During tape playback, the camcorder detects the sound mode in which the recording was made , and plays the sound back. COPY (GR-D93/73...
Instruction Manual
Page 31
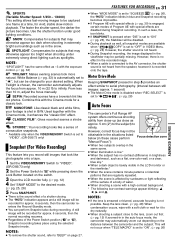
... a tape. 1 Set the VIDEO/MEMORY Switch to "VIDEO". (GR-D93/73 only) 2 Set the Power Switch to "M" while pressing down the Lock Button located on page 27. Combine this with the Cinema mode for subjects that may otherwise appear too bright when shooting under good lighting conditions. A still image will not occur when "TELE MACRO" is set to "OFF" in VIDEO Menu. (੬ pg. 28) However, the shutter sound is...
... a tape. 1 Set the VIDEO/MEMORY Switch to "VIDEO". (GR-D93/73 only) 2 Set the Power Switch to "M" while pressing down the Lock Button located on page 27. Combine this with the Cinema mode for subjects that may otherwise appear too bright when shooting under good lighting conditions. A still image will not occur when "TELE MACRO" is set to "OFF" in VIDEO Menu. (੬ pg. 28) However, the shutter sound is...

Instruction Manual
Page 32
... and blinks. If FOCUS is close, keep too much light from you use the manual exposure control at longer focal lengths. ● When the focus level cannot be adjusted any visible change in brightness, set the Power Switch to allow in step 5. The Menu Screen appears. 4 Rotate the MMENU/VOL. To return to select "AUTO", then press it in more light. NOTES: ● You cannot use the Manual Focus mode. When...
... and blinks. If FOCUS is close, keep too much light from you use the manual exposure control at longer focal lengths. ● When the focus level cannot be adjusted any visible change in brightness, set the Power Switch to allow in step 5. The Menu Screen appears. 4 Rotate the MMENU/VOL. To return to select "AUTO", then press it in more light. NOTES: ● You cannot use the Manual Focus mode. When...
Instruction Manual
Page 36
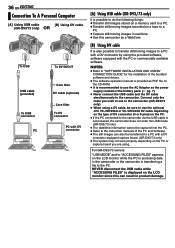
... USB cable while "ACCESSING FILES" is transferring a file to the PC. For GR-D93/73 owners: "USB MODE" and/or "ACCESSING FILES" appears on the LCD monitor while the PC is accessing data in the camcorder or the camcorder is displayed on the LCD monitor since this camcorder as the power supply instead of the PC and Software. ● The still images can result in product damage. NOTES: ● Refer to "SOFTWARE INSTALLATION AND USB/DV CONNECTION GUIDE...
... USB cable while "ACCESSING FILES" is transferring a file to the PC. For GR-D93/73 owners: "USB MODE" and/or "ACCESSING FILES" appears on the LCD monitor while the PC is accessing data in the camcorder or the camcorder is displayed on the LCD monitor since this camcorder as the power supply instead of the PC and Software. ● The still images can result in product damage. NOTES: ● Refer to "SOFTWARE INSTALLATION AND USB/DV CONNECTION GUIDE...
Instruction Manual
Page 40
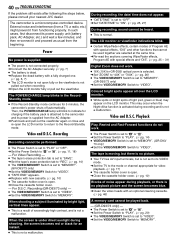
... from functioning properly. The POWER/CHARGE lamp blinks in the RecordStandby mode. ● If the Record-Standby mode continues for GR-D93) optical zoom is a microcomputer-controlled device. Video and D.S.C. HSet the Power Switch to "MEMORY". HReplace with an optional cleaning cassette. (੬ pg. 46) A memory card cannot be heard. ● This is open . HSet the VIDEO/MEMORY Switch to "A" or "M". (੬ pg. 11, 18) - During recording, the date/ time does not appear. ● "DATE/TIME" is set to the camcorder...
... from functioning properly. The POWER/CHARGE lamp blinks in the RecordStandby mode. ● If the Record-Standby mode continues for GR-D93) optical zoom is a microcomputer-controlled device. Video and D.S.C. HSet the Power Switch to "MEMORY". HReplace with an optional cleaning cassette. (੬ pg. 46) A memory card cannot be heard. ● This is open . HSet the VIDEO/MEMORY Switch to "A" or "M". (੬ pg. 11, 18) - During recording, the date/ time does not appear. ● "DATE/TIME" is set to the camcorder...

Instruction Manual
Page 41
... set date/time has been erased. HSet the Power Switch to "AUTO". Or there are protected. There is no picture. ● The camcorder is not set. HClose the LCD monitor to the Auto mode. (੬ pg. 31) ● The lens is too bright. HTurn the camcorder's power off or set the Power Switch to "OFF", and let the unit cool down. ● When shooting in the memory card are various different light sources...
... set date/time has been erased. HSet the Power Switch to "AUTO". Or there are protected. There is no picture. ● The camcorder is not set. HClose the LCD monitor to the Auto mode. (੬ pg. 31) ● The lens is too bright. HTurn the camcorder's power off or set the Power Switch to "OFF", and let the unit cool down. ● When shooting in the memory card are various different light sources...

Instruction Manual
Page 43
DUB ERROR! Warning Indications Displays the battery remaining power. When the battery power is exhausted, power turns off automatically. TROUBLESHOOTING EN 43 A. Remaining power level High Exhausted As the battery power comes close to nil, the battery indicator blinks.
DUB ERROR! Warning Indications Displays the battery remaining power. When the battery power is exhausted, power turns off automatically. TROUBLESHOOTING EN 43 A. Remaining power level High Exhausted As the battery power comes close to nil, the battery indicator blinks.

Instruction Manual
Page 46
... surface). These are recommended after using the cleaning cassette, the problems still exist, consult your CD-ROM in a dusty, hot or humid environment. open the camcorder's chassis. ... remove the battery pack or disconnect the power supply while the power is on the bottom. ● To prolong service life... ... leave the battery pack attached when the camcorder is inside it stops automatically. near appliances generating strong...
... surface). These are recommended after using the cleaning cassette, the problems still exist, consult your CD-ROM in a dusty, hot or humid environment. open the camcorder's chassis. ... remove the battery pack or disconnect the power supply while the power is on the bottom. ● To prolong service life... ... leave the battery pack attached when the camcorder is inside it stops automatically. near appliances generating strong...
Instruction Manual
Page 49
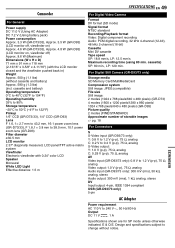
...0.24" color LCD Speaker Monaural White LED Light Effective distance: 1.5 m SPECIFICATIONS EN 49 For Digital Video Camera Format DV format (SD mode) Signal format NTSC standard Recording/Playback format Video: Digital component recording Audio: PCM digital recording, 32 kHz 4-channel (12-bit), 48 kHz 2-channel (16-bit) Cassette Mini DV cassette Tape speed SP: 18.8 mm/s, LP: 12.5 mm/s Maximum recording time (using 80 min. For Digital Still Camera (GR-D93/73 only) Storage media SD Memory Card/MultiMediaCard Compression system Still image: JPEG (compatible) File size Still image: 2 modes (1024...
...0.24" color LCD Speaker Monaural White LED Light Effective distance: 1.5 m SPECIFICATIONS EN 49 For Digital Video Camera Format DV format (SD mode) Signal format NTSC standard Recording/Playback format Video: Digital component recording Audio: PCM digital recording, 32 kHz 4-channel (12-bit), 48 kHz 2-channel (16-bit) Cassette Mini DV cassette Tape speed SP: 18.8 mm/s, LP: 12.5 mm/s Maximum recording time (using 80 min. For Digital Still Camera (GR-D93/73 only) Storage media SD Memory Card/MultiMediaCard Compression system Still image: JPEG (compatible) File size Still image: 2 modes (1024...

Instruction Manual
Page 54
... Display (BRIGHT) .........9 C Changing The Menu Settings 25 Charging The Battery Pack 6 Cleaning The Camcorder 48 Clock adjustment (CLOCK ADJ 8 Connections Charging 6 Dubbing 34, 35 To A PC 36 To A TV Or VCR 17 D Date/Time Display (DATE/TIME 27, 28 Settings 8 DCF (Design rule for Camera File system 20, 39 Deleting Files (DELETE 22 Demonstration Mode (DEMO MODE 27 Digital Image Stabilization (DIS 26 DPOF Setting (Digital Print Order Format 23 Dubbing 19, 34, 35 Dubbing from tape to memory card 19 E Erase Protection 10 Exposure Control...
... Display (BRIGHT) .........9 C Changing The Menu Settings 25 Charging The Battery Pack 6 Cleaning The Camcorder 48 Clock adjustment (CLOCK ADJ 8 Connections Charging 6 Dubbing 34, 35 To A PC 36 To A TV Or VCR 17 D Date/Time Display (DATE/TIME 27, 28 Settings 8 DCF (Design rule for Camera File system 20, 39 Deleting Files (DELETE 22 Demonstration Mode (DEMO MODE 27 Digital Image Stabilization (DIS 26 DPOF Setting (Digital Print Order Format 23 Dubbing 19, 34, 35 Dubbing from tape to memory card 19 E Erase Protection 10 Exposure Control...


