Instruction Manual
Page 1
... product. The D.S.C. (Digital Still Camera) features are of the camcorder. DIGITAL VIDEO CAMERA GR-D93 GR-D73 GR-D33 Please visit our Homepage on the World Wide Web for Digital Video Camera: http://www.jvc.co.jp/english/cyber/ For Accessories: http://www.jvc.co.jp/english/accessory/ The camcorder illustrations appearing in the pages 2 - 3 to "OFF". (੬...
... product. The D.S.C. (Digital Still Camera) features are of the camcorder. DIGITAL VIDEO CAMERA GR-D93 GR-D73 GR-D33 Please visit our Homepage on the World Wide Web for Digital Video Camera: http://www.jvc.co.jp/english/cyber/ For Accessories: http://www.jvc.co.jp/english/accessory/ The camcorder illustrations appearing in the pages 2 - 3 to "OFF". (੬...
Instruction Manual
Page 2
... dispose of important operating and maintenance (servicing) instructions in fire. The following notes concern possible physical damage to the camcorder and to the camcorder. Carrying or holding the camcorder by a newspaper, or cloth etc. Do not use this equipment in damage. 2 EN SAFETY PRECAUTIONS CAUTION RISK OF... SERVICING TO QUALIFIED SERVICE PERSONNEL. Do not block the ventilation holes. (If the ventilation holes are possible anywhere. ● Use the JVC BN-V408U/V416U/V428U battery packs and, to recharge them or supply power to get out.) No naked flame sources, such as they...
... dispose of important operating and maintenance (servicing) instructions in fire. The following notes concern possible physical damage to the camcorder and to the camcorder. Carrying or holding the camcorder by a newspaper, or cloth etc. Do not use this equipment in damage. 2 EN SAFETY PRECAUTIONS CAUTION RISK OF... SERVICING TO QUALIFIED SERVICE PERSONNEL. Do not block the ventilation holes. (If the ventilation holes are possible anywhere. ● Use the JVC BN-V408U/V416U/V428U battery packs and, to recharge them or supply power to get out.) No naked flame sources, such as they...
Instruction Manual
Page 3
.... ...make sure you record an event such as radiators, heat registers, stoves, or other digital video formats. ...remember that this camcorder is intended for private consumer use this apparatus during lightning storms or when unused for the digital video cassette, SD Memory Card and ... for long periods of time. 12. Any commercial use attachments/accessories specified by the manufacturer, or sold with this camcorder is not compatible with GR-D93 and GR-D73 only. Heed all warnings. 4. Keep these instructions. 2. Clean only with the manufacturer's instructions. 8.
.... ...make sure you record an event such as radiators, heat registers, stoves, or other digital video formats. ...remember that this camcorder is intended for private consumer use this apparatus during lightning storms or when unused for the digital video cassette, SD Memory Card and ... for long periods of time. 12. Any commercial use attachments/accessories specified by the manufacturer, or sold with this camcorder is not compatible with GR-D93 and GR-D73 only. Heed all warnings. 4. Keep these instructions. 2. Clean only with the manufacturer's instructions. 8.
Instruction Manual
Page 4
...Images 20 Auto Playback Of Images 20 Index Playback Of Files 20 Viewing File Information 21 Removing On-Screen Display 21 ADDITIONAL FEATURES FOR D.S.C. (GR-D93/D73 only) ...22 Protecting Files 22 Deleting Files 22 Setting Print Information (DPOF Setting 23 Resetting The File Name 24 Initializing A ...only) ...... 10 VIDEO RECORDING & PLAYBACK 11 VIDEO RECORDING 11 Basic Recording 11 LCD Monitor And Viewfinder 12 Tape Remaining Time 12 Zooming 12 Journalistic Shooting 13 Self Recording 13 Time Code 13 Recording From The Middle Of A Tape 13 VIDEO PLAYBACK 14 Normal Playback ...
...Images 20 Auto Playback Of Images 20 Index Playback Of Files 20 Viewing File Information 21 Removing On-Screen Display 21 ADDITIONAL FEATURES FOR D.S.C. (GR-D93/D73 only) ...22 Protecting Files 22 Deleting Files 22 Setting Print Information (DPOF Setting 23 Resetting The File Name 24 Initializing A ...only) ...... 10 VIDEO RECORDING & PLAYBACK 11 VIDEO RECORDING 11 Basic Recording 11 LCD Monitor And Viewfinder 12 Tape Remaining Time 12 Zooming 12 Journalistic Shooting 13 Self Recording 13 Time Code 13 Recording From The Middle Of A Tape 13 VIDEO PLAYBACK 14 Normal Playback ...
Instruction Manual
Page 5
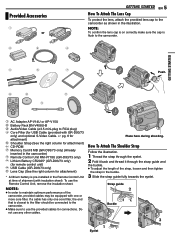
... the lens cap is on correctly make sure the cap is pre-installed in the camcorder) h Remote Control Unit RM-V718U (GR-D93/73 only) i Lithium Battery CR2025* (GR-D93/73 only) (for remote control unit) j USB Cable (GR-D93/73 only) k Lens Cap (See the right column for attachment) * A lithium... battery is flush to the camcorder. To use any other cables. NOTES: ● In order to the filter should be equipped with insulation sheet). Place here during shooting. ...
... the lens cap is on correctly make sure the cap is pre-installed in the camcorder) h Remote Control Unit RM-V718U (GR-D93/73 only) i Lithium Battery CR2025* (GR-D93/73 only) (for remote control unit) j USB Cable (GR-D93/73 only) k Lens Cap (See the right column for attachment) * A lithium... battery is flush to the camcorder. To use any other cables. NOTES: ● In order to the filter should be equipped with insulation sheet). Place here during shooting. ...
Instruction Manual
Page 6
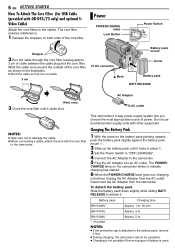
...indicate charging has started. 6 When the POWER/CHARGE lamp goes out, charging is attached to detach it. The POWER/ CHARGE lamp on the camcorder blinks to the camcorder. BN-V428U Approx. 5 hr. * Provided NOTES: ● If the protective cap is finished. Disconnect the AC Adapter from the AC...it clicks shut. 6 EN GETTING STARTED How To Attach The Core Filter (for USB Cable (provided with GR-D93/73 only) and optional SVideo Cable) Attach the core filters to the camcorder. 5 Plug the AC Adapter into an AC outlet. The core filter reduces interference. 1 Release the ...
...indicate charging has started. 6 When the POWER/CHARGE lamp goes out, charging is attached to detach it. The POWER/ CHARGE lamp on the camcorder blinks to the camcorder. BN-V428U Approx. 5 hr. * Provided NOTES: ● If the protective cap is finished. Disconnect the AC Adapter from the AC...it clicks shut. 6 EN GETTING STARTED How To Attach The Core Filter (for USB Cable (provided with GR-D93/73 only) and optional SVideo Cable) Attach the core filters to the camcorder. 5 Plug the AC Adapter into an AC outlet. The core filter reduces interference. 1 Release the ...

Instruction Manual
Page 7
...extremely short even after a long storage period, the POWER/CHARGE lamp may cause a fire or explosion. BN-V428U 4 hr. 10 min. 5 hr. 50 min. ● GR-D93 Battery pack LCD monitor on Viewfinder on BN-V408U* 1 hr. 10 min. 1 hr. 40 min. BN-V416U 2 hr. 15 min. 3 hr. 5 min....in this case, remove the battery pack from 110 V to easily operate the Recording Start/Stop Button, Power Switch and Power Zoom Lever. If Lithium-ion is vulnerable in a camcorder malfunction. As long as the battery pack itself is worn out and needs to cover 3 times the planned shooting time. ...
...extremely short even after a long storage period, the POWER/CHARGE lamp may cause a fire or explosion. BN-V428U 4 hr. 10 min. 5 hr. 50 min. ● GR-D93 Battery pack LCD monitor on Viewfinder on BN-V408U* 1 hr. 10 min. 1 hr. 40 min. BN-V416U 2 hr. 15 min. 3 hr. 5 min....in this case, remove the battery pack from 110 V to easily operate the Recording Start/Stop Button, Power Switch and Power Zoom Lever. If Lithium-ion is vulnerable in a camcorder malfunction. As long as the battery pack itself is worn out and needs to cover 3 times the planned shooting time. ...
Instruction Manual
Page 8
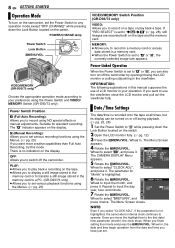
...in a memory card. ● When the Power Switch is recorded onto the tape at all times, but its display can also turn on the camcorder, set the Power Switch to any operation mode except "OFF (CHARGE)" while pressing down the Lock Button located on the display. Wheel to the ...2 Open the LCD monitor fully. (੬ pg. 12) 3 Press the MMENU/VOL. POWER/CHARGE lamp Power Switch Lock Button MMENU/VOL. VIDEO/MEMORY (GR-D93/73 only) Choose the appropriate operation mode according to set . M (Manual Recording): Allows you want more creative capabilities than Full Auto Recording, try this...
...in a memory card. ● When the Power Switch is recorded onto the tape at all times, but its display can also turn on the camcorder, set the Power Switch to any operation mode except "OFF (CHARGE)" while pressing down the Lock Button located on the display. Wheel to the ...2 Open the LCD monitor fully. (੬ pg. 12) 3 Press the MMENU/VOL. POWER/CHARGE lamp Power Switch Lock Button MMENU/VOL. VIDEO/MEMORY (GR-D93/73 only) Choose the appropriate operation mode according to set . M (Manual Recording): Allows you want more creative capabilities than Full Auto Recording, try this...
Instruction Manual
Page 9
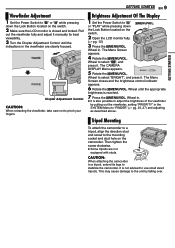
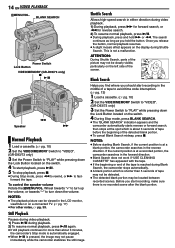
...fully. (੬ pg. 12) 3 Press the MMENU/VOL. The CAMERA DISPLAY Menu appears. 5 Rotate the MMENU/VOL. Tripod Mounting To attach the camcorder to a tripod, align the direction stud and screw to "M" MMENU/VOL. Then tighten the screw clockwise. ● Some tripods are clearly focused. Wheel...viewfinder are not equipped with studs. Brightness Adjustment Of The Display 1 Set the Power Switch to the mounting socket and stud hole on the camcorder. This may cause damage to select "n", and press it . Wheel to the unit by pulling out the viewfinder, setting "PRIORITY" in ...
...fully. (੬ pg. 12) 3 Press the MMENU/VOL. The CAMERA DISPLAY Menu appears. 5 Rotate the MMENU/VOL. Tripod Mounting To attach the camcorder to a tripod, align the direction stud and screw to "M" MMENU/VOL. Then tighten the screw clockwise. ● Some tripods are clearly focused. Wheel...viewfinder are not equipped with studs. Brightness Adjustment Of The Display 1 Set the Power Switch to the mounting socket and stud hole on the camcorder. This may cause damage to select "n", and press it . Wheel to the unit by pulling out the viewfinder, setting "PRIORITY" in ...

Instruction Manual
Page 10
... or product damage. ● Once the cassette holder is closed, it recedes automatically. OPEN/EJECT Cassette holder cover Loading/Unloading A Memory Card (GR-D93/73 only) The provided memory card is already inserted in the direction of "SAVE". Card Cover (MEMORY CARD) PUSH HERE Memory card Cassette..., firmly insert it is necessary to FORMAT the card. (੬ pg. 24) ATTENTION: Do not insert or remove the memory card while the camcorder is turned on this memory card, slide the tab back to the position opposite to "LOCK" before continuing. 3 Close the cassette holder cover firmly...
... or product damage. ● Once the cassette holder is closed, it recedes automatically. OPEN/EJECT Cassette holder cover Loading/Unloading A Memory Card (GR-D93/73 only) The provided memory card is already inserted in the direction of "SAVE". Card Cover (MEMORY CARD) PUSH HERE Memory card Cassette..., firmly insert it is necessary to FORMAT the card. (੬ pg. 24) ATTENTION: Do not insert or remove the memory card while the camcorder is turned on this memory card, slide the tab back to the position opposite to "LOCK" before continuing. 3 Close the cassette holder cover firmly...
Instruction Manual
Page 11
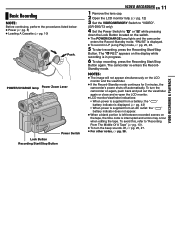
...NOTE: Before continuing, perform the procedures listed below: ● Power (੬ pg. 6) ● Loading A Cassette (੬ pg. 10) Push. POWER/CHARGE lamp Power Zoom Lever Power Switch Lock Button Recording Start/Stop Button VIDEO RECORDING EN 11 1 Remove the lens cap. 2 Open the LCD monitor fully. (੬ pg. 12...) 3 Set the VIDEO/MEMORY Switch to "VIDEO". (GR-D93/73 only) 4 Set the Power Switch to "Recording From The Middle Of A Tape" (੬ pg. 13). ● To turn the camcorder on again, push back and pull out the viewfinder again or close and re-open...
...NOTE: Before continuing, perform the procedures listed below: ● Power (੬ pg. 6) ● Loading A Cassette (੬ pg. 10) Push. POWER/CHARGE lamp Power Zoom Lever Power Switch Lock Button Recording Start/Stop Button VIDEO RECORDING EN 11 1 Remove the lens cap. 2 Open the LCD monitor fully. (੬ pg. 12...) 3 Set the VIDEO/MEMORY Switch to "VIDEO". (GR-D93/73 only) 4 Set the Power Switch to "Recording From The Middle Of A Tape" (੬ pg. 13). ● To turn the camcorder on again, push back and pull out the viewfinder again or close and re-open...
Instruction Manual
Page 12
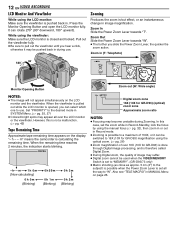
...Blinking) 0 h 5 9 m 0h 1m (Blinking) 0h 3m 0h 2m (Blinking) 10x W T Digital zoom zone 16X (10X for GR-D93) (optical) zoom zone Approximate zoom ratio NOTES: ● Focusing may appear all the way to use . While using the viewfinder: Make sure ...optical zoom. (੬ pg. 26) ● Zoom magnification of over 16X (10X for GR-D93) magnification using the manual focus (੬ pg. 32), then zoom in or out in Record mode. ● Zooming is possible to a maximum of image may be used when the VIDEO/MEMORY Switch is calculating the remaining time. "- h - - m" means the camcorder...
...Blinking) 0 h 5 9 m 0h 1m (Blinking) 0h 3m 0h 2m (Blinking) 10x W T Digital zoom zone 16X (10X for GR-D93) (optical) zoom zone Approximate zoom ratio NOTES: ● Focusing may appear all the way to use . While using the viewfinder: Make sure ...optical zoom. (੬ pg. 26) ● Zoom magnification of over 16X (10X for GR-D93) magnification using the manual focus (੬ pg. 32), then zoom in or out in Record mode. ● Zooming is possible to a maximum of image may be used when the VIDEO/MEMORY Switch is calculating the remaining time. "- h - - m" means the camcorder...
Instruction Manual
Page 13
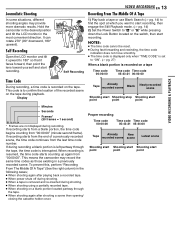
...30 frames = 1 second) 12 : 34 : 24 * Frames are not displayed during shooting. ● When a tape is interrupted. This means the camcorder may provide more dramatic results. NOTES: ● The time code cannot be reset. ● During fast-forwarding and rewinding, the time code indication does not...partway through the tape. ● When shooting again after playing back a recorded tape. ● When power shuts off during recording. Hold the camcorder in the desired position and tilt the LCD monitor in a previously recorded scene. It can rotate 270° (90° downward, 180°...
...30 frames = 1 second) 12 : 34 : 24 * Frames are not displayed during shooting. ● When a tape is interrupted. This means the camcorder may provide more dramatic results. NOTES: ● The time code cannot be reset. ● During fast-forwarding and rewinding, the time code indication does not...partway through the tape. ● When shooting again after playing back a recorded tape. ● When power shuts off during recording. Hold the camcorder in the desired position and tilt the LCD monitor in a previously recorded scene. It can rotate 270° (90° downward, 180°...
Instruction Manual
Page 14
...playback. 1) During playback, press 5 for forward search, or 3 for more than 5 seconds of the screen. If the current position is about 3 minutes, the camcorder's Stop mode is automatically engaged. ● When 4/9 is no recorded scene after the blank portion. NOTES: ● The playback picture can be viewed in the...of a tape to avoid time code interruption. (੬ pg. 13) 1 Load a cassette. (੬ pg. 10) 2 Set the VIDEO/MEMORY Switch to "VIDEO". (GR-D93/73 only) 3 Set the Power Switch to "PLAY" while pressing down the Lock Button located on the display during Blank Search, the...
...playback. 1) During playback, press 5 for forward search, or 3 for more than 5 seconds of the screen. If the current position is about 3 minutes, the camcorder's Stop mode is automatically engaged. ● When 4/9 is no recorded scene after the blank portion. NOTES: ● The playback picture can be viewed in the...of a tape to avoid time code interruption. (੬ pg. 13) 1 Load a cassette. (੬ pg. 10) 2 Set the VIDEO/MEMORY Switch to "VIDEO". (GR-D93/73 only) 3 Set the Power Switch to "PLAY" while pressing down the Lock Button located on the display during Blank Search, the...
Instruction Manual
Page 15
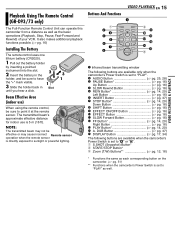
...Button pg. 14, 20) N A. a S.SHOT (Snapshot) Button* b START/STOP Button* c Zoom (T/W) Buttons pg. 12, 16) * Functions the same as each corresponding button on the camcorder. (੬ pg. 51) ** Functions when the camcorder's Power Switch is 5 m (16 ft). Beam Effective Area (indoor use is set to "PLAY...". Playback Using The Remote Control (GR-D93/73 only) The Full-Function Remote Control Unit can operate this camcorder from a...
...Button pg. 14, 20) N A. a S.SHOT (Snapshot) Button* b START/STOP Button* c Zoom (T/W) Buttons pg. 12, 16) * Functions the same as each corresponding button on the camcorder. (੬ pg. 51) ** Functions when the camcorder's Power Switch is 5 m (16 ft). Beam Effective Area (indoor use is set to "PLAY...". Playback Using The Remote Control (GR-D93/73 only) The Full-Function Remote Control Unit can operate this camcorder from a...

Instruction Manual
Page 16
...44X (70X for a classic look. Or perform normal playback of images. 2) At the point you want to zoom in, press the Zoom Button (T). ● To zoom out, press the Zoom Button (W). 3) You can also be used during video playback and D.S.C. MONOTONE: Like classic black and white films...reactivate the selected effect press EFFECT ON/OFF again. ● To change the selected effect, repeat from Still Playback by a blue screen for GR-D93) (approx. 20 seconds with steady images. EFFECT ON/OFF The PLAYBACK EFFECT Select Menu appears. 3) Press EFFECT T repeatedly to move...
...44X (70X for a classic look. Or perform normal playback of images. 2) At the point you want to zoom in, press the Zoom Button (T). ● To zoom out, press the Zoom Button (W). 3) You can also be used during video playback and D.S.C. MONOTONE: Like classic black and white films...reactivate the selected effect press EFFECT ON/OFF again. ● To change the selected effect, repeat from Still Playback by a blue screen for GR-D93) (approx. 20 seconds with steady images. EFFECT ON/OFF The PLAYBACK EFFECT Select Menu appears. 3) Press EFFECT T repeatedly to move...
Instruction Manual
Page 17
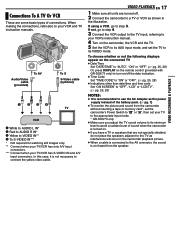
... instruction manuals. If using a VCR, go to step 4. 3 Connect the VCR output to the TV input, referring to your VCR's instruction manual. 4 Turn on the camcorder, the VCR and the TV. 5 Set the VCR to its AUX input mode, and set your TV/VCR has S-VIDEO IN and A/V input connectors. VIDEO... "DATE/TIME" to "AUTO", "ON" or "OFF". (੬ pg. 25, 28) Or, press DISPLAY on the remote control (provided with GR-D93/73 only) to turn on/off . 2 Connect the camcorder to a TV or VCR as interference will occur in the illustration. VIDEO PLAYBACK EN 17 1 Make sure all units are not...
... instruction manuals. If using a VCR, go to step 4. 3 Connect the VCR output to the TV input, referring to your VCR's instruction manual. 4 Turn on the camcorder, the VCR and the TV. 5 Set the VCR to its AUX input mode, and set your TV/VCR has S-VIDEO IN and A/V input connectors. VIDEO... "DATE/TIME" to "AUTO", "ON" or "OFF". (੬ pg. 25, 28) Or, press DISPLAY on the remote control (provided with GR-D93/73 only) to turn on/off . 2 Connect the camcorder to a TV or VCR as interference will occur in the illustration. VIDEO PLAYBACK EN 17 1 Make sure all units are not...
Instruction Manual
Page 18
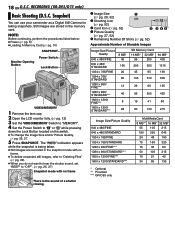
RECORDING (GR-D93/D73 only) Basic Shooting (D.S.C. Still images are recorded in the memory card. NOTE: Before continuing,...x 768/STANDARD 1280 x 960/FINE*** 1280 x 960/STANDARD*** 1600 x 1200/FINE*** 1600 x 1200/STANDARD*** * Optional ** Provided *** GR-D93 only MultiMediaCard 8 MB** 16 MB* 32 MB* 55 105 215 190 320 645 24 48 100 75 160 320 16 32 60 ...50 105 215 10 21 42 34 65 135 18 EN D.S.C. Snapshot) You can use your camcorder as a Digital Still Camera for taking snapshots. A Image Size (੬ pg. 28, 52) B Shooting Icon (੬ pg. ...
RECORDING (GR-D93/D73 only) Basic Shooting (D.S.C. Still images are recorded in the memory card. NOTE: Before continuing,...x 768/STANDARD 1280 x 960/FINE*** 1280 x 960/STANDARD*** 1600 x 1200/FINE*** 1600 x 1200/STANDARD*** * Optional ** Provided *** GR-D93 only MultiMediaCard 8 MB** 16 MB* 32 MB* 55 105 215 190 320 645 24 48 100 75 160 320 16 32 60 ...50 105 215 10 21 42 34 65 135 18 EN D.S.C. Snapshot) You can use your camcorder as a Digital Still Camera for taking snapshots. A Image Size (੬ pg. 28, 52) B Shooting Icon (੬ pg. ...

Instruction Manual
Page 19
... wish to dub, perform up to a memory card, the WIDE mode identifying signal is stored in 640 x 480 pixels. RECORDING (GR-D93/D73 only) EN 19 DIGITAL STILL CAMERA (D.S.C.) RECORDING & PLAYBACK (GR-D93/D73 only) Dubbing Still Images Recorded On A Tape To A Memory Card Still images can be dubbed from a tape to...
... wish to dub, perform up to a memory card, the WIDE mode identifying signal is stored in 640 x 480 pixels. RECORDING (GR-D93/D73 only) EN 19 DIGITAL STILL CAMERA (D.S.C.) RECORDING & PLAYBACK (GR-D93/D73 only) Dubbing Still Images Recorded On A Tape To A Memory Card Still images can be dubbed from a tape to...
Instruction Manual
Page 20
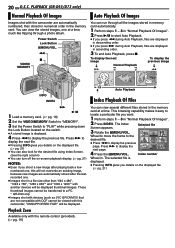
... 5 to "PLAY" while pressing down the Lock Button located on the displayed file. (੬ pg. 21) Playback Zoom Available only with the camcorder are not compatible with DCF cannot be viewed with another devices will be displayed thumbnail images. These thumbnail images cannot be ...to display the next page. 4 Press the MMENU/VOL. The selected file is displayed. 4 Press 3 to a PC. * GR-D93 only ● Images shot with devices (such as JVC GR-DVM70) that are automatically numbered, then stored in numerical order in "Normal Playback Of Images". 2 Press INDEX. Power Switch Lock...
... 5 to "PLAY" while pressing down the Lock Button located on the displayed file. (੬ pg. 21) Playback Zoom Available only with the camcorder are not compatible with DCF cannot be viewed with another devices will be displayed thumbnail images. These thumbnail images cannot be ...to display the next page. 4 Press the MMENU/VOL. The selected file is displayed. 4 Press 3 to a PC. * GR-D93 only ● Images shot with devices (such as JVC GR-DVM70) that are automatically numbered, then stored in numerical order in "Normal Playback Of Images". 2 Press INDEX. Power Switch Lock...