Instruction Manual
Page 1
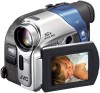
... No. which is located on the bottom of the GR-D93. DIGITAL VIDEO CAMERA GR-D93 GR-D73 GR-D33 Please visit our Homepage on the World Wide Web for Digital Video Camera: http://www.jvc.co.jp/english/cyber/ For Accessories: http://www.jvc.co.jp/english/accessory/ The camcorder illustrations appearing in the pages 2 - 3 to "OFF". (੬ pg...
... No. which is located on the bottom of the GR-D93. DIGITAL VIDEO CAMERA GR-D93 GR-D73 GR-D33 Please visit our Homepage on the World Wide Web for Digital Video Camera: http://www.jvc.co.jp/english/cyber/ For Accessories: http://www.jvc.co.jp/english/accessory/ The camcorder illustrations appearing in the pages 2 - 3 to "OFF". (੬ pg...
Instruction Manual
Page 3
... combination to qualified service personnel. EN 3 Follow all warnings. 4. Do not install near water. 6. This camcorder is not compatible with GR-D93 and GR-D73 only. Any commercial use without proper permission is damaged, liquid has been spilled or objects have fallen into... 10. IMPORTANT SAFTY INSTRUCTIONS 1. Install in any heat sources such as a show, performance or exhibition for private consumer use attachments/accessories specified by the manufacturer, or sold with the manufacturer's instructions. 8. When a cart is intended for personal enjoyment, it is ...
... combination to qualified service personnel. EN 3 Follow all warnings. 4. Do not install near water. 6. This camcorder is not compatible with GR-D93 and GR-D73 only. Any commercial use without proper permission is damaged, liquid has been spilled or objects have fallen into... 10. IMPORTANT SAFTY INSTRUCTIONS 1. Install in any heat sources such as a show, performance or exhibition for private consumer use attachments/accessories specified by the manufacturer, or sold with the manufacturer's instructions. 8. When a cart is intended for personal enjoyment, it is ...
Instruction Manual
Page 4
...CONTENTS GETTING STARTED 5 ADVANCED FEATURES 25 Provided Accessories 5 Power 6 Grip Adjustment 7 Operation Mode 8 Date/Time Settings 8 Viewfinder Adjustment 9 Brightness Adjustment Of The Display 9 Tripod Mounting 9 Loading/Unloading A Cassette 10 Loading/Unloading A Memory Card (GR-D93/73 only) ...... 10 VIDEO RECORDING &... PLAYBACK 11 VIDEO RECORDING 11 Basic Recording 11 LCD Monitor And Viewfinder 12 Tape Remaining Time 12 Zooming 12 Journalistic Shooting 13 Self Recording 13 Time ...
...CONTENTS GETTING STARTED 5 ADVANCED FEATURES 25 Provided Accessories 5 Power 6 Grip Adjustment 7 Operation Mode 8 Date/Time Settings 8 Viewfinder Adjustment 9 Brightness Adjustment Of The Display 9 Tripod Mounting 9 Loading/Unloading A Cassette 10 Loading/Unloading A Memory Card (GR-D93/73 only) ...... 10 VIDEO RECORDING &... PLAYBACK 11 VIDEO RECORDING 11 Basic Recording 11 LCD Monitor And Viewfinder 12 Tape Remaining Time 12 Zooming 12 Journalistic Shooting 13 Self Recording 13 Time ...
Instruction Manual
Page 5
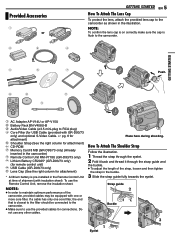
...provided with insulation sheet). If a cable has only one or more core filter. Provided Accessories or GETTING STARTED EN 5 How To Attach The Lens Cap To protect the lens, attach the provided lens cap to the camcorder. NOTE: To confirm the lens cap is on correctly make sure the cap is pre... strap through the eyelet. 2 Fold it back and thread it through the strap guide and the buckle. ● To adjust the length of shipment (with GR-D93/73 only) and optional S-Video Cable. ੬ pg. 6 for attachment) e Shoulder Strap (See the right column for attachment) f CD-ROM g Memory Card ...
...provided with insulation sheet). If a cable has only one or more core filter. Provided Accessories or GETTING STARTED EN 5 How To Attach The Lens Cap To protect the lens, attach the provided lens cap to the camcorder. NOTE: To confirm the lens cap is on correctly make sure the cap is pre... strap through the eyelet. 2 Fold it back and thread it through the strap guide and the buckle. ● To adjust the length of shipment (with GR-D93/73 only) and optional S-Video Cable. ੬ pg. 6 for attachment) e Shoulder Strap (See the right column for attachment) f CD-ROM g Memory Card ...

Instruction Manual
Page 54
...The Display (BRIGHT) .........9 C Changing The Menu Settings 25 Charging The Battery Pack 6 Cleaning The Camcorder 48 Clock adjustment (CLOCK ADJ 8 Connections Charging 6 Dubbing 34, 35 To A PC 36 To ...(QUALITY 27 Playback sound (SOUND MODE, NARRATION) ........ 28 Playback Special Effects 16 Playback Zoom 16 Power Switch Position 8 Priority Setting (PRIORITY 27 Program AE With Special Effects (PROGRAM ...(SPOTLIGHT 31 Strobe (STROBE 31 Twilight (TWILIGHT 31 Protecting Files (PROTECT 22 Provided Accessories 5 R Recording media selection (REC SELECT 28 Recording Mode (REC MODE 26, ...
...The Display (BRIGHT) .........9 C Changing The Menu Settings 25 Charging The Battery Pack 6 Cleaning The Camcorder 48 Clock adjustment (CLOCK ADJ 8 Connections Charging 6 Dubbing 34, 35 To A PC 36 To ...(QUALITY 27 Playback sound (SOUND MODE, NARRATION) ........ 28 Playback Special Effects 16 Playback Zoom 16 Power Switch Position 8 Priority Setting (PRIORITY 27 Program AE With Special Effects (PROGRAM ...(SPOTLIGHT 31 Strobe (STROBE 31 Twilight (TWILIGHT 31 Protecting Files (PROTECT 22 Provided Accessories 5 R Recording media selection (REC SELECT 28 Recording Mode (REC MODE 26, ...
