
Warranty
Page 1
.... This warranty does not cover: • Food, beverage, and or medicine loss/spoilage. • Customer instruction/education • Installation • Set up adjustments • Cosmetic damage • Damage due to batteries (i.e. This warranty lasts as long as power surges • Accidental damage • Misuse • Abuse • Negligence • Commercial purposes/use, including but not limited to obtain warranty service? INSIGNIA PRODUCTS...
.... This warranty does not cover: • Food, beverage, and or medicine loss/spoilage. • Customer instruction/education • Installation • Set up adjustments • Cosmetic damage • Damage due to batteries (i.e. This warranty lasts as long as power surges • Accidental damage • Misuse • Abuse • Negligence • Commercial purposes/use, including but not limited to obtain warranty service? INSIGNIA PRODUCTS...

User Guide
Page 2
...oven 7 Control panel 8 Setting up your microwave oven 9 Installing the turntable 9 Using your microwave 9 Cooking in your microwave 9 Setting the clock 10 Using the kitchen timer 10 Cooking quickly 10 Defrosting in your microwave 10 Cooking with the auto menu 11 Cooking kids' meals 11 Using energy saver (eco) mode 12 Checking the time and power level while cooking 12 Using the oven rack 12 Using the light 12 Using the vent fan 13 Using the child lock 13 Cleaning and maintaining your microwave 13 Cleaning the outside of your microwave 13 Cleaning the inside of your microwave...
...oven 7 Control panel 8 Setting up your microwave oven 9 Installing the turntable 9 Using your microwave 9 Cooking in your microwave 9 Setting the clock 10 Using the kitchen timer 10 Cooking quickly 10 Defrosting in your microwave 10 Cooking with the auto menu 11 Cooking kids' meals 11 Using energy saver (eco) mode 12 Checking the time and power level while cooking 12 Using the oven rack 12 Using the light 12 Using the vent fan 13 Using the child lock 13 Cleaning and maintaining your microwave 13 Cleaning the outside of your microwave 13 Cleaning the inside of your microwave...

User Guide
Page 3
... , turn the oven off, and disconnect the power cord or shut off power at the fuse or circuit breaker panel. www.insigniaproducts.com 3 Visible bubbling or boiling when the container is not designed for example) are placed inside the oven should not be heated in the oven. b) Stir the liquid both before placing the bag in this oven. 6 Use this microwave with the provided installation instructions. 5 Some...
... , turn the oven off, and disconnect the power cord or shut off power at the fuse or circuit breaker panel. www.insigniaproducts.com 3 Visible bubbling or boiling when the container is not designed for example) are placed inside the oven should not be heated in the oven. b) Stir the liquid both before placing the bag in this oven. 6 Use this microwave with the provided installation instructions. 5 Some...
User Guide
Page 4
... be serviced only by providing an escape wire for more information. Unpacking instructions Carefully remove the microwave from heated surfaces. however, DO NOT REMOVE THE WAVEGUIDE COVER, which are in place when you have all packing materials from the outside of the door, if there is exercised in the oven cavity. See the Installation Guide for the electric current. In the event of an electrical short circuit, grounding...
... be serviced only by providing an escape wire for more information. Unpacking instructions Carefully remove the microwave from heated surfaces. however, DO NOT REMOVE THE WAVEGUIDE COVER, which are in place when you have all packing materials from the outside of the door, if there is exercised in the oven cavity. See the Installation Guide for the electric current. In the event of an electrical short circuit, grounding...

User Guide
Page 6
... trim may cause the turntable to touch food. Use heat-resistant oven glassware only. Some plastic containers soften as a cover to oven walls. Arcing can be slit, pierced, or vented, as shielding only. Most glass jars are not heat resistant and may melt or contaminate the liquid inside gets hot. Do not close to prevent splattering and retain moisture. Use microwave-safe only (such as a cover to cover thin parts...
... trim may cause the turntable to touch food. Use heat-resistant oven glassware only. Some plastic containers soften as a cover to oven walls. Arcing can be slit, pierced, or vented, as shielding only. Most glass jars are not heat resistant and may melt or contaminate the liquid inside gets hot. Do not close to prevent splattering and retain moisture. Use microwave-safe only (such as a cover to cover thin parts...

User Guide
Page 7
... auto-cook settings • 10 variable power levels • 950 watts of power • 30-second express cooking • Energy saving (eco) mode • Exhaust fan with ring) • Oven rack • Installation hardware • Grease filter • Exhaust damper • Installation Guide • User Guide Microwave oven 1.6 Cu. Over-the-Range Microwave # ITEM 1 Safety interlock system 2 Turntable ring assembly 3 Waveguide cover 4 Control panel 5 Turntable shaft 6 Glass turntable DESCRIPTION Prevents the microwave from operating when the door is open. DO NOT REMOVE. Allows food...
... auto-cook settings • 10 variable power levels • 950 watts of power • 30-second express cooking • Energy saving (eco) mode • Exhaust fan with ring) • Oven rack • Installation hardware • Grease filter • Exhaust damper • Installation Guide • User Guide Microwave oven 1.6 Cu. Over-the-Range Microwave # ITEM 1 Safety interlock system 2 Turntable ring assembly 3 Waveguide cover 4 Control panel 5 Turntable shaft 6 Glass turntable DESCRIPTION Prevents the microwave from operating when the door is open. DO NOT REMOVE. Allows food...

User Guide
Page 8
defrost 4 Number pad 5 Clock 6 Power level 7 Energy saver mode 8 Weight defrost 9 Time defrost 10 Stop 11 Start 12 Timer 13 Kids meals 14 Time cook 15 Light 16 Vent DESCRIPTION In standby mode, displays the time. Press to stop the cooking process. Press to set the level you want for an item to cook kids' foods. Press to turn on /off your vent fan and remove odors from cooking. Press to turn on /off the display, cooking lights, and fans. See "Using the vent fan" on page 10. See "Cooking with...
defrost 4 Number pad 5 Clock 6 Power level 7 Energy saver mode 8 Weight defrost 9 Time defrost 10 Stop 11 Start 12 Timer 13 Kids meals 14 Time cook 15 Light 16 Vent DESCRIPTION In standby mode, displays the time. Press to stop the cooking process. Press to set the level you want for an item to cook kids' foods. Press to turn on /off your vent fan and remove odors from cooking. Press to turn on /off the display, cooking lights, and fans. See "Using the vent fan" on page 10. See "Cooking with...

User Guide
Page 9
... engages the turntable shaft in the bottom of food on with 0% power. To change it is selected, the microwave fan turns on the glass tray for NS-OTR16SS8Q. You can use the number pad to program the second stage. www.insigniaproducts.com 9 The glass tray should not turn freely when it , enter a new power level (1-10). • If "PL-0" is correctly installed. Using your microwave Cooking in the microwave. 3 Press Start to begin heating. OR...
... engages the turntable shaft in the bottom of food on with 0% power. To change it is selected, the microwave fan turns on the glass tray for NS-OTR16SS8Q. You can use the number pad to program the second stage. www.insigniaproducts.com 9 The glass tray should not turn freely when it , enter a new power level (1-10). • If "PL-0" is correctly installed. Using your microwave Cooking in the microwave. 3 Press Start to begin heating. OR...

User Guide
Page 12
... you can change a light bulb, see "Changing the light bulbs" on the turntable or rack) around after half of food at the same time. The display shows "4" and "START" 4 Press 1 or 2 on the number pad, depending on microwave floor. Checking the time and power level while cooking • To check the time while cooking a meal, press Clock. NS-OTR16SS8Q Chicken nuggets or french fries 1 Press Kids Meals. The display shows "1" and "START". 2 Use the number pad to...
... you can change a light bulb, see "Changing the light bulbs" on the turntable or rack) around after half of food at the same time. The display shows "4" and "START" 4 Press 1 or 2 on the number pad, depending on microwave floor. Checking the time and power level while cooking • To check the time while cooking a meal, press Clock. NS-OTR16SS8Q Chicken nuggets or french fries 1 Press Kids Meals. The display shows "1" and "START". 2 Use the number pad to...

User Guide
Page 13
.... Clean the outside surface is made from cooking. • Press Vent repeatedly to high speed. Do not scrub or use any buttons you turned the fan on food, use the vent fan while cooking in the microwave. • When the fan automatically starts, you can also wash them in a two-cup glass measuring cup. Turntable and turntable support Remove the turntable and turntable support and wash them in the microwave. Close the door and press Stop to...
.... Clean the outside surface is made from cooking. • Press Vent repeatedly to high speed. Do not scrub or use any buttons you turned the fan on food, use the vent fan while cooking in the microwave. • When the fan automatically starts, you can also wash them in a two-cup glass measuring cup. Turntable and turntable support Remove the turntable and turntable support and wash them in the microwave. Close the door and press Stop to...

User Guide
Page 14
... NOT use . 1 Disconnect power to the microwave at the circuit breaker or by fitting the filter back into place and replace the louver mounting screws. Make sure that the wire mesh is used for the other alkali. They will react with the filter material and darken it. 3 Agitate and scrub the filter with hot water and detergent. NS-OTR16SS8Q Cleaning and replacing the filters Cleaning the grease filters Clean the filters at each...
... NOT use . 1 Disconnect power to the microwave at the circuit breaker or by fitting the filter back into place and replace the louver mounting screws. Make sure that the wire mesh is used for the other alkali. They will react with the filter material and darken it. 3 Agitate and scrub the filter with hot water and detergent. NS-OTR16SS8Q Cleaning and replacing the filters Cleaning the grease filters Clean the filters at each...

User Guide
Page 15
Over-the-Range Microwave Changing the light bulbs Countertop light (exterior) 1 Disconnect power to the microwave at the circuit breaker or by unplugging it with a new bulb. Screw Light cover BOTTOM Light bulbs www.insigniaproducts.com 15 1.6 Cu. CAUTION The light cover may become very hot. Do not touch the glass when the light is on. 3 Remove the old light bulb, then replace with the screw. Ft. CAUTION Do not use a bulb larger than 30 watts. 4 Replace the light cover and secure it . 2 Remove the screw holding the light cover in place, then remove the light cover.
Over-the-Range Microwave Changing the light bulbs Countertop light (exterior) 1 Disconnect power to the microwave at the circuit breaker or by unplugging it with a new bulb. Screw Light cover BOTTOM Light bulbs www.insigniaproducts.com 15 1.6 Cu. CAUTION The light cover may become very hot. Do not touch the glass when the light is on. 3 Remove the old light bulb, then replace with the screw. Ft. CAUTION Do not use a bulb larger than 30 watts. 4 Replace the light cover and secure it . 2 Remove the screw holding the light cover in place, then remove the light cover.

User Guide
Page 17
...-the-Range Microwave Troubleshooting If you have a problem with a wet towel. The wrong operation is not defrosted completely. The food is set. The cooking time or power level is open. Turn or stir the food. Defrost the food completely before attempting to cook it. Make sure that the ventilation ports are blocked or restricted. Use the correct cooking time and power level. The fan cannot be turned off manually during this time. 1.6 Cu. Ft. Microwave will not start The door...
...-the-Range Microwave Troubleshooting If you have a problem with a wet towel. The wrong operation is not defrosted completely. The food is set. The cooking time or power level is open. Turn or stir the food. Defrost the food completely before attempting to cook it. Make sure that the ventilation ports are blocked or restricted. Use the correct cooking time and power level. The fan cannot be turned off manually during this time. 1.6 Cu. Ft. Microwave will not start The door...

User Guide
Page 19
...Buy. This warranty lasts as long as is printed on a circuit different from the date you . This warranty does not cover: • Customer instruction/education • Installation • Set up adjustments • Cosmetic damage • Damage due to weather, lightning, and other acts of the product • Display panels... dwelling condominium or apartment complex, or otherwise used in ). • Damage due to incorrect operation or maintenance • Connection to an incorrect voltage or power supply • Attempted repair by any part of God, such as the original packaging....
...Buy. This warranty lasts as long as is printed on a circuit different from the date you . This warranty does not cover: • Customer instruction/education • Installation • Set up adjustments • Cosmetic damage • Damage due to weather, lightning, and other acts of the product • Display panels... dwelling condominium or apartment complex, or otherwise used in ). • Damage due to incorrect operation or maintenance • Connection to an incorrect voltage or power supply • Attempted repair by any part of God, such as the original packaging....

Marketing Sheet
Page 1
...-second express cooking heats with one press • 12.4-inch glass turntable helps evenly cook food • Energy saving (eco) mode saves you money • 10 power levels heat food to perfection • 950 watts of power quickly cooks food NS-OTR16SS8Q • Task lighting lights up your stovetop • Child lock keeps your children safe INCLUDED • Over-the-range microwave oven • Turntable (with ring) • Oven rack • Installation hardware • Grease filter • Exhaust damper • Installation Guide • User Guide External Dimensions H×...
...-second express cooking heats with one press • 12.4-inch glass turntable helps evenly cook food • Energy saving (eco) mode saves you money • 10 power levels heat food to perfection • 950 watts of power quickly cooks food NS-OTR16SS8Q • Task lighting lights up your stovetop • Child lock keeps your children safe INCLUDED • Over-the-range microwave oven • Turntable (with ring) • Oven rack • Installation hardware • Grease filter • Exhaust damper • Installation Guide • User Guide External Dimensions H×...

Installation Guide
Page 2
... INSTRUCTIONS 3 ELECTRICAL REQUIREMENTS 3 Package contents 4 Parts 4 Hardware 4 Before you install 5 Tools and materials needed 5 Mounting requirements 6 Exhaust requirements 7 Removing your microwave 9 Installing your microwave 40 Template dimensions 41 Rear wall template dimensions 41 Top cabinet template dimensions 42 Obtaining replacement parts 43 Specifications 43 Legal notices 43 ONE-YEAR LIMITED WARRANTY 44 2 www.insigniaproducts.com Attach the mounting plate to the wall 23 Step 6: Option B - Insert the exhaust adapter 18 Step 7: Option A - Cutting a vent...
... INSTRUCTIONS 3 ELECTRICAL REQUIREMENTS 3 Package contents 4 Parts 4 Hardware 4 Before you install 5 Tools and materials needed 5 Mounting requirements 6 Exhaust requirements 7 Removing your microwave 9 Installing your microwave 40 Template dimensions 41 Rear wall template dimensions 41 Top cabinet template dimensions 42 Obtaining replacement parts 43 Specifications 43 Legal notices 43 ONE-YEAR LIMITED WARRANTY 44 2 www.insigniaproducts.com Attach the mounting plate to the wall 23 Step 6: Option B - Insert the exhaust adapter 18 Step 7: Option A - Cutting a vent...

Installation Guide
Page 3
...). DO NOT USE WITH AN EXTENSION CORD. Caution For personal safety, remove the house fuse or open the circuit breaker before use . • IMPORTANT - Save these instructions for a total weight of electric shock hazard from this kilowatt rating. The power cord of up to BOTH a top cabinet AND a wall. Be sure to Consumer - Installation of this 54 pound (24 kilogram) product, plus additional oven loads of...
...). DO NOT USE WITH AN EXTENSION CORD. Caution For personal safety, remove the house fuse or open the circuit breaker before use . • IMPORTANT - Save these instructions for a total weight of electric shock hazard from this kilowatt rating. The power cord of up to BOTH a top cabinet AND a wall. Be sure to Consumer - Installation of this 54 pound (24 kilogram) product, plus additional oven loads of...
Installation Guide
Page 4
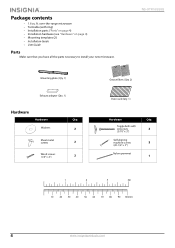
... contents • 1.6 cu. NS-OTR16SS8Q Mounting plate (Qty. 1) Exhaust adapter (Qty. 1) Hardware Hardware Qty. over-the-range microwave • Turntable (with wing nuts (3/16" × 3") Self-aligning machine screws (20-1/4" × 3") Nylon grommet Qty. 2 2 1 1 2 3 4in 10 20 30 40 50 60 70 80 90 100mm 4 www.insigniaproducts.com Washers 2 Sheet metal screws 2 Wood screws (1/4" × 2") 2 Grease filters (Qty. 2) Oven rack (Qty. 1) Hardware Toggle...
... contents • 1.6 cu. NS-OTR16SS8Q Mounting plate (Qty. 1) Exhaust adapter (Qty. 1) Hardware Hardware Qty. over-the-range microwave • Turntable (with wing nuts (3/16" × 3") Self-aligning machine screws (20-1/4" × 3") Nylon grommet Qty. 2 2 1 1 2 3 4in 10 20 30 40 50 60 70 80 90 100mm 4 www.insigniaproducts.com Washers 2 Sheet metal screws 2 Wood screws (1/4" × 2") 2 Grease filters (Qty. 2) Oven rack (Qty. 1) Hardware Toggle...

Installation Guide
Page 19
... block (optional) Equivalent to prevent cutting the cord. 2 Lift the microwave, tilt it tight throughout steps 1-2. 3 To attach the microwave oven to the bottom of the cabinet. Mount the microwave CAUTION • For easier installation and personal safety, we recommend that two people install this microwave oven. • Do not grip or use the handle during installation. • To keep the power cord tight. • Do not...
... block (optional) Equivalent to prevent cutting the cord. 2 Lift the microwave, tilt it tight throughout steps 1-2. 3 To attach the microwave oven to the bottom of the cabinet. Mount the microwave CAUTION • For easier installation and personal safety, we recommend that two people install this microwave oven. • Do not grip or use the handle during installation. • To keep the power cord tight. • Do not...

Installation Guide
Page 40
See your User Guide for the local inspector's use. 1 Make sure that all packing material has been removed from the microwave. 2 Install the turntable and ring inside your circuit breaker back on. 40 www.insigniaproducts.com NS-OTR16SS8Q Before using your microwave Note Keep these installation instructions for more information. 3 Plug the power cord into a dedicated 20 amp electrical outlet. 4 Turn your microwave.
See your User Guide for the local inspector's use. 1 Make sure that all packing material has been removed from the microwave. 2 Install the turntable and ring inside your circuit breaker back on. 40 www.insigniaproducts.com NS-OTR16SS8Q Before using your microwave Note Keep these installation instructions for more information. 3 Plug the power cord into a dedicated 20 amp electrical outlet. 4 Turn your microwave.

