
Firmware Installation Guide (English)
Page 1
... down the number of Windows XP, Windows Vista, Windows 7 or Mac OS 10.3 or newer. This option is not recommended with dial‐up or DSL service with an open USB port, USB 2.0 flash drive (stick), broadband internet access and operating software of your TV (this update process. Be sure to download 1. If the instructions provided below . 2. Firmware update: Download/Install instructions for TV Model: NS‐L55X‐10A System requirements...
... down the number of Windows XP, Windows Vista, Windows 7 or Mac OS 10.3 or newer. This option is not recommended with dial‐up or DSL service with an open USB port, USB 2.0 flash drive (stick), broadband internet access and operating software of your TV (this update process. Be sure to download 1. If the instructions provided below . 2. Firmware update: Download/Install instructions for TV Model: NS‐L55X‐10A System requirements...
Firmware Installation Guide (English)
Page 2
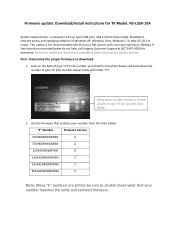
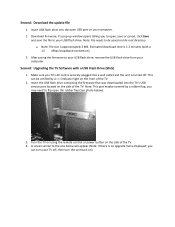
Second: Download the update file 1. After saving the firmware to your USB flash drive. Note: This port maybe covered by a red indicator light on ): Note: File needs to be verified by a rubber flap, you TV's AC cord is securely plugged into a wall outlet and the unit is no upgrade menu displayed; a. Note: File size is 1‐2 minutes (with a USB Flash Drive (Stick) 1. Second: Upgrading the TV Software with a 1.5 Mbps broadband connection). 3. This can turn the unit...
Second: Download the update file 1. After saving the firmware to your USB flash drive. Note: This port maybe covered by a red indicator light on ): Note: File needs to be verified by a rubber flap, you TV's AC cord is securely plugged into a wall outlet and the unit is no upgrade menu displayed; a. Note: File size is 1‐2 minutes (with a USB Flash Drive (Stick) 1. Second: Upgrading the TV Software with a 1.5 Mbps broadband connection). 3. This can turn the unit...
What is Firmware? (English)
Page 1
... of the operation. You just got a new digital camera and you accidentally deleted all of media. In other type of your photos. Since this is added to your device supports firmware upgrades, make sure you carefully follow the upgrading instructions to take pictures once again. Tech Tutor information you can solve the problem quickly. Whether it's a cell phone, remote control, calculator, digital camera, TV...
... of the operation. You just got a new digital camera and you accidentally deleted all of media. In other type of your photos. Since this is added to your device supports firmware upgrades, make sure you carefully follow the upgrading instructions to take pictures once again. Tech Tutor information you can solve the problem quickly. Whether it's a cell phone, remote control, calculator, digital camera, TV...
User Manual (English)
Page 3
...safety instructions 2 Warnings 2 Cautions 3 Introduction 4 Installing a wall-mount bracket 4 TV components 5 Accessories 5 Cleaning cloth 5 Front 5 Back 5 Side 6 Remote control 6 Using the remote control 7 Installing the remote control batteries 7 Aiming the remote control 8 Using the remote control holder 8 Programming a universal remote control to work with your TV . . . . 8 Making connections 9 Connecting the power 9 Connecting an outdoor antenna 9 Connecting cable TV 9 Connecting satellite TV via a satellite TV box 10 Connecting a VCR 10 Connecting a camcorder or game...
...safety instructions 2 Warnings 2 Cautions 3 Introduction 4 Installing a wall-mount bracket 4 TV components 5 Accessories 5 Cleaning cloth 5 Front 5 Back 5 Side 6 Remote control 6 Using the remote control 7 Installing the remote control batteries 7 Aiming the remote control 8 Using the remote control holder 8 Programming a universal remote control to work with your TV . . . . 8 Making connections 9 Connecting the power 9 Connecting an outdoor antenna 9 Connecting cable TV 9 Connecting satellite TV via a satellite TV box 10 Connecting a VCR 10 Connecting a camcorder or game...
User Manual (English)
Page 4
... Downloading rating information 26 Locking control buttons 27 Using closed captioning 27 Viewing closed captioning 27 Selecting the closed captioning mode 27 Customizing DTV closed captioning styles 28 Adjusting time settings 29 Setting the clock 29 Setting the sleep timer 29 Adjusting menu settings 30 Selecting the menu language 30 Changing the menu transparency 30 Labeling an input source 31 Adjusting the INSIGNIA logo brightness 32 Turning Auto Input Sensing on or off 32 Resetting settings to the defaults 33 Programming your remote control 33 Troubleshooting remote control...
... Downloading rating information 26 Locking control buttons 27 Using closed captioning 27 Viewing closed captioning 27 Selecting the closed captioning mode 27 Customizing DTV closed captioning styles 28 Adjusting time settings 29 Setting the clock 29 Setting the sleep timer 29 Adjusting menu settings 30 Selecting the menu language 30 Changing the menu transparency 30 Labeling an input source 31 Adjusting the INSIGNIA logo brightness 32 Turning Auto Input Sensing on or off 32 Resetting settings to the defaults 33 Programming your remote control 33 Troubleshooting remote control...

User Manual (English)
Page 5
..., shelves, desks, speakers, chests, or carts may fall over , or knocked down. • Make sure that you route all cords and cables so that they cannot be pulled or grabbed by curious children. Use only a TV stand rated for the weight of your TV. • Carefully read and understand all enclosed instructions for proper use your flat panel display As you...
..., shelves, desks, speakers, chests, or carts may fall over , or knocked down. • Make sure that you route all cords and cables so that they cannot be pulled or grabbed by curious children. Use only a TV stand rated for the weight of your TV. • Carefully read and understand all enclosed instructions for proper use your flat panel display As you...
User Manual (English)
Page 8
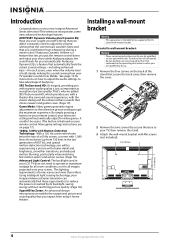
To install a wall-mount bracket: Warning These servicing instructions are lower than that lets you put the remote control down and enjoy your show while Audyssey adjusts the sound levels for all images projected onto your screen. SRS TruSurround HD: At Insignia, providing you with the clearer dialog and the enhanced bass sounds that movie viewers and games crave. (Page 19) Game Mode: Video games generally require adjustments to the television picture settings to...
To install a wall-mount bracket: Warning These servicing instructions are lower than that lets you put the remote control down and enjoy your show while Audyssey adjusts the sound levels for all images projected onto your screen. SRS TruSurround HD: At Insignia, providing you with the clearer dialog and the enhanced bass sounds that movie viewers and games crave. (Page 19) Game Mode: Video games generally require adjustments to the television picture settings to...
User Manual (English)
Page 9
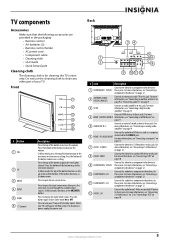
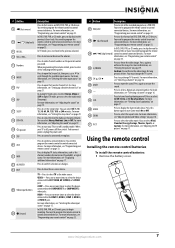
...; Remote control holder • AC power cord • Component cable • Cleaning cloth • User Guide • Quick Setup Guide Cleaning cloth The cleaning cloth is off (standby mode). In Menu mode, the top of the button functions as the up arrow and the bottom of your TV on -screen menu. For more information, see "Connecting a component video device" on page 9. 3 SPDIF Connect an audio amplifier to this jack. For more 4 HDMI 1/HDMI 2/HDMI 3 information, see "Connecting a S-Video...
...; Remote control holder • AC power cord • Component cable • Cleaning cloth • User Guide • Quick Setup Guide Cleaning cloth The cleaning cloth is off (standby mode). In Menu mode, the top of the button functions as the up arrow and the bottom of your TV on -screen menu. For more information, see "Connecting a component video device" on page 9. 3 SPDIF Connect an audio amplifier to this jack. For more 4 HDMI 1/HDMI 2/HDMI 3 information, see "Connecting a S-Video...
User Manual (English)
Page 10
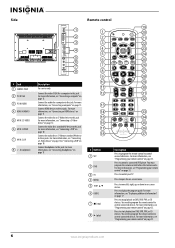
... control connected devices. For more information, see "Connecting a VCR" on DVD, DVR, PVR, or CD devices. Press to start playback on page 10. You need to program the remote control to these jacks. Press to these jacks. For more information, see "Programming your TV. Connect HDMI devices to open the on page 13. Side # Jack 1 SERVICE PORT 2 PC IN VGA 3 PC IN AUDIO 4 HDMI 4/HDMI 5 5 AV IN 2 S-VIDEO 6 AV IN 2 VIDEO 7 AV IN 2 L/R 8 (headphone...
... control connected devices. For more information, see "Connecting a VCR" on DVD, DVR, PVR, or CD devices. Press to start playback on page 10. You need to program the remote control to these jacks. Press to these jacks. For more information, see "Programming your TV. Connect HDMI devices to open the on page 13. Side # Jack 1 SERVICE PORT 2 PC IN VGA 3 PC IN AUDIO 4 HDMI 4/HDMI 5 5 AV IN 2 S-VIDEO 6 AV IN 2 VIDEO 7 AV IN 2 L/R 8 (headphone...
User Manual (English)
Page 11
... 2 VIDEO, or S-VIDEO jack. To disconnect power, unplug the power cord. For more information, see "Programming your remote control" on -screen menu. COMP-Press one or more information, see "Setting the sleep timer" on page 17. For more times to select the device connected to select the aspect ratio. Press this button again to turn Game mode On or Off. 36 ZOOM Press to the COMPONENT 1 or COMPONENT 2 video jacks. You need to program the remote control to mute the sound. Press to control connected...
... 2 VIDEO, or S-VIDEO jack. To disconnect power, unplug the power cord. For more information, see "Programming your remote control" on -screen menu. COMP-Press one or more information, see "Setting the sleep timer" on page 17. For more times to select the device connected to select the aspect ratio. Press this button again to turn Game mode On or Off. 36 ZOOM Press to the COMPONENT 1 or COMPONENT 2 video jacks. You need to program the remote control to mute the sound. Press to control connected...
User Manual (English)
Page 13
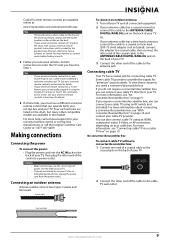
... plug the other end of the cable to the cable TV wall outlet. See your universal remote control's instructions for details. 3 If all connected equipment. 2 If your antenna cable has a coaxial connector, connect the cable to the ANTENNA/CABLE DIGITAL/ANALOG jack on the back of your TV. If you require a converter/descrambler box, you must use your TV for your universal remote control or set -top box and your TV. Codes for other remote controls are available online...
... plug the other end of the cable to the cable TV wall outlet. See your universal remote control's instructions for details. 3 If all connected equipment. 2 If your antenna cable has a coaxial connector, connect the cable to the ANTENNA/CABLE DIGITAL/ANALOG jack on the back of your TV. If you require a converter/descrambler box, you must use your TV for your universal remote control or set -top box and your TV. Codes for other remote controls are available online...

User Manual (English)
Page 15
... INPUT to open the Source List, then press or to select HDMI 1, HDMI 2, or HDMI 3. If the picture mode is connected to the S-VIDEO jack, the S-VIDEO jack controls the AV IN 2 L and R audio jacks. Next connect an audio cable to the HDMI 3 PC AUDIO INPUT jack and to the AV IN 2 VIDEO and AV IN 2 L and R audio jacks on your TV and to select AV1. 5 Insert a videotape into the VCR, then press PLAY. Note If a device is set to select...
... INPUT to open the Source List, then press or to select HDMI 1, HDMI 2, or HDMI 3. If the picture mode is connected to the S-VIDEO jack, the S-VIDEO jack controls the AV IN 2 L and R audio jacks. Next connect an audio cable to the HDMI 3 PC AUDIO INPUT jack and to the AV IN 2 VIDEO and AV IN 2 L and R audio jacks on your TV and to select AV1. 5 Insert a videotape into the VCR, then press PLAY. Note If a device is set to select...

User Manual (English)
Page 19
... INPUT. To disconnect power, unplug the power cord. Source List TV AV 1 AV 2 Component 1 Component 2 VGA HDMI 1 HDMI 2 HDMI 3 HDMI 4 HDMI 5 2 Press or to highlight the video input source your TV. The Game Inputs source list opens. Note If Auto Input Sensing is not set to your TV turned on , press INPUT. The Source List opens. Warning When your TV is connected to Game or Game Custom: 1 With your want . On-screen menu overview Picture menu Picture Mode Brightness Contrast Color Tint Sharpness PICTURE AUDIO CHANNELS SETTINGS Vivid...
... INPUT. To disconnect power, unplug the power cord. Source List TV AV 1 AV 2 Component 1 Component 2 VGA HDMI 1 HDMI 2 HDMI 3 HDMI 4 HDMI 5 2 Press or to highlight the video input source your TV. The Game Inputs source list opens. Note If Auto Input Sensing is not set to your TV turned on , press INPUT. The Source List opens. Warning When your TV is connected to Game or Game Custom: 1 With your want . On-screen menu overview Picture menu Picture Mode Brightness Contrast Color Tint Sharpness PICTURE AUDIO CHANNELS SETTINGS Vivid...
User Manual (English)
Page 21
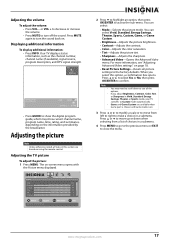
... to see "Adjusting Advanced Video settings" on page 18. • Reset Picture Settings-Resets all tasks in a submenu. 4 Press MENU to go to the previous menu or EXIT to the factory defaults. Your TV displays status information, such as the channel number, channel name (if available), signal source, program description, and DTV signal strength. Adjusting the picture Note Unless otherwise noted, all picture settings to close the menu. Picture Mode Brightness Contrast Color Tint Sharpness PICTURE AUDIO CHANNELS SETTINGS Vivid 42...
... to see "Adjusting Advanced Video settings" on page 18. • Reset Picture Settings-Resets all tasks in a submenu. 4 Press MENU to go to the previous menu or EXIT to the factory defaults. Your TV displays status information, such as the channel number, channel name (if available), signal source, program description, and DTV signal strength. Adjusting the picture Note Unless otherwise noted, all picture settings to close the menu. Picture Mode Brightness Contrast Color Tint Sharpness PICTURE AUDIO CHANNELS SETTINGS Vivid 42...

User Manual (English)
Page 22
In VGA mode or HDMI mode when a computer is set to change the overall color of the screen. Adjusting Advanced Video settings To adjust advanced video settings: 1 On the Picture menu, press or to access the sub-menu. Picture Brightness Contrast Color Tint Sharpness Advanced Video PICTURE AUDIO CHANNELS SETTINGS 50 50 64 0 0 MOVE OK ENTER SELECT MENU PREVIOUS Adjust advanced video features to fine tune the picture EXIT EXIT Picture Advanced Video Aspert Ratio Overscan Color Temperature Noise Reduction DCM Advanced Contrast PICTURE AUDIO CHANNELS SETTINGS Wide On...
In VGA mode or HDMI mode when a computer is set to change the overall color of the screen. Adjusting Advanced Video settings To adjust advanced video settings: 1 On the Picture menu, press or to access the sub-menu. Picture Brightness Contrast Color Tint Sharpness Advanced Video PICTURE AUDIO CHANNELS SETTINGS 50 50 64 0 0 MOVE OK ENTER SELECT MENU PREVIOUS Adjust advanced video features to fine tune the picture EXIT EXIT Picture Advanced Video Aspert Ratio Overscan Color Temperature Noise Reduction DCM Advanced Contrast PICTURE AUDIO CHANNELS SETTINGS Wide On...

User Manual (English)
Page 24
... TV source Antenna Cable Cable/Satellite Box 0 Analog Channels 0 Digital Channels Scan for channels MOVE OK ENTER SELECT MENU PREVIOUS Select Antenna if using the remote control. The Channels menu opens. 3 Press to highlight Audio Only, then press OK/ENTER or to access the sub-menu. 4 Press or to select CHANNELS. To play TV audio only: 1 Press MENU. To automatically scan for channels. Channels Auto Channel Search Add/Skip Channels Favorites Channel Labels Channel Strength Audio Only PICTURE AUDIO CHANNELS SETTINGS Off MOVE OK ENTER SELECT Adjust channel options MENU PREVIOUS...
... TV source Antenna Cable Cable/Satellite Box 0 Analog Channels 0 Digital Channels Scan for channels MOVE OK ENTER SELECT MENU PREVIOUS Select Antenna if using the remote control. The Channels menu opens. 3 Press to highlight Audio Only, then press OK/ENTER or to access the sub-menu. 4 Press or to select CHANNELS. To play TV audio only: 1 Press MENU. To automatically scan for channels. Channels Auto Channel Search Add/Skip Channels Favorites Channel Labels Channel Strength Audio Only PICTURE AUDIO CHANNELS SETTINGS Off MOVE OK ENTER SELECT Adjust channel options MENU PREVIOUS...

User Manual (English)
Page 27
.... Note When you are based on -screen menu opens with the Picture menu displayed. The Settings menu opens. Settings Parental Controls Closed Caption Time Menu Settings LOGO Brightness Auto Input Sensing PICTURE AUDIO CHANNELS SETTINGS Low On MOVE OK ENTER SELECT Set various TV options MENU PREVIOUS EXIT EXIT 3 Press to select CHANNELS. Enter Password www.insigniaproducts.com 23 Checking the DTV signal strength To check the DTV signal strength: 1 Press MENU. The on using the remote control. A TV program may have an MPAA or...
.... Note When you are based on -screen menu opens with the Picture menu displayed. The Settings menu opens. Settings Parental Controls Closed Caption Time Menu Settings LOGO Brightness Auto Input Sensing PICTURE AUDIO CHANNELS SETTINGS Low On MOVE OK ENTER SELECT Set various TV options MENU PREVIOUS EXIT EXIT 3 Press to select CHANNELS. Enter Password www.insigniaproducts.com 23 Checking the DTV signal strength To check the DTV signal strength: 1 Press MENU. The on using the remote control. A TV program may have an MPAA or...
User Manual (English)
Page 37
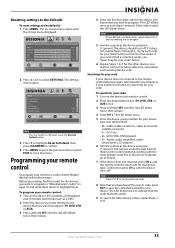
... program in "Manufacturers' codes" on page 37 and write them down or highlight them. Resetting settings to the defaults To reset settings to the remote control after trying all codes listed for your brand, or if your brand is not listed, try searching for your code. Settings Parental Controls Closed Caption Time Menu Settings LOGO Brightness Auto Input Sensing PICTURE AUDIO CHANNELS SETTINGS Low On MOVE OK ENTER SELECT Set various TV options MENU PREVIOUS EXIT EXIT Note You may need...
... program in "Manufacturers' codes" on page 37 and write them down or highlight them. Resetting settings to the defaults To reset settings to the remote control after trying all codes listed for your brand, or if your brand is not listed, try searching for your code. Settings Parental Controls Closed Caption Time Menu Settings LOGO Brightness Auto Input Sensing PICTURE AUDIO CHANNELS SETTINGS Low On MOVE OK ENTER SELECT Set various TV options MENU PREVIOUS EXIT EXIT Note You may need...
User Manual (English)
Page 53
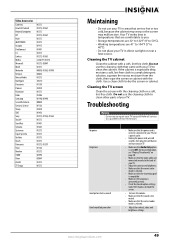
... cabinet with the cloth. Cleaning the TV screen Clean the screen with your TV. • Adjust the contrast and brightness. • Make sure that the correct video mode is connected correctly. • Check the closed caption settings. Use a clean cloth to a qualified service technician. Refer all service to dry the screen or cabinet. Your TV works best in temperatures that are comfortable to you. •...
... cabinet with the cloth. Cleaning the TV screen Clean the screen with your TV. • Adjust the contrast and brightness. • Make sure that the correct video mode is connected correctly. • Check the closed caption settings. Use a clean cloth to a qualified service technician. Refer all service to dry the screen or cabinet. Your TV works best in temperatures that are comfortable to you. •...
User Manual (English)
Page 54
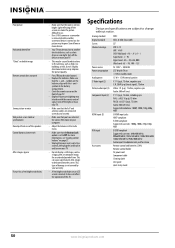
... correct VGA mode on your TV. • Do not display a still image, such as a hair dryer or neon light. A-8 ~ A-1, A ~ I Super band - Turn off the screen can cause a permanent after-image to Off. For more devices. • Your TV may interfere with the remote control signal. Specifications Design and specifications are connected correctly and securely. • Make sure that the + and - Analog standard Digital standard Screen Channel coverage Power source Power consumption Audio power S-Video input (2) Video/audio input (2) Component input (2) HDMI input (5) VGA input...
... correct VGA mode on your TV. • Do not display a still image, such as a hair dryer or neon light. A-8 ~ A-1, A ~ I Super band - Turn off the screen can cause a permanent after-image to Off. For more devices. • Your TV may interfere with the remote control signal. Specifications Design and specifications are connected correctly and securely. • Make sure that the + and - Analog standard Digital standard Screen Channel coverage Power source Power consumption Audio power S-Video input (2) Video/audio input (2) Component input (2) HDMI input (5) VGA input...


