

Warranty (English)
Page 1
...Insignia during the Warranty Period. The Warranty Period lasts for 2 years (730 days) from the date you purchased it from an authorized dealer of Insignia... Insignia and...an Insignia-approved repair person dispatched to your Insignia ...by Insignia) will (at a retail... Should the Insignia-approved repair ... is only available to Insignia television consumers residing in ... Two-year limited warranty Insignia Products ("Insignia") warrants to you, ...Insignia television (size and features to be determined by an authorized Insignia repair center or store personnel, Insignia...
...Insignia during the Warranty Period. The Warranty Period lasts for 2 years (730 days) from the date you purchased it from an authorized dealer of Insignia... Insignia and...an Insignia-approved repair person dispatched to your Insignia ...by Insignia) will (at a retail... Should the Insignia-approved repair ... is only available to Insignia television consumers residing in ... Two-year limited warranty Insignia Products ("Insignia") warrants to you, ...Insignia television (size and features to be determined by an authorized Insignia repair center or store personnel, Insignia...
Warranty (English)
Page 2
... the Product • Products sold as is a trademark of their respective owners. 2 www.insigniaproducts.com Contact Insignia: For customer service please call 1-877-467-4289 www.insigniaproducts.com Distributed by static (non-moving) images applied for lengthy periods (burn-in some countries. All rights... reserved. INSIGNIA SHALL NOT BE LIABLE FOR ANY INCIDENTAL OR CONSEQUENTIAL DAMAGES FOR THE BREACH OF...
... the Product • Products sold as is a trademark of their respective owners. 2 www.insigniaproducts.com Contact Insignia: For customer service please call 1-877-467-4289 www.insigniaproducts.com Distributed by static (non-moving) images applied for lengthy periods (burn-in some countries. All rights... reserved. INSIGNIA SHALL NOT BE LIABLE FOR ANY INCIDENTAL OR CONSEQUENTIAL DAMAGES FOR THE BREACH OF...
User Manual (English)
Page 3
... 16 Adjusting the volume 17 Displaying additional information 17 Adjusting the picture 17 Adjusting the TV picture 17 Adjusting Advanced Video settings 18 www.insigniaproducts.com i
... 16 Adjusting the volume 17 Displaying additional information 17 Adjusting the picture 17 Adjusting the TV picture 17 Adjusting Advanced Video settings 18 www.insigniaproducts.com i
User Manual (English)
Page 4
... the sleep timer 29 Adjusting menu settings 30 Selecting the menu language 30 Changing the menu transparency 30 Labeling an input source 31 Adjusting the INSIGNIA logo brightness 32 Turning Auto Input Sensing on or off 32 Resetting settings to the defaults 33 Programming your remote control 33 Troubleshooting remote control... Cleaning the TV cabinet 49 Cleaning the TV screen 49 Troubleshooting 49 Specifications 50 Legal notices 51 Two-year limited warranty 53 ii www.insigniaproducts.com
... the sleep timer 29 Adjusting menu settings 30 Selecting the menu language 30 Changing the menu transparency 30 Labeling an input source 31 Adjusting the INSIGNIA logo brightness 32 Turning Auto Input Sensing on or off 32 Resetting settings to the defaults 33 Programming your remote control 33 Troubleshooting remote control... Cleaning the TV cabinet 49 Cleaning the TV screen 49 Troubleshooting 49 Specifications 50 Legal notices 51 Two-year limited warranty 53 ii www.insigniaproducts.com
User Manual (English)
Page 5
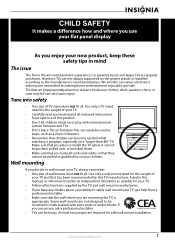
... your new product, keep these safety tips in this TV manufacturer, listed in mind The issue The home theater entertainment experience is appropriate. www.insigniaproducts.com 1 Wall mounting If you decide to the manufacturer's recommendations. f CHILD SAFETY It makes a difference how and where you use of your TV. • Carefully read...
... your new product, keep these safety tips in this TV manufacturer, listed in mind The issue The home theater entertainment experience is appropriate. www.insigniaproducts.com 1 Wall mounting If you decide to the manufacturer's recommendations. f CHILD SAFETY It makes a difference how and where you use of your TV. • Carefully read...
User Manual (English)
Page 6
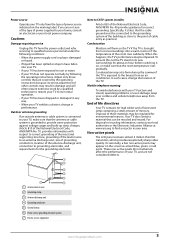
.... 7 Do not block any antenna or cable system. Unauthorized substitutions may cause skin inflammation. • If the liquid gets in correct operating condition. 2 www.insigniaproducts.com Handling the LCD panel • Your TV's screen is located on the apparatus. Safety check After completing any heat sources such as radiators, heat registers...
.... 7 Do not block any antenna or cable system. Unauthorized substitutions may cause skin inflammation. • If the liquid gets in correct operating condition. 2 www.insigniaproducts.com Handling the LCD panel • Your TV's screen is located on the apparatus. Safety check After completing any heat sources such as radiators, heat registers...
User Manual (English)
Page 7
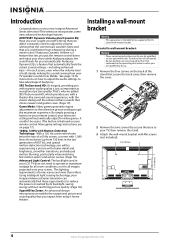
....org to the breeze from the power outlet and refer servicing to its new surroundings for the grounding electrode. 1 2 3 4 5 7 6 1 Antenna lead-in performance. www.insigniaproducts.com 3 In such cases, change in wire 2 Grounding clamp 3 Antenna discharge unit 4 Grounding conductors 5 Ground clamps 6 Power service grounding electrode system 7 Electric service equipment Note to...
....org to the breeze from the power outlet and refer servicing to its new surroundings for the grounding electrode. 1 2 3 4 5 7 6 1 Antenna lead-in performance. www.insigniaproducts.com 3 In such cases, change in wire 2 Grounding clamp 3 Antenna discharge unit 4 Grounding conductors 5 Ground clamps 6 Power service grounding electrode system 7 Electric service equipment Note to...
User Manual (English)
Page 8
... adjust the volume: wishing that the commercials wouldn't blare and that lets you put the remote control down and enjoy your new Insignia Advanced Series television! More game settings instructions are for instructions on how to adjust the audio settings to take advantage of some new...with M6 screws (not included). 23.62" (600 mm) 15.74" (400 mm) 4 www.insigniaproducts.com Audyssey Dynamic Volume is held steady, making the sound coming from your Insignia Advanced Series television can automatically find these opportunities to be easier. (The button is featured on your screen....
... adjust the volume: wishing that the commercials wouldn't blare and that lets you put the remote control down and enjoy your new Insignia Advanced Series television! More game settings instructions are for instructions on how to adjust the audio settings to take advantage of some new...with M6 screws (not included). 23.62" (600 mm) 15.74" (400 mm) 4 www.insigniaproducts.com Audyssey Dynamic Volume is held steady, making the sound coming from your Insignia Advanced Series television can automatically find these opportunities to be easier. (The button is featured on your screen....
User Manual (English)
Page 9
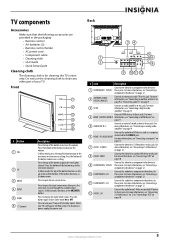
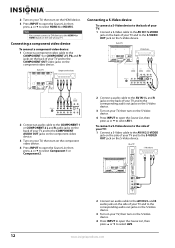
..., see "Connecting a component video device" on page 13. 7 AV IN 1 S-VIDEO Connect the video for a DVI device, such as the OK/ENTER button. www.insigniaproducts.com 5 Press the bottom of your TV. Press the bottom of the button to go to these jacks. When your TV on page 12. 8 AV IN...
..., see "Connecting a component video device" on page 13. 7 AV IN 1 S-VIDEO Connect the video for a DVI device, such as the OK/ENTER button. www.insigniaproducts.com 5 Press the bottom of your TV. Press the bottom of the button to go to these jacks. When your TV on page 12. 8 AV IN...
User Manual (English)
Page 10
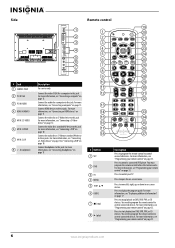
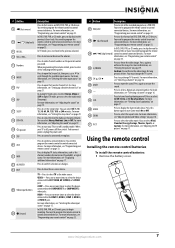
... a computer to control your remote control" on page 12. For more information, see "Connecting a S-Video device" on page 33. 6 www.insigniaproducts.com For more information, see "Programming your remote control" on page 10. Press to control connected devices. For more information, see "Displaying additional information" on... HDMI 25 7 26 8 27 9 28 10 29 11 30 12 31 32 13 14 33 15 34 16 GAME 35 DYN VOL 17 36 18 NS-RC02U-10A 37 # Button 1 SET 2 DVD 3 TV 4 MENU 5 6 GUIDE 7 (stop playback on -screen menus. Press to display the program guide. For ...
... a computer to control your remote control" on page 12. For more information, see "Connecting a S-Video device" on page 33. 6 www.insigniaproducts.com For more information, see "Programming your remote control" on page 10. Press to control connected devices. For more information, see "Displaying additional information" on... HDMI 25 7 26 8 27 9 28 10 29 11 30 12 31 32 13 14 33 15 34 16 GAME 35 DYN VOL 17 36 18 NS-RC02U-10A 37 # Button 1 SET 2 DVD 3 TV 4 MENU 5 6 GUIDE 7 (stop playback on -screen menus. Press to display the program guide. For ...
User Manual (English)
Page 11
... when Mute. For more information, see "Adjusting the TV picture" on page 33. # Button Description 27 PVR/LIST Press to control connected devices. www.insigniaproducts.com 7
... when Mute. For more information, see "Adjusting the TV picture" on page 33. # Button Description 27 PVR/LIST Press to control connected devices. www.insigniaproducts.com 7
User Manual (English)
Page 12
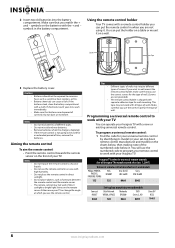
...of walls. Do not use the correct screws for the type of wall. (Screws are disposed of time, remove the batteries. Either move your Insignia TV with a remote control holder you are not using it . Using the remote control holder Your TV comes with a new or existing universal ... 0463 Set-top box manufacturers and models Dish Network Motorola VIP508, VIP622 DRC800 TIVO Series 3, HD 720 0463 0091 DirectTV RC23 10463 8 www.insigniaproducts.com Make sure that you match the + and - symbols on the front of your skin, wash immediately. • Make sure that you use the...
...of walls. Do not use the correct screws for the type of wall. (Screws are disposed of time, remove the batteries. Either move your Insignia TV with a remote control holder you are not using it . Using the remote control holder Your TV comes with a new or existing universal ... 0463 Set-top box manufacturers and models Dish Network Motorola VIP508, VIP622 DRC800 TIVO Series 3, HD 720 0463 0091 DirectTV RC23 10463 8 www.insigniaproducts.com Make sure that you match the + and - symbols on the front of your skin, wash immediately. • Make sure that you use the...
User Manual (English)
Page 13
...8226; If you found in Step 1. You may need a converter/descrambler box. Cautions • Make sure that can manually program it using the Insignia TV remote to "teach" the commands one end of a coaxial cable to use the correct type of the cable to identify a code that ...a coaxial connector, connect the cable to your cable TV using an RF switch (not included). For more help, call the Insignia Customer Care Center at : www.insigniaproducts.com/universalcontrolcodes.aspx Tips • The brand name is often visible on the back. • If your universal remote control isn't...
...8226; If you found in Step 1. You may need a converter/descrambler box. Cautions • Make sure that can manually program it using the Insignia TV remote to "teach" the commands one end of a coaxial cable to use the correct type of the cable to identify a code that ...a coaxial connector, connect the cable to your cable TV using an RF switch (not included). For more help, call the Insignia Customer Care Center at : www.insigniaproducts.com/universalcontrolcodes.aspx Tips • The brand name is often visible on the back. • If your universal remote control isn't...

User Manual (English)
Page 14
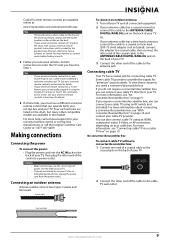
... jacks on the back of antenna cable. Note If a device is connected to the AV IN 1 VIDEO jack, unplug the S-Video device. 10 www.insigniaproducts.com Set the RF switch to the B position to the VIDEO OUT and AUDIO OUT jacks on the cable box. 2 Connect the other end of your...
... jacks on the back of antenna cable. Note If a device is connected to the AV IN 1 VIDEO jack, unplug the S-Video device. 10 www.insigniaproducts.com Set the RF switch to the B position to the VIDEO OUT and AUDIO OUT jacks on the cable box. 2 Connect the other end of your...

User Manual (English)
Page 15
Back of TV HDMI device Side of TV Camcorder or game console 2 Connect the other end of TV HDMI device www.insigniaproducts.com 11 Note You can connect an HDMI device to the HDMI 1, HDMI 2 or HDMI 3 jack on the side of your TV. Next connect an audio ...
Back of TV HDMI device Side of TV Camcorder or game console 2 Connect the other end of TV HDMI device www.insigniaproducts.com 11 Note You can connect an HDMI device to the HDMI 1, HDMI 2 or HDMI 3 jack on the side of your TV. Next connect an audio ...
User Manual (English)
Page 16
... of your TV: 1 Connect a S-Video cable to the AV IN 1 S-VIDEO jack on the back of your TV and to select AV2. 12 www.insigniaproducts.com
... of your TV: 1 Connect a S-Video cable to the AV IN 1 S-VIDEO jack on the back of your TV and to select AV2. 12 www.insigniaproducts.com

User Manual (English)
Page 17
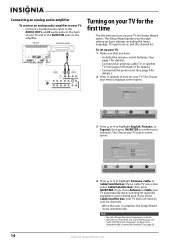
... TV's speakers is muted. Connecting headphones To connect headphones: • Plug headphones into the jack on the side of TV Digital audio amplifier www.insigniaproducts.com 13 Connecting a computer Note If the computer has an HDMI jack, you "wake" your computer, press (power) on your TV or remote control. Back of...
... TV's speakers is muted. Connecting headphones To connect headphones: • Plug headphones into the jack on the side of TV Digital audio amplifier www.insigniaproducts.com 13 Connecting a computer Note If the computer has an HDMI jack, you "wake" your computer, press (power) on your TV or remote control. Back of...
User Manual (English)
Page 18
... 10 for details.) • Connected the power cord. (See page 9 for the first time The first time you turn on page 20. 14 www.insigniaproducts.com Back of your TV, the Setup Wizard opens. The Choose your menu Language screen opens. The Choose your TV source screen opens.
... 10 for details.) • Connected the power cord. (See page 9 for the first time The first time you turn on page 20. 14 www.insigniaproducts.com Back of your TV, the Setup Wizard opens. The Choose your menu Language screen opens. The Choose your TV source screen opens.

User Manual (English)
Page 19
... select HDMI 3. • Press HDMI four times to select HDMI 4. • Press HDMI five times to affect picture quality MENU PREVIOUS EXIT EXIT www.insigniaproducts.com 15 Source List TV AV 1 AV 2 Component 1 Component 2 VGA HDMI 1 HDMI 2 HDMI 3 HDMI 4 HDMI 5 2 Press or to Game or Game Custom: 1 With your TV. Note...
... select HDMI 3. • Press HDMI four times to select HDMI 4. • Press HDMI five times to affect picture quality MENU PREVIOUS EXIT EXIT www.insigniaproducts.com 15 Source List TV AV 1 AV 2 Component 1 Component 2 VGA HDMI 1 HDMI 2 HDMI 3 HDMI 4 HDMI 5 2 Press or to Game or Game Custom: 1 With your TV. Note...

User Manual (English)
Page 20
..., press -, then press the number for a DTV sub-channel to go to the next higher or lower channel in the channel scanning. 16 www.insigniaproducts.com Press to directly select a channel. Selecting a channel To select a channel: • Press CH or CH to go to the previous screen. Press to select menu...
..., press -, then press the number for a DTV sub-channel to go to the next higher or lower channel in the channel scanning. 16 www.insigniaproducts.com Press to directly select a channel. Selecting a channel To select a channel: • Press CH or CH to go to the previous screen. Press to select menu...
