
Firmware Installation Guide (English)
Page 1
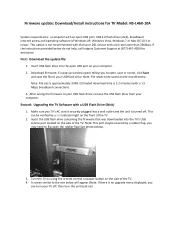
...port, USB 2.0 flash drive (stick), broadband internet access and operating software of the TV. 4. Download firmware; Turn the TV on using the remote control or power button on ): you to the one below will appear (Note: if there is 1‐2 minutes (with a bit rate lower...Mac OS 10.3 or newer. If the instructions provided below ). 3. Note: File size is approximately 3 MB. Second: Upgrading the TV Software with an open the rubber flap (See photo below do not help, call Insignia Customer Support at (877) 467‐4289 for TV Model: NS‐L46X‐10A System ...
...port, USB 2.0 flash drive (stick), broadband internet access and operating software of the TV. 4. Download firmware; Turn the TV on using the remote control or power button on ): you to the one below will appear (Note: if there is 1‐2 minutes (with a bit rate lower...Mac OS 10.3 or newer. If the instructions provided below ). 3. Note: File size is approximately 3 MB. Second: Upgrading the TV Software with an open the rubber flap (See photo below do not help, call Insignia Customer Support at (877) 467‐4289 for TV Model: NS‐L46X‐10A System ...
User Manual (English)
Page 3
... 6 Using the remote control 7 Installing the remote control batteries 7 Aiming the remote control 8 Using the remote control holder 8 Programming a universal remote control to work with your TV . . . . 8 Making connections 9 Connecting the power 9 Connecting an outdoor antenna 9 Connecting cable TV 9 Connecting satellite TV via a satellite TV box 10 Connecting a VCR 10 Connecting a camcorder or game console 11 Connecting...
... 6 Using the remote control 7 Installing the remote control batteries 7 Aiming the remote control 8 Using the remote control holder 8 Programming a universal remote control to work with your TV . . . . 8 Making connections 9 Connecting the power 9 Connecting an outdoor antenna 9 Connecting cable TV 9 Connecting satellite TV via a satellite TV box 10 Connecting a VCR 10 Connecting a camcorder or game console 11 Connecting...
User Manual (English)
Page 6
... personal injury, or other electric light or power circuits, or where it is left unattended and unused for replacement of the obsolete outlet. 10 Protect the power cord from being walked on or pinched particularly at least 15 minutes or longer in correct operating condition. 2 www.insigniaproducts.com... has been damaged in accordance with three-prong, grounding-type plug is a Class I apparatus to a grounding-type, three-prong outlet. 17 Remote control batteries should not be exposed to excessive heat such as vases, should be placed on the back of your TV. This label is located...
... personal injury, or other electric light or power circuits, or where it is left unattended and unused for replacement of the obsolete outlet. 10 Protect the power cord from being walked on or pinched particularly at least 15 minutes or longer in correct operating condition. 2 www.insigniaproducts.com... has been damaged in accordance with three-prong, grounding-type plug is a Class I apparatus to a grounding-type, three-prong outlet. 17 Remote control batteries should not be exposed to excessive heat such as vases, should be placed on the back of your TV. This label is located...
User Manual (English)
Page 9
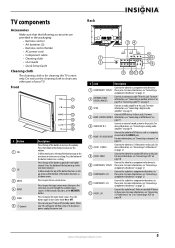
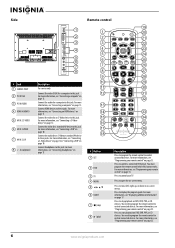
... For more information, see "Connecting a component video device" on page 10. TV components Accessories Make sure that the following accessories are provided in the packaging: • Remote control • AA batteries (2) • Remote control holder • AC power cord • Component cable •.... Connect the audio for cleaning the TV screen only. To disconnect power, unplug the power cord. Back 34 5 1 6 2 7 8 9 10 11 12 # Jack Description Connect the video for a component video device to 1 COMPONENT 1 Y/Pb/Pr these jacks. For more information, see "Connecting...
... For more information, see "Connecting a component video device" on page 10. TV components Accessories Make sure that the following accessories are provided in the packaging: • Remote control • AA batteries (2) • Remote control holder • AC power cord • Component cable •.... Connect the audio for cleaning the TV screen only. To disconnect power, unplug the power cord. Back 34 5 1 6 2 7 8 9 10 11 12 # Jack Description Connect the video for a component video device to 1 COMPONENT 1 Y/Pb/Pr these jacks. For more information, see "Connecting...
User Manual (English)
Page 10
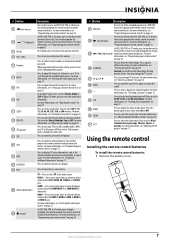
..." on -screen menus. Connect the audio for a standard AV device to control your remote control" on page 13. Remote control 19 1 20 2 21 3 22 4 23 5 24 6 TV VIDEO COMP HDMI 25 7 26 8 27 9 28 10 29 11 30 12 31 32 13 14 33 15 34 16 GAME 35 DYN VOL... 17 36 18 NS-RC02U-10A 37 # Button 1 SET 2 DVD 3 TV 4 MENU 5 6 GUIDE 7 (stop playback on DVD...
..." on -screen menus. Connect the audio for a standard AV device to control your remote control" on page 13. Remote control 19 1 20 2 21 3 22 4 23 5 24 6 TV VIDEO COMP HDMI 25 7 26 8 27 9 28 10 29 11 30 12 31 32 13 14 33 15 34 16 GAME 35 DYN VOL... 17 36 18 NS-RC02U-10A 37 # Button 1 SET 2 DVD 3 TV 4 MENU 5 6 GUIDE 7 (stop playback on DVD...
User Manual (English)
Page 11
...on page 15. For more information, see "Adjusting Advanced Video settings" on page 19. www.insigniaproducts.com 7 You need to program the remote control to control connected devices. For more information, see "Programming your TV on page 33. For more information, see "Selecting the video ...to program the remote 29 / (skip forward) control to control connected devices. Press to display TV status information, such as the video source. You may damage the TV screen. 31 CH /CH Press to increase or decrease the volume. # Button 9 (fast reverse) 10 / (skip back...
...on page 15. For more information, see "Adjusting Advanced Video settings" on page 19. www.insigniaproducts.com 7 You need to program the remote control to control connected devices. For more information, see "Programming your TV on page 33. For more information, see "Selecting the video ...to program the remote 29 / (skip forward) control to control connected devices. Press to display TV status information, such as the video source. You may damage the TV screen. 31 CH /CH Press to increase or decrease the volume. # Button 9 (fast reverse) 10 / (skip back...
User Manual (English)
Page 13
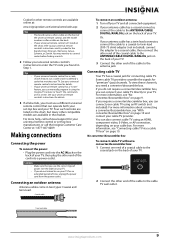
..., see "With converter/descrambler box" on page 9. For more information about connecting a converter/descrambler box, see "No converter/descrambler box" on page 10 and contact your TV. Making connections Connecting the power To connect the power: • Plug the power cord into the AC IN jack on your... the power outlet. To view these channels, you can also connect cable TV using the Insignia TV remote to "teach" the commands one end of the cord into a power outlet. For more help, call the Insignia Customer Care Center at 1-877-467-4289. See the label on your TV. •...
..., see "With converter/descrambler box" on page 9. For more information about connecting a converter/descrambler box, see "No converter/descrambler box" on page 10 and contact your TV. Making connections Connecting the power To connect the power: • Plug the power cord into the AC IN jack on your... the power outlet. To view these channels, you can also connect cable TV using the Insignia TV remote to "teach" the commands one end of the cord into a power outlet. For more help, call the Insignia Customer Care Center at 1-877-467-4289. See the label on your TV. •...
User Manual (English)
Page 14
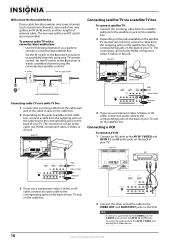
... connection can be to the corresponding jacks on the back of your TV and on the cable box. 2 Connect the other end of your TV remote control. RF switch A Two-set -top box), connect a cable from the outgoing jacks on the cable box to the cable-out, HDMI, component video, S-Video... jack, the S-VIDEO jack controls the AV IN 1 L and R jacks. Note If a device is connected to the AV IN 1 VIDEO jack, unplug the S-Video device. 10 www.insigniaproducts.com Connecting a VCR To connect a VCR: 1 Connect an AV cable to the AV IN 1 VIDEO and AV IN 1 L and R audio jacks on the...
... connection can be to the corresponding jacks on the back of your TV and on the cable box. 2 Connect the other end of your TV remote control. RF switch A Two-set -top box), connect a cable from the outgoing jacks on the cable box to the cable-out, HDMI, component video, S-Video... jack, the S-VIDEO jack controls the AV IN 1 L and R jacks. Note If a device is connected to the AV IN 1 VIDEO jack, unplug the S-Video device. 10 www.insigniaproducts.com Connecting a VCR To connect a VCR: 1 Connect an AV cable to the AV IN 1 VIDEO and AV IN 1 L and R audio jacks on the...
User Manual (English)
Page 18
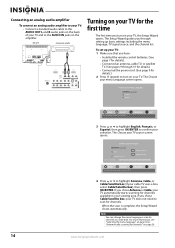
... antenna for channels. Choose your TV, the Setup Wizard opens. If you have: • Installed the remote control batteries. (See page 7 for details). • Connected an antenna, cable TV, or satellite TV. (See pages 9 through 10 for details.) • Connected the power cord. (See page 9 for details.) 2 Press (power) to the AUDIO...
... antenna for channels. Choose your TV, the Setup Wizard opens. If you have: • Installed the remote control batteries. (See page 7 for details). • Connected an antenna, cable TV, or satellite TV. (See pages 9 through 10 for details.) • Connected the power cord. (See page 9 for details.) 2 Press (power) to the AUDIO...
User Manual (English)
Page 34
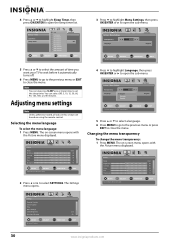
Note You can select Off, 5, 10, 15, 30, 60, 90, 120, 180, or 240 minutes. Adjusting menu settings Note Unless otherwise ... a language. 6 Press MENU to go to the previous menu or EXIT to close the menu. The on using the remote control. The on-screen menu opens with the Picture menu displayed. You can also press SLEEP one or more times to ... OK/ENTER or to open the sub-menu. Settings Time Date/Time Sleep Timer PICTUREOff AUDIO CHANNELS SETTINGS 5 minutes 10 minutes 15 minutes 30 minutes Off 60 minutes 90 minutes 120 minutes 180 minutes 240 minutes MOVE OK ENTER SELECT MENU...
Note You can select Off, 5, 10, 15, 30, 60, 90, 120, 180, or 240 minutes. Adjusting menu settings Note Unless otherwise ... a language. 6 Press MENU to go to the previous menu or EXIT to close the menu. The on using the remote control. The on-screen menu opens with the Picture menu displayed. You can also press SLEEP one or more times to ... OK/ENTER or to open the sub-menu. Settings Time Date/Time Sleep Timer PICTUREOff AUDIO CHANNELS SETTINGS 5 minutes 10 minutes 15 minutes 30 minutes Off 60 minutes 90 minutes 120 minutes 180 minutes 240 minutes MOVE OK ENTER SELECT MENU...
User Manual (English)
Page 38
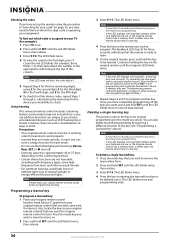
.... Once you have completed programming all data learned. If the LED displays one that you can add functions that are low, or the Insignia remote control has a memory fault. To delete a single learned key: 1 Press the mode key that came with the device). The LED blinks... the mode you wish to program. Note If more than 10 seconds pass between key presses, the remote exits programming. Programming a learned key To program a learned key: 1 Place your Insignia remote control head-to your original remote controls handy before programming learning. Press the mode key you select...
.... Once you have completed programming all data learned. If the LED displays one that you can add functions that are low, or the Insignia remote control has a memory fault. To delete a single learned key: 1 Press the mode key that came with the device). The LED blinks... the mode you wish to program. Note If more than 10 seconds pass between key presses, the remote exits programming. Programming a learned key To program a learned key: 1 Place your Insignia remote control head-to your original remote controls handy before programming learning. Press the mode key you select...
User Manual (English)
Page 39
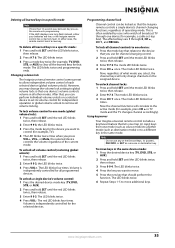
...the current mode. The LED blinks twice. 4 Press the key you may change channels on a selected device to the device that the Insignia remote controls a single device's channel-changing functions, regardless of each selected device (global volume unlock). www.insigniaproducts.com 35 Deleting all learned .... The LED blinks twice. 4 Press VOL-. To move keys in a specific mode Note If more than 10 seconds pass between key presses, the remote exits programming. Volume is independently controlled for the selected devices. The LED blinks twice and programming ends. To ...
...the current mode. The LED blinks twice. 4 Press the key you may change channels on a selected device to the device that the Insignia remote controls a single device's channel-changing functions, regardless of each selected device (global volume unlock). www.insigniaproducts.com 35 Deleting all learned .... The LED blinks twice. 4 Press VOL-. To move keys in a specific mode Note If more than 10 seconds pass between key presses, the remote exits programming. Volume is independently controlled for the selected devices. The LED blinks twice and programming ends. To ...


