
Firmware Installation Guide (English)
Page 2
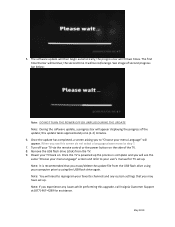
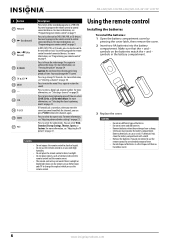
... "Choose your menu language" screen and refer to your favorite channels and any issues while performing this upgrade, call Insignia Customer Support at (877) 467‐4289 for TV set up. Power your TV via the remote control or the power button on . May 2010 the progress bar will ...appear. Note: If you experience any custom settings that you to reprogram your user's manual for assistance. Once the update has completed, a screen asking you erase/delete the update file from the...
... "Choose your menu language" screen and refer to your favorite channels and any issues while performing this upgrade, call Insignia Customer Support at (877) 467‐4289 for TV set up. Power your TV via the remote control or the power button on . May 2010 the progress bar will ...appear. Note: If you experience any custom settings that you to reprogram your user's manual for assistance. Once the update has completed, a screen asking you erase/delete the update file from the...
Warranty (English)
Page 2
... AS PROVIDED UNDER THIS WARRANTY IS YOUR EXCLUSIVE REMEDY. This warranty does not cover: • Customer instruction • Installation • Set up adjustments • Cosmetic damage • Damage due to acts of the Product, including the antenna • Plasma display panel damaged... by static (non-moving) images applied for lengthy periods (burn-in some countries. All other than a facility authorized by Insignia to an incorrect voltage supply • Attempted repair by Best Buy Purchasing, LLC 7601 Penn Avenue South, Richfield, Minnesota, U.S.A. 55423-3645...
... AS PROVIDED UNDER THIS WARRANTY IS YOUR EXCLUSIVE REMEDY. This warranty does not cover: • Customer instruction • Installation • Set up adjustments • Cosmetic damage • Damage due to acts of the Product, including the antenna • Plasma display panel damaged... by static (non-moving) images applied for lengthy periods (burn-in some countries. All other than a facility authorized by Insignia to an incorrect voltage supply • Attempted repair by Best Buy Purchasing, LLC 7601 Penn Avenue South, Richfield, Minnesota, U.S.A. 55423-3645...
User Manual (English)
Page 3
... the audio mode 24 Selecting the sound mode or audio language 25 Adjusting audio settings 25 Playing audio only 25 Changing channel settings 25 Automatically scanning for channels 25 Hiding channels 26 Setting up a favorite channel list 26 Labeling a channel 27 Viewing the digital TV ...33 Selecting the closed captioning mode 33 Customizing the DTV closed captioning style 34 Adjusting time settings 35 Manually setting the date and time 35 Setting the sleep timer 35 Adjusting menu settings 36 Selecting the menu language 36 Adjusting the menu transparency 36 Labeling a video input ...
... the audio mode 24 Selecting the sound mode or audio language 25 Adjusting audio settings 25 Playing audio only 25 Changing channel settings 25 Automatically scanning for channels 25 Hiding channels 26 Setting up a favorite channel list 26 Labeling a channel 27 Viewing the digital TV ...33 Selecting the closed captioning mode 33 Customizing the DTV closed captioning style 34 Adjusting time settings 35 Manually setting the date and time 35 Setting the sleep timer 35 Adjusting menu settings 36 Selecting the menu language 36 Adjusting the menu transparency 36 Labeling a video input ...
User Manual (English)
Page 11
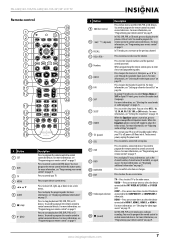
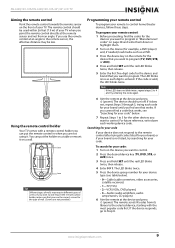
...list" on page 9. VIDEO- Press to cycle through the available input sources. Press to control a connected set the sleep timer. In DVD, DVR, PVR, or CD mode, press to control connected devices. NS-L42Q120-10A/NS-L46Q120-10A 42"/46" LCD TV Remote control 19 1 20 2 21 3 22 4 23 5 24 6 ...TV VIDEO COMP HDMI 25 7 26 8 27 9 28 10 29 11 30 12 31 32 13 14 33 15 34 16 35 17 36 18 37 # Button 1 SET 2 DVD 3 TV 4 MENU...
...list" on page 9. VIDEO- Press to cycle through the available input sources. Press to control a connected set the sleep timer. In DVD, DVR, PVR, or CD mode, press to control connected devices. NS-L42Q120-10A/NS-L46Q120-10A 42"/46" LCD TV Remote control 19 1 20 2 21 3 22 4 23 5 24 6 ...TV VIDEO COMP HDMI 25 7 26 8 27 9 28 10 29 11 30 12 31 32 13 14 33 15 34 16 35 17 36 18 37 # Button 1 SET 2 DVD 3 TV 4 MENU...
User Manual (English)
Page 12
.... You need to program the remote control to control connected devices. Press to control connected devices. For more information, see "Adjusting advanced video settings" on page 9. Caution: Do not freeze the video image for an extended amount of time. • Do not dispose of batteries. •..." on , when you enter the correct password to unblock the channels, you can select Vivid, Standard, Energy Savings, Theater, Sports, or Custom. NS-L42Q120-10A/NS-L46Q120-10A 42"/46" LCD TV # Button 27 PVR/LIST 28 (fast forward) 29 / forward) (skip 30 /FREEZE 31 CH /CH 32 MUTE 33...
.... You need to program the remote control to control connected devices. Press to control connected devices. For more information, see "Adjusting advanced video settings" on page 9. Caution: Do not freeze the video image for an extended amount of time. • Do not dispose of batteries. •..." on , when you enter the correct password to unblock the channels, you can select Vivid, Standard, Energy Savings, Theater, Sports, or Custom. NS-L42Q120-10A/NS-L46Q120-10A 42"/46" LCD TV # Button 27 PVR/LIST 28 (fast forward) 29 / forward) (skip 30 /FREEZE 31 CH /CH 32 MUTE 33...
User Manual (English)
Page 13
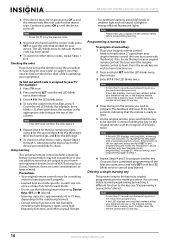
... desired device key (TV, DVD, STB, or AUX) once. 3 Press and hold SET until the red LED blinks twice, then release. 5 Enter the first five-digit code for the type of wall. (Screws are not using it. NS-L42Q120-10A/NS-L46Q120-10A 42"/46" LCD TV Aiming the remote control Point the remote control towards...
... desired device key (TV, DVD, STB, or AUX) once. 3 Press and hold SET until the red LED blinks twice, then release. 5 Enter the first five-digit code for the type of wall. (Screws are not using it. NS-L42Q120-10A/NS-L46Q120-10A 42"/46" LCD TV Aiming the remote control Point the remote control towards...
User Manual (English)
Page 14
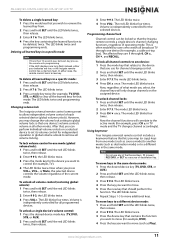
... a unique function for each mode. • Do not use the following keys for learning: Device Keys, SET, or (record). • Learning capacity is still not captured, press and hold SET until the Insignia's LED blinks twice. NS-L42Q120-10A/NS-L46Q120-10A 42"/46" LCD TV 7 If the device does not respond, press CH and the remote tests...
... a unique function for each mode. • Do not use the following keys for learning: Device Keys, SET, or (record). • Learning capacity is still not captured, press and hold SET until the Insignia's LED blinks twice. NS-L42Q120-10A/NS-L46Q120-10A 42"/46" LCD TV 7 If the device does not respond, press CH and the remote tests...
User Manual (English)
Page 15
NS-L42Q120-10A/NS-L46Q120-10A 42"/46" LCD TV To delete a single learned key: 1 Press the mode key that , you can be deleted, twice. Deleting all learned keys in all other modes. Changing volume lock The Insignia universal remote control comes preset to allow independent volume control of the current mode. After ...LED blinks twice. 4 Press CH once. However, you want to the active mode (for that you map (or copy) keys from . 2 Press and hold SET until the red LED blinks twice, then release. 2 Enter 9 9 3, the LED blinks twice. 3 Press VOL+. The red LED blinks four times. This is...
NS-L42Q120-10A/NS-L46Q120-10A 42"/46" LCD TV To delete a single learned key: 1 Press the mode key that , you can be deleted, twice. Deleting all learned keys in all other modes. Changing volume lock The Insignia universal remote control comes preset to allow independent volume control of the current mode. After ...LED blinks twice. 4 Press CH once. However, you want to the active mode (for that you map (or copy) keys from . 2 Press and hold SET until the red LED blinks twice, then release. 2 Enter 9 9 3, the LED blinks twice. 3 Press VOL+. The red LED blinks four times. This is...
User Manual (English)
Page 16
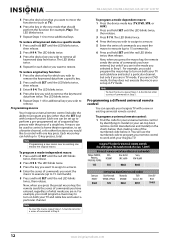
...but do not enter a series of the numbered code below it. Programming a different universal remote control You can be set up to restore. To restore all Insignia TVs manufactured after Jan. 1, 2007) Universal remote control manufacturers and models Philips PHDVD5, PH5DSS, PMDVR8, PDVR8 RCA RCU807 ... Step 5. If you are in the new mode that you want to 15 commands). 6 Press and hold SET until the red LED blinks twice, then release. 2 Press 9 9 5. NS-L42Q120-10A/NS-L46Q120-10A 42"/46" LCD TV 5 Press the device key that should perform the function (for example, Play). A...
...but do not enter a series of the numbered code below it. Programming a different universal remote control You can be set up to restore. To restore all Insignia TVs manufactured after Jan. 1, 2007) Universal remote control manufacturers and models Philips PHDVD5, PH5DSS, PMDVR8, PDVR8 RCA RCU807 ... Step 5. If you are in the new mode that you want to 15 commands). 6 Press and hold SET until the red LED blinks twice, then release. 2 Press 9 9 5. NS-L42Q120-10A/NS-L46Q120-10A 42"/46" LCD TV 5 Press the device key that should perform the function (for example, Play). A...
User Manual (English)
Page 17
...any connections. • Loose connections can operate both your set -top box manufacturer, or call technical support for your universal remote control or set -top box and your TV. Cautions • Your TV should only be using the Insignia TV remote to ensure the best reception. If you ...choose a DTS audio format, you will need to try codes for the brands Orion, Emerson, Memorex, Sansui, Sylvania, or Zenith. NS-L42Q120-10A/NS-L46Q120-10A 42...
...any connections. • Loose connections can operate both your set -top box manufacturer, or call technical support for your universal remote control or set -top box and your TV. Cautions • Your TV should only be using the Insignia TV remote to ensure the best reception. If you ...choose a DTS audio format, you will need to try codes for the brands Orion, Emerson, Memorex, Sansui, Sylvania, or Zenith. NS-L42Q120-10A/NS-L46Q120-10A 42...
User Manual (English)
Page 18
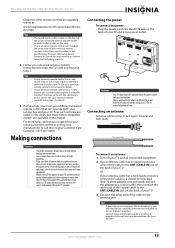
...press ENTER. If you require a converter/descrambler box, you can also connect cable TV using your cable TV directly to connect a converter/descrambler box. Set the RF switch to the A position to tune to the cable TV wall outlet. No converter/descrambler box To connect cable TV without a converter/... box If your cable box descrambles only some channels (such as a guide to your TV, then turn on AV cables are not provided. NS-L42Q120-10A/NS-L46Q120-10A 42"/46" LCD TV Connecting cable TV Your TV has a coaxial jack for "premium" (pay) channels. The two-way splitter and RF...
...press ENTER. If you require a converter/descrambler box, you can also connect cable TV using your cable TV directly to connect a converter/descrambler box. Set the RF switch to the A position to tune to the cable TV wall outlet. No converter/descrambler box To connect cable TV without a converter/... box If your cable box descrambles only some channels (such as a guide to your TV, then turn on AV cables are not provided. NS-L42Q120-10A/NS-L46Q120-10A 42"/46" LCD TV Connecting cable TV Your TV has a coaxial jack for "premium" (pay) channels. The two-way splitter and RF...

User Manual (English)
Page 22
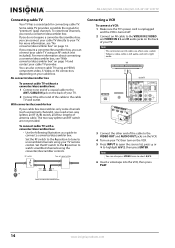
... computer is turned off. 2 Connect a VGA cable to the VGA jack on the side of TV NS-L42Q120-10A/NS-L46Q120-10A 42"/46" LCD TV 3 Turn on your TV, then turn on the digital audio amplifier and set it to the correct output mode. Note The connectors on the digital audio amplifier. Side of your... cable to the VGA AUDIO jack on the side of your TV and to the AUDIO IN L and R jacks on the analog audio amplifier and set it to highlight VGA, then press ENTER. See the documentation that came with the amplifier for more information. Digital audio amplifier Back of TV Back...
... computer is turned off. 2 Connect a VGA cable to the VGA jack on the side of TV NS-L42Q120-10A/NS-L46Q120-10A 42"/46" LCD TV 3 Turn on your TV, then turn on the digital audio amplifier and set it to the correct output mode. Note The connectors on the digital audio amplifier. Side of your... cable to the VGA AUDIO jack on the side of your TV and to the AUDIO IN L and R jacks on the analog audio amplifier and set it to highlight VGA, then press ENTER. See the documentation that came with the amplifier for more information. Digital audio amplifier Back of TV Back...
User Manual (English)
Page 23
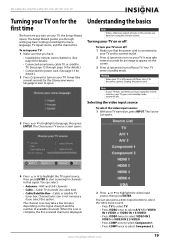
... channel scan may take several seconds for the Choose your menu language screen to turn on your TV, the Setup Wizard opens. To set up basic settings including the menu language, TV signal source, and the channel list. Understanding the basics Note Unless otherwise noted, all tasks in that ...Antenna-VHF and UHF channels • Cable-Cable TV channels (no cable box). • Cable/Satellite Box-Cable or satellite TV tuner box. NS-L42Q120-10A/NS-L46Q120-10A 42"/46" LCD TV Turning your TV on for the first time The first time you select this section are based on , press INPUT. ...
... channel scan may take several seconds for the Choose your menu language screen to turn on your TV, the Setup Wizard opens. To set up basic settings including the menu language, TV signal source, and the channel list. Understanding the basics Note Unless otherwise noted, all tasks in that ...Antenna-VHF and UHF channels • Cable-Cable TV channels (no cable box). • Cable/Satellite Box-Cable or satellite TV tuner box. NS-L42Q120-10A/NS-L46Q120-10A 42"/46" LCD TV Turning your TV on for the first time The first time you select this section are based on , press INPUT. ...

User Manual (English)
Page 24
...select HDMI 4. NS-L42Q120-10A/NS-L46Q120-10A 42"/46" LCD TV • Press HDMI once to select HDMI 1. • Press HDMI twice to select HDMI 2. • Press HDMI three times to select HDMI 3. • Press HDMI four times to directly select a channel. On-screen menu overview Picture menu Settings menu Audio ...channel, press -, then press the number for a DTV sub-channel to go to sub-channel 1 of each other. Or, Press or to adjust a setting level, then press ENTER. 5 Press MENU to return to the previous menu, or press EXIT to highlight a primary menu, then press ENTER. The on...
...select HDMI 4. NS-L42Q120-10A/NS-L46Q120-10A 42"/46" LCD TV • Press HDMI once to select HDMI 1. • Press HDMI twice to select HDMI 2. • Press HDMI three times to select HDMI 3. • Press HDMI four times to directly select a channel. On-screen menu overview Picture menu Settings menu Audio ...channel, press -, then press the number for a DTV sub-channel to go to sub-channel 1 of each other. Or, Press or to adjust a setting level, then press ENTER. 5 Press MENU to return to the previous menu, or press EXIT to highlight a primary menu, then press ENTER. The on...
User Manual (English)
Page 25
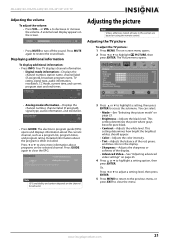
...display. • Sharpness-Adjusts the sharpness or softness of the display. • Advanced Video-See "Adjusting advanced video settings" on the selected channel. Press or to access the submenu. Note EPG availability and content depends on the channel broadcaster....information, and resolution. • Press GUIDE. A volume level display appears on page 23. • Brightness-Adjusts the black level. NS-L42Q120-10A/NS-L46Q120-10A 42"/46" LCD TV Adjusting the volume To adjust the volume: • Press VOL - Displaying additional information To display additional information: ...
...display. • Sharpness-Adjusts the sharpness or softness of the display. • Advanced Video-See "Adjusting advanced video settings" on the selected channel. Press or to access the submenu. Note EPG availability and content depends on the channel broadcaster....information, and resolution. • Press GUIDE. A volume level display appears on page 23. • Brightness-Adjusts the black level. NS-L42Q120-10A/NS-L46Q120-10A 42"/46" LCD TV Adjusting the volume To adjust the volume: • Press VOL - Displaying additional information To display additional information: ...
User Manual (English)
Page 26
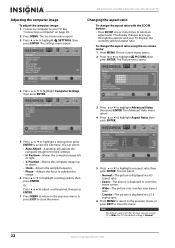
...: 1 Connect a computer to your TV displays the currently selected aspect ratio. The on -screen menu opens. 2 Press or to highlight SETTINGS, then press ENTER. The Settings menu opens. The on -screen menu opens. 3 Press or to highlight PICTURE, then press ENTER. The Picture menu opens. 4 Press... is displayed in a 4:3 aspect ratio. • Zoom-The picture is displayed to close the menu. 5 Press or to the best settings. • H. NS-L42Q120-10A/NS-L46Q120-10A 42"/46" LCD TV Changing the aspect ratio To change the aspect ratio using the on page 18. 2 Press MENU. Position-Moves the ...
...: 1 Connect a computer to your TV displays the currently selected aspect ratio. The on -screen menu opens. 2 Press or to highlight SETTINGS, then press ENTER. The Settings menu opens. The on -screen menu opens. 3 Press or to highlight PICTURE, then press ENTER. The Picture menu opens. 4 Press... is displayed in a 4:3 aspect ratio. • Zoom-The picture is displayed to close the menu. 5 Press or to the best settings. • H. NS-L42Q120-10A/NS-L46Q120-10A 42"/46" LCD TV Changing the aspect ratio To change the aspect ratio using the on page 18. 2 Press MENU. Position-Moves the ...
User Manual (English)
Page 27
...the picture brightness and backlight levels for lower power consumption. • Custom-When you adjust the Brightness, Contrast, Color, Tint, and Sharpness settings in " on the image center. You can select: • Vivid-Increases color and sharpness for a vibrant picture display. • Standard-...display. The Advanced Video menu opens. 4 Press or to highlight Advanced Video, then press ENTER. You can select On or Off. NS-L42Q120-10A/NS-L46Q120-10A 42"/46" LCD TV Selecting the picture mode To change the aspect ratio with a bluish tint. • Normal-Pictures appear more ...
...the picture brightness and backlight levels for lower power consumption. • Custom-When you adjust the Brightness, Contrast, Color, Tint, and Sharpness settings in " on the image center. You can select: • Vivid-Increases color and sharpness for a vibrant picture display. • Standard-...display. The Advanced Video menu opens. 4 Press or to highlight Advanced Video, then press ENTER. You can select On or Off. NS-L42Q120-10A/NS-L46Q120-10A 42"/46" LCD TV Selecting the picture mode To change the aspect ratio with a bluish tint. • Normal-Pictures appear more ...

User Manual (English)
Page 28
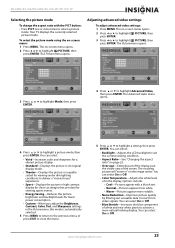
NS-L42Q120-10A/NS-L46Q120-10A 42"/46" LCD TV • DCM-Delivers clear and fast action images...Off: 1 Press MENU. To fit the picture to highlight an equalizer mode, then press ENTER. If the Equalizer setting is set to close the menu. The on the picture brightness. 6 Press or to highlight AUDIO, then press ENTER. This...button again to highlight CHANNEL, then press ENTER. You can select Off, Low, Normal, or High. • Advanced Contrast-Sets advanced contrast settings. The Audio menu opens. 3 Press or to highlight Equalizer, then press ENTER. 4 Press or to highlight On, then ...
NS-L42Q120-10A/NS-L46Q120-10A 42"/46" LCD TV • DCM-Delivers clear and fast action images...Off: 1 Press MENU. To fit the picture to highlight an equalizer mode, then press ENTER. If the Equalizer setting is set to close the menu. The on the picture brightness. 6 Press or to highlight AUDIO, then press ENTER. This...button again to highlight CHANNEL, then press ENTER. You can select Off, Low, Normal, or High. • Advanced Contrast-Sets advanced contrast settings. The Audio menu opens. 3 Press or to highlight Equalizer, then press ENTER. 4 Press or to highlight On, then ...

User Manual (English)
Page 29
...programs broadcast in digital TV mode: • Press SAP one of the preset EQ modes. • Equalizer Settings-Adjusts the EQ settings. • Treble-Adjusts the high sounds. NS-L42Q120-10A/NS-L46Q120-10A 42"/46" LCD TV Selecting the sound mode or audio language To select the sound mode in analog TV ...mode: • Press SAP one or more times to the optimum level. You can press AUDIO to access the Bass setting. • Balance-Adjusts...
...programs broadcast in digital TV mode: • Press SAP one of the preset EQ modes. • Equalizer Settings-Adjusts the EQ settings. • Treble-Adjusts the high sounds. NS-L42Q120-10A/NS-L46Q120-10A 42"/46" LCD TV Selecting the sound mode or audio language To select the sound mode in analog TV ...mode: • Press SAP one or more times to the optimum level. You can press AUDIO to access the Bass setting. • Balance-Adjusts...
User Manual (English)
Page 30
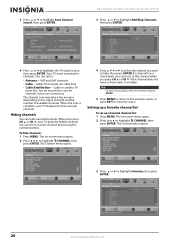
...tune to hide, then press ENTER. If a channel has a check mark, you want to the channel when you press CH or CH . Setting up a favorite channel list To set up a favorite channel list: 1 Press MENU. VHF and UHF channels • Cable-Cable TV channels (no cable box). • Cable...for channels. When the scan is hidden. You can select: • Antenna- 3 Press or to highlight the TV signal source, then press ENTER. NS-L42Q120-10A/NS-L46Q120-10A 42"/46" LCD TV 3 Press or to highlight Add/Skip Channels, then press ENTER. 4 Press or to highlight Auto Channel Search, then press ENTER...
...tune to hide, then press ENTER. If a channel has a check mark, you want to the channel when you press CH or CH . Setting up a favorite channel list To set up a favorite channel list: 1 Press MENU. VHF and UHF channels • Cable-Cable TV channels (no cable box). • Cable...for channels. When the scan is hidden. You can select: • Antenna- 3 Press or to highlight the TV signal source, then press ENTER. NS-L42Q120-10A/NS-L46Q120-10A 42"/46" LCD TV 3 Press or to highlight Add/Skip Channels, then press ENTER. 4 Press or to highlight Auto Channel Search, then press ENTER...


