Firmware Installation Guide (English)
Page 1
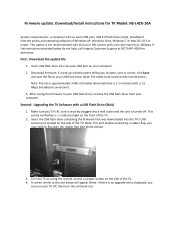
... flip open , save or cancel, click Save and save the file to the one below do not help, call Insignia Customer Support at (877) 467‐4289 for TV Model: NS‐L42X‐10A System requirements: a computer with an open USB port, USB 2.0 flash drive (stick), broadband internet access and operating software of... computer. This option is no upgrade menu displayed; First: Download the update file 1. Estimated download time is approximately 3 MB. Turn the TV on using the remote control or power button on ):
... flip open , save or cancel, click Save and save the file to the one below do not help, call Insignia Customer Support at (877) 467‐4289 for TV Model: NS‐L42X‐10A System requirements: a computer with an open USB port, USB 2.0 flash drive (stick), broadband internet access and operating software of... computer. This option is no upgrade menu displayed; First: Download the update file 1. Estimated download time is approximately 3 MB. Turn the TV on using the remote control or power button on ):
Firmware Installation Guide (English)
Page 2
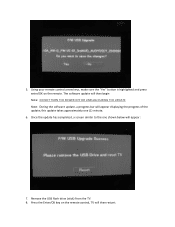
5. Remove the USB flash drive (stick) from the TV. 8. Press the Enter/OK key on the remote. Once the update has completed, a screen similar to the one (1) minute. 6. this update takes approximately one shown below will appear: 7. The software update will then begin Note: DO NOT TURN THE POWER OFF OR UNPLUG DURING THE UPDATE Note: During the software update, a progress bar will then restart. Using your remote control arrow keys, make sure the "Yes" button is highlighted and press enter/OK on the remote control, TV will appear displaying the progress of the update;
5. Remove the USB flash drive (stick) from the TV. 8. Press the Enter/OK key on the remote. Once the update has completed, a screen similar to the one (1) minute. 6. this update takes approximately one shown below will appear: 7. The software update will then begin Note: DO NOT TURN THE POWER OFF OR UNPLUG DURING THE UPDATE Note: During the software update, a progress bar will then restart. Using your remote control arrow keys, make sure the "Yes" button is highlighted and press enter/OK on the remote control, TV will appear displaying the progress of the update;
What is Firmware? (English)
Page 1
... have the firmware sent to a USB drive, CD-ROM, or other type of media. Since this is Firmware? If your computer. Whether it's a cell phone, remote control, calculator, digital camera, TV, or GPS, the firmware is software that components are working, gets the hardware in gear, and allows other words, firmware...
... have the firmware sent to a USB drive, CD-ROM, or other type of media. Since this is Firmware? If your computer. Whether it's a cell phone, remote control, calculator, digital camera, TV, or GPS, the firmware is software that components are working, gets the hardware in gear, and allows other words, firmware...
User Manual (English)
Page 3
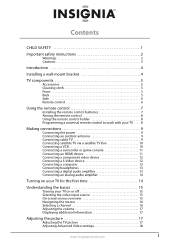
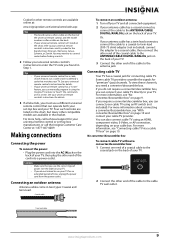
... instructions 2 Warnings 2 Cautions 3 Introduction 4 Installing a wall-mount bracket 4 TV components 5 Accessories 5 Cleaning cloth 5 Front 5 Back 5 Side 6 Remote control 6 Using the remote control 7 Installing the remote control batteries 7 Aiming the remote control 8 Using the remote control holder 8 Programming a universal remote control to work with your TV . . . . 8 Making connections 9 Connecting the power 9 Connecting an outdoor antenna 9 Connecting cable...
... instructions 2 Warnings 2 Cautions 3 Introduction 4 Installing a wall-mount bracket 4 TV components 5 Accessories 5 Cleaning cloth 5 Front 5 Back 5 Side 6 Remote control 6 Using the remote control 7 Installing the remote control batteries 7 Aiming the remote control 8 Using the remote control holder 8 Programming a universal remote control to work with your TV . . . . 8 Making connections 9 Connecting the power 9 Connecting an outdoor antenna 9 Connecting cable...
User Manual (English)
Page 4
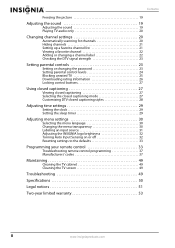
... language 30 Changing the menu transparency 30 Labeling an input source 31 Adjusting the INSIGNIA logo brightness 32 Turning Auto Input Sensing on or off 32 Resetting settings to the defaults 33 Programming your remote control 33 Troubleshooting remote control programming 37 Manufacturers' codes 37 Maintaining 49 Cleaning the TV cabinet 49 Cleaning...
... language 30 Changing the menu transparency 30 Labeling an input source 31 Adjusting the INSIGNIA logo brightness 32 Turning Auto Input Sensing on or off 32 Resetting settings to the defaults 33 Programming your remote control 33 Troubleshooting remote control programming 37 Manufacturers' codes 37 Maintaining 49 Cleaning the TV cabinet 49 Cleaning...
User Manual (English)
Page 6
... electric shock, do not touch the liquid in accordance with three-prong, grounding-type plug is a Class I apparatus to a grounding-type, three-prong outlet. 17 Remote control batteries should not be exposed to excessive heat such as sunshine, fire, or the like. 18 The apparatus should be grounded to qualified service...
... electric shock, do not touch the liquid in accordance with three-prong, grounding-type plug is a Class I apparatus to a grounding-type, three-prong outlet. 17 Remote control batteries should not be exposed to excessive heat such as sunshine, fire, or the like. 18 The apparatus should be grounded to qualified service...
User Manual (English)
Page 8
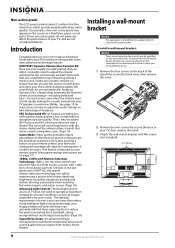
...expect from today's home theater. This television incorporates some scenes are not considered defects. SRS TruSurround HD: At Insignia, providing you put the remote control down and enjoy your television settings will be supported by UL Listed wall mount bracket. By simply pressing ...7.87" (200 mm) 4 www.insigniaproducts.com Introduction Congratulations on your new Insignia Advanced Series television! See page 19 for video games. It couldn't be easier. (The button is featured on your remote control. Non-active pixels The LCD panel contains almost 3 million thin film ...
...expect from today's home theater. This television incorporates some scenes are not considered defects. SRS TruSurround HD: At Insignia, providing you put the remote control down and enjoy your television settings will be supported by UL Listed wall mount bracket. By simply pressing ...7.87" (200 mm) 4 www.insigniaproducts.com Introduction Congratulations on your new Insignia Advanced Series television! See page 19 for video games. It couldn't be easier. (The button is featured on your remote control. Non-active pixels The LCD panel contains almost 3 million thin film ...
User Manual (English)
Page 9
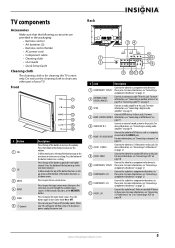
... again to these jacks. Press to these jacks. TV components Accessories Make sure that the following accessories are provided in the packaging: • Remote control • AA batteries (2) • Remote control holder • AC power cord • Component cable • Cleaning cloth • User Guide • Quick Setup Guide Cleaning cloth The...
... again to these jacks. Press to these jacks. TV components Accessories Make sure that the following accessories are provided in the packaging: • Remote control • AA batteries (2) • Remote control holder • AC power cord • Component cable • Cleaning cloth • User Guide • Quick Setup Guide Cleaning cloth The...
User Manual (English)
Page 10
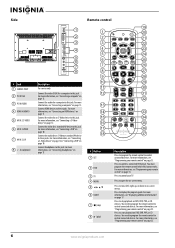
..." on -screen menu. Remote control 19 1 20 2 21 3 22 4 23 5 24 6 TV VIDEO COMP HDMI 25 7 26 8 27 9 28 10 29 11 30 12 31 32 13 14 33 15 34 16 GAME 35 DYN VOL 17 36 18 NS-RC02U-10A 37 # Button 1 SET 2 DVD 3 TV 4 MENU 5 6 GUIDE 7 (stop playback on ...page 11. You must program the remote control before this jack. Connect HDMI devices to this button works. For more information, see "...
..." on -screen menu. Remote control 19 1 20 2 21 3 22 4 23 5 24 6 TV VIDEO COMP HDMI 25 7 26 8 27 9 28 10 29 11 30 12 31 32 13 14 33 15 34 16 GAME 35 DYN VOL 17 36 18 NS-RC02U-10A 37 # Button 1 SET 2 DVD 3 TV 4 MENU 5 6 GUIDE 7 (stop playback on ...page 11. You must program the remote control before this jack. Connect HDMI devices to this button works. For more information, see "...
User Manual (English)
Page 11
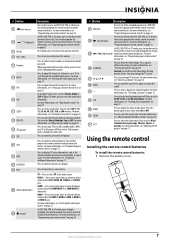
...image. For more times to select TV as the channel number, channel name (if available), or signal source. Using the remote control Installing the remote control batteries To install the remote control batteries: 1 Remove the battery cover. # Button 9 (fast reverse) 10 / (skip back) 11 RECALL 12..., see "Programming your TV is off . For more information, see "Selecting a channel" on page 15. You need to program the remote control to control a connected device. For more times to select the device connected to the COMPONENT 1 or COMPONENT 2 video jacks. Press to...
...image. For more times to select TV as the channel number, channel name (if available), or signal source. Using the remote control Installing the remote control batteries To install the remote control batteries: 1 Remove the battery cover. # Button 9 (fast reverse) 10 / (skip back) 11 RECALL 12..., see "Programming your TV is off . For more information, see "Selecting a channel" on page 15. You need to program the remote control to control a connected device. For more times to select the device connected to the COMPONENT 1 or COMPONENT 2 video jacks. Press to...
User Manual (English)
Page 12
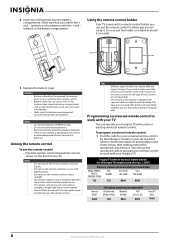
... into the battery compartment. You can put the remote control in an area with a cloth. Notes Do not mix batteries of your Insignia TV. The remote control may not work with your TV You can operate your Insignia TV with a remote control holder you can cause a rash. Tips... code below , then making note of wall. Insignia TV codes for universal remote controls (for all types of time, remove the batteries. Aiming the remote control To aim the remote control: • Point the remote control towards the remote sensor on the batteries with separate adhesive tape for...
... into the battery compartment. You can put the remote control in an area with a cloth. Notes Do not mix batteries of your Insignia TV. The remote control may not work with your TV You can operate your Insignia TV with a remote control holder you can cause a rash. Tips... code below , then making note of wall. Insignia TV codes for universal remote controls (for all types of time, remove the batteries. Aiming the remote control To aim the remote control: • Point the remote control towards the remote sensor on the batteries with separate adhesive tape for...
User Manual (English)
Page 13
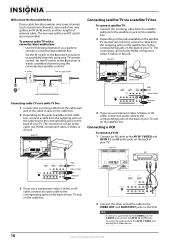
... the coaxial jack on the chart, but many other compatible models are available online at a time. You can manually program it using the Insignia TV remote to "teach" the commands one end of time, unplug the power cord from the power outlet. No converter/descrambler box To connect cable ... your cable TV directly to the antenna jack. For more help, call the Insignia Customer Care Center at 1-877-467-4289. See your universal remote control's instructions for details. • If your cable box. Four such remotes are listed on the back of your TV. 2 Connect the other end of...
... the coaxial jack on the chart, but many other compatible models are available online at a time. You can manually program it using the Insignia TV remote to "teach" the commands one end of time, unplug the power cord from the power outlet. No converter/descrambler box To connect cable ... your cable TV directly to the antenna jack. For more help, call the Insignia Customer Care Center at 1-877-467-4289. See your universal remote control's instructions for details. • If your cable box. Four such remotes are listed on the back of your TV. 2 Connect the other end of...
User Manual (English)
Page 14
... available on the cable box, connect a cable from the outgoing jacks on the satellite box to the corresponding jacks on the back of your TV remote control. Note If a device is connected to the HDMI, component video, S-Video, or AV jack. Set the RF switch to the B position to watch scrambled...
... available on the cable box, connect a cable from the outgoing jacks on the satellite box to the corresponding jacks on the back of your TV remote control. Note If a device is connected to the HDMI, component video, S-Video, or AV jack. Set the RF switch to the B position to watch scrambled...

User Manual (English)
Page 17
... amplifier: • Connect a digital audio cable to the SPDIF jack on the back of your TV and to an HDMI jack on your TV or remote control. To connect a computer: 1 Connect a VGA cable to the PC IN VGA jack on the side of your TV and to the AUDIO OUT jack...
... amplifier: • Connect a digital audio cable to the SPDIF jack on the back of your TV and to an HDMI jack on your TV or remote control. To connect a computer: 1 Connect a VGA cable to the PC IN VGA jack on the side of your TV and to the AUDIO OUT jack...
User Manual (English)
Page 18
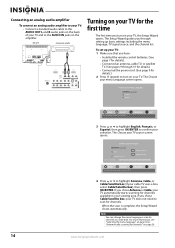
... Choose your TV and to highlight Antenna, Cable, or Cable/Satellite box (if your viewing area. The Setup Wizard guides you have: • Installed the remote control batteries. (See page 7 for details). • Connected an antenna, cable TV, or satellite TV. (See pages 9 through setting up your TV: 1 Make sure that...
... Choose your TV and to highlight Antenna, Cable, or Cable/Satellite box (if your viewing area. The Setup Wizard guides you have: • Installed the remote control batteries. (See page 7 for details). • Connected an antenna, cable TV, or satellite TV. (See pages 9 through setting up your TV: 1 Make sure that...
User Manual (English)
Page 19
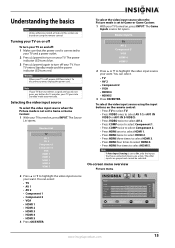
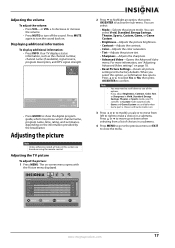
... Press or to turn your TV on and off: 1 Make sure that have connected devices are active. To select the video input source using the remote control. On-screen menu overview Picture menu Picture Mode Brightness Contrast Color Tint Sharpness PICTURE AUDIO CHANNELS SETTINGS Vivid 42 45 54 0 +5 MOVE OK ENTER... and cannot be selected. Understanding the basics Note Unless otherwise noted, all tasks in this section are based on using the input buttons on the remote control: • Press TV to select TV. • Press VIDEO once to select AV 1(for 15 minutes, your TV goes into it. ...
... Press or to turn your TV on and off: 1 Make sure that have connected devices are active. To select the video input source using the remote control. On-screen menu overview Picture menu Picture Mode Brightness Contrast Color Tint Sharpness PICTURE AUDIO CHANNELS SETTINGS Vivid 42 45 54 0 +5 MOVE OK ENTER... and cannot be selected. Understanding the basics Note Unless otherwise noted, all tasks in this section are based on using the input buttons on the remote control: • Press TV to select TV. • Press VIDEO once to select AV 1(for 15 minutes, your TV goes into it. ...
User Manual (English)
Page 21
... Picture Settings-Resets all tasks in a submenu. 4 Press MENU to go to the previous menu or EXIT to the factory defaults. The on using the remote control. Displaying additional information To display additional information: • Press INFO. Adjusting the volume To adjust the volume: • Press VOL -
... Picture Settings-Resets all tasks in a submenu. 4 Press MENU to go to the previous menu or EXIT to the factory defaults. The on using the remote control. Displaying additional information To display additional information: • Press INFO. Adjusting the volume To adjust the volume: • Press VOL -
User Manual (English)
Page 23
..., Medium, or Heavy. • SRS TruSurround HD-Provides the ultimate home theater sound solution. Note If you select this section are based on using the remote control. Press or to select Yes or No, then press OK/ENTER to confirm. 4 Press or to modify a scale or to move from left and...
..., Medium, or Heavy. • SRS TruSurround HD-Provides the ultimate home theater sound solution. Note If you select this section are based on using the remote control. Press or to select Yes or No, then press OK/ENTER to confirm. 4 Press or to modify a scale or to move from left and...
User Manual (English)
Page 24
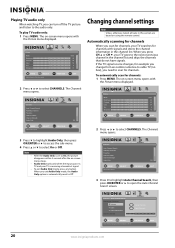
... TV source Antenna Cable Cable/Satellite Box 0 Analog Channels 0 Digital Channels Scan for channels MOVE OK ENTER SELECT MENU PREVIOUS Select Antenna if using the remote control. Channels Auto Channel Search Add/Skip Channels Favorites Channel Labels Channel Strength Audio Only PICTURE AUDIO CHANNELS SETTINGS Off MOVE OK ENTER SELECT Adjust...
... TV source Antenna Cable Cable/Satellite Box 0 Analog Channels 0 Digital Channels Scan for channels MOVE OK ENTER SELECT MENU PREVIOUS Select Antenna if using the remote control. Channels Auto Channel Search Add/Skip Channels Favorites Channel Labels Channel Strength Audio Only PICTURE AUDIO CHANNELS SETTINGS Off MOVE OK ENTER SELECT Adjust...

User Manual (English)
Page 27
... Low On MOVE OK ENTER SELECT Set various TV options MENU PREVIOUS EXIT EXIT 3 Press to open the DTV signal meter. The on using the remote control. Setting or changing the password Your TV has a V-chip that lets you control the type of selected digital channel MENU PREVIOUS 100 EXIT EXIT...
... Low On MOVE OK ENTER SELECT Set various TV options MENU PREVIOUS EXIT EXIT 3 Press to open the DTV signal meter. The on using the remote control. Setting or changing the password Your TV has a V-chip that lets you control the type of selected digital channel MENU PREVIOUS 100 EXIT EXIT...


