
Firmware Installation Guide (English)
Page 1
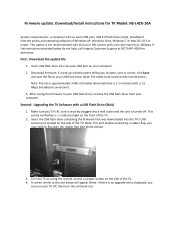
...;L42X‐10A System requirements: a computer with a 1.5 Mbps broadband connection). 3. Insert the USB flash drive containing the firmware that was downloaded into the open USB port, USB 2.0 flash drive (stick), broadband internet access and operating software of the TV. 2. Note: File needs to flip open , save or cancel, click Save and save the file to your USB flash drive; Turn the TV on using the remote control or power button on the side of the TV. 4. Download firmware; Firmware update: Download/Install instructions...
...;L42X‐10A System requirements: a computer with a 1.5 Mbps broadband connection). 3. Insert the USB flash drive containing the firmware that was downloaded into the open USB port, USB 2.0 flash drive (stick), broadband internet access and operating software of the TV. 2. Note: File needs to flip open , save or cancel, click Save and save the file to your USB flash drive; Turn the TV on using the remote control or power button on the side of the TV. 4. Download firmware; Firmware update: Download/Install instructions...
What is Firmware? (English)
Page 1
... time you press the power button, the firmware opens the lens, turns on the flash, displays the menus, and many other systems to take over if necessary. Without new firmware, your device has a "bug." Whether it's a cell phone, remote control, calculator, digital camera, TV, or GPS, the firmware is especially helpful if your GPS would quickly become obsolete. The firmware holds the information that components are working...
... time you press the power button, the firmware opens the lens, turns on the flash, displays the menus, and many other systems to take over if necessary. Without new firmware, your device has a "bug." Whether it's a cell phone, remote control, calculator, digital camera, TV, or GPS, the firmware is especially helpful if your GPS would quickly become obsolete. The firmware holds the information that components are working...
User Manual (English)
Page 3
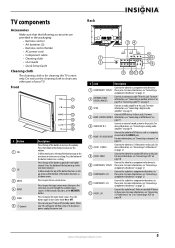
...safety instructions 2 Warnings 2 Cautions 3 Introduction 4 Installing a wall-mount bracket 4 TV components 5 Accessories 5 Cleaning cloth 5 Front 5 Back 5 Side 6 Remote control 6 Using the remote control 7 Installing the remote control batteries 7 Aiming the remote control 8 Using the remote control holder 8 Programming a universal remote control to work with your TV . . . . 8 Making connections 9 Connecting the power 9 Connecting an outdoor antenna 9 Connecting cable TV 9 Connecting satellite TV via a satellite TV box 10 Connecting a VCR 10 Connecting a camcorder or game...
...safety instructions 2 Warnings 2 Cautions 3 Introduction 4 Installing a wall-mount bracket 4 TV components 5 Accessories 5 Cleaning cloth 5 Front 5 Back 5 Side 6 Remote control 6 Using the remote control 7 Installing the remote control batteries 7 Aiming the remote control 8 Using the remote control holder 8 Programming a universal remote control to work with your TV . . . . 8 Making connections 9 Connecting the power 9 Connecting an outdoor antenna 9 Connecting cable TV 9 Connecting satellite TV via a satellite TV box 10 Connecting a VCR 10 Connecting a camcorder or game...
User Manual (English)
Page 4
... Downloading rating information 26 Locking control buttons 27 Using closed captioning 27 Viewing closed captioning 27 Selecting the closed captioning mode 27 Customizing DTV closed captioning styles 28 Adjusting time settings 29 Setting the clock 29 Setting the sleep timer 29 Adjusting menu settings 30 Selecting the menu language 30 Changing the menu transparency 30 Labeling an input source 31 Adjusting the INSIGNIA logo brightness 32 Turning Auto Input Sensing on or off 32 Resetting settings to the defaults 33 Programming your remote control 33 Troubleshooting remote control...
... Downloading rating information 26 Locking control buttons 27 Using closed captioning 27 Viewing closed captioning 27 Selecting the closed captioning mode 27 Customizing DTV closed captioning styles 28 Adjusting time settings 29 Setting the clock 29 Setting the sleep timer 29 Adjusting menu settings 30 Selecting the menu language 30 Changing the menu transparency 30 Labeling an input source 31 Adjusting the INSIGNIA logo brightness 32 Turning Auto Input Sensing on or off 32 Resetting settings to the defaults 33 Programming your remote control 33 Troubleshooting remote control...

User Manual (English)
Page 5
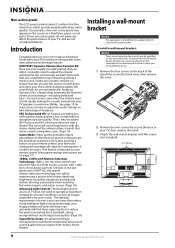
...-life" TV. Use only a TV stand rated for safe wall mount installation. However, TVs are required for the weight of your TV, always remember: • One size of TV stand does not fit all . If you decide to wall mount your TV. • Carefully read and understand all cords and cables so that you route all enclosed instructions for proper use your flat panel display As you...
...-life" TV. Use only a TV stand rated for safe wall mount installation. However, TVs are required for the weight of your TV, always remember: • One size of TV stand does not fit all . If you decide to wall mount your TV. • Carefully read and understand all cords and cables so that you route all enclosed instructions for proper use your flat panel display As you...
User Manual (English)
Page 8
... adjusts the sound levels for video games. By simply pressing a button on your remote control, your television settings will be experiencing a picture with superior audio quality is held steady, making the sound coming from today's home theater. More game settings instructions are for each scene, even when the volume level is just as important as a fixed blue, green, or red point. To install a wall-mount bracket: Warning These servicing instructions are on the screen as exceptional picture...
... adjusts the sound levels for video games. By simply pressing a button on your remote control, your television settings will be experiencing a picture with superior audio quality is held steady, making the sound coming from today's home theater. More game settings instructions are for each scene, even when the volume level is just as important as a fixed blue, green, or red point. To install a wall-mount bracket: Warning These servicing instructions are on the screen as exceptional picture...
User Manual (English)
Page 9
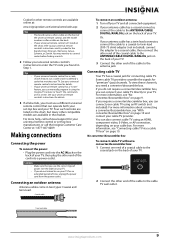
... cycle through the available input sources. For more information, see "Connecting a S-Video device" on 12 or "Connecting a VCR" on -screen menu. Do not use the cleaning cloth to turn your TV on page 12. 2 ANTENNA/CABLE DIGITAL/ANALOG Connect an antenna or cable TV to the HDMI 3 jack. In Menu mode, press the top of the button to go to the next menu or to the next higher channel. Press the top of...
... cycle through the available input sources. For more information, see "Connecting a S-Video device" on 12 or "Connecting a VCR" on -screen menu. Do not use the cleaning cloth to turn your TV on page 12. 2 ANTENNA/CABLE DIGITAL/ANALOG Connect an antenna or cable TV to the HDMI 3 jack. In Menu mode, press the top of the button to go to the next menu or to the next higher channel. Press the top of...
User Manual (English)
Page 10
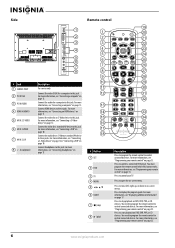
... 33. Connect the audio for a standard AV device to control connected devices. Connect headphones to these jacks. You need to program the remote control to open the on DVD, DVR, PVR, or CD devices. Press to control connected devices. For more information, see "Displaying additional information" on page 13. Side # Jack 1 SERVICE PORT 2 PC IN VGA 3 PC IN AUDIO 4 HDMI 4/HDMI 5 5 AV IN 2 S-VIDEO 6 AV IN 2 VIDEO 7 AV IN 2 L/R 8 (headphone) 1 2 3 4 5 6 7 8 Description For service only. Connect the video for...
... 33. Connect the audio for a standard AV device to control connected devices. Connect headphones to these jacks. You need to program the remote control to open the on DVD, DVR, PVR, or CD devices. Press to control connected devices. For more information, see "Displaying additional information" on page 13. Side # Jack 1 SERVICE PORT 2 PC IN VGA 3 PC IN AUDIO 4 HDMI 4/HDMI 5 5 AV IN 2 S-VIDEO 6 AV IN 2 VIDEO 7 AV IN 2 L/R 8 (headphone) 1 2 3 4 5 6 7 8 Description For service only. Connect the video for...
User Manual (English)
Page 11
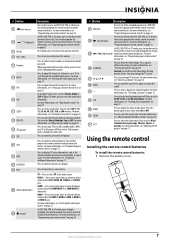
... Press to turn closed captioning" on page 16. 32 MUTE Press to mute the sound. You can select Vivid, Standard, Energy Savings, Theater, Sports, or Custom. For more times to select the device connected the AV 1 VIDEO, AV 2 VIDEO, or S-VIDEO jack. Using the remote control Installing the remote control batteries To install the remote control batteries: 1 Remove the battery cover. You need to program the remote 29 / (skip forward) control to control connected devices. Press to set -top box. HDMI-Press...
... Press to turn closed captioning" on page 16. 32 MUTE Press to mute the sound. You can select Vivid, Standard, Energy Savings, Theater, Sports, or Custom. For more times to select the device connected the AV 1 VIDEO, AV 2 VIDEO, or S-VIDEO jack. Using the remote control Installing the remote control batteries To install the remote control batteries: 1 Remove the battery cover. You need to program the remote 29 / (skip forward) control to control connected devices. Press to set -top box. HDMI-Press...
User Manual (English)
Page 13
... box" on page 10. Twin-lead cable www.insigniaproducts.com 9 See your universal remote control's instructions for details. • If your universal remote control has a "Learn" feature, you can manually program it using an HDMI, component video, S-Video, or AV connection, depending on your universal remote control's instructions and try several codes before finding a match. 2 Follow your TV. 2 Connect the other compatible models are available in two types: Coaxial and twin-lead. Coaxial cable To connect an outdoor antenna: 1 Turn...
... box" on page 10. Twin-lead cable www.insigniaproducts.com 9 See your universal remote control's instructions for details. • If your universal remote control has a "Learn" feature, you can manually program it using an HDMI, component video, S-Video, or AV connection, depending on your universal remote control's instructions and try several codes before finding a match. 2 Follow your TV. 2 Connect the other compatible models are available in two types: Coaxial and twin-lead. Coaxial cable To connect an outdoor antenna: 1 Turn...
User Manual (English)
Page 15
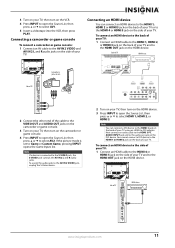
... VCR, then press PLAY. To assign the audio jacks to the AV IN 2 VIDEO jack, unplug the S-Video device. 2 Turn on your TV, then turn on the HDMI device. 3 Press INPUT to open the Source List, then press or to Game or Custom Game, pressing INPUT opens the Game Inputs list. You cannot connect a DVI device to select HDMI 1, HDMI 2, or HDMI 3. Next connect an audio cable to the HDMI 3 PC AUDIO INPUT jack and to the audio out jack on the VCR. 4 Press INPUT...
... VCR, then press PLAY. To assign the audio jacks to the AV IN 2 VIDEO jack, unplug the S-Video device. 2 Turn on your TV, then turn on the HDMI device. 3 Press INPUT to open the Source List, then press or to Game or Custom Game, pressing INPUT opens the Game Inputs list. You cannot connect a DVI device to select HDMI 1, HDMI 2, or HDMI 3. Next connect an audio cable to the HDMI 3 PC AUDIO INPUT jack and to the audio out jack on the VCR. 4 Press INPUT...
User Manual (English)
Page 19
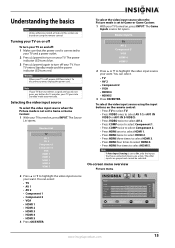
... TV turned on using the input buttons on , press INPUT. Source List TV AV 1 AV 2 Component 1 Component 2 VGA HDMI 1 HDMI 2 HDMI 3 HDMI 4 HDMI 5 2 Press or to affect picture quality MENU PREVIOUS EXIT EXIT www.insigniaproducts.com 15 On-screen menu overview Picture menu Picture Mode Brightness Contrast Color Tint Sharpness PICTURE AUDIO CHANNELS SETTINGS Vivid 42 45 54 0 +5 MOVE OK ENTER SELECT Adjust settings to highlight the video input source your TV and a power outlet. 2 Press (power) to On, only the inputs that the power cord is...
... TV turned on using the input buttons on , press INPUT. Source List TV AV 1 AV 2 Component 1 Component 2 VGA HDMI 1 HDMI 2 HDMI 3 HDMI 4 HDMI 5 2 Press or to affect picture quality MENU PREVIOUS EXIT EXIT www.insigniaproducts.com 15 On-screen menu overview Picture menu Picture Mode Brightness Contrast Color Tint Sharpness PICTURE AUDIO CHANNELS SETTINGS Vivid 42 45 54 0 +5 MOVE OK ENTER SELECT Adjust settings to highlight the video input source your TV and a power outlet. 2 Press (power) to On, only the inputs that the power cord is...
User Manual (English)
Page 21
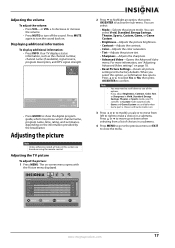
..., all tasks in Vivid, Standard, Energy Savings, Theater, or Sports mode, your TV switches to show the digital program guide, which may need to scroll down when selecting from left to right to the factory defaults. Adjusting the TV picture To adjust the picture: 1 Press MENU. When you adjust Brightness, Contrast, Color, Tint, or Sharpness in this option, a confirmation box opens. Adjusting the volume To adjust the volume: • Press VOL - or...
..., all tasks in Vivid, Standard, Energy Savings, Theater, or Sports mode, your TV switches to show the digital program guide, which may need to scroll down when selecting from left to right to the factory defaults. Adjusting the TV picture To adjust the picture: 1 Press MENU. When you adjust Brightness, Contrast, Color, Tint, or Sharpness in this option, a confirmation box opens. Adjusting the volume To adjust the volume: • Press VOL - or...
User Manual (English)
Page 22
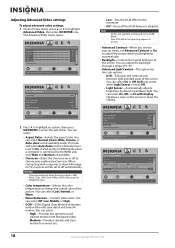
..., and 1080p in GAME Mode. Turn DCM off the DCM feature is set ot Off. • Light Sensor-Automatically adjusts brightness by HDMI/DVI input. • Color temperature-Selects the color temperature to show full image on the Channels menu is set Advanced Contrast to On to choose your preferred picture size. You can select Cool, Normal, or Warm. • Noise Reduction-Controls video noise. DCR only works when Light Sensor is disabled.
..., and 1080p in GAME Mode. Turn DCM off the DCM feature is set ot Off. • Light Sensor-Automatically adjusts brightness by HDMI/DVI input. • Color temperature-Selects the color temperature to show full image on the Channels menu is set Advanced Contrast to On to choose your preferred picture size. You can select Cool, Normal, or Warm. • Noise Reduction-Controls video noise. DCR only works when Light Sensor is disabled.
User Manual (English)
Page 24
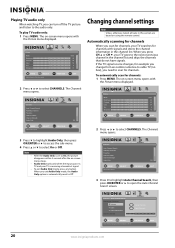
... have signals. PICTURE AUDIO CHANNELS SETTINGS Channels Auto Channel Search Choose your TV searches for standard or HD TV EXIT EXIT 20 www.insigniaproducts.com When you scan for channels, your TV source Antenna Cable Cable/Satellite Box 0 Analog Channels 0 Digital Channels Scan for channels MOVE OK ENTER SELECT MENU PREVIOUS Select Antenna if using the remote control. Playing TV audio only When watching TV, you exit Audio Only mode, the Audio Only option is automatically reset to Off. Picture Mode Brightness Contrast Color Tint Sharpness PICTURE AUDIO CHANNELS SETTINGS...
... have signals. PICTURE AUDIO CHANNELS SETTINGS Channels Auto Channel Search Choose your TV searches for standard or HD TV EXIT EXIT 20 www.insigniaproducts.com When you scan for channels, your TV source Antenna Cable Cable/Satellite Box 0 Analog Channels 0 Digital Channels Scan for channels MOVE OK ENTER SELECT MENU PREVIOUS Select Antenna if using the remote control. Playing TV audio only When watching TV, you exit Audio Only mode, the Audio Only option is automatically reset to Off. Picture Mode Brightness Contrast Color Tint Sharpness PICTURE AUDIO CHANNELS SETTINGS...
User Manual (English)
Page 25
... skip channels in the list. The on -screen menu opens with the Picture menu displayed. Press EXIT to select CHANNELS. You can press EXIT to start the scan. The on -screen menu opens with the Picture menu displayed. Picture Mode Brightness Contrast Color Tint Sharpness PICTURE AUDIO CHANNELS SETTINGS Vivid 42 45 54 0 +5 MOVE OK ENTER SELECT Adjust settings to affect picture quality MENU PREVIOUS EXIT EXIT 2 Press or to close the menu. 4 Press to highlight Antenna, Cable, or Cable/Satellite Box, then...
... skip channels in the list. The on -screen menu opens with the Picture menu displayed. Press EXIT to select CHANNELS. You can press EXIT to start the scan. The on -screen menu opens with the Picture menu displayed. Picture Mode Brightness Contrast Color Tint Sharpness PICTURE AUDIO CHANNELS SETTINGS Vivid 42 45 54 0 +5 MOVE OK ENTER SELECT Adjust settings to affect picture quality MENU PREVIOUS EXIT EXIT 2 Press or to close the menu. 4 Press to highlight Antenna, Cable, or Cable/Satellite Box, then...

User Manual (English)
Page 27
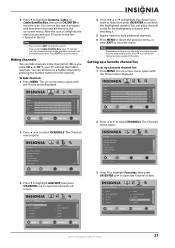
... Color Tint Sharpness PICTURE AUDIO CHANNELS SETTINGS Vivid 42 45 54 0 +5 MOVE OK ENTER SELECT Adjust settings to affect picture quality MENU PREVIOUS EXIT EXIT 3 Press to highlight Channel Strength, then press OK/ENTER or to select CHANNELS. Settings Parental Controls Closed Caption Time Menu Settings LOGO Brightness Auto Input Sensing PICTURE AUDIO CHANNELS SETTINGS Low On MOVE OK ENTER SELECT Set various TV options MENU PREVIOUS EXIT EXIT 3 Press to close the menu. Channel Strength CH 7-3 Now 0% 0 MOVE OK ENTER SELECT Display signal strength of programs...
... Color Tint Sharpness PICTURE AUDIO CHANNELS SETTINGS Vivid 42 45 54 0 +5 MOVE OK ENTER SELECT Adjust settings to affect picture quality MENU PREVIOUS EXIT EXIT 3 Press to highlight Channel Strength, then press OK/ENTER or to select CHANNELS. Settings Parental Controls Closed Caption Time Menu Settings LOGO Brightness Auto Input Sensing PICTURE AUDIO CHANNELS SETTINGS Low On MOVE OK ENTER SELECT Set various TV options MENU PREVIOUS EXIT EXIT 3 Press to close the menu. Channel Strength CH 7-3 Now 0% 0 MOVE OK ENTER SELECT Display signal strength of programs...
User Manual (English)
Page 37
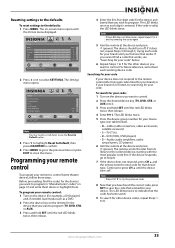
... been saved. 9 To search for the other device codes, repeat Steps 1 to control. Settings Parental Controls Closed Caption Time Menu Settings LOGO Brightness Auto Input Sensing PICTURE AUDIO CHANNELS SETTINGS Low On MOVE OK ENTER SELECT Set various TV options MENU PREVIOUS EXIT EXIT Note You may need to scroll down each digit is valid, the LED blinks twice. Programming your remote control To program your brand until you want to control. 2 Press the desired device key (TV...
... been saved. 9 To search for the other device codes, repeat Steps 1 to control. Settings Parental Controls Closed Caption Time Menu Settings LOGO Brightness Auto Input Sensing PICTURE AUDIO CHANNELS SETTINGS Low On MOVE OK ENTER SELECT Set various TV options MENU PREVIOUS EXIT EXIT Note You may need to scroll down each digit is valid, the LED blinks twice. Programming your remote control To program your brand until you want to control. 2 Press the desired device key (TV...
User Manual (English)
Page 53
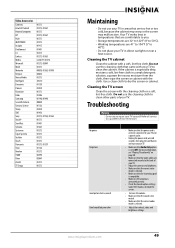
...-free cloth. Some TEXT modes can block the screen. • Increase the volume. • Make sure that the sound is not muted. • Make sure that Audio Only option is connected correctly. • Check the closed caption settings. Do not use the cleaning cloth to 40°C). • Do not place your TV in direct sunlight or near a heat source. Your TV works best...
...-free cloth. Some TEXT modes can block the screen. • Increase the volume. • Make sure that the sound is not muted. • Make sure that Audio Only option is connected correctly. • Check the closed caption settings. Do not use the cleaning cloth to 40°C). • Do not place your TV in direct sunlight or near a heat source. Your TV works best...
User Manual (English)
Page 54
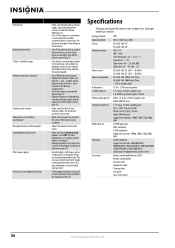
... "Locking control buttons" on page 27. • Unplug the power cord, wait a few seconds, then plug the cord back in the Audio menu. • Make sure that the + and - A-8 ~ A-1, A ~ I Super band - Turn off the device or move your TV. • Make sure that the A/V and antenna cables are subject to be poor. Analog standard Digital standard Screen Channel coverage Power source Power consumption Audio power S-Video input (2) Video/audio input (2) Component input (2) HDMI input (5) VGA input Accessories NTSC ATSC, 8-VSB, Clear-QAM NS-L42X-10A...
... "Locking control buttons" on page 27. • Unplug the power cord, wait a few seconds, then plug the cord back in the Audio menu. • Make sure that the + and - A-8 ~ A-1, A ~ I Super band - Turn off the device or move your TV. • Make sure that the A/V and antenna cables are subject to be poor. Analog standard Digital standard Screen Channel coverage Power source Power consumption Audio power S-Video input (2) Video/audio input (2) Component input (2) HDMI input (5) VGA input Accessories NTSC ATSC, 8-VSB, Clear-QAM NS-L42X-10A...


