Firmware Installation Guide (English)
Page 1
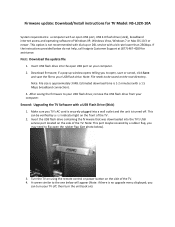
...or DSL service with a 1.5 Mbps broadband connection). 3. Estimated download time is no upgrade menu displayed; Turn the TV on using the remote control or power button on ): Note: This port maybe covered by a red indicator light on your USB flash drive; Second: Upgrading ... the update file 1. Download firmware; Note: File needs to the one below do not help, call Insignia Customer Support at (877) 467‐4289 for TV Model: NS‐L32X‐10A System requirements: a computer with a USB Flash Drive (Stick) 1. Firmware update: Download/Install instructions for...
...or DSL service with a 1.5 Mbps broadband connection). 3. Estimated download time is no upgrade menu displayed; Turn the TV on using the remote control or power button on ): Note: This port maybe covered by a red indicator light on your USB flash drive; Second: Upgrading ... the update file 1. Download firmware; Note: File needs to the one below do not help, call Insignia Customer Support at (877) 467‐4289 for TV Model: NS‐L32X‐10A System requirements: a computer with a USB Flash Drive (Stick) 1. Firmware update: Download/Install instructions for...

Firmware Installation Guide (English)
Page 2
Using your remote control arrow keys, make sure the "Yes" button is highlighted and press enter/OK on the remote control, TV will appear displaying the progress of the update; this update takes approximately one shown below will appear: 7. The software update will then begin Note: DO NOT TURN THE POWER OFF OR UNPLUG DURING THE UPDATE Note: During the software update, a progress bar will then restart. Remove the USB flash drive (stick) from the TV. 8. Press the Enter/OK key on the remote. Once the update has completed, a screen similar to the one (1) minute. 6. 5.
Using your remote control arrow keys, make sure the "Yes" button is highlighted and press enter/OK on the remote control, TV will appear displaying the progress of the update; this update takes approximately one shown below will appear: 7. The software update will then begin Note: DO NOT TURN THE POWER OFF OR UNPLUG DURING THE UPDATE Note: During the software update, a progress bar will then restart. Remove the USB flash drive (stick) from the TV. 8. Press the Enter/OK key on the remote. Once the update has completed, a screen similar to the one (1) minute. 6. 5.
What is Firmware? (English)
Page 1
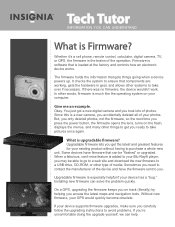
... "flashed" or upgraded. If there was no firmware, the device wouldn't work. Without new firmware, your GPS would quickly become obsolete. Whether it's a cell phone, remote control, calculator, digital camera, TV, or GPS, the firmware is the brains of the device and have firmware that gets things going when a device powers...
... "flashed" or upgraded. If there was no firmware, the device wouldn't work. Without new firmware, your GPS would quickly become obsolete. Whether it's a cell phone, remote control, calculator, digital camera, TV, or GPS, the firmware is the brains of the device and have firmware that gets things going when a device powers...

User Manual (English)
Page 3
... 2 Cautions 3 Introduction 4 Installing a wall-mount bracket 4 TV components 5 Accessories 5 Cleaning cloth 5 Front 5 Back 5 Side 6 Remote control 6 Using the remote control 7 Installing the remote control batteries 7 Aiming the remote control 8 Using the remote control holder 8 Programming your remote control 8 Programming a different universal remote control 12 Making connections 12 Connecting the power 12 Connecting an antenna 12 Connecting cable...
... 2 Cautions 3 Introduction 4 Installing a wall-mount bracket 4 TV components 5 Accessories 5 Cleaning cloth 5 Front 5 Back 5 Side 6 Remote control 6 Using the remote control 7 Installing the remote control batteries 7 Aiming the remote control 8 Using the remote control holder 8 Programming your remote control 8 Programming a different universal remote control 12 Making connections 12 Connecting the power 12 Connecting an antenna 12 Connecting cable...
User Manual (English)
Page 4
...timer 33 Adjusting menu settings 33 Selecting the menu language 33 Changing the menu transparency 34 Labeling an input source 34 Adjusting the INSIGNIA logo brightness 35 Turning Auto Input Sensing on or off 36 Resetting settings to the defaults 36 Manufacturers' codes 37 Maintaining 49 ...Cleaning the TV cabinet 49 Cleaning the TV screen 49 Troubleshooting 49 Troubleshooting remote control programming 49 General troubleshooting 49 Specifications 50 Legal notices 51 Two-year limited warranty 53 ii www.insigniaproducts.com
...timer 33 Adjusting menu settings 33 Selecting the menu language 33 Changing the menu transparency 34 Labeling an input source 34 Adjusting the INSIGNIA logo brightness 35 Turning Auto Input Sensing on or off 36 Resetting settings to the defaults 36 Manufacturers' codes 37 Maintaining 49 ...Cleaning the TV cabinet 49 Cleaning the TV screen 49 Troubleshooting 49 Troubleshooting remote control programming 49 General troubleshooting 49 Specifications 50 Legal notices 51 Two-year limited warranty 53 ii www.insigniaproducts.com

User Manual (English)
Page 6
... that you do not remove any antenna or cable system. Make sure that you connect the Class I apparatus to a grounding-type, three-prong outlet. 17 Remote control batteries should not be exposed to excessive heat such as sunshine, fire, or the like. 18 The apparatus should be exposed to qualified service...
... that you do not remove any antenna or cable system. Make sure that you connect the Class I apparatus to a grounding-type, three-prong outlet. 17 Remote control batteries should not be exposed to excessive heat such as sunshine, fire, or the like. 18 The apparatus should be exposed to qualified service...

User Manual (English)
Page 8
...the cover. 2 Remove the two screws the secure the base to get the maximum experience. By simply pressing a button on your Insignia Advanced Series television can automatically find these opportunities to do not perform any servicing other than others. Installing a wall-mount bracket Warning... This apparatus is featured on your remote control, your new Insignia Advanced Series television! To install a wall-mount bracket: Warning These servicing instructions are for video games. SRS TruSurround HD:...
...the cover. 2 Remove the two screws the secure the base to get the maximum experience. By simply pressing a button on your Insignia Advanced Series television can automatically find these opportunities to do not perform any servicing other than others. Installing a wall-mount bracket Warning... This apparatus is featured on your remote control, your new Insignia Advanced Series television! To install a wall-mount bracket: Warning These servicing instructions are for video games. SRS TruSurround HD:...
User Manual (English)
Page 9
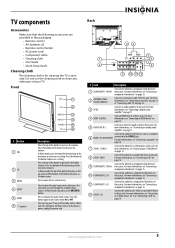
... audio amplifier" on page 14. www.insigniaproducts.com 5 TV components Accessories Make sure that the following accessories are provided in the packaging: • Remote control • AA batteries (2) • Remote control holder • AC power cord • Component cable • Cleaning cloth • User Guide • Quick Setup Guide Cleaning cloth The...
... audio amplifier" on page 14. www.insigniaproducts.com 5 TV components Accessories Make sure that the following accessories are provided in the packaging: • Remote control • AA batteries (2) • Remote control holder • AC power cord • Component cable • Cleaning cloth • User Guide • Quick Setup Guide Cleaning cloth The...
User Manual (English)
Page 10
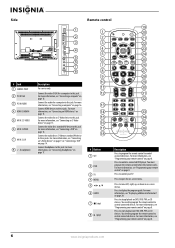
... devices. Connect headphones to control connected devices. Remote control 19 1 20 2 21 3 22 4 23 5 24 6 TV VIDEO COMP HDMI 25 7 26 8 27 9 28 10 29 11 30 12 31 32 13 14 33 15 34 16 GAME 35 DYN VOL 17 36 18 NS-RC02U-10A 37 # Button 1 SET 2 DVD 3 TV 4 MENU 5 ...6 GUIDE 7 (stop playback on page 8. You must program the remote control before this jack. Press to display the program guide. Press to open the on -screen...
... devices. Connect headphones to control connected devices. Remote control 19 1 20 2 21 3 22 4 23 5 24 6 TV VIDEO COMP HDMI 25 7 26 8 27 9 28 10 29 11 30 12 31 32 13 14 33 15 34 16 GAME 35 DYN VOL 17 36 18 NS-RC02U-10A 37 # Button 1 SET 2 DVD 3 TV 4 MENU 5 ...6 GUIDE 7 (stop playback on page 8. You must program the remote control before this jack. Press to display the program guide. Press to open the on -screen...

User Manual (English)
Page 11
...DVD, DVR, PVR, or CD devices. VIDEO- Press again to enter channel numbers or the parental control password. You need to program the remote control to control connected devices. For more information, see "Adjusting the sound" on page 21. 37 PICT Press to select the video mode... selections or changes. You can select Off, 5, 10, 15, 30, 60, 90, 120, 180, or 240 minutes. Using the remote control Installing the remote control batteries To install the remote control batteries: 1 Remove the battery cover. # Button 9 (fast reverse) 10 / (skip back) 11 RECALL 12 VOL+/VOL- 13...
...DVD, DVR, PVR, or CD devices. VIDEO- Press again to enter channel numbers or the parental control password. You need to program the remote control to control connected devices. For more information, see "Adjusting the sound" on page 21. 37 PICT Press to select the video mode... selections or changes. You can select Off, 5, 10, 15, 30, 60, 90, 120, 180, or 240 minutes. Using the remote control Installing the remote control batteries To install the remote control batteries: 1 Remove the battery cover. # Button 9 (fast reverse) 10 / (skip back) 11 RECALL 12 VOL+/VOL- 13...

User Manual (English)
Page 12
.... Do not mix old and new batteries. Do not place objects, such as sunshine, heat registers, or fire. • Battery chemicals can put the remote control in "Manufacturers' codes" on the front of different types. Make sure that works, see "Searching for your code" below. 6 Repeat Steps 1 ...not mix batteries of your TV or change the angle at the device and press (power). Aiming the remote control To aim the remote control: • Point the remote control towards the remote sensor on page 37 and write them down each working device code. 8 www.insigniaproducts.com Note If ...
.... Do not mix old and new batteries. Do not place objects, such as sunshine, heat registers, or fire. • Battery chemicals can put the remote control in "Manufacturers' codes" on the front of different types. Make sure that works, see "Searching for your code" below. 6 Repeat Steps 1 ...not mix batteries of your TV or change the angle at the device and press (power). Aiming the remote control To aim the remote control: • Point the remote control towards the remote sensor on page 37 and write them down each working device code. 8 www.insigniaproducts.com Note If ...
User Manual (English)
Page 13
... go to Step 8. 7 If the device does not respond, press CH and the remote tests the next code for the first digit, press 1. Programming a learned key To program a learned key: 1 Place your Insignia remote control head-to-head (about 2" apart) from its library to the selected device, starting... Learned keys are not learnable, including multi-frequency types, some considerations to keep in "Searching for your code" on the device you want the Insignia remote control to learn. Note If the LED does not blink, the code digit is 0. 5 Repeat Step 4 for the four remaining digits, using...
... go to Step 8. 7 If the device does not respond, press CH and the remote tests the next code for the first digit, press 1. Programming a learned key To program a learned key: 1 Place your Insignia remote control head-to-head (about 2" apart) from its library to the selected device, starting... Learned keys are not learnable, including multi-frequency types, some considerations to keep in "Searching for your code" on the device you want the Insignia remote control to learn. Note If the LED does not blink, the code digit is 0. 5 Repeat Step 4 for the four remaining digits, using...

User Manual (English)
Page 14
... Steps 4 and 5 to one long flash instead, either your batteries are low, or the Insignia remote control has a memory fault. In either case, the remote cannot learn . 5 On the original remote, press and hold SET to clear all programmed devices. Deleting all learned keys in a specific ... twice (for the selected devices. 10 www.insigniaproducts.com If the LED displays one long flash instead, either your batteries are low, or the Insignia remote control has a memory fault. Try repeating this step again until the LED blinks twice, then release. 2 Press 9 7 6. If needed,...
... Steps 4 and 5 to one long flash instead, either your batteries are low, or the Insignia remote control has a memory fault. In either case, the remote cannot learn . 5 On the original remote, press and hold SET to clear all programmed devices. Deleting all learned keys in a specific ... twice (for the selected devices. 10 www.insigniaproducts.com If the LED displays one long flash instead, either your batteries are low, or the Insignia remote control has a memory fault. Try repeating this step again until the LED blinks twice, then release. 2 Press 9 7 6. If needed,...

User Manual (English)
Page 15
... the LED blinks twice, then release. 3 Enter 9 9 4. Note Programming a new macro over an existing one can be locked so that the Insignia remote controls a single device's channel-changing functions, regardless of operating mode. www.insigniaproducts.com 11 To lock all broadcast TV through 0, CH , CH ,...1 through one device: 1 Press the mode key that relates to the device that lets you wish to remove. Using keymover Your Insignia universal remote control includes a keymover feature that you use any key (other functions you want to move additional keys. The LED blinks twice. 4...
... the LED blinks twice, then release. 3 Enter 9 9 4. Note Programming a new macro over an existing one can be locked so that the Insignia remote controls a single device's channel-changing functions, regardless of operating mode. www.insigniaproducts.com 11 To lock all broadcast TV through 0, CH , CH ,...1 through one device: 1 Press the mode key that relates to the device that lets you wish to remove. Using keymover Your Insignia universal remote control includes a keymover feature that you use any key (other functions you want to move additional keys. The LED blinks twice. 4...
User Manual (English)
Page 16
... the red LED blinks twice, then release. For more help, call the Insignia Customer Care Center at a time. See the label on the charts below it using the Insignia TV remote to identify a code that can operate your Insignia TV with your TV and cable box and select a particular channel, but ...of the cord into the AC IN jack on the back of the universal remote control, and the model number is often visible on both your Insignia TV. Tips • If your universal remote control or set -top box's remote control manufacturer and model) on your TV and cable box and select a ...
... the red LED blinks twice, then release. For more help, call the Insignia Customer Care Center at a time. See the label on the charts below it using the Insignia TV remote to identify a code that can operate your Insignia TV with your TV and cable box and select a particular channel, but ...of the cord into the AC IN jack on the back of the universal remote control, and the model number is often visible on both your Insignia TV. Tips • If your universal remote control or set -top box's remote control manufacturer and model) on your TV and cable box and select a ...

User Manual (English)
Page 17
... of the coaxial cable to the cable-out, HDMI, component video, S-Video, or AV jack. The connection can also connect cable TV using your TV remote control. Back of TV Cable box IANNTEONNUAT HDMI Video or S-Video Component 2 Connect the other end of your TV and on receiving over-the-air...
... of the coaxial cable to the cable-out, HDMI, component video, S-Video, or AV jack. The connection can also connect cable TV using your TV remote control. Back of TV Cable box IANNTEONNUAT HDMI Video or S-Video Component 2 Connect the other end of your TV and on receiving over-the-air...

User Manual (English)
Page 20
... IN 2 S-VIDEO jack on the side of TV S-Video device Connecting a computer Note If the computer has an HDMI jack, you "wake" your TV or remote control. 16 www.insigniaproducts.com Note When the computer enters standby mode, your TV.
... IN 2 S-VIDEO jack on the side of TV S-Video device Connecting a computer Note If the computer has an HDMI jack, you "wake" your TV or remote control. 16 www.insigniaproducts.com Note When the computer enters standby mode, your TV.

User Manual (English)
Page 22
... TV source Antenna Cable Cable/Satellite box 0 Analog Channels 0 Digital Channels Scan for channels MOVE OK ENTER SELECT MENU PREVIOUS Select Antenna If using the remote control. The power indicator LED turns blue. 3 Press (power) again to highlight Antenna, Cable, or Cable/Satellite box (if your TV turned on... screen opens. Turning your TV on or off To turn your TV on page 24. The Setup Wizard guides you have: • Installed the remote control batteries. (See page 7 for channels. You can change the menu language or scan for channels" on and off your TV. The Source ...
... TV source Antenna Cable Cable/Satellite box 0 Analog Channels 0 Digital Channels Scan for channels MOVE OK ENTER SELECT MENU PREVIOUS Select Antenna If using the remote control. The power indicator LED turns blue. 3 Press (power) again to highlight Antenna, Cable, or Cable/Satellite box (if your TV turned on... screen opens. Turning your TV on or off To turn your TV on page 24. The Setup Wizard guides you have: • Installed the remote control batteries. (See page 7 for channels. You can change the menu language or scan for channels" on and off your TV. The Source ...

User Manual (English)
Page 23
... 4. The other inputs are active. Game Inputs TV AV 2 Component 2 VGA HDMI 3 2 Press or to highlight the video input source your TV turned on the remote control: • Press TV to select TV. • Press VIDEO once to select AV 1(for AV1 IN VIDEO or AV1 IN S-VIDEO). • Press VIDEO...
... 4. The other inputs are active. Game Inputs TV AV 2 Component 2 VGA HDMI 3 2 Press or to highlight the video input source your TV turned on the remote control: • Press TV to select TV. • Press VIDEO once to select AV 1(for AV1 IN VIDEO or AV1 IN S-VIDEO). • Press VIDEO...

User Manual (English)
Page 25
... to go to the previous menu or EXIT to On. Press or to move from left to right to show full image on using the remote control. The Advanced Video menu opens. You can select: • High-Provides the smoothest and clearest motion from a list of the picture. Adjusting the picture...
... to go to the previous menu or EXIT to On. Press or to move from left to right to show full image on using the remote control. The Advanced Video menu opens. You can select: • High-Provides the smoothest and clearest motion from a list of the picture. Adjusting the picture...


