
Warranty (English)
Page 1
...labor and parts charges. How to your Insignia Product during the Warranty Period. If you purchased the Product from the date you purchased the Product. This warranty does not cover: • Customer instruction/education • Installation • Set up to five (5) pixel failures throughout the... PARTICULAR PURPOSE, ARE LIMITED IN DURATION TO THE WARRANTY PERIOD SET FORTH ABOVE AND NO WARRANTIES, WHETHER EXPRESS OR IMPLIED, WILL APPLY AFTER THE WARRANTY PERIOD. Contact Insignia: For customer service please call 1-800-663-2275. INSIGNIA is " or "with new or rebuilt parts; ENGLISH 12...
...labor and parts charges. How to your Insignia Product during the Warranty Period. If you purchased the Product from the date you purchased the Product. This warranty does not cover: • Customer instruction/education • Installation • Set up to five (5) pixel failures throughout the... PARTICULAR PURPOSE, ARE LIMITED IN DURATION TO THE WARRANTY PERIOD SET FORTH ABOVE AND NO WARRANTIES, WHETHER EXPRESS OR IMPLIED, WILL APPLY AFTER THE WARRANTY PERIOD. Contact Insignia: For customer service please call 1-800-663-2275. INSIGNIA is " or "with new or rebuilt parts; ENGLISH 12...

User Manual (English)
Page 3
... 47 Use a USB flash drive 47 Switch to USB mode 47 Browse photos 48 View favorite photos 49 View photos in a slideshow 49 Customize slideshow settings 50 Adjust the picture 51 www.insigniaproducts.com iii
... 47 Use a USB flash drive 47 Switch to USB mode 47 Browse photos 48 View favorite photos 49 View photos in a slideshow 49 Customize slideshow settings 50 Adjust the picture 51 www.insigniaproducts.com iii

User Manual (English)
Page 4
...Select the analog closed captioning mode 64 Select the digital closed captioning mode 64 Customize digital closed captioning settings 65 Adjust time settings 66 Set the clock 66 Set the sleep timer 67 Adjust menu settings 67 Select the menu language 67 Label an input source 68 Turn Input Sensor on or off ...68 Maintenance 68 Clean the TV cabinet 68 Clean the TV screen 68 Troubleshoot 69 Restore settings to the defaults 69 View system information 69 Update the TV firmware 70 Video and audio 71 Remote control 73 General 74 Roku Streaming...
...Select the analog closed captioning mode 64 Select the digital closed captioning mode 64 Customize digital closed captioning settings 65 Adjust time settings 66 Set the clock 66 Set the sleep timer 67 Adjust menu settings 67 Select the menu language 67 Label an input source 68 Turn Input Sensor on or off ...68 Maintenance 68 Clean the TV cabinet 68 Clean the TV screen 68 Troubleshoot 69 Restore settings to the defaults 69 View system information 69 Update the TV firmware 70 Video and audio 71 Remote control 73 General 74 Roku Streaming...

User Manual (English)
Page 9
Your NS-48D510NA15 represents the state of the art in "Adjust the TV picture... communicate with each other. (See page 44 for connection instructions.) INlink Enjoy the benefit of a high-quality Insignia product. No setup is designed for instruction on how to use INlink.) DTS Sound™ DTS Sound delivers clear... LED TV design and is needed! Insignia 48" LED TV Insignia 48" LED TV Introduction Congratulations on your remote control, your television settings will automatically adjust for connection instructions.) Roku Ready® Your Insignia TV is certified to work with the...
Your NS-48D510NA15 represents the state of the art in "Adjust the TV picture... communicate with each other. (See page 44 for connection instructions.) INlink Enjoy the benefit of a high-quality Insignia product. No setup is designed for instruction on how to use INlink.) DTS Sound™ DTS Sound delivers clear... LED TV design and is needed! Insignia 48" LED TV Insignia 48" LED TV Introduction Congratulations on your remote control, your television settings will automatically adjust for connection instructions.) Roku Ready® Your Insignia TV is certified to work with the...

User Manual (English)
Page 17
...such as the channel number, channel name (if available), or signal source. Press to control INlink-compatible (HDMI CEC) devices. INlink-Press to set the sleep timer. See "Select the video input source" on page 58. TV-Press to return to the previous channel. -Press to increase or... 41. Digital programs-Press to mute the sound. You can select: • Mono-Select this option if there is noise or static on page 41. Insignia 48" LED TV Remote control # Button 1 (power) 2 Numbers 3 4 ENTER 5 MENU 6 EXIT 7 ASPECT 8 VOL+/- 9 SLEEP Description Press to turn closed captioning on -screen...
...such as the channel number, channel name (if available), or signal source. Press to control INlink-compatible (HDMI CEC) devices. INlink-Press to set the sleep timer. See "Select the video input source" on page 58. TV-Press to return to the previous channel. -Press to increase or... 41. Digital programs-Press to mute the sound. You can select: • Mono-Select this option if there is noise or static on page 41. Insignia 48" LED TV Remote control # Button 1 (power) 2 Numbers 3 4 ENTER 5 MENU 6 EXIT 7 ASPECT 8 VOL+/- 9 SLEEP Description Press to turn closed captioning on -screen...
User Manual (English)
Page 24
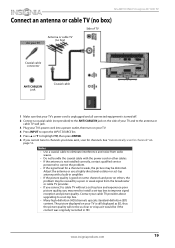
... in amplifier. • If the picture quality is good on some channels and poor on others, the problem may need to install a set-top box to improve signal reception and picture quality. See "Automatically scan for channels. Adjust the antenna or use a highly directional outdoor or... scan for channels" on page 56. The picture displayed on your cable TV provider about upgrading to a set-top box. • Many high-definition (HD) channels upscale standard-definition (SD) content. NS-48D510NA15 Insignia 48" LED TV Connect an antenna or cable TV (no box) Side of TV On your TV Antenna...
... in amplifier. • If the picture quality is good on some channels and poor on others, the problem may need to install a set-top box to improve signal reception and picture quality. See "Automatically scan for channels. Adjust the antenna or use a highly directional outdoor or... scan for channels" on page 56. The picture displayed on your cable TV provider about upgrading to a set-top box. • Many high-definition (HD) channels upscale standard-definition (SD) content. NS-48D510NA15 Insignia 48" LED TV Connect an antenna or cable TV (no box) Side of TV On your TV Antenna...

User Manual (English)
Page 27
Insignia 48" LED TV AV (composite video) (good) Notes • Cables are often color-coded to match color-coded jacks. • The yellow video connector on ... provided) to the green VIDEO/Y jack and AUDIO L and R jacks on the back of your TV. 4 Turn on the DVD or Blu-ray player, then set it to the correct output mode. Notes • The VIDEO/Y, PB, and PR video jacks (used to connect a component device) share the AUDIO L and R jacks...
Insignia 48" LED TV AV (composite video) (good) Notes • Cables are often color-coded to match color-coded jacks. • The yellow video connector on ... provided) to the green VIDEO/Y jack and AUDIO L and R jacks on the back of your TV. 4 Turn on the DVD or Blu-ray player, then set it to the correct output mode. Notes • The VIDEO/Y, PB, and PR video jacks (used to connect a component device) share the AUDIO L and R jacks...

User Manual (English)
Page 30
www.insigniaproducts.com 25 Connect a game console HDMI (best) On your TV HDMI cable connector Game console NS-48D510NA15 Insignia 48" LED TV Side of TV HDMI jack HDMI cable 1 Make sure that came with the console. 5 Press INPUT to open the INPUT SOURCE list. 6 ... OUT jack on the game console. 3 Plug your TV's power cord into a power outlet, then turn on your TV. 4 Turn on the game console, then set it to use any audio cables. Note An HDMI cable carries both audio and video.
www.insigniaproducts.com 25 Connect a game console HDMI (best) On your TV HDMI cable connector Game console NS-48D510NA15 Insignia 48" LED TV Side of TV HDMI jack HDMI cable 1 Make sure that came with the console. 5 Press INPUT to open the INPUT SOURCE list. 6 ... OUT jack on the game console. 3 Plug your TV's power cord into a power outlet, then turn on your TV. 4 Turn on the game console, then set it to use any audio cables. Note An HDMI cable carries both audio and video.

User Manual (English)
Page 31
... Audio cable video cable connectors connectors Component Analog video jacks audio jacks Game console Back of your TV. 4 Turn on the game console, then set it to highlight Component/AV, then press ENTER. 26 www.insigniaproducts.com For more information, see the documentation that your TV's power cord is ...a power outlet, then turn on your TV and to match color-coded jacks. Note • Your game console may require a special component video cable. Insignia 48" LED TV Component video (better) Note Cables are often color-coded to the component jack(s) on the game console.
... Audio cable video cable connectors connectors Component Analog video jacks audio jacks Game console Back of your TV. 4 Turn on the game console, then set it to highlight Component/AV, then press ENTER. 26 www.insigniaproducts.com For more information, see the documentation that your TV's power cord is ...a power outlet, then turn on your TV and to match color-coded jacks. Note • Your game console may require a special component video cable. Insignia 48" LED TV Component video (better) Note Cables are often color-coded to the component jack(s) on the game console.

User Manual (English)
Page 32
...power cord is unplugged and the game console is analog. 3 Plug your TV's power cord into a power outlet, then turn on the game console, then set it to the correct output mode. On your TV. 4 Turn on your TV AV (composite video) cable connector Audio cable connectors AV Analog (composite audio... and AUDIO L and R jacks on the back of your TV and to the composite jack(s) on the AV cable connects to the green VIDEO/Y jack. NS-48D510NA15 Insignia 48" LED TV AV (composite video) (good) Notes • Cables are often color-coded to match color-coded jacks. • The yellow video connector ...
...power cord is unplugged and the game console is analog. 3 Plug your TV's power cord into a power outlet, then turn on the game console, then set it to the correct output mode. On your TV. 4 Turn on your TV AV (composite video) cable connector Audio cable connectors AV Analog (composite audio... and AUDIO L and R jacks on the back of your TV and to the composite jack(s) on the AV cable connects to the green VIDEO/Y jack. NS-48D510NA15 Insignia 48" LED TV AV (composite video) (good) Notes • Cables are often color-coded to match color-coded jacks. • The yellow video connector ...

User Manual (English)
Page 36
... TV. 2 In the screen that still lets you hear the sound. When using headphones, use the lowest volume setting on page 55. Side of TV 1 Connect the headphones to the /AUDIO OUT jack. NS-48D510NA15 Insignia 48" LED TV Connect headphones When you connect headphones, the TV speakers are muted and the audio plays...
... TV. 2 In the screen that still lets you hear the sound. When using headphones, use the lowest volume setting on page 55. Side of TV 1 Connect the headphones to the /AUDIO OUT jack. NS-48D510NA15 Insignia 48" LED TV Connect headphones When you connect headphones, the TV speakers are muted and the audio plays...

User Manual (English)
Page 37
... optical AUDIO IN jack on the digital speaker system or sound bar. 3 Plug your TV's power cord into a power outlet, then turn on your TV, set it to the digital audio jack. For more information, see the documentation that your TV's power cord is unplugged and the digital speaker system or... audio jack 1 Make sure that came with the digital speaker system or sound bar. 5 On your TV. 4 Turn on page 54. 32 www.insigniaproducts.com Insignia 48" LED TV Connect external speakers or a sound bar You can connect external speakers or a sound bar to the correct source.
... optical AUDIO IN jack on the digital speaker system or sound bar. 3 Plug your TV's power cord into a power outlet, then turn on your TV, set it to the digital audio jack. For more information, see the documentation that your TV's power cord is unplugged and the digital speaker system or... audio jack 1 Make sure that came with the digital speaker system or sound bar. 5 On your TV. 4 Turn on page 54. 32 www.insigniaproducts.com Insignia 48" LED TV Connect external speakers or a sound bar You can connect external speakers or a sound bar to the correct source.

User Manual (English)
Page 38
... or sound bar. 5 On your TV. 4 Turn on the analog speaker system or sound bar, then set the Headphone/Audio Out option on page 54. See the Headphone/Audio Out option in "Adjust sound settings" on the AUDIO menu to the correct source. Side of your TV and to the AUDIO IN... the analog speaker system or sound bar. 3 Plug your TV's power cord into a power outlet, then turn on your TV, set it to Audio Out Fixed or Audio Out Variable. NS-48D510NA15 Insignia 48" LED TV Analog audio When you connect an analog system or a sound bar to the /AUDIO OUT jack, the TV...
... or sound bar. 5 On your TV. 4 Turn on the analog speaker system or sound bar, then set the Headphone/Audio Out option on page 54. See the Headphone/Audio Out option in "Adjust sound settings" on the AUDIO menu to the correct source. Side of your TV and to the AUDIO IN... the analog speaker system or sound bar. 3 Plug your TV's power cord into a power outlet, then turn on your TV, set it to Audio Out Fixed or Audio Out Variable. NS-48D510NA15 Insignia 48" LED TV Analog audio When you connect an analog system or a sound bar to the /AUDIO OUT jack, the TV...

User Manual (English)
Page 42
...mode. Select Yes to continue using Store Display Mode, or select No to select your time zone. NS-48D510NA15 Insignia 48" LED TV 6 Press S or T to highlight Time Zone, then press X to access the setting. 7 Press S or T to change your selection, then press ENTER. You can select Eastern, ..., Hawaii, Atlantic, or Newfoundland, then press ENTER, MENU, or W. 8 Press S or T to highlight Daylight Saving, then press X to access the setting. 9 Press S or T to select On (if your viewing area observes Daylight Saving Time) or Off (if your viewing area does not observe Daylight Saving...
...mode. Select Yes to continue using Store Display Mode, or select No to select your time zone. NS-48D510NA15 Insignia 48" LED TV 6 Press S or T to highlight Time Zone, then press X to access the setting. 7 Press S or T to change your selection, then press ENTER. You can select Eastern, ..., Hawaii, Atlantic, or Newfoundland, then press ENTER, MENU, or W. 8 Press S or T to highlight Daylight Saving, then press X to access the setting. 9 Press S or T to select On (if your viewing area observes Daylight Saving Time) or Off (if your viewing area does not observe Daylight Saving...
User Manual (English)
Page 45
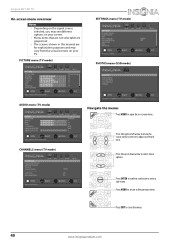
PICTURE menu (TV mode) SETTINGS menu (TV mode) PHOTOS menu (USB mode) AUDIO menu (TV mode) CHANNELS menu (TV mode) Navigate the menus Press MENU to confirm a selection or enter a ... previous menu. Press the up or down arrow to adjust a selected item. Press the right or left arrow to move the cursor on your TV. Insignia 48" LED TV On-screen menu overview Notes • Depending on the signal source selected, you may see different options on your screen. • Menu...
PICTURE menu (TV mode) SETTINGS menu (TV mode) PHOTOS menu (USB mode) AUDIO menu (TV mode) CHANNELS menu (TV mode) Navigate the menus Press MENU to confirm a selection or enter a ... previous menu. Press the up or down arrow to adjust a selected item. Press the right or left arrow to move the cursor on your TV. Insignia 48" LED TV On-screen menu overview Notes • Depending on the signal source selected, you may see different options on your screen. • Menu...

User Manual (English)
Page 46
... , or press ENTER to turn the sound back on page 58. For example, to tune to scroll through the pages. For information about setting up a favorite channel list, see "Set up a favorite channel list" on . Note If a list has more than one page, press S or T to channel 5.1, press 5, (sub-channel... the number buttons to select the main digital channel, press (sub-channel), then press the number button for the channel to change the channel. NS-48D510NA15 Insignia 48" LED TV Select a channel • Press CH or CH to go to the last viewed channel. • Press FAVORITE to open the...
... , or press ENTER to turn the sound back on page 58. For example, to tune to scroll through the pages. For information about setting up a favorite channel list, see "Set up a favorite channel list" on . Note If a list has more than one page, press S or T to channel 5.1, press 5, (sub-channel... the number buttons to select the main digital channel, press (sub-channel), then press the number button for the channel to change the channel. NS-48D510NA15 Insignia 48" LED TV Select a channel • Press CH or CH to go to the last viewed channel. • Press FAVORITE to open the...

User Manual (English)
Page 49
... turned on. • If you connect an HDMI device that came with your TV. The SETTINGS menu opens. The on-screen menu opens. 2 Press W or X to highlight INlink, then press ENTER. Insignia 48" LED TV Use INlink INlink lets you control HDMI CEC-compatible devices connected to the HDMI... jacks on your TV using the remote control that is set the INlink Control setting on the SETTINGS · INLINK menu to On. Turn Device Auto Power...
... turned on. • If you connect an HDMI device that came with your TV. The SETTINGS menu opens. The on-screen menu opens. 2 Press W or X to highlight INlink, then press ENTER. Insignia 48" LED TV Use INlink INlink lets you control HDMI CEC-compatible devices connected to the HDMI... jacks on your TV using the remote control that is set the INlink Control setting on the SETTINGS · INLINK menu to On. Turn Device Auto Power...
User Manual (English)
Page 50
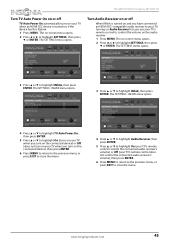
... HDMI CEC-compatible audio receiver to your TV, turning on Audio Receiver lets you turn on , if the device has this feature. 1 Press MENU. The SETTINGS · INLINK menu opens. 4 Press S or T to highlight TV Auto Power On, then press ENTER. 5 Press S or T to highlight On (turns on your TV when... (does not turn on the connected device), then press ENTER. 6 Press MENU to return to the previous menu, or press EXIT to close the menu. NS-48D510NA15 Insignia 48" LED TV Turn TV Auto Power On on or off When INlink is turned on your TV when you use your TV's remote control...
... HDMI CEC-compatible audio receiver to your TV, turning on Audio Receiver lets you turn on , if the device has this feature. 1 Press MENU. The SETTINGS · INLINK menu opens. 4 Press S or T to highlight TV Auto Power On, then press ENTER. 5 Press S or T to highlight On (turns on your TV when... (does not turn on the connected device), then press ENTER. 6 Press MENU to return to the previous menu, or press EXIT to close the menu. NS-48D510NA15 Insignia 48" LED TV Turn TV Auto Power On on or off When INlink is turned on your TV when you use your TV's remote control...

User Manual (English)
Page 51
...more than one INlink-compatible device connected, you can display a list of HDMI CEC devices that are connected to highlight Connect, then press ENTER. The SETTINGS · INLINK menu opens. 3 Press S or T to highlight INlink Device Lists, then press ENTER. A list of HDMI CEC-compatible devices you...device you want to connect to, then press ENTER. 6 Press MENU to return to the previous menu, or press EXIT to highlight SETTINGS, then press T or ENTER. Insignia 48" LED TV Display a list of INlink-compatible devices You can select the device you want to use. 1 Press INPUT, ...
...more than one INlink-compatible device connected, you can display a list of HDMI CEC devices that are connected to highlight Connect, then press ENTER. The SETTINGS · INLINK menu opens. 3 Press S or T to highlight INlink Device Lists, then press ENTER. A list of HDMI CEC-compatible devices you...device you want to connect to, then press ENTER. 6 Press MENU to return to the previous menu, or press EXIT to highlight SETTINGS, then press T or ENTER. Insignia 48" LED TV Display a list of INlink-compatible devices You can select the device you want to use. 1 Press INPUT, ...
User Manual (English)
Page 52
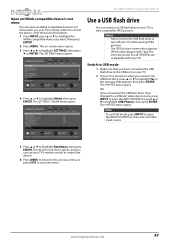
... USB flash drive to the USB port on your TV. 2 If your TV is turned on -screen menu opens. 3 Press W or X to highlight SETTINGS, then press T or ENTER. www.insigniaproducts.com 47 Switch to USB mode 1 Make sure that appears, then press ENTER. Use a USB flash drive You... then press ENTER. The device's root menu opens, and you want, then press ENTER. 2 Press MENU. The SETTINGS menu opens. 4 Press S or T to highlight Root Menu, then press ENTER. NS-48D510NA15 Insignia 48" LED TV Open an INlink-compatible device's root menu You can open an INlink-compatible device's root menu, ...
... USB flash drive to the USB port on your TV. 2 If your TV is turned on -screen menu opens. 3 Press W or X to highlight SETTINGS, then press T or ENTER. www.insigniaproducts.com 47 Switch to USB mode 1 Make sure that appears, then press ENTER. Use a USB flash drive You... then press ENTER. The device's root menu opens, and you want, then press ENTER. 2 Press MENU. The SETTINGS menu opens. 4 Press S or T to highlight Root Menu, then press ENTER. NS-48D510NA15 Insignia 48" LED TV Open an INlink-compatible device's root menu You can open an INlink-compatible device's root menu, ...


