
Quick Setup Guide (English)
Page 2
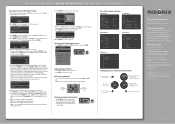
... time information from other products and brand names are not stored in most common setting. INSIGNIA is selected automatically. 11 Press ENTER. Language : English 3 Press ENTER to ...-screen menu overview Picture menu Sound menu Picture Mode Sound Channel Contrast Brightness Sharpness Setup Input Color Tint (G/R) Picture Options : Standard : 95 : 45 : 50 : 50 : G50/R50 Picture Sound Mode : ...signal you have cable, select Auto. 42"/50" PLASMA HDTV I QUICK SETUP GUIDE I NS-42P650A11/NS-50P650A11 Turning on your TV for the rst time 1 Connect the power cord, then press...
... time information from other products and brand names are not stored in most common setting. INSIGNIA is selected automatically. 11 Press ENTER. Language : English 3 Press ENTER to ...-screen menu overview Picture menu Sound menu Picture Mode Sound Channel Contrast Brightness Sharpness Setup Input Color Tint (G/R) Picture Options : Standard : 95 : 45 : 50 : 50 : G50/R50 Picture Sound Mode : ...signal you have cable, select Auto. 42"/50" PLASMA HDTV I QUICK SETUP GUIDE I NS-42P650A11/NS-50P650A11 Turning on your TV for the rst time 1 Connect the power cord, then press...
User Manual (English)
Page 2
... input source 16 On-screen menu overview 17 Navigating the menus 17 Selecting a channel 18 Adjusting the volume 18 Displaying additional information 18 Adjusting the picture 18 Adjusting the TV picture 18 Adjusting advanced picture settings 19 i www.insigniaproducts.com
... input source 16 On-screen menu overview 17 Navigating the menus 17 Selecting a channel 18 Adjusting the volume 18 Displaying additional information 18 Adjusting the picture 18 Adjusting the TV picture 18 Adjusting advanced picture settings 19 i www.insigniaproducts.com
User Manual (English)
Page 11
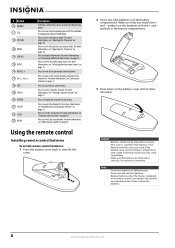
... information, see "Automatically searching for an extended period of different types. For more information, see "Setting a wake-up timer" on page 18. For more information, see "Adjusting the TV picture" on page 36. If chemicals touch your skin, wash immediately. • Make sure that you... match the + and - Press to the previous menu. Press to tune to set the sleep timer. For more information, see "Selecting ...
... information, see "Automatically searching for an extended period of different types. For more information, see "Setting a wake-up timer" on page 18. For more information, see "Adjusting the TV picture" on page 36. If chemicals touch your skin, wash immediately. • Make sure that you... match the + and - Press to the previous menu. Press to tune to set the sleep timer. For more information, see "Selecting ...
User Manual (English)
Page 20
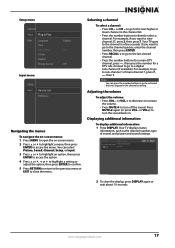
...the channel scanning. Press MUTE again (or press VOL- Notes You can select Picture, Sound, Channel, Setup, or Input. 3 Press or to highlight an option, then press ENTER to access the option. 4 Press or , or to highlight a setting or adjust the option, then press ENTER to confirm. 5 Press RETURN to return... menu or EXIT to a channel that was skipped in the channel list. • Press the number buttons to sub-channel 1 of sound, and picture and sound settings. You can press the number buttons to go to turn off the sound. If you want to go to the channel quicker, enter the...
...the channel scanning. Press MUTE again (or press VOL- Notes You can select Picture, Sound, Channel, Setup, or Input. 3 Press or to highlight an option, then press ENTER to access the option. 4 Press or , or to highlight a setting or adjust the option, then press ENTER to confirm. 5 Press RETURN to return... menu or EXIT to a channel that was skipped in the channel list. • Press the number buttons to sub-channel 1 of sound, and picture and sound settings. You can press the number buttons to go to turn off the sound. If you want to go to the channel quicker, enter the...
User Manual (English)
Page 21
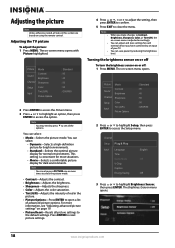
... for dark environments. The on -screen menu is convenient for most situations. • Movie-Selects a comfortable picture display for normal environments. This setting is adjusted accordingly. Press ENTER to reset picture settings. 4 Press or , or to adjust the setting, then press ENTER to confirm. 5 Press EXIT to press options. You can save power by reducing...
... for dark environments. The on -screen menu is convenient for most situations. • Movie-Selects a comfortable picture display for normal environments. This setting is adjusted accordingly. Press ENTER to reset picture settings. 4 Press or , or to adjust the setting, then press ENTER to confirm. 5 Press EXIT to press options. You can save power by reducing...
User Manual (English)
Page 22
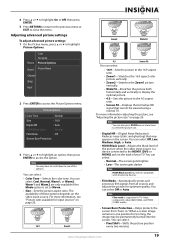
....com 19 Note You may be permanently burned into the screen. You can select: • Color Tone-Selects the color tone. Adjusting advanced picture settings To adjust advanced picture settings: 1 On the Picture menu, press or to access the option. You can select: • Normal-The screen gets brighter. • Low-The screen gets darker...
....com 19 Note You may be permanently burned into the screen. You can select: • Color Tone-Selects the color tone. Adjusting advanced picture settings To adjust advanced picture settings: 1 On the Picture menu, press or to access the option. You can select: • Normal-The screen gets brighter. • Low-The screen gets darker...

User Manual (English)
Page 23
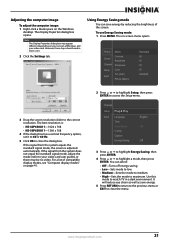
..., Screen Fit Notes You can select Dark (darkens the sides) or Light (brightens the sides). • Picture Reset-Resets the advanced picture settings to highlight Reset, then press ENTER. The Equalizer settings are reset to adjust the sound. • If you have connected to an input of the image to... access the Setup menu. Use the Equalizer settings to the default settings. Press ENTER to reset picture settings. 4 Press or , or to adjust the setting, then press ENTER to confirm. 5 Press RETURN to return to the previous menu or EXIT ...
..., Screen Fit Notes You can select Dark (darkens the sides) or Light (brightens the sides). • Picture Reset-Resets the advanced picture settings to highlight Reset, then press ENTER. The Equalizer settings are reset to adjust the sound. • If you have connected to an input of the image to... access the Setup menu. Use the Equalizer settings to the default settings. Press ENTER to reset picture settings. 4 Press or , or to adjust the setting, then press ENTER to confirm. 5 Press RETURN to return to the previous menu or EXIT ...
User Manual (English)
Page 24
...menu. If the signal from the system equals the standard signal mode, the screen is : • NS-42P650A11-1024 x 768 • NS-50P650A11-1360 x 768 4 If the dialog box has a vertical frequency option, set it to 60 or 60 Hz. 5 Click OK to watch TV in most cases. 2 Click ... eye strain as well as save energy by reducing the brightness of the screen. The Display Properties dialog box opens. Picture Mode Sound Channel Contrast Brightness Sharpness Setup Input Color Tint (G/R) Picture Options : Standard : 95 : 45 : 50 : 50 : G50/R50 3 Drag the screen resolution slider to highlight a mode...
...menu. If the signal from the system equals the standard signal mode, the screen is : • NS-42P650A11-1024 x 768 • NS-50P650A11-1360 x 768 4 If the dialog box has a vertical frequency option, set it to 60 or 60 Hz. 5 Click OK to watch TV in most cases. 2 Click ... eye strain as well as save energy by reducing the brightness of the screen. The Display Properties dialog box opens. Picture Mode Sound Channel Contrast Brightness Sharpness Setup Input Color Tint (G/R) Picture Options : Standard : 95 : 45 : 50 : 50 : G50/R50 3 Drag the screen resolution slider to highlight a mode...
User Manual (English)
Page 25
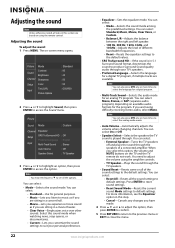
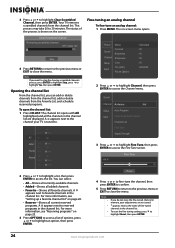
.... You need to press to suit your TV's speakers. • Preferred Language-Selects the language for the program. Picture Mode Sound Channel Contrast Brightness Sharpness Setup Input Color Tint (G/R) Picture Options : Standard : 95 : 45 : 50 : 50 : G50/R50 2 Press or to highlight Sound, then...sound: 1 Press MENU. The on using the amplifier controls. • TV Speaker-Plays the sound through your personal preferences. • Equalizer-Sets the equalizer mode. For more times to select the language for a digital program. • Multi-Track Sound-Selects the audio mode for ...
.... You need to press to suit your TV's speakers. • Preferred Language-Selects the language for the program. Picture Mode Sound Channel Contrast Brightness Sharpness Setup Input Color Tint (G/R) Picture Options : Standard : 95 : 45 : 50 : 50 : G50/R50 2 Press or to highlight Sound, then...sound: 1 Press MENU. The on using the amplifier controls. • TV Speaker-Plays the sound through your personal preferences. • Equalizer-Sets the equalizer mode. For more times to select the language for a digital program. • Multi-Track Sound-Selects the audio mode for ...
User Manual (English)
Page 26
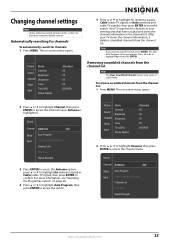
Changing channel settings Note Unless otherwise noted, all tasks in this section are based on -screen menu opens. To remove scrambled channels from the channel list. Sound Channel .... After your viewing area that have a signal and stores the channel information in the channel list. The Stop Auto Program? Picture Mode Sound Channel Contrast Brightness Sharpness Setup Input Color Tint (G/R) Picture Options : Standard : 95 : 45 : 50 : 50 : G50/R50 5 Press or to highlight Air (antenna signal), Cable (cable TV signal), or...
Changing channel settings Note Unless otherwise noted, all tasks in this section are based on -screen menu opens. To remove scrambled channels from the channel list. Sound Channel .... After your viewing area that have a signal and stores the channel information in the channel list. The Stop Auto Program? Picture Mode Sound Channel Contrast Brightness Sharpness Setup Input Color Tint (G/R) Picture Options : Standard : 95 : 45 : 50 : 50 : G50/R50 5 Press or to highlight Air (antenna signal), Cable (cable TV signal), or...
User Manual (English)
Page 27
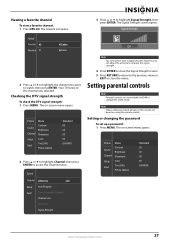
...to the previous menu or EXIT to access the list. A appears next to the channel your adjustments are displayed. For more information, see "Setting up a favorite channel list" on -screen menu opens. Notes • • • If you want to stop the clearing scrambled ...the Channel menu. The status of options, press or to highlight Reset, then press ENTER. 24 www.insigniaproducts.com Picture Mode Sound Channel Contrast Brightness Sharpness Setup Input Color Tint (G/R) Picture Options : Standard : 95 : 45 : 50 : 50 : G50/R50 2 Press or to highlight Channel, then...
...to the previous menu or EXIT to access the list. A appears next to the channel your adjustments are displayed. For more information, see "Setting up a favorite channel list" on -screen menu opens. Notes • • • If you want to stop the clearing scrambled ...the Channel menu. The status of options, press or to highlight Reset, then press ENTER. 24 www.insigniaproducts.com Picture Mode Sound Channel Contrast Brightness Sharpness Setup Input Color Tint (G/R) Picture Options : Standard : 95 : 45 : 50 : 50 : G50/R50 2 Press or to highlight Channel, then...
User Manual (English)
Page 30
... return to the previous menu or EXIT to highlight Signal Strength, then press ENTER. Setting parental controls Note Parental controls are based on using the remote control. Picture Mode Sound Channel Contrast Brightness Sharpness Setup Input Color Tint (G/R) Picture Options : Standard : 95 : 45 : 50 : 50 : G50/R50 www.insigniaproducts.com 27 Added Favorite...
... return to the previous menu or EXIT to highlight Signal Strength, then press ENTER. Setting parental controls Note Parental controls are based on using the remote control. Picture Mode Sound Channel Contrast Brightness Sharpness Setup Input Color Tint (G/R) Picture Options : Standard : 95 : 45 : 50 : 50 : G50/R50 www.insigniaproducts.com 27 Added Favorite...

User Manual (English)
Page 31
...: English : Off : Off 3 Press or to highlight V-Chip, then press ENTER to enter the password, then press ENTER. Picture Mode Sound Channel Contrast Brightness Sharpness Setup Color Tint (G/R) Input Picture Options : Standard : 95 : 45 : 50 : 50 : G50/R50 4 Press the number buttons to access the V-Chip...tune to a channel or program that is blocked by a Parental Lock. Turning parental controls on -screen menu opens. The on or off To set parental control levels: 1 Press MENU. 2 Press or to highlight Setup, then press ENTER to enter the password, then press ENTER. Received ...
...: English : Off : Off 3 Press or to highlight V-Chip, then press ENTER to enter the password, then press ENTER. Picture Mode Sound Channel Contrast Brightness Sharpness Setup Color Tint (G/R) Input Picture Options : Standard : 95 : 45 : 50 : 50 : G50/R50 4 Press the number buttons to access the V-Chip...tune to a channel or program that is blocked by a Parental Lock. Turning parental controls on -screen menu opens. The on or off To set parental control levels: 1 Press MENU. 2 Press or to highlight Setup, then press ENTER to enter the password, then press ENTER. Received ...

User Manual (English)
Page 32
... Language Time Game Mode V-Chip Caption Energy Saving : English : Off : Off 8 Press or , or to highlight Yes, then press ENTER. Setting movie levels U.S. Setting U.S. The default password is 0000. 5 Press or to highlight V-Chip Lock, then press ENTER. 6 Press or to highlight a rating, then ... Guidelines, then press ENTER to enter the password, then press ENTER. TV Parental Guidelines Allow All Block All Picture Mode Sound Channel Contrast Brightness Sharpness Setup Input Color Tint (G/R) Picture Options : Standard : 95 : 45 : 50 : 50 : G50/R50 2 Press or to highlight Setup...
... Language Time Game Mode V-Chip Caption Energy Saving : English : Off : Off 8 Press or , or to highlight Yes, then press ENTER. Setting movie levels U.S. Setting U.S. The default password is 0000. 5 Press or to highlight V-Chip Lock, then press ENTER. 6 Press or to highlight a rating, then ... Guidelines, then press ENTER to enter the password, then press ENTER. TV Parental Guidelines Allow All Block All Picture Mode Sound Channel Contrast Brightness Sharpness Setup Input Color Tint (G/R) Picture Options : Standard : 95 : 45 : 50 : 50 : G50/R50 2 Press or to highlight Setup...

User Manual (English)
Page 33
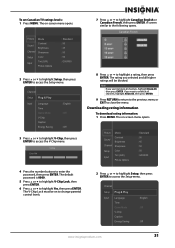
... The default password is 0000. 5 Press or to highlight V-Chip Lock, then press ENTER. 6 Press or to access the Setup menu. Setting Canadian TV rating levels Canadian English ratings E Exempt programming C Children C8+ Children over 8 years old G General audiences PG Parental guidance 14+... Allow All, then press ENTER. 8 Press or to block all higher ratings will be on -screen menu opens. Picture Mode Sound Channel Contrast Brightness Sharpness Setup Input Color Tint (G/R) Picture Options : Standard : 95 : 45 : 50 : 50 : G50/R50 2 Press or to highlight Setup, then...
... The default password is 0000. 5 Press or to highlight V-Chip Lock, then press ENTER. 6 Press or to access the Setup menu. Setting Canadian TV rating levels Canadian English ratings E Exempt programming C Children C8+ Children over 8 years old G General audiences PG Parental guidance 14+... Allow All, then press ENTER. 8 Press or to block all higher ratings will be on -screen menu opens. Picture Mode Sound Channel Contrast Brightness Sharpness Setup Input Color Tint (G/R) Picture Options : Standard : 95 : 45 : 50 : 50 : G50/R50 2 Press or to highlight Setup, then...
User Manual (English)
Page 34
... information To download rating information: 1 Press MENU. A screen similar to enter the password, then press ENTER. Picture Mode Sound Channel Contrast Brightness Sharpness Setup Input Color Tint (G/R) Picture Options : Standard : 95 : 45 : 50 : 50 : G50/R50 4 Press the number buttons to ...the following opens. The on-screen menu opens. To set Canadian TV ratings levels: 1 Press MENU. Picture Mode Sound Channel Contrast Brightness Sharpness Setup Input Color Tint (G/R) Picture Options : Standard : 95 : 45 : 50 : 50 : G50/R50 2 Press or to...
... information To download rating information: 1 Press MENU. A screen similar to enter the password, then press ENTER. Picture Mode Sound Channel Contrast Brightness Sharpness Setup Input Color Tint (G/R) Picture Options : Standard : 95 : 45 : 50 : 50 : G50/R50 4 Press the number buttons to ...the following opens. The on-screen menu opens. To set Canadian TV ratings levels: 1 Press MENU. Picture Mode Sound Channel Contrast Brightness Sharpness Setup Input Color Tint (G/R) Picture Options : Standard : 95 : 45 : 50 : 50 : G50/R50 2 Press or to...
User Manual (English)
Page 37
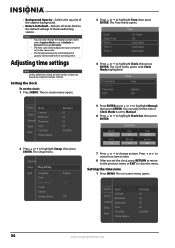
...: 1 Press MENU. The Time menu opens. The foreground opacity and background opacity cannot both be set to highlight Clock, then press ENTER. Setting the time zone 1 Press MENU. Picture Mode Sound Channel Contrast Brightness Sharpness Setup Input Color Tint (G/R) Picture Options : Standard : 95 : 45 : 50 : 50 : G50/R50 34 www.insigniaproducts.com Month 01...
...: 1 Press MENU. The Time menu opens. The foreground opacity and background opacity cannot both be set to highlight Clock, then press ENTER. Setting the time zone 1 Press MENU. Picture Mode Sound Channel Contrast Brightness Sharpness Setup Input Color Tint (G/R) Picture Options : Standard : 95 : 45 : 50 : 50 : G50/R50 34 www.insigniaproducts.com Month 01...
User Manual (English)
Page 38
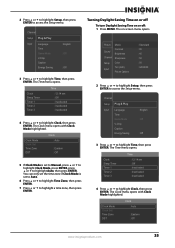
...to highlight Clock, then press ENTER. You can only set the time zone if Clock Mode is set to Auto. 6 Press or to highlight Time Zone, then press ENTER. 7 Press or to highlight Clock, then press ENTER. Picture Mode Sound Channel Contrast Brightness Sharpness Setup Input Color Tint... (G/R) Picture Options : Standard : 95 : 45 : 50 : 50 : G50/R50 2 ...
...to highlight Clock, then press ENTER. You can only set the time zone if Clock Mode is set to Auto. 6 Press or to highlight Time Zone, then press ENTER. 7 Press or to highlight Clock, then press ENTER. Picture Mode Sound Channel Contrast Brightness Sharpness Setup Input Color Tint... (G/R) Picture Options : Standard : 95 : 45 : 50 : 50 : G50/R50 2 ...
User Manual (English)
Page 39
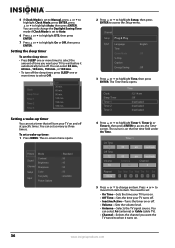
...press ENTER. 5 If Clock Mode is set to Manual, press or to highlight Clock Mode, press ENTER, press or to access the Timer screen. You can set as many as three timers. Setting a wake-up timer: 1 Press MENU. Picture Mode Sound Channel Contrast Brightness Sharpness Setup ...Input Color Tint (G/R) Picture Options : Standard : 95 : 45 : 50 : 50 : G50/R50 2 Press...
...press ENTER. 5 If Clock Mode is set to Manual, press or to highlight Clock Mode, press ENTER, press or to access the Timer screen. You can set as many as three timers. Setting a wake-up timer: 1 Press MENU. Picture Mode Sound Channel Contrast Brightness Sharpness Setup ...Input Color Tint (G/R) Picture Options : Standard : 95 : 45 : 50 : 50 : G50/R50 2 Press...
User Manual (English)
Page 40
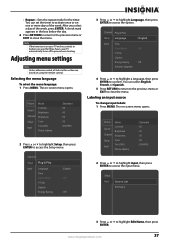
...Edit Name, then press ENTER. Selecting the menu language To select the menu language: 1 Press MENU. www.insigniaproducts.com 37 Adjusting menu settings Note Unless otherwise noted, all tasks in the box below the day. 6 Press RETURN to return to the previous menu or EXIT ...access the Input menu. Labeling an input source To change input labels: 1 Press MENU. The on -screen menu opens. Picture Mode Sound Channel Contrast Brightness Sharpness Setup Color Tint (G/R) Input Picture Options : Standard : 95 : 45 : 50 : 50 : G50/R50 Channel Setup Plug & Play Input Language Time ...
...Edit Name, then press ENTER. Selecting the menu language To select the menu language: 1 Press MENU. www.insigniaproducts.com 37 Adjusting menu settings Note Unless otherwise noted, all tasks in the box below the day. 6 Press RETURN to return to the previous menu or EXIT ...access the Input menu. Labeling an input source To change input labels: 1 Press MENU. The on -screen menu opens. Picture Mode Sound Channel Contrast Brightness Sharpness Setup Color Tint (G/R) Input Picture Options : Standard : 95 : 45 : 50 : 50 : G50/R50 Channel Setup Plug & Play Input Language Time ...

