
Quick Setup Guide (English)
Page 1
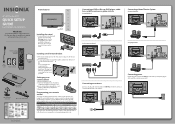
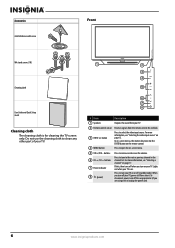
... codes. If you enjoy the quality and reliability of your user guide or visit www.insigniaproducts.com. Universal remote control TV codes (for all Insignia TVs manufactured after Jan. 1, 2007) Universal remote control makers and models Philips PHDVD5, PH5DSS, PMDVR8, PDVR8 RCA RCU807 One...the + and - Warning- symbols on the batteries align with other end of your universal Insignia remote control to come. Front features 42"/50" Plasma HDTV QUICK SETUP GUIDE NS-42P650A11/NS-50P650A11 Thank You for purchasing this product for years to work with the four screws provided. ...
... codes. If you enjoy the quality and reliability of your user guide or visit www.insigniaproducts.com. Universal remote control TV codes (for all Insignia TVs manufactured after Jan. 1, 2007) Universal remote control makers and models Philips PHDVD5, PH5DSS, PMDVR8, PDVR8 RCA RCU807 One...the + and - Warning- symbols on the batteries align with other end of your universal Insignia remote control to come. Front features 42"/50" Plasma HDTV QUICK SETUP GUIDE NS-42P650A11/NS-50P650A11 Thank You for purchasing this product for years to work with the four screws provided. ...
Quick Setup Guide (English)
Page 2
...Fe, Delegación Cuajimalpa, Distrito Federal, México 05349 RFC#BBI0802114Q2 © 2010 BBY Solutions, Inc. All rights reserved. All other Insignia TV owners. Plug & Play Menu Language, Store Demo, Channels, and Time will be set. Language : English 3 Press ENTER to access the menu...manually set the time using the number buttons. 42"/50" PLASMA HDTV I QUICK SETUP GUIDE I NS-42P650A11/NS-50P650A11 Turning on your TV for details. Plug & Play Select 'Home Use' when installing this TV in some countries. Fiber optic cable networks have , contact your User Guide! Plug & Play ...
...Fe, Delegación Cuajimalpa, Distrito Federal, México 05349 RFC#BBI0802114Q2 © 2010 BBY Solutions, Inc. All rights reserved. All other Insignia TV owners. Plug & Play Menu Language, Store Demo, Channels, and Time will be set. Language : English 3 Press ENTER to access the menu...manually set the time using the number buttons. 42"/50" PLASMA HDTV I QUICK SETUP GUIDE I NS-42P650A11/NS-50P650A11 Turning on your TV for details. Plug & Play Select 'Home Use' when installing this TV in some countries. Fiber optic cable networks have , contact your User Guide! Plug & Play ...

User Manual (English)
Page 1
User Guide 42" and 50" 720p Plasma TV NS-42P650A11, NS-50P650A11
User Guide 42" and 50" 720p Plasma TV NS-42P650A11, NS-50P650A11
User Manual (English)
Page 2
... safety instructions 2 Warnings 2 Cautions 3 Introduction 4 Installing the stand or wall-mount bracket 4 Installing the stand 4 Securing your TV to a wall or cabinet 4 Installing a wall-mount bracket 5 TV components 5 Accessories 5 Cleaning cloth 6 Front 6 Back 7 Remote control 7 Using the remote control 8 Installing remote control batteries ... a digital audio amplifier 13 Connecting an analog audio amplifier 13 Turning on your TV for the first time 14 Understanding the basics 16 Turning your TV on or off 16 Selecting the video input source 16 On-screen menu overview...
... safety instructions 2 Warnings 2 Cautions 3 Introduction 4 Installing the stand or wall-mount bracket 4 Installing the stand 4 Securing your TV to a wall or cabinet 4 Installing a wall-mount bracket 5 TV components 5 Accessories 5 Cleaning cloth 6 Front 6 Back 7 Remote control 7 Using the remote control 8 Installing remote control batteries ... a digital audio amplifier 13 Connecting an analog audio amplifier 13 Turning on your TV for the first time 14 Understanding the basics 16 Turning your TV on or off 16 Selecting the video input source 16 On-screen menu overview...
User Manual (English)
Page 3
...the password 28 Turning parental controls on or off 28 Temporarily unblocking a channel 29 Setting U.S. TV parental control levels 29 Setting movie levels 30 Setting Canadian TV rating levels 31 Downloading rating information 31 Using closed captioning 33 Viewing closed captioning 33 Selecting the...input source 38 Resetting the Plug & Play option 38 Resetting settings to the defaults 38 Upgrading TV software 39 Maintaining 40 Cleaning the TV cabinet 40 Cleaning the TV screen 40 Troubleshooting 40 Specifications 41 Computer display modes 42 Legal notices 44 Two-year limited ...
...the password 28 Turning parental controls on or off 28 Temporarily unblocking a channel 29 Setting U.S. TV parental control levels 29 Setting movie levels 30 Setting Canadian TV rating levels 31 Downloading rating information 31 Using closed captioning 33 Viewing closed captioning 33 Selecting the...input source 38 Resetting the Plug & Play option 38 Resetting settings to the defaults 38 Upgrading TV software 39 Maintaining 40 Cleaning the TV cabinet 40 Cleaning the TV screen 40 Troubleshooting 40 Specifications 41 Computer display modes 42 Legal notices 44 Two-year limited ...

User Manual (English)
Page 4
...your ability to making home entertainment enjoyable and safe. Tune into safety • One size of your TV and that the wall where you are mounting the TV is a growing trend, and larger TVs are not always supported on dressers, bookcases, shelves, desks, speakers, chests, or carts may fall ...Make sure that children can be pulled or grabbed by curious children. f CHILD SAFETY It makes a difference how and where you use of your TV. • Carefully read and understand all . We and the consumer electronics industry are required for safe wall mount installation. Make sure that they ...
...your ability to making home entertainment enjoyable and safe. Tune into safety • One size of your TV and that the wall where you are mounting the TV is a growing trend, and larger TVs are not always supported on dressers, bookcases, shelves, desks, speakers, chests, or carts may fall ...Make sure that children can be pulled or grabbed by curious children. f CHILD SAFETY It makes a difference how and where you use of your TV. • Carefully read and understand all . We and the consumer electronics industry are required for safe wall mount installation. Make sure that they ...
User Manual (English)
Page 5
...careful of broken glass. No user-serviceable parts are not sure of the type of power supplied to your home, consult an electrician or your TV. 1 Read these instructions. 2 Keep these instructions. 3 Heed all warnings. 4 Follow all servicing to this apparatus near any antenna or cable ... on or pinched particularly at plugs, convenience receptacles, and the point where they exit from being walked on the apparatus. Do not drop your TV. Safety check After completing any way, such as radiators, heat registers, stoves, or other hazards. Class I apparatus to a grounding-type, three...
...careful of broken glass. No user-serviceable parts are not sure of the type of power supplied to your home, consult an electrician or your TV. 1 Read these instructions. 2 Keep these instructions. 3 Heed all warnings. 4 Follow all servicing to this apparatus near any antenna or cable ... on or pinched particularly at plugs, convenience receptacles, and the point where they exit from being walked on the apparatus. Do not drop your TV. Safety check After completing any way, such as radiators, heat registers, stoves, or other hazards. Class I apparatus to a grounding-type, three...
User Manual (English)
Page 6
...can only operate normally at www.eia.org to the point of the National Electrical Code, ANSI/NFPA No. 70, provides information with your TV picture and sound, operating problems, or even damage, keep your local authorities or the Electronic Industries Alliance at heights under the following the operating...work by following conditions: • When the power supply cord or plug is normal and does not indicate any way. • When your TV exhibits a distinct change the location of the building as heat dissipates from the panel through the vent hole in the upper part of the ...
...can only operate normally at www.eia.org to the point of the National Electrical Code, ANSI/NFPA No. 70, provides information with your TV picture and sound, operating problems, or even damage, keep your local authorities or the Electronic Industries Alliance at heights under the following the operating...work by following conditions: • When the power supply cord or plug is normal and does not indicate any way. • When your TV exhibits a distinct change the location of the building as heat dissipates from the panel through the vent hole in the upper part of the ...
User Manual (English)
Page 7
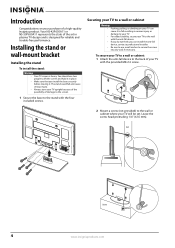
... into dry wall, if necessary. Your NS-42P650A11 or NS-50P650A11 represents the state of the art in place. • Make sure that you can install the anti-fall and cause serious injury. • Always store your TV upright because of the possibility of a high-quality Insignia product. Securing your TV to a wall or cabinet Warnings...
... into dry wall, if necessary. Your NS-42P650A11 or NS-50P650A11 represents the state of the art in place. • Make sure that you can install the anti-fall and cause serious injury. • Always store your TV upright because of the possibility of a high-quality Insignia product. Securing your TV to a wall or cabinet Warnings...
User Manual (English)
Page 8
...do not comply with the ground or slanted downwards for use screws that it does not come loose. • Before moving your TV, untie the anti-fall cord. Non-Insignia wall mount 3 Install the base cover using two screws (included). Installing a wall-mount bracket Warning This apparatus is installed, remove... the wall-mount bracket to the wall or cabinet screw. Insignia wall mount Screw Or, For a non-Insignia wall-mount kit, attach the wall-mount bracket to make sure that it does not fall. • When attaching the TV to the wall, tie the cord level with the VESA standard...
...do not comply with the ground or slanted downwards for use screws that it does not come loose. • Before moving your TV, untie the anti-fall cord. Non-Insignia wall mount 3 Install the base cover using two screws (included). Installing a wall-mount bracket Warning This apparatus is installed, remove... the wall-mount bracket to the wall or cabinet screw. Insignia wall mount Screw Or, For a non-Insignia wall-mount kit, attach the wall-mount bracket to make sure that it does not fall. • When attaching the TV to the wall, tie the cord level with the VESA standard...
User Manual (English)
Page 9
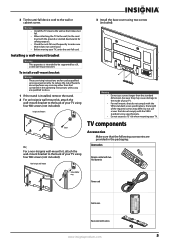
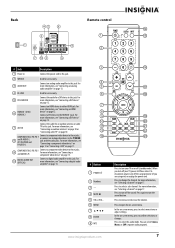
... the power cord. 6 www.insigniaproducts.com Do not use the cleaning cloth to turn on page 17. Press to clean any other part of your TV. # Item 1 Speakers Description Outputs the sound from the remote control. For more information, see "Selecting the video input source" on -screen menu. 5 ...VOL+/VOL- To disconnect power, turn off the surge protector (if you turn off your TV on the remote control. 4 MENU button Press to increase or decrease the volume. Blinks, then turns off (standby mode). In on-screen menus, this...
... the power cord. 6 www.insigniaproducts.com Do not use the cleaning cloth to turn on page 17. Press to clean any other part of your TV. # Item 1 Speakers Description Outputs the sound from the remote control. For more information, see "Selecting the video input source" on -screen menu. 5 ...VOL+/VOL- To disconnect power, turn off the surge protector (if you turn off your TV on the remote control. 4 MENU button Press to increase or decrease the volume. Blinks, then turns off (standby mode). In on-screen menus, this...
User Manual (English)
Page 10
...select a sub-channel. For more information, see "Connecting an outdoor antenna" on page 10 or "Connecting cable TV" on page 12. 7 ANT IN Connect the cable for an outdoor antenna or cable TV to the Y/VIDEO jack and the audio jacks. To disconnect power, turn off the surge protector (if you... 13. 4 EX-LINK Used for service only. 5 DVI AUDIO IN Connect the audio for a DVI device to turn off (standby mode). Press to turn your TV, power still flows into it. For more information, see "Connecting a DVI device" on page 10. 8 COMPONENT IN 2 PR, PB, Y and R-AUDIO-L AV1 IN VIDEO...
...select a sub-channel. For more information, see "Connecting an outdoor antenna" on page 10 or "Connecting cable TV" on page 12. 7 ANT IN Connect the cable for an outdoor antenna or cable TV to the Y/VIDEO jack and the audio jacks. To disconnect power, turn off the surge protector (if you... 13. 4 EX-LINK Used for service only. 5 DVI AUDIO IN Connect the audio for a DVI device to turn off (standby mode). Press to turn your TV, power still flows into it. For more information, see "Connecting a DVI device" on page 10. 8 COMPONENT IN 2 PR, PB, Y and R-AUDIO-L AV1 IN VIDEO...
User Manual (English)
Page 11
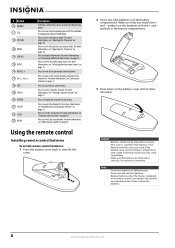
..., see "Selecting a channel" on page 18. Make sure that batteries are disposed of different types. For more information, see "Adjusting the TV picture" on page 17. Notes Do not mix batteries of correctly. Using the remote control Installing remote control batteries To install remote control batteries:... 1 Press the battery cover latch in component video or HDMI mode. For more information, see "Adjusting the TV picture" on or off. Press to display the channel list sub-menu. Press to turn closed captioning on page 18. Press to ...
..., see "Selecting a channel" on page 18. Make sure that batteries are disposed of different types. For more information, see "Adjusting the TV picture" on page 17. Notes Do not mix batteries of correctly. Using the remote control Installing remote control batteries To install remote control batteries:... 1 Press the battery cover latch in component video or HDMI mode. For more information, see "Adjusting the TV picture" on or off. Press to display the channel list sub-menu. Press to turn closed captioning on page 18. Press to ...

User Manual (English)
Page 12
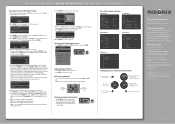
... on the back. • If your universal remote control isn't listed on the chart, but many other compatible models are using the Insignia TV remote to "teach" the commands one ) or unplug the power cord from interference. Aiming the remote control To aim the remote control:... furniture, between the remote control and the remote sensor. To program a universal remote control: 1 Find the code for details. 3 If all Insignia TVs manufactured after Jan. 1, 2007) Universal remote control manufacturers and models Philips PHDVD5, PH5DSS, PMDVR8, PDVR8 RCA RCU807 One for All URC-6690 Sony...
... on the back. • If your universal remote control isn't listed on the chart, but many other compatible models are using the Insignia TV remote to "teach" the commands one ) or unplug the power cord from interference. Aiming the remote control To aim the remote control:... furniture, between the remote control and the remote sensor. To program a universal remote control: 1 Find the code for details. 3 If all Insignia TVs manufactured after Jan. 1, 2007) Universal remote control manufacturers and models Philips PHDVD5, PH5DSS, PMDVR8, PDVR8 RCA RCU807 One for All URC-6690 Sony...
User Manual (English)
Page 13
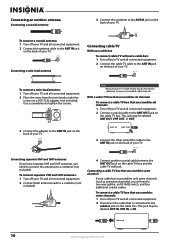
...view unscrambled cable channels. ANT IN Connecting a twin-lead antenna UHF VHF ANT IN Connecting cable TV Without a cable box To connect cable TV without a cable box: 1 Turn off your TV and all channels To connect a cable TV box that is cable-ready, you will need to connect the antennas to a combiner (not included... IN, or IN. ANT IN ANT OUT 3 Connect the other end of the cable to the ANT IN jack on the back of your TV. With a cable TV box that unscrambles all connected equipment. 2 Place the wires from the twin leads under the screws on the cable box. Use a screwdriver to ...
...view unscrambled cable channels. ANT IN Connecting a twin-lead antenna UHF VHF ANT IN Connecting cable TV Without a cable box To connect cable TV without a cable box: 1 Turn off your TV and all channels To connect a cable TV box that is cable-ready, you will need to connect the antennas to a combiner (not included... IN, or IN. ANT IN ANT OUT 3 Connect the other end of the cable to the ANT IN jack on the back of your TV. With a cable TV box that unscrambles all connected equipment. 2 Place the wires from the twin leads under the screws on the cable box. Use a screwdriver to ...
User Manual (English)
Page 14
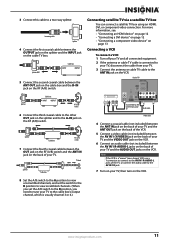
... 4 Connect the first coaxial cable between the OUTPUT jack on the splitter and the INPUT jack on the RF (A/B) switch. Back of TV Splitter Cable box INPUT OUTPUT RF (A/B) switch 6 Connect the third coaxial cable to the other OUT jack on the splitter and to the...6 Connect an audio cable (not included) between the AV IN 1 R-AUDIO-L jacks on the RF (A/B) switch. Connecting satellite TV via a satellite TV box You can connect a satellite TV box using an HDMI, DVI, or component video connection. Splitter OUT Cable box INPUT OUTPUT 5 Connect the second coaxial cable between ...
... 4 Connect the first coaxial cable between the OUTPUT jack on the splitter and the INPUT jack on the RF (A/B) switch. Back of TV Splitter Cable box INPUT OUTPUT RF (A/B) switch 6 Connect the third coaxial cable to the other OUT jack on the splitter and to the...6 Connect an audio cable (not included) between the AV IN 1 R-AUDIO-L jacks on the RF (A/B) switch. Connecting satellite TV via a satellite TV box You can connect a satellite TV box using an HDMI, DVI, or component video connection. Splitter OUT Cable box INPUT OUTPUT 5 Connect the second coaxial cable between ...

User Manual (English)
Page 15
... as the COMPONENT IN 1 R-AUDIO-L jacks. If the camcorder or game console has an HDMI jack, you must use the HDMI IN 2 jack. Back of TV Connecting an HDMI device To connect an HDMI device to confirm the HDMI version, then request an upgrade. HDMI cables that provided the HDMI device... to the back of your TV: 1 Turn off your TV and all connected equipment. 2 Connect an HDMI/DVI cable (not included) or DVI-HDMI adapter (not included) between the HDMI IN 1(DVI) or...
... as the COMPONENT IN 1 R-AUDIO-L jacks. If the camcorder or game console has an HDMI jack, you must use the HDMI IN 2 jack. Back of TV Connecting an HDMI device To connect an HDMI device to confirm the HDMI version, then request an upgrade. HDMI cables that provided the HDMI device... to the back of your TV: 1 Turn off your TV and all connected equipment. 2 Connect an HDMI/DVI cable (not included) or DVI-HDMI adapter (not included) between the HDMI IN 1(DVI) or...

User Manual (English)
Page 16
... component video device. If you connect the video to the COMPONENT IN 1 video jacks, connect the audio to adjust the volume. Back of your TV and use the amplifier controls to the COMPONENT IN 1 R-AUDIO-L jacks. To connect an analog audio amplifier: • Connect an audio cable (not...Component video cable R W R B G 3 Connect an audio cable (not included) between the HDMI IN 1 (DVI) jack on the back of your TV and the DVI jack on your TV, only 2-channel sound is using DVI: 1 Connect an HDMI/DVI cable (not included) between the COMPONENT IN 1 L/R or COMPONENT IN 2 R-AUDIO-L...
... component video device. If you connect the video to the COMPONENT IN 1 video jacks, connect the audio to adjust the volume. Back of your TV and use the amplifier controls to the COMPONENT IN 1 R-AUDIO-L jacks. To connect an analog audio amplifier: • Connect an audio cable (not...Component video cable R W R B G 3 Connect an audio cable (not included) between the HDMI IN 1 (DVI) jack on the back of your TV and the DVI jack on your TV, only 2-channel sound is using DVI: 1 Connect an HDMI/DVI cable (not included) between the COMPONENT IN 1 L/R or COMPONENT IN 2 R-AUDIO-L...
User Manual (English)
Page 17
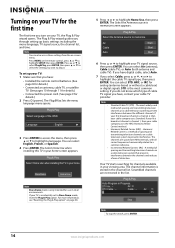
... have digital cable, select Auto. 7 If you have : • Installed the remote control batteries. (See page 8 for channels available in your TV is stored in the list. Harmonic Related Carrier is only intended for details.) 2 Press (power). The most common setting. Note • •... for use in Progress. Plug & Play Auto Program in retail environments. If your first broadcast channel is the most widely used method of cable TV signal you select Cable, press or , or to adjust. Air : 8 DTV Cable : -- A method of spacing and transmitting television channels...
... have digital cable, select Auto. 7 If you have : • Installed the remote control batteries. (See page 8 for channels available in your TV is stored in the list. Harmonic Related Carrier is only intended for details.) 2 Press (power). The most common setting. Note • •... for use in Progress. Plug & Play Auto Program in retail environments. If your first broadcast channel is the most widely used method of cable TV signal you select Cable, press or , or to adjust. Air : 8 DTV Cable : -- A method of spacing and transmitting television channels...
User Manual (English)
Page 18
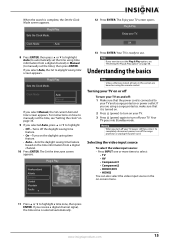
... Plug & Play Sets the Clock Mode. To completely disconnect power, turn on the time information from a digital channel) or Manual (to turn your TV on and off the daylight saving time feature. • On-Turns on the daylight saving time feature. • Auto-Sets the daylight saving time ... Mode screen appears. Selecting the video input source To select the video input source: • Press INPUT one or more times to select: • TV • AV • Component1 • Component2 • HDMI1/DVI • HDMI2 You can also select the video input source in this section are...
... Plug & Play Sets the Clock Mode. To completely disconnect power, turn on the time information from a digital channel) or Manual (to turn your TV on and off the daylight saving time feature. • On-Turns on the daylight saving time feature. • Auto-Sets the daylight saving time ... Mode screen appears. Selecting the video input source To select the video input source: • Press INPUT one or more times to select: • TV • AV • Component1 • Component2 • HDMI1/DVI • HDMI2 You can also select the video input source in this section are...


