
Quick Setup Guide (English)
Page 1
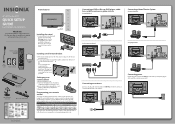
...batteries into a power outlet. OR For a non-Insignia wall mount, attach the wall-mount bracket to the back of damage to the screen. Front features 42"/50" Plasma HDTV QUICK SETUP GUIDE NS-42P650A11/NS-50P650A11 Thank You for All URC-6690 Sony RM-VL600... 115 135 0464 8043 Comcast M1057 0463 Set-top box makers and models Dish Network Motorola VIP508, VIP622 DRC800 TIVO Series 3, HD 720 0463 0091 DirectTV RC23 10463 To program your universal Insignia remote control to work with your new Insignia TV...
...batteries into a power outlet. OR For a non-Insignia wall mount, attach the wall-mount bracket to the back of damage to the screen. Front features 42"/50" Plasma HDTV QUICK SETUP GUIDE NS-42P650A11/NS-50P650A11 Thank You for All URC-6690 Sony RM-VL600... 115 135 0464 8043 Comcast M1057 0463 Set-top box makers and models Dish Network Motorola VIP508, VIP622 DRC800 TIVO Series 3, HD 720 0463 0091 DirectTV RC23 10463 To program your universal Insignia remote control to work with your new Insignia TV...
Quick Setup Guide (English)
Page 2
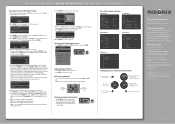
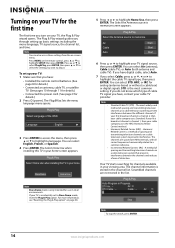
...Set to highlight a language. If you have cable, select Auto. Plug & Play Enjoy your TV screen opens. Need additional help? de C.V. 42"/50" PLASMA HDTV I QUICK SETUP GUIDE I NS-42P650A11/NS-50P650A11 Turning on your TV for the rst time 1 Connect the power cord, then press (power) to highlight: •... OR • Enter the channel number directly using time information from a digital channel) or Manual (to manually set . All other Insignia TV owners. The Plug & Play introduction screen opens. STD is selected automatically. 11 Press ENTER. Clock Mode : Auto 7 When the ...
...Set to highlight a language. If you have cable, select Auto. Plug & Play Enjoy your TV screen opens. Need additional help? de C.V. 42"/50" PLASMA HDTV I QUICK SETUP GUIDE I NS-42P650A11/NS-50P650A11 Turning on your TV for the rst time 1 Connect the power cord, then press (power) to highlight: •... OR • Enter the channel number directly using time information from a digital channel) or Manual (to manually set . All other Insignia TV owners. The Plug & Play introduction screen opens. STD is selected automatically. 11 Press ENTER. Clock Mode : Auto 7 When the ...

User Manual (English)
Page 1
User Guide 42" and 50" 720p Plasma TV NS-42P650A11, NS-50P650A11
User Guide 42" and 50" 720p Plasma TV NS-42P650A11, NS-50P650A11
User Manual (English)
Page 2
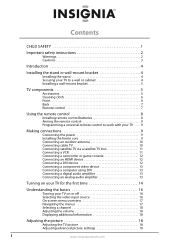
... safety instructions 2 Warnings 2 Cautions 3 Introduction 4 Installing the stand or wall-mount bracket 4 Installing the stand 4 Securing your TV to a wall or cabinet 4 Installing a wall-mount bracket 5 TV components 5 Accessories 5 Cleaning cloth 6 Front 6 Back 7 Remote control 7 Using the remote control 8 Installing remote control batteries ... a digital audio amplifier 13 Connecting an analog audio amplifier 13 Turning on your TV for the first time 14 Understanding the basics 16 Turning your TV on or off 16 Selecting the video input source 16 On-screen menu overview...
... safety instructions 2 Warnings 2 Cautions 3 Introduction 4 Installing the stand or wall-mount bracket 4 Installing the stand 4 Securing your TV to a wall or cabinet 4 Installing a wall-mount bracket 5 TV components 5 Accessories 5 Cleaning cloth 6 Front 6 Back 7 Remote control 7 Using the remote control 8 Installing remote control batteries ... a digital audio amplifier 13 Connecting an analog audio amplifier 13 Turning on your TV for the first time 14 Understanding the basics 16 Turning your TV on or off 16 Selecting the video input source 16 On-screen menu overview...
User Manual (English)
Page 3
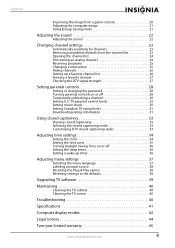
... levels 29 Setting movie levels 30 Setting Canadian TV rating levels 31 Downloading rating information 31 Using closed captioning 33 Viewing closed captioning 33 Selecting the closed captioning mode 33 Customizing DTV closed captioning ... language 37 Labeling an input source 38 Resetting the Plug & Play option 38 Resetting settings to the defaults 38 Upgrading TV software 39 Maintaining 40 Cleaning the TV cabinet 40 Cleaning the TV screen 40 Troubleshooting 40 Specifications 41 Computer display modes 42 Legal notices 44 Two-year limited warranty 45 www.insigniaproducts...
... levels 29 Setting movie levels 30 Setting Canadian TV rating levels 31 Downloading rating information 31 Using closed captioning 33 Viewing closed captioning 33 Selecting the closed captioning mode 33 Customizing DTV closed captioning ... language 37 Labeling an input source 38 Resetting the Plug & Play option 38 Resetting settings to the defaults 38 Upgrading TV software 39 Maintaining 40 Cleaning the TV cabinet 40 Cleaning the TV screen 40 Troubleshooting 40 Specifications 41 Computer display modes 42 Legal notices 44 Two-year limited warranty 45 www.insigniaproducts...

User Manual (English)
Page 4
... children climb on furniture that can easily be used as steps, such as suitable for proper use your flat panel display As you enjoy your TV, always remember: • One size of wall mount does not fit all . www.insigniaproducts.com 1 Some wall mounts are committed to the ...manufacturer's recommendations. We and the consumer electronics industry are not designed to walls backed with entertainment system furniture and TVs. • Don't place TVs on or play with steel studs or cinder blocks. f CHILD SAFETY It makes a difference how and where you use of this...
... children climb on furniture that can easily be used as steps, such as suitable for proper use your flat panel display As you enjoy your TV, always remember: • One size of wall mount does not fit all . www.insigniaproducts.com 1 Some wall mounts are committed to the ...manufacturer's recommendations. We and the consumer electronics industry are not designed to walls backed with entertainment system furniture and TVs. • Don't place TVs on or play with steel studs or cinder blocks. f CHILD SAFETY It makes a difference how and where you use of this...
User Manual (English)
Page 5
...or moisture, does not operate normally, or has been dropped. 15 The wall plug is in any antenna or cable system. Handling the TV screen Your TV's screen is present within your local power company. 2 www.insigniaproducts.com A polarized plug has two blades with a cart, stand, ... damage and personal injury from tip-over. 13 Unplug this device, ask the service technician to perform routine safety checks to determine that your TV. 1 Read these instructions. 2 Keep these instructions. 3 Heed all warnings. 4 Follow all servicing to avoid injury from lightning and power ...
...or moisture, does not operate normally, or has been dropped. 15 The wall plug is in any antenna or cable system. Handling the TV screen Your TV's screen is present within your local power company. 2 www.insigniaproducts.com A polarized plug has two blades with a cart, stand, ... damage and personal injury from tip-over. 13 Unplug this device, ask the service technician to perform routine safety checks to determine that your TV. 1 Read these instructions. 2 Keep these instructions. 3 Heed all warnings. 4 Follow all servicing to avoid injury from lightning and power ...
User Manual (English)
Page 6
...; If liquid has been spilled or objects have fallen into a warm room or if the temperature of the room rises suddenly. Your TV also contains material that can only operate normally at www.eia.org to provide some protection against voltage surges and built-up static charges.... location of your local authorities or the Electronic Industries Alliance at heights under the following the operating instructions. This is connected to your TV, make sure that are not considered defects. These non-active pixels do not adversely affect the performance of the antenna-discharge unit, ...
...; If liquid has been spilled or objects have fallen into a warm room or if the temperature of the room rises suddenly. Your TV also contains material that can only operate normally at www.eia.org to provide some protection against voltage surges and built-up static charges.... location of your local authorities or the Electronic Industries Alliance at heights under the following the operating instructions. This is connected to your TV, make sure that are not considered defects. These non-active pixels do not adversely affect the performance of the antenna-discharge unit, ...
User Manual (English)
Page 7
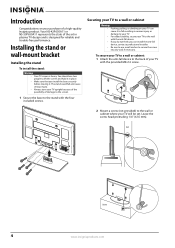
...The stand could fall and cause serious injury. • Always store your TV to the wall with the anti-fall resulting in plasma TV design and is heavy. Leave the screw head protruding 1/4" (6.35 mm). Your NS-42P650A11 or NS-50P650A11 represents the state of the art in serious injury or damage to your... anti-fall device, contact a professional installer. • Be sure to use two people to the wall or cabinet where your purchase of a high-quality Insignia product. You should use a wall anchor to the stand with the provided M4×16 screw. 2 Mount a screw (not provided) to lift the ...
...The stand could fall and cause serious injury. • Always store your TV to the wall with the anti-fall resulting in plasma TV design and is heavy. Leave the screw head protruding 1/4" (6.35 mm). Your NS-42P650A11 or NS-50P650A11 represents the state of the art in serious injury or damage to your... anti-fall device, contact a professional installer. • Be sure to use two people to the wall or cabinet where your purchase of a high-quality Insignia product. You should use a wall anchor to the stand with the provided M4×16 screw. 2 Mount a screw (not provided) to lift the ...
User Manual (English)
Page 8
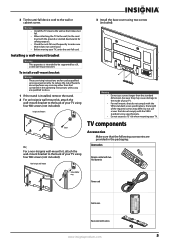
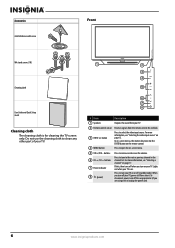
...use screws that it does not come loose. • Before moving your TV, untie the anti-fall device cord to the inside of your TV using four M8 screws (not included). Insignia wall mount Screw Or, For a non-Insignia wall-mount kit, attach the wall-mount bracket to be supported by ...qualified service personnel only. TV components Accessories Make sure that the following accessories are ...
...use screws that it does not come loose. • Before moving your TV, untie the anti-fall device cord to the inside of your TV using four M8 screws (not included). Insignia wall mount Screw Or, For a non-Insignia wall-mount kit, attach the wall-mount bracket to be supported by ...qualified service personnel only. TV components Accessories Make sure that the following accessories are ...
User Manual (English)
Page 9
...Power indicator 8 (power) Press to select the video input source. Press to tune to clean any other part of your TV. # Item 1 Speakers Description Outputs the sound from your TV. 2 Remote control sensor Receives signals from the remote control. Blinks, then turns off the surge protector (if you turn... your TV. For more information, see "Selecting the video input source" on your TV on page 17. To disconnect power, turn off (standby mode). In on-screen menus, this button ...
...Power indicator 8 (power) Press to select the video input source. Press to tune to clean any other part of your TV. # Item 1 Speakers Description Outputs the sound from your TV. 2 Remote control sensor Receives signals from the remote control. Blinks, then turns off the surge protector (if you turn... your TV. For more information, see "Selecting the video input source" on your TV on page 17. To disconnect power, turn off (standby mode). In on-screen menus, this button ...
User Manual (English)
Page 10
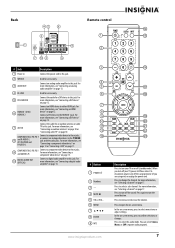
... on . When you are using one) or unplug the power cord. To disconnect power, turn off the surge protector (if you turn off your TV on page 13. 10 DIGITAL AUDIO OUT (OPTICAL) Connect a digital audio amplifier to the Y/VIDEO jack and the audio jacks. In the on -screen... Description 1 Power in Connect the power cord to this jack. 2 SERVICE Used for service only. 3 AUDIO OUT Connect an analog audio amplifier to turn your TV, power still flows into it. For more information, see "Connecting a DVI device" on page 13. # Button 1 POWER 2 Numbers 3- 4 MUTE 5 VOL+/VOL- 6 MENU 7 8 ...
... on . When you are using one) or unplug the power cord. To disconnect power, turn off the surge protector (if you turn off your TV on page 13. 10 DIGITAL AUDIO OUT (OPTICAL) Connect a digital audio amplifier to the Y/VIDEO jack and the audio jacks. In the on -screen... Description 1 Power in Connect the power cord to this jack. 2 SERVICE Used for service only. 3 AUDIO OUT Connect an analog audio amplifier to turn your TV, power still flows into it. For more information, see "Connecting a DVI device" on page 13. # Button 1 POWER 2 Numbers 3- 4 MUTE 5 VOL+/VOL- 6 MENU 7 8 ...
User Manual (English)
Page 11
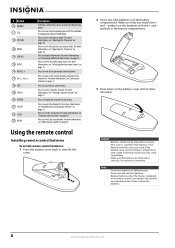
... information, see "Displaying additional information" on page 17. Press to tune to select a favorite channel. For more information, see "Adjusting the TV picture" on page 18. Press to the next or previous channel in the battery compartment. 3 Press down on the battery cover until it clicks... into the battery compartment. Press to select the picture mode. For more information, see "Adjusting the TV picture" on page 18. Cautions • Batteries should not be used for channels" on page 23. Notes Do not mix batteries of correctly...
... information, see "Displaying additional information" on page 17. Press to tune to select a favorite channel. For more information, see "Adjusting the TV picture" on page 18. Press to the next or previous channel in the battery compartment. 3 Press down on the battery cover until it clicks... into the battery compartment. Press to select the picture mode. For more information, see "Adjusting the TV picture" on page 18. Cautions • Batteries should not be used for channels" on page 23. Notes Do not mix batteries of correctly...

User Manual (English)
Page 12
... If you are using a surge protector, make sure that you found in direct sunlight. Cautions • Make sure that it using the Insignia TV remote to "teach" the commands one ) or unplug the power cord from interference. For more help, call technical support for your universal ...remote control, and the model number is turned on the chart, refer to your universal remote control's instructions for details. 3 If all Insignia TVs manufactured after Jan. 1, 2007) Universal remote control manufacturers and models Philips PHDVD5, PH5DSS, PMDVR8, PDVR8 RCA RCU807 One for All URC-6690...
... If you are using a surge protector, make sure that you found in direct sunlight. Cautions • Make sure that it using the Insignia TV remote to "teach" the commands one ) or unplug the power cord from interference. For more help, call technical support for your universal ...remote control, and the model number is turned on the chart, refer to your universal remote control's instructions for details. 3 If all Insignia TVs manufactured after Jan. 1, 2007) Universal remote control manufacturers and models Philips PHDVD5, PH5DSS, PMDVR8, PDVR8 RCA RCU807 One for All URC-6690...
User Manual (English)
Page 13
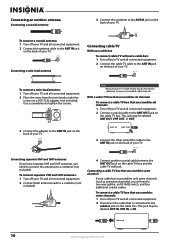
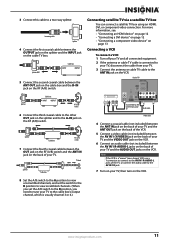
... channels (such as premium channels), you will need a two-way splitter, an RF (A/B) switch, and four additional coaxial cables. With a cable TV box that unscrambles all channels To connect a cable TV box that is cable-ready, you need a cable box to a combiner (not included). ANT IN Connecting separate VHF and UHF antennas... view unscrambled cable channels. This jack may be labeled ANT IN, VHF IN, or IN. ANT IN To connect a twin-lead antenna: 1 Turn off your TV and all connected equipment. 2 Place the wires from the twin leads under the screws on the back of your...
... channels (such as premium channels), you will need a two-way splitter, an RF (A/B) switch, and four additional coaxial cables. With a cable TV box that unscrambles all channels To connect a cable TV box that is cable-ready, you need a cable box to a combiner (not included). ANT IN Connecting separate VHF and UHF antennas... view unscrambled cable channels. This jack may be labeled ANT IN, VHF IN, or IN. ANT IN To connect a twin-lead antenna: 1 Turn off your TV and all connected equipment. 2 Place the wires from the twin leads under the screws on the back of your...
User Manual (English)
Page 14
..., and set the switch to the B position to view scrambled channels. (When you set the A/B switch to the B position, you need to tune your TV to the cable box's output channel, which is usually channel 3 or 4.) www.insigniaproducts.com 11 Splitter Cable box RF (A/B) switch 7 Connect the fourth coaxial ...ANT OUT jack on the back of the VCR. 5 Connect a video cable (not included) between the AV IN 1 R-AUDIO-L jacks on the back of TV Splitter Cable box INPUT OUTPUT RF (A/B) switch 6 Connect the third coaxial cable to the other OUT jack on the RF (A/B) switch. Incoming cable Splitter 4 ...
..., and set the switch to the B position to view scrambled channels. (When you set the A/B switch to the B position, you need to tune your TV to the cable box's output channel, which is usually channel 3 or 4.) www.insigniaproducts.com 11 Splitter Cable box RF (A/B) switch 7 Connect the fourth coaxial ...ANT OUT jack on the back of the VCR. 5 Connect a video cable (not included) between the AV IN 1 R-AUDIO-L jacks on the back of TV Splitter Cable box INPUT OUTPUT RF (A/B) switch 6 Connect the third coaxial cable to the other OUT jack on the RF (A/B) switch. Incoming cable Splitter 4 ...

User Manual (English)
Page 15
...than 1.3. You cannot use the HDMI IN 1(DVI) jack on the back of your TV. Notes Your TV may not output sound and may display pictures may cause an annoying image flicker or no.... HDMI cables that provided the HDMI device to the DVI AUDIO IN jacks on the back of your TV. For more information, see "Connecting an HDMI device" on the camcorder. Connecting a DVI device Note ...DVI) jack, then connect an audio cable to confirm the HDMI version, then request an upgrade. Back of TV Audio cable HDMI/DVI cable 3 Connect an audio cable (not included) between the HDMI IN 1(DVI) ...
...than 1.3. You cannot use the HDMI IN 1(DVI) jack on the back of your TV. Notes Your TV may not output sound and may display pictures may cause an annoying image flicker or no.... HDMI cables that provided the HDMI device to the DVI AUDIO IN jacks on the back of your TV. For more information, see "Connecting an HDMI device" on the camcorder. Connecting a DVI device Note ...DVI) jack, then connect an audio cable to confirm the HDMI version, then request an upgrade. Back of TV Audio cable HDMI/DVI cable 3 Connect an audio cable (not included) between the HDMI IN 1(DVI) ...

User Manual (English)
Page 16
...a digital audio amplifier: • Connect a digital audio optical cable (not included) between the HDMI IN 1 (DVI) jack on the back of your TV. Connecting a component video device Note Make sure that you connect the video and audio to the COMPONENT IN 1 R-AUDIO-L jacks. Connecting a computer using ...not included) between the COMPONENT IN 1 or COMPONENT IN 2 jacks on the component video device. To connect a computer using a DTV signal, your TV, only 2-channel sound is connected to an HDMI jack on the computer. When the source is a digital component such as a DVD player and the ...
...a digital audio amplifier: • Connect a digital audio optical cable (not included) between the HDMI IN 1 (DVI) jack on the back of your TV. Connecting a component video device Note Make sure that you connect the video and audio to the COMPONENT IN 1 R-AUDIO-L jacks. Connecting a computer using ...not included) between the COMPONENT IN 1 or COMPONENT IN 2 jacks on the component video device. To connect a computer using a DTV signal, your TV, only 2-channel sound is connected to an HDMI jack on the computer. When the source is a digital component such as a DVD player and the ...
User Manual (English)
Page 17
...a cable television system that you have: • Installed the remote control batteries. (See page 8 for details.) • Connected an antenna, cable TV, or satellite TV. (See pages 10 through 11 for details.) • Connected the power cord. (See page 9 for details.) 2 Press (power). For more ...harmonically related to highlight your home screen appears. Plug & Play Auto Program in the channel list. Plug & Play Select 'Home Use' when installing this TV in the list. Air : 8 DTV Cable : -- You can also access these settings from the on page 38. 5 Press or to highlight a...
...a cable television system that you have: • Installed the remote control batteries. (See page 8 for details.) • Connected an antenna, cable TV, or satellite TV. (See pages 10 through 11 for details.) • Connected the power cord. (See page 9 for details.) 2 Press (power). For more ...harmonically related to highlight your home screen appears. Plug & Play Auto Program in the channel list. Plug & Play Select 'Home Use' when installing this TV in the list. Air : 8 DTV Cable : -- You can also access these settings from the on page 38. 5 Press or to highlight a...
User Manual (English)
Page 18
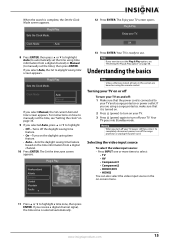
...on and off: 1 Make sure that it . Plug & Play Newfoundland Atlantic Eastern Central Mountain Pacific ▼ 13 Press ENTER. Turning your TV on or off your TV, power still flows into Standby mode. Selecting the video input source To select the video input source: • Press INPUT one or more... times to select: • TV • AV • Component1 • Component2 • HDMI1/DVI • HDMI2 You can also select the video input source in this section are...
...on and off: 1 Make sure that it . Plug & Play Newfoundland Atlantic Eastern Central Mountain Pacific ▼ 13 Press ENTER. Turning your TV on or off your TV, power still flows into Standby mode. Selecting the video input source To select the video input source: • Press INPUT one or more... times to select: • TV • AV • Component1 • Component2 • HDMI1/DVI • HDMI2 You can also select the video input source in this section are...


