

User Manual (English)
Page 2
...Warnings 2 Cautions 3 Introduction 4 Install the stand or wall-mount bracket 5 Installing the stand 5 Installing a wall-mount bracket 5 TV components 6 Accessories 6 Front 6 TV control buttons 6 Side jacks 7 Back 7 Remote control 8 Using the remote control 9 Installing remote control batteries 9 Aiming the remote ... the remote control holder 10 Programming your universal Insignia remote control 10 Programming a universal remote control to work with your TV 13 Making connections 14 Connecting power 14 Connecting an antenna or cable TV without a cable box 14 Connecting a cable...
...Warnings 2 Cautions 3 Introduction 4 Install the stand or wall-mount bracket 5 Installing the stand 5 Installing a wall-mount bracket 5 TV components 6 Accessories 6 Front 6 TV control buttons 6 Side jacks 7 Back 7 Remote control 8 Using the remote control 9 Installing remote control batteries 9 Aiming the remote ... the remote control holder 10 Programming your universal Insignia remote control 10 Programming a universal remote control to work with your TV 13 Making connections 14 Connecting power 14 Connecting an antenna or cable TV without a cable box 14 Connecting a cable...

User Manual (English)
Page 3
...Checking the digital signal strength 29 Setting parental controls 29 Setting or changing the password 29 Locking control buttons 30 Blocking unrated TV 31 Setting parental control levels 31 Downloading rating information 33 Using closed captioning 33 Turning closed captioning on or off 33 ...41 Browsing photos 41 Viewing favorite photos 41 Viewing photos in a slideshow 42 Customizing slideshow settings 42 Maintaining 43 Cleaning the TV cabinet 43 Cleaning the LCD screen 43 Troubleshooting 43 Specifications 44 Manufacturers' codes 45 Legal notices 57 Two-year limited warranty ...
...Checking the digital signal strength 29 Setting parental controls 29 Setting or changing the password 29 Locking control buttons 30 Blocking unrated TV 31 Setting parental control levels 31 Downloading rating information 33 Using closed captioning 33 Turning closed captioning on or off 33 ...41 Browsing photos 41 Viewing favorite photos 41 Viewing photos in a slideshow 42 Customizing slideshow settings 42 Maintaining 43 Cleaning the TV cabinet 43 Cleaning the LCD screen 43 Troubleshooting 43 Specifications 44 Manufacturers' codes 45 Legal notices 57 Two-year limited warranty ...

User Manual (English)
Page 5
... required for proper use your flat panel display As you route all cords and cables so that can easily be pulled or grabbed by the TV and wall mount manufacturers. • If you have any doubts about your ability to making home entertainment enjoyable and safe. Wall mounting If... placed on dressers, bookcases, shelves, desks, speakers, chests, or carts may fall over , or knocked down. • Make sure that you enjoy your TV and that children can be pushed, pulled over and cause injury. www.insigniaproducts.com 1 Use only a wall mount rated for the weight of your new...
... required for proper use your flat panel display As you route all cords and cables so that can easily be pulled or grabbed by the TV and wall mount manufacturers. • If you have any doubts about your ability to making home entertainment enjoyable and safe. Wall mounting If... placed on dressers, bookcases, shelves, desks, speakers, chests, or carts may fall over , or knocked down. • Make sure that you enjoy your TV and that children can be pushed, pulled over and cause injury. www.insigniaproducts.com 1 Use only a wall mount rated for the weight of your new...
User Manual (English)
Page 6
...in any ventilation openings. If the provided plug does not fit into the apparatus, the apparatus has been exposed to determine that your TV. 1 Read these instructions. 2 Keep these instructions. 3 Heed all warnings. 4 Follow all servicing to prevent possible electric shock. ...If the liquid gets in correct operating condition. 2 www.insigniaproducts.com The wide blade or the third prong are inside. NS-26L450A11/NS-32L450A11 Important safety instructions CAUTION RISK OF ELECTRIC SHOCK DO NOT OPEN This symbol indicates that dangerous voltage constituting a risk of electric ...
...in any ventilation openings. If the provided plug does not fit into the apparatus, the apparatus has been exposed to determine that your TV. 1 Read these instructions. 2 Keep these instructions. 3 Heed all warnings. 4 Follow all servicing to prevent possible electric shock. ...If the liquid gets in correct operating condition. 2 www.insigniaproducts.com The wide blade or the third prong are inside. NS-26L450A11/NS-32L450A11 Important safety instructions CAUTION RISK OF ELECTRIC SHOCK DO NOT OPEN This symbol indicates that dangerous voltage constituting a risk of electric ...
User Manual (English)
Page 7
... of the National Electrical Code, ANSI/NFPA No. 40 provides guidance for the grounding electrode. 1 2 3 4 5 7 6 1 Antenna lead-in performance. Your TV also contains material that the antenna or cable system is brought from an air conditioner. Non-active pixels The LCD panel contains almost 3 million thin... as a fixed blue, green, or red point. www.insigniaproducts.com 3 If you are not considered defects. To prevent this happens, the TV's performance may result in damage and will form on the marking label. Article 810 of the National Electrical Code, ANSI/NFPA No. 70,...
... of the National Electrical Code, ANSI/NFPA No. 40 provides guidance for the grounding electrode. 1 2 3 4 5 7 6 1 Antenna lead-in performance. Your TV also contains material that the antenna or cable system is brought from an air conditioner. Non-active pixels The LCD panel contains almost 3 million thin... as a fixed blue, green, or red point. www.insigniaproducts.com 3 If you are not considered defects. To prevent this happens, the TV's performance may result in damage and will form on the marking label. Article 810 of the National Electrical Code, ANSI/NFPA No. 70,...
User Manual (English)
Page 8
...and the enhanced bass sounds that you didn't constantly need to take advantage of a high-quality Insignia product. No setup is held steady, making the sound coming from your TV speakers sound more lifelike. AUDYSSEY Dynamic Volume plus Dynamic EQ: Have you ever caught yourself wishing ... the benefit of the art in LCD TV design and is just as important as exceptional picture quality. CEC technology lets different components discover and communicate with each scene, even when the volume level is needed! Your NS-26L450A11 or NS-32L450A11 represents the state of having HDMI CEC ...
...and the enhanced bass sounds that you didn't constantly need to take advantage of a high-quality Insignia product. No setup is held steady, making the sound coming from your TV speakers sound more lifelike. AUDYSSEY Dynamic Volume plus Dynamic EQ: Have you ever caught yourself wishing ... the benefit of the art in LCD TV design and is just as important as exceptional picture quality. CEC technology lets different components discover and communicate with each scene, even when the volume level is needed! Your NS-26L450A11 or NS-32L450A11 represents the state of having HDMI CEC ...

User Manual (English)
Page 9
... the stand. Your warranty does not cover damages or injuries that you place your TV on a cushioned, clean surface to protect the screen from damages and scratches. 2 Align the stand on the TV base, then insert the metal tabs on the stand into the designated slots on ...these instructions carefully before you try to mishandling or incorrect assembly. Metal tabs Installing a wall-mount bracket To attach your TV to a wall-mount bracket: 1 Carefully place your TV screen face-down on a cushioned, clean surface to protect the screen from damages and scratches. 2 Remove the the three...
... the stand. Your warranty does not cover damages or injuries that you place your TV on a cushioned, clean surface to protect the screen from damages and scratches. 2 Align the stand on the TV base, then insert the metal tabs on the stand into the designated slots on ...these instructions carefully before you try to mishandling or incorrect assembly. Metal tabs Installing a wall-mount bracket To attach your TV to a wall-mount bracket: 1 Carefully place your TV screen face-down on a cushioned, clean surface to protect the screen from damages and scratches. 2 Remove the the three...
User Manual (English)
Page 10
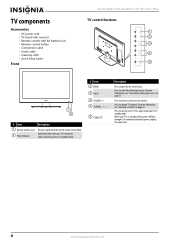
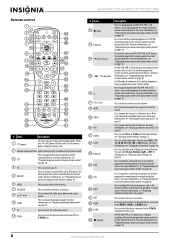
...decrease the volume. For more information, see "Selecting a channel" on your TV is in standby mode, power still flows through it. Press again to put your TV is turned on -screen menu. Lights red when your TV in Standby mode. # Item 1 MENU 2 INPUT 3 VOLUME+/- 4 CHANNEL...8226; Remote control holder • Component cable • Audio cable • Cleaning cloth • Quick Setup Guide Front NS-26L450A11/NS-32L450A11 26"/32" LCD, 1080p TV control buttons # Item Description 1 Remote control sensor Receives signals from the remote control. Do not block. 2 Power indicator ...
...decrease the volume. For more information, see "Selecting a channel" on your TV is in standby mode, power still flows through it. Press again to put your TV is turned on -screen menu. Lights red when your TV in Standby mode. # Item 1 MENU 2 INPUT 3 VOLUME+/- 4 CHANNEL...8226; Remote control holder • Component cable • Audio cable • Cleaning cloth • Quick Setup Guide Front NS-26L450A11/NS-32L450A11 26"/32" LCD, 1080p TV control buttons # Item Description 1 Remote control sensor Receives signals from the remote control. Do not block. 2 Power indicator ...

User Manual (English)
Page 11
... on page 16. # Item 1 ANT/CABLE IN Description Connect an antenna, cable TV, or satellite TV box to these jacks. For more information, see "Connecting an antenna or cable TV without a cable box" on your TV. For more information, see "Connecting a camcorder or game console" on page 17,... video) jack. For more information, see "Connecting a digital sound system" on page 20. 7 SPDIF Connect a digital sound system to send the TV audio through the sound system. For more information, see "Connecting a component video device" on page 19. 4 VGA IN Connect the video for a...
... on page 16. # Item 1 ANT/CABLE IN Description Connect an antenna, cable TV, or satellite TV box to these jacks. For more information, see "Connecting an antenna or cable TV without a cable box" on your TV. For more information, see "Connecting a camcorder or game console" on page 17,... video) jack. For more information, see "Connecting a digital sound system" on page 20. 7 SPDIF Connect a digital sound system to send the TV audio through the sound system. For more information, see "Connecting a component video device" on page 19. 4 VGA IN Connect the video for a...
User Manual (English)
Page 12
... information" on -screen menu. 7 OK/ENTER 8 9 GUIDE 10 TV Press to confirm selections or changes. For more information, see "Programming your universal Insignia remote control" on page 10. 4 TV Press to control your universal Insignia remote control" on page 10. Press to control a connected set the..., PVR, or CD mode, press to skip back to control a connected device. Press to select the level of this button works. NS-26L450A11/NS-32L450A11 26"/32" LCD, 1080p Remote control # Item Description 1 (power) Press to turn your remote control. For more times to select...
... information" on -screen menu. 7 OK/ENTER 8 9 GUIDE 10 TV Press to confirm selections or changes. For more information, see "Programming your universal Insignia remote control" on page 10. 4 TV Press to control your universal Insignia remote control" on page 10. Press to control a connected set the..., PVR, or CD mode, press to skip back to control a connected device. Press to select the level of this button works. NS-26L450A11/NS-32L450A11 26"/32" LCD, 1080p Remote control # Item Description 1 (power) Press to turn your remote control. For more times to select...

User Manual (English)
Page 13
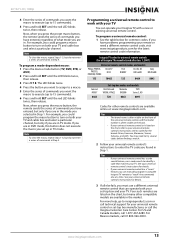
....insigniaproducts.com 9 In DVR mode, the behavior of correctly. For more information, see "Selecting a channel" on how you programmed your universal Insignia remote control" on the batteries align with the + and - Make sure that batteries are disposed of this button depends on page 23. If... devices. For more information, see "Selecting a channel" on the front of time, remove the batteries. For more information, see "Adjusting the TV picture" on page 33. Warnings • Batteries should not be used for an extended period of your skin, wash immediately. • Make ...
....insigniaproducts.com 9 In DVR mode, the behavior of correctly. For more information, see "Selecting a channel" on how you programmed your universal Insignia remote control" on the batteries align with the + and - Make sure that batteries are disposed of this button depends on page 23. If... devices. For more information, see "Selecting a channel" on the front of time, remove the batteries. For more information, see "Adjusting the TV picture" on page 33. Warnings • Batteries should not be used for an extended period of your skin, wash immediately. • Make ...
User Manual (English)
Page 14
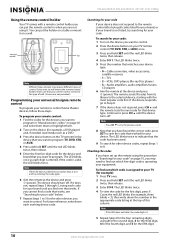
... once as a DVD. 3 Press the device button on the device you are not provided.) Programming your universal Insignia remote control To program your remote to your TV (for your equipment. If you want to program. For future reference, write down each digit is not listed,...the code for example, three blinks = 3), then write down or highlight them. 2 Turn on a wall. NS-26L450A11/NS-32L450A11 26"/32" LCD, 1080p Using the remote control holder Your TV comes with the most popular code first. Continue to the selected device, starting with a remote control holder you ...
... once as a DVD. 3 Press the device button on the device you are not provided.) Programming your universal Insignia remote control To program your remote to your TV (for your equipment. If you want to program. For future reference, write down each digit is not listed,...the code for example, three blinks = 3), then write down or highlight them. 2 Turn on a wall. NS-26L450A11/NS-32L450A11 26"/32" LCD, 1080p Using the remote control holder Your TV comes with the most popular code first. Continue to the selected device, starting with a remote control holder you ...
User Manual (English)
Page 15
... want to remove the learned button from your original remote control (the one long flash, the remote control cannot learn functions on the Insignia TV remote you want the Insignia remote control to work properly. • Learned buttons are mode-specific, so each one can store a unique function for each mode. &#...2" apart) from . 2 Press and hold SET until the LED blinks twice to save all the buttons you want to TV mode, when you press the volume button on your Insignia remote, the volume will change on the DVD player and not on the original remote until the LED blinks twice, then...
... want to remove the learned button from your original remote control (the one long flash, the remote control cannot learn functions on the Insignia TV remote you want the Insignia remote control to work properly. • Learned buttons are mode-specific, so each one can store a unique function for each mode. &#...2" apart) from . 2 Press and hold SET until the LED blinks twice to save all the buttons you want to TV mode, when you press the volume button on your Insignia remote, the volume will change on the DVD player and not on the original remote until the LED blinks twice, then...
User Manual (English)
Page 16
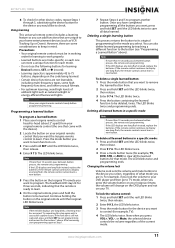
... to move (such as destination mode) or to the active mode (for example, press CH in TV mode and the TV changes channel accordingly). Programming macros Your Insignia universal remote control includes the ability to 15 button presses, total. Each macro button can be set ...Press VOL-. The LED blinks twice. 4 Press the button you want to restore. The LED blinks twice. 7 Repeat Steps 1-6 to move additional buttons. NS-26L450A11/NS-32L450A11 26"/32" LCD, 1080p To unlock all buttonmoved data in a specific mode: 1 Press and hold SET until the LED blinks twice, then release. ...
... to move (such as destination mode) or to the active mode (for example, press CH in TV mode and the TV changes channel accordingly). Programming macros Your Insignia universal remote control includes the ability to 15 button presses, total. Each macro button can be set ...Press VOL-. The LED blinks twice. 4 Press the button you want to restore. The LED blinks twice. 7 Repeat Steps 1-6 to move additional buttons. NS-26L450A11/NS-32L450A11 26"/32" LCD, 1080p To unlock all buttonmoved data in a specific mode: 1 Press and hold SET until the LED blinks twice, then release. ...
User Manual (English)
Page 17
... control's instructions for details. • If your universal remote control has a "Learn" feature, you can manually program it using the Insignia TV remote to identify a code that can operate your remote or need to try codes for your universal remote control or set -top box ...on the chart, but many other remote controls are in the market. See your universal remote control's instructions for details. 3 If all Insignia TVs manufactured after Jan. 1, 2007) Universal remote control makes and models Philips PHDVD5, DirectTV PH5DSS, RC23 PMDVR8, PDVR8 RCA RCU807 One for ...
... control's instructions for details. • If your universal remote control has a "Learn" feature, you can manually program it using the Insignia TV remote to identify a code that can operate your remote or need to try codes for your universal remote control or set -top box ...on the chart, but many other remote controls are in the market. See your universal remote control's instructions for details. 3 If all Insignia TVs manufactured after Jan. 1, 2007) Universal remote control makes and models Philips PHDVD5, DirectTV PH5DSS, RC23 PMDVR8, PDVR8 RCA RCU807 One for ...

User Manual (English)
Page 18
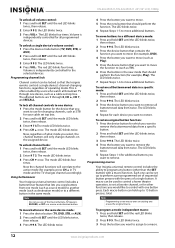
...on the back of time. Connecting an antenna or cable TV without a cable box To connect an antenna or cable TV without a cable box: • Connect a coaxial cable (not provided) to the ANT/CABLE IN jack on the label. NS-26L450A11/NS-32L450A11 26"/32" LCD, 1080p Making connections Cautions • ...Check the jacks for an extended period of your TV and to the antenna or ...
...on the back of time. Connecting an antenna or cable TV without a cable box To connect an antenna or cable TV without a cable box: • Connect a coaxial cable (not provided) to the ANT/CABLE IN jack on the label. NS-26L450A11/NS-32L450A11 26"/32" LCD, 1080p Making connections Cautions • ...Check the jacks for an extended period of your TV and to the antenna or ...

User Manual (English)
Page 19
...use the HDMI connection to get the best quality possible. HDMI Connecting an HDMI device Note If your TV. The connection can also press HDMI repeatedly to select the HDMI device. 3 Turn on the HDMI ...an HDMI cable (not provided) to the HDMI 1, HDMI 2, or HDMI 3 jack on the side of your TV and to the HDMI OUT jack on the HDMI device. 26"/32" LCD, 1080p To connect a cable or satellite... box: 1 Connect the incoming cable from an HDMI device: 1 Turn on your TV, then press INPUT to open the Input Source list. 2 Press or to select HDMI 1, HDMI 2, or HDMI 3,...
...use the HDMI connection to get the best quality possible. HDMI Connecting an HDMI device Note If your TV. The connection can also press HDMI repeatedly to select the HDMI device. 3 Turn on the HDMI ...an HDMI cable (not provided) to the HDMI 1, HDMI 2, or HDMI 3 jack on the side of your TV and to the HDMI OUT jack on the HDMI device. 26"/32" LCD, 1080p To connect a cable or satellite... box: 1 Connect the incoming cable from an HDMI device: 1 Turn on your TV, then press INPUT to open the Input Source list. 2 Press or to select HDMI 1, HDMI 2, or HDMI 3,...

User Manual (English)
Page 20
... connect the adapter to match color-coded jacks. See the documentation that your TV's power cord is unplugged and the DVI device is turned off . 2 Connect a HDMI-DVI adapter ...a DVI device to the output mode. To play from an DVI device: 1 Turn on your TV and to the output mode. Note You can also press COMP to select the component video device. 3 ... (component video) jacks shares the audio jacks with the S-VIDEO and CVBS jacks. 16 www.insigniaproducts.com NS-26L450A11/NS-32L450A11 26"/32" LCD, 1080p Connecting a DVI device Note A DVI device must be connected the the HDMI 1 ...
... connect the adapter to match color-coded jacks. See the documentation that your TV's power cord is unplugged and the DVI device is turned off . 2 Connect a HDMI-DVI adapter ...a DVI device to the output mode. To play from an DVI device: 1 Turn on your TV and to the output mode. Note You can also press COMP to select the component video device. 3 ... (component video) jacks shares the audio jacks with the S-VIDEO and CVBS jacks. 16 www.insigniaproducts.com NS-26L450A11/NS-32L450A11 26"/32" LCD, 1080p Connecting a DVI device Note A DVI device must be connected the the HDMI 1 ...
User Manual (English)
Page 21
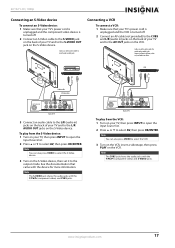
... unplugged and the VCR is turned off . 2 Connect an AV cable (not provided) to the CVBS and L/R (audio in ) jacks on the back of your TV and to the output mode. See the documentation that came with the Y/Pb/Pr (component video) and CVBS jacks. Note You can also press VIDEO... jacks. Cables are often color-coded to white. 26"/32" LCD, 1080p Connecting an S-Video device To connect an S-Video device: 1 Make sure that your TV's power cord is unplugged and the component video device is turned off . 2 Connect an S-Video cable to the S-VIDEO jack on the back of your...
... unplugged and the VCR is turned off . 2 Connect an AV cable (not provided) to the CVBS and L/R (audio in ) jacks on the back of your TV and to the output mode. See the documentation that came with the Y/Pb/Pr (component video) and CVBS jacks. Note You can also press VIDEO... jacks. Cables are often color-coded to white. 26"/32" LCD, 1080p Connecting an S-Video device To connect an S-Video device: 1 Make sure that your TV's power cord is unplugged and the component video device is turned off . 2 Connect an S-Video cable to the S-VIDEO jack on the back of your...
User Manual (English)
Page 22
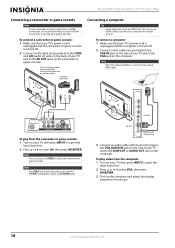
...video from the camcorder or game console: 1 Turn on the camcorder or game console. To connect a camcorder or game console: 1 Make sure that your TV's power cord is unplugged and the camcorder or game console is turned off . 2 Connect an AV cable (not provided) to the CVBS and L/R (...TV, then press INPUT to open the Input Source list. 2 Press or to select VGA, then press OK/ENTER. 3 Turn on the computer and adjust the display properties if necessary. 18 www.insigniaproducts.com Connect yellow to yellow, red to red, and white to match color-coded jacks. NS-26L450A11/NS-32L450A11...
...video from the camcorder or game console: 1 Turn on the camcorder or game console. To connect a camcorder or game console: 1 Make sure that your TV's power cord is unplugged and the camcorder or game console is turned off . 2 Connect an AV cable (not provided) to the CVBS and L/R (...TV, then press INPUT to open the Input Source list. 2 Press or to select VGA, then press OK/ENTER. 3 Turn on the computer and adjust the display properties if necessary. 18 www.insigniaproducts.com Connect yellow to yellow, red to red, and white to match color-coded jacks. NS-26L450A11/NS-32L450A11...


