User Manual (English)
Page 2
...Introduction 4 Installing the stand or wall-mount bracket 5 Installing the stand 5 Installing a wall-mount bracket 5 TV components 6 Package contents 6 Front 6 Back 7 Side 7 Remote control 8 Making connections 9 What connection should I use 9 Connecting power 10 Connecting a cable or satellite box 10 Connecting an antenna or cable TV (no box 13 Connecting a ... Installing remote control batteries 19 Aiming the remote control 19 Turning on your TV for the first time 20 Understanding the basics 21 Turning your TV on or off 21 Selecting the video input source 21 On-screen menu ...
...Introduction 4 Installing the stand or wall-mount bracket 5 Installing the stand 5 Installing a wall-mount bracket 5 TV components 6 Package contents 6 Front 6 Back 7 Side 7 Remote control 8 Making connections 9 What connection should I use 9 Connecting power 10 Connecting a cable or satellite box 10 Connecting an antenna or cable TV (no box 13 Connecting a ... Installing remote control batteries 19 Aiming the remote control 19 Turning on your TV for the first time 20 Understanding the basics 21 Turning your TV on or off 21 Selecting the video input source 21 On-screen menu ...

User Manual (English)
Page 9
...NS-32E740A12 M4 type 10 mm 3 Secure the flat stand cover to the TV with suitable weight/load. (See "Miscellaneous" on page 47.) To attach your TV to a wall-mount bracket: 1 Carefully place your TV screen face-down on a cushioned, clean surface to protect the screen from damages and scratches. Installing a wall-mount bracket Warning This TV.... Installing the stand To install the stand: 1 Carefully place your TV, do not install the stand. Insignia 32" LED-LCD HDTV, 720p Installing the stand or wall-mount bracket Notes If you decide to protect the screen from damages and scratches....
...NS-32E740A12 M4 type 10 mm 3 Secure the flat stand cover to the TV with suitable weight/load. (See "Miscellaneous" on page 47.) To attach your TV to a wall-mount bracket: 1 Carefully place your TV screen face-down on a cushioned, clean surface to protect the screen from damages and scratches. Installing a wall-mount bracket Warning This TV.... Installing the stand To install the stand: 1 Carefully place your TV, do not install the stand. Insignia 32" LED-LCD HDTV, 720p Installing the stand or wall-mount bracket Notes If you decide to protect the screen from damages and scratches....
User Manual (English)
Page 10
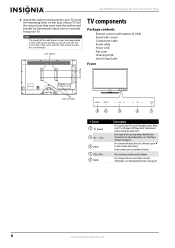
... or decrease the volume. Press to open the Input Source list, then press or to select a video input source. NS-32E740A12 Insignia 32" LED-LCD HDTV, 720p 4 Attach the wall-mount bracket to your TV using the mounting holes on or off , power still flows into it. See the instructions that came with screws Component cable Audio cable...
... or decrease the volume. Press to open the Input Source list, then press or to select a video input source. NS-32E740A12 Insignia 32" LED-LCD HDTV, 720p 4 Attach the wall-mount bracket to your TV using the mounting holes on or off , power still flows into it. See the instructions that came with screws Component cable Audio cable...
User Manual (English)
Page 51
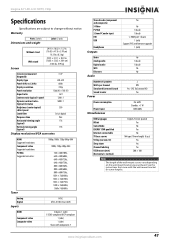
... audio Digital audio WiFi Ethernet Audio No 1 (back) 1 (back) No No Number of speakers Watts per channel Simulated Surround Sound Sound Leveler Power 2 8W Yes - Insignia 32" LED-LCD HDTV, 720p Specifications Specifications are subject to change without notice. Warranty Parts: 2 years Dimensions and weight Labor: 2 years Screen Without stand With...
... audio Digital audio WiFi Ethernet Audio No 1 (back) 1 (back) No No Number of speakers Watts per channel Simulated Surround Sound Sound Leveler Power 2 8W Yes - Insignia 32" LED-LCD HDTV, 720p Specifications Specifications are subject to change without notice. Warranty Parts: 2 years Dimensions and weight Labor: 2 years Screen Without stand With...
Quick Setup Guide (English)
Page 1
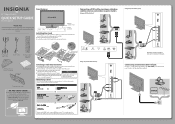
...NS-32E740A12 Thank You for purchasing this product for years to come Remote control sensor Power indicator Installing the stand 1 Carefully place your TV screen face-down on the back of your TV and to the Antenna/Cable wall jack. A copy of the HDMI cable that came with the four provided screws. Warning 4 Attach the wall-mount bracket... jack to connect a DVI device to the end of your TV using the four screws you enjoy the quality and reliability of this fine Insignia television. For the best video quality, connect a device to be supported by a UL Listed wall mount bracket.
...NS-32E740A12 Thank You for purchasing this product for years to come Remote control sensor Power indicator Installing the stand 1 Carefully place your TV screen face-down on the back of your TV and to the Antenna/Cable wall jack. A copy of the HDMI cable that came with the four provided screws. Warning 4 Attach the wall-mount bracket... jack to connect a DVI device to the end of your TV using the four screws you enjoy the quality and reliability of this fine Insignia television. For the best video quality, connect a device to be supported by a UL Listed wall mount bracket.
Important Information (English)
Page 9
SRS TruSurround HD Yes Power consumption Power input Miscellaneous On: 64W Standby: HDMI port 1 (back) 1 (side) Support JPEG and firmware upgrade 1 (side) Video Analog audio Digital audio WiFi Ethernet Audio No 1 (back) 1 (back) No No Simulated Surround Sound Sound Leveler Power Yes - Inputs HDMI Component video Composite video Shared audio (component and composite) S-Video PC/VGA 3.5mm PC audio input DVI USB Headphone Outputs 2 (back), 1 (side) E-EDID-compliant HDCP-compliant 1 (side) 1 (side) Share with Component-Y Yes No 1 (back) 1 (back) 1-
SRS TruSurround HD Yes Power consumption Power input Miscellaneous On: 64W Standby: HDMI port 1 (back) 1 (side) Support JPEG and firmware upgrade 1 (side) Video Analog audio Digital audio WiFi Ethernet Audio No 1 (back) 1 (back) No No Simulated Surround Sound Sound Leveler Power Yes - Inputs HDMI Component video Composite video Shared audio (component and composite) S-Video PC/VGA 3.5mm PC audio input DVI USB Headphone Outputs 2 (back), 1 (side) E-EDID-compliant HDCP-compliant 1 (side) 1 (side) Share with Component-Y Yes No 1 (back) 1 (back) 1-


