
User Manual
Page 4
... satellite/cable service information has been changed Network Information is a trademark of Telenor Conax AS. • "Dolby" and the double-D symbol are scrambled. Warning HUMAX cannot be used in sequence as the receiver searchs the signal. • Specifications are defined automatically for TV-Cabo subscriber When user searchs channels, the channel numbers from 001 to inform your Smart card. The use of unofficial software. Note When the changed . It is provided by the use of software...
... satellite/cable service information has been changed Network Information is a trademark of Telenor Conax AS. • "Dolby" and the double-D symbol are scrambled. Warning HUMAX cannot be used in sequence as the receiver searchs the signal. • Specifications are defined automatically for TV-Cabo subscriber When user searchs channels, the channel numbers from 001 to inform your Smart card. The use of unofficial software. Note When the changed . It is provided by the use of software...
User Manual
Page 6
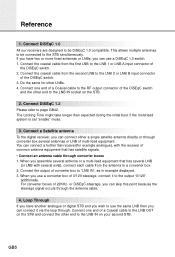
... satellite signals. • Connect an antenna cable through the antenna cable. 4. When you can connect it to a converter box. 2. When you can skip this point because the steerage signal occurs through converter boxes 1. Connect the coaxial cable from the first LNB to page GB42. Connect a Satellite antenna To the digital receiver, you use a DiSEqC 1.0 switch. 1. The Locking Time might take longer than expected during the initial boot if the motorised system is set "enable" mode...
... satellite signals. • Connect an antenna cable through the antenna cable. 4. When you can connect it to a converter box. 2. When you can skip this point because the steerage signal occurs through converter boxes 1. Connect the coaxial cable from the first LNB to page GB42. Connect a Satellite antenna To the digital receiver, you use a DiSEqC 1.0 switch. 1. The Locking Time might take longer than expected during the initial boot if the motorised system is set "enable" mode...
User Manual
Page 7
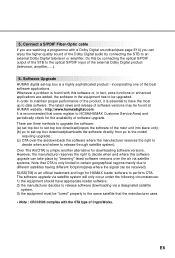
... date software. E6 Software Upgrade HUMAX digital set -top box download(copies the software of software versions may be found with a Dolby Digital soundtrack(see page E14) you can take place by connecting the STB to be "tuned" properly to the same satellite that OTA is a highly sophisticated product - Whenever a problem is simply another alternative for HUMAX loader software to different satellites having different footprints(area where the signal can be received...
... date software. E6 Software Upgrade HUMAX digital set -top box download(copies the software of software versions may be found with a Dolby Digital soundtrack(see page E14) you can take place by connecting the STB to be "tuned" properly to the same satellite that OTA is a highly sophisticated product - Whenever a problem is simply another alternative for HUMAX loader software to different satellites having different footprints(area where the signal can be received...
User Manual
Page 9
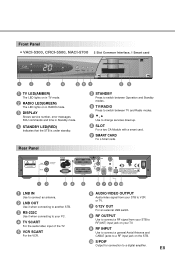
... the VCR. 6 AUDIO/VIDEO OUTPUT Audio/video signal from your STB to VCR or TV. 7 0/12V OUT For an external LNB switch. 8 RF OUTPUT Use to connect a RF signal from your STB to RF(ANT) input jack on your TV. 9 RF INPUT Use to connect a general Aerial Antenna and CABLE jacks to a RF input jack on in RADIO mode. 3 DISPLAY Shows service number, error messages, RCU commands and time in Standby mode. 4 STANDBY LED(RED) Indicates that the STB is under standby. Front Panel VACI-5300, CRCI...
... the VCR. 6 AUDIO/VIDEO OUTPUT Audio/video signal from your STB to VCR or TV. 7 0/12V OUT For an external LNB switch. 8 RF OUTPUT Use to connect a RF signal from your STB to RF(ANT) input jack on your TV. 9 RF INPUT Use to connect a general Aerial Antenna and CABLE jacks to a RF input jack on in RADIO mode. 3 DISPLAY Shows service number, error messages, RCU commands and time in Standby mode. 4 STANDBY LED(RED) Indicates that the STB is under standby. Front Panel VACI-5300, CRCI...
User Manual
Page 13
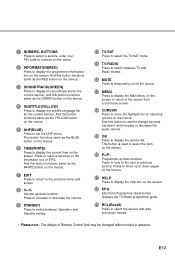
... the screen. 18 EPG Electronic Programme Guide button displays the TV/Radio programme guide. 19 RCL(Recall) Press to move the highlight bar for the current service. Press to tune to set the UHF menu. And this button functions same as the YELLOW button on the menus. 5 UHF(BLUE) Press to the next or previous service. This button is used to display the service list. And this button is used to change services...
... the screen. 18 EPG Electronic Programme Guide button displays the TV/Radio programme guide. 19 RCL(Recall) Press to move the highlight bar for the current service. Press to tune to set the UHF menu. And this button functions same as the YELLOW button on the menus. 5 UHF(BLUE) Press to the next or previous service. This button is used to display the service list. And this button is used to change services...
User Manual
Page 14
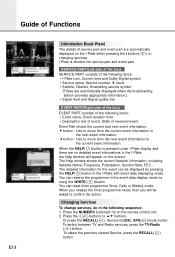
... remote control unit. 2. To switch between TV and Radio services, press the TV/Radio ( ) button. The detailed information for the event can be asked to the next event information. Changing Services To change services, do in the I -Plate with event data displaying mode. Guide of Functions E13 Information Box(I-Plate) The details of service part and event part are automatically displayed on the I -Plate icon, Current time and Dolby Digital symbol • Service name, Service number, icons • Subtitle...
... remote control unit. 2. To switch between TV and Radio services, press the TV/Radio ( ) button. The detailed information for the event can be asked to the next event information. Changing Services To change services, do in the I -Plate with event data displaying mode. Guide of Functions E13 Information Box(I-Plate) The details of service part and event part are automatically displayed on the I -Plate icon, Current time and Dolby Digital symbol • Service name, Service number, icons • Subtitle...
User Manual
Page 15
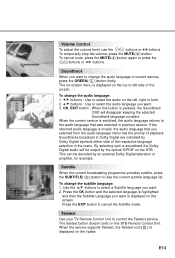
... the EXIT button to see the current subtitle language list. E14 Use the buttons to select a Subtitle language you want . 3. The on-screen menu is displayed on the top to select the audio on the STB Remote Control Unit. Subtitle When the current broadcasting programme provides subtitle, press the SUBTITLE( )button to cancel the Subtitle mode. Teletext Use your TV Remote Control Unit to select the audio language you selected from the audio language menu has...
... the EXIT button to see the current subtitle language list. E14 Use the buttons to select a Subtitle language you want . 3. The on-screen menu is displayed on the top to select the audio on the STB Remote Control Unit. Subtitle When the current broadcasting programme provides subtitle, press the SUBTITLE( )button to cancel the Subtitle mode. Teletext Use your TV Remote Control Unit to select the audio language you selected from the audio language menu has...
User Manual
Page 16
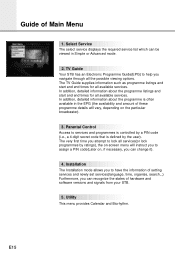
... and signals from your STB. 5. Parental Control Access to assign a PIN code(Later on the particular broadcaster). 3. Utility This menu provides Calendar and Biorhythm. The TV Guide supplies information such as programme listings and start and end times for all available services. The very first time you navigate through all services(or lock programmes by ratings), the on-screen menu will vary, depending on , if necessary, you can change it). 4. Installation The Installation mode...
... and signals from your STB. 5. Parental Control Access to assign a PIN code(Later on the particular broadcaster). 3. Utility This menu provides Calendar and Biorhythm. The TV Guide supplies information such as programme listings and start and end times for all available services. The very first time you navigate through all services(or lock programmes by ratings), the on-screen menu will vary, depending on , if necessary, you can change it). 4. Installation The Installation mode...
User Manual
Page 22
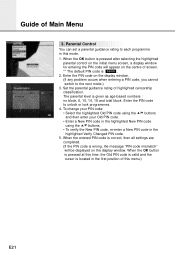
... initial menu screen, a display window for entering the PIN code will be displayed on the centre of this mode. 1. To change your PIN code: • Select the highlighted Old PIN code using the buttons and then enter your Old PIN code. • Enter a New PIN code in the highlighted New PIN code using the buttons. • To verify the New PIN code, re-enter a New PIN code in the first position of screen. ** The default PIN code is given as age-based numbers : no block, 6, 10, 14, 18 and total block. Parental Control You can set a parental...
... initial menu screen, a display window for entering the PIN code will be displayed on the centre of this mode. 1. To change your PIN code: • Select the highlighted Old PIN code using the buttons and then enter your Old PIN code. • Enter a New PIN code in the highlighted New PIN code using the buttons. • To verify the New PIN code, re-enter a New PIN code in the first position of screen. ** The default PIN code is given as age-based numbers : no block, 6, 10, 14, 18 and total block. Parental Control You can set a parental...
User Manual
Page 23
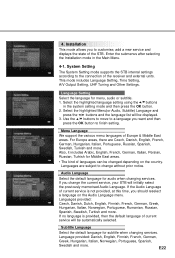
... We support the various menu languages of the receiver and external units. Enter the submenus after selecting the Installation mode in the system setting mode and then press the OK button. 2. Audio Language Select the default language for subtitle when changing services. If no language is not provided, at this time, you change without prior notice. Subtitle Language Select the default language for audio when changing services. E22 This mode includes Language Setting, Time Setting, A/V Output Setting, UHF Tuning...
... We support the various menu languages of the receiver and external units. Enter the submenus after selecting the Installation mode in the system setting mode and then press the OK button. 2. Audio Language Select the default language for subtitle when changing services. If no language is not provided, at this time, you change without prior notice. Subtitle Language Select the default language for audio when changing services. E22 This mode includes Language Setting, Time Setting, A/V Output Setting, UHF Tuning...
User Manual
Page 24
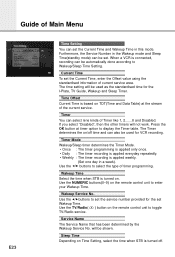
... recording is based on the remote control unit to select the type of current service area. Guide of Main Menu E23 Time Setting You can be automatically done according to enter your Wakeup Time. The time setting will be used for the set Wakeup Time. Use the TV/Radio( ) button on TDT(Time and Data Table) at timer option to set the Current Time, enter the Offset value using the standardised information of timer programming. Time Offset Current Time...
... recording is based on the remote control unit to select the type of current service area. Guide of Main Menu E23 Time Setting You can be automatically done according to enter your Wakeup Time. The time setting will be used for the set Wakeup Time. Use the TV/Radio( ) button on TDT(Time and Data Table) at timer option to set the Current Time, enter the Offset value using the standardised information of timer programming. Time Offset Current Time...
User Manual
Page 25
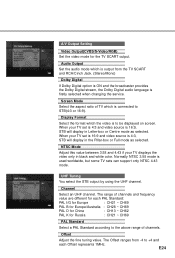
... changing the service. When your TV set is 16:9 and video source is 4:3, STB will display in Letter-box or Centre mode as selected. UHF Tuning You select the STB output by using the UHF channel. The Offset ranges from the TV SCART and RCA/Cinch Jack. (Stereo/Mono) Dolby Digital lf Dolby Digital option is ON and the broadcaster provides the Dolby Digital stream, the Dolby Digital audio language is 16:9, STB will display...
... changing the service. When your TV set is 16:9 and video source is 4:3, STB will display in Letter-box or Centre mode as selected. UHF Tuning You select the STB output by using the UHF channel. The Offset ranges from the TV SCART and RCA/Cinch Jack. (Stereo/Mono) Dolby Digital lf Dolby Digital option is ON and the broadcaster provides the Dolby Digital stream, the Dolby Digital audio language is 16:9, STB will display...
User Manual
Page 27
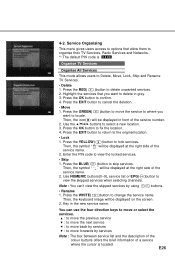
... Networks. ** The default PIN code is located. Press the EXIT button to return to change the service name. Press the WHITE( )button to the original location. • Lock 1. Then, the symbol " " will be displayed at the right side of the service number. 2. Use NUMERIC buttons(0~9), service list or EPG( )button to confirm. 4. Highlight the services that allow them to delete in the new service name. Press the OK button to view the skipped services when selecting channels. Enter the PIN code...
... Networks. ** The default PIN code is located. Press the EXIT button to return to change the service name. Press the WHITE( )button to the original location. • Lock 1. Then, the symbol " " will be displayed at the right side of the service number. 2. Use NUMERIC buttons(0~9), service list or EPG( )button to confirm. 4. Highlight the services that allow them to delete in the new service name. Press the OK button to view the skipped services when selecting channels. Enter the PIN code...
User Manual
Page 32
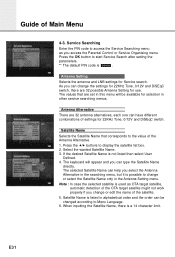
... the satellite. 5. Antenna Setting Selects the antenna and LNB settings for Service search. Press the OK button to access the Service Searching menu as OTA target satellite, automatic detection of the OTA target satellite might not work properly if you change the settings for 22KHz Tone, 0/12V and DiSEqC switch, there are set in this menu will appear and you access the Parental Control or Service Organising menu. Service Searching Enter the PIN code to start Service Search after setting the parameters. ** The default PIN code is listed in...
... the satellite. 5. Antenna Setting Selects the antenna and LNB settings for Service search. Press the OK button to access the Service Searching menu as OTA target satellite, automatic detection of the OTA target satellite might not work properly if you change the settings for 22KHz Tone, 0/12V and DiSEqC switch, there are set in this menu will appear and you access the Parental Control or Service Organising menu. Service Searching Enter the PIN code to start Service Search after setting the parameters. ** The default PIN code is listed in...
User Manual
Page 33
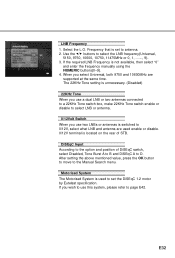
... by Eutelsat specification. E32 The 22KHz Tone setting is unnecessary. (Disabled) 22KHz Tone When you use a dual LNB or two antennas connected to a 22KHz Tone switch box, make 22KHz Tone switch enable or disable to select LNB or antenna. 0/12Volt Switch When you wish to use two LNBs or antennas is not available, then select "0" and enter the frequency manually using the NUMERIC buttons(0~9). 4. DiSEqC Input According to the option and position of STB. Use the buttons to...
... by Eutelsat specification. E32 The 22KHz Tone setting is unnecessary. (Disabled) 22KHz Tone When you use a dual LNB or two antennas connected to a 22KHz Tone switch box, make 22KHz Tone switch enable or disable to select LNB or antenna. 0/12Volt Switch When you wish to use two LNBs or antennas is not available, then select "0" and enter the frequency manually using the NUMERIC buttons(0~9). 4. DiSEqC Input According to the option and position of STB. Use the buttons to...
User Manual
Page 36
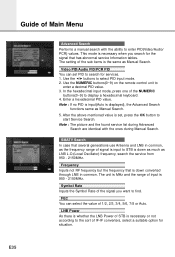
... of signal is input to STB is the same as Manual Search. The setting of the signal you search for the signal that has abnormal service Infornation tables. Use the NUMERIC buttons(0~9) on the remote control unit to start Service Search. Note : If no PID is input(Auto is necessary when you want to find. Guide of Main Menu Advanced Search Performs a manual search with the ones during Advanced Search are identical with the ability to enter PID(Video/Audio...
... of signal is input to STB is the same as Manual Search. The setting of the signal you search for the signal that has abnormal service Infornation tables. Use the NUMERIC buttons(0~9) on the remote control unit to start Service Search. Note : If no PID is input(Auto is necessary when you want to find. Guide of Main Menu Advanced Search Performs a manual search with the ones during Advanced Search are identical with the ability to enter PID(Video/Audio...
User Manual
Page 39
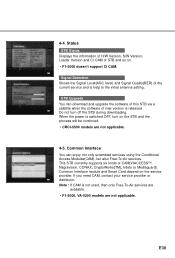
STB Upgrade You can enjoy not only scrambled services using the Conditional Access Modules(CAM), but also Free-To-Air services. This STB currently supports six kinds of the current service and is switched OFF, turn off the STB during downloading. When the power is help to the initial antenna setting. Signal Detection Shows the Signal Level(AGC level) and Signal Quality(BER) of CAM(VIACCESS™, Nagravision, CONAX, CryptoWorks(TM), Irdeto or...
STB Upgrade You can enjoy not only scrambled services using the Conditional Access Modules(CAM), but also Free-To-Air services. This STB currently supports six kinds of the current service and is switched OFF, turn off the STB during downloading. When the power is help to the initial antenna setting. Signal Detection Shows the Signal Level(AGC level) and Signal Quality(BER) of CAM(VIACCESS™, Nagravision, CONAX, CryptoWorks(TM), Irdeto or...

User Manual
Page 40
..., press the OK button. • Smart Card details You can see the blocked Viacces Service. • Specifications are encrypted by only CryptoWorks(TM) and distributor labels displayed on the TV screen. Change Maturity Rating The STB is recommended that this PIN code to "No block" or for ages ranging from programm providers. Enter this PIN code should be set to view and change this option. This PIN code is required to...
..., press the OK button. • Smart Card details You can see the blocked Viacces Service. • Specifications are encrypted by only CryptoWorks(TM) and distributor labels displayed on the TV screen. Change Maturity Rating The STB is recommended that this PIN code to "No block" or for ages ranging from programm providers. Enter this PIN code should be set to view and change this option. This PIN code is required to...
User Manual
Page 43
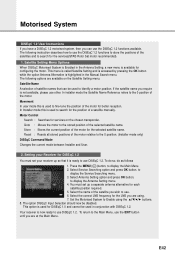
... a satellite manually. The following options are available on the chosen transponder. Satellite Name A selection of the satellites and to the Main Menu, use the DiSEqC 1.2 functions available. In Installer mode this is now ready to display the Service Searching menu. 3. Select the correct LNB frequency for DiSEqC 1.0 and cannot be disabled. You must set up so that can use the EXIT button until you are using the buttons. 8. The following instruction describes how to use...
... a satellite manually. The following options are available on the chosen transponder. Satellite Name A selection of the satellites and to the Main Menu, use the DiSEqC 1.2 functions available. In Installer mode this is now ready to display the Service Searching menu. 3. Select the correct LNB frequency for DiSEqC 1.0 and cannot be disabled. You must set up so that can use the EXIT button until you are using the buttons. 8. The following instruction describes how to use...
User Manual
Page 46
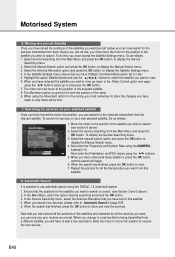
... access the Satellite Settings menu. Now enter the Frequency and Symbol Rate using the buttons. 5. Automatic Search It is used to receive the new service. Now that you want to Automatic Search of the selected satellite. 8. Before you can do this , you must move the motor to search. When you want to use the buttons to select the satellite you want , you wish to view, go down to the Motor Control option...
... access the Satellite Settings menu. Now enter the Frequency and Symbol Rate using the buttons. 5. Automatic Search It is used to receive the new service. Now that you want to Automatic Search of the selected satellite. 8. Before you can do this , you must move the motor to search. When you want to use the buttons to select the satellite you want , you wish to view, go down to the Motor Control option...


