
Owners Guide
Page 3
... property rights. Dispose of the plasma television as video games, stock market quotations, computer generated graphics, and other hazards. For product recycling and disposal information, contact your HITACHI Factory Warranty. Insert the power cord into a 120 volt 60 Hz outlet. Caution Never remove ... images are covered in Canada). Note • There are no user serviceable parts inside the plasma television. • Model and serial numbers are NOT COVERED by your TV screen. A CableCARD provided by your local government agency or www.eRecycle.org (in California), the...
... property rights. Dispose of the plasma television as video games, stock market quotations, computer generated graphics, and other hazards. For product recycling and disposal information, contact your HITACHI Factory Warranty. Insert the power cord into a 120 volt 60 Hz outlet. Caution Never remove ... images are covered in Canada). Note • There are no user serviceable parts inside the plasma television. • Model and serial numbers are NOT COVERED by your TV screen. A CableCARD provided by your local government agency or www.eRecycle.org (in California), the...
Owners Guide
Page 5
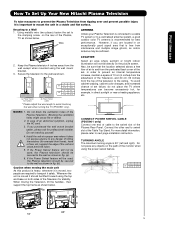
...chance of set to the clamping screw on the rear of the Plasma TV as shown below . D 27.5 cm 39 cm 60" 50" 5 Wire ANTENNA Unless your Plasma Television is connected to a cable TV system or to a centralized antenna system, a good outdoor color TV antenna is 30° (left and right). Using metallic wire.... Whenever the unit is important to mount the unit in . First time use How To Set Up Your New Hitachi Plasma Television To take measures to prevent the Plasma Television from tipping over and prevent possible injury it is moved it should be lifted forward using the top and base...
...chance of set to the clamping screw on the rear of the Plasma TV as shown below . D 27.5 cm 39 cm 60" 50" 5 Wire ANTENNA Unless your Plasma Television is connected to a cable TV system or to a centralized antenna system, a good outdoor color TV antenna is 30° (left and right). Using metallic wire.... Whenever the unit is important to mount the unit in . First time use How To Set Up Your New Hitachi Plasma Television To take measures to prevent the Plasma Television from tipping over and prevent possible injury it is moved it should be lifted forward using the top and base...
Owners Guide
Page 7
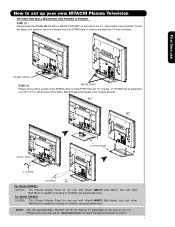
... the Base; Use with Hitachi WM07S Wall Mount. Use with Hitachi WM07L Wall Mount. This Plasma Display Panel for your tv. 7 How to set up your new HITACHI Plasma Television SETTING FOR WALL MOUNTING FOR P50X901 & P60X901 STEP (1) : Please locate the STAND METAL(50") or METAL POST(60") on the size of resulting in instability causing possible injury...
... the Base; Use with Hitachi WM07S Wall Mount. Use with Hitachi WM07L Wall Mount. This Plasma Display Panel for your tv. 7 How to set up your new HITACHI Plasma Television SETTING FOR WALL MOUNTING FOR P50X901 & P60X901 STEP (1) : Please locate the STAND METAL(50") or METAL POST(60") on the size of resulting in instability causing possible injury...
Owners Guide
Page 11
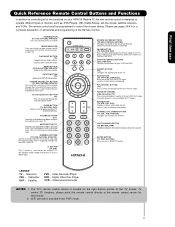
...to Select/Activate highlighted menu items. Closed Caption (CC) BUTTON (TV) Press to manually enter the TV channel, and used for a complete description of all of the functions on your HITACHI Plasma TV, the new remote control is in DVD or PVR/VCR. EXIT BUTTON (TV, SAT/CBL, PVR/VCR) Exits out of the OSD, ...INPUTS menu systems if their menu is located on the screen, such as SELECT feature. CHANNEL UP & DOWN BUTTONS (TV, CBL, STB, PVR/VCR)...
...to Select/Activate highlighted menu items. Closed Caption (CC) BUTTON (TV) Press to manually enter the TV channel, and used for a complete description of all of the functions on your HITACHI Plasma TV, the new remote control is in DVD or PVR/VCR. EXIT BUTTON (TV, SAT/CBL, PVR/VCR) Exits out of the OSD, ...INPUTS menu systems if their menu is located on the screen, such as SELECT feature. CHANNEL UP & DOWN BUTTONS (TV, CBL, STB, PVR/VCR)...
Owners Guide
Page 13
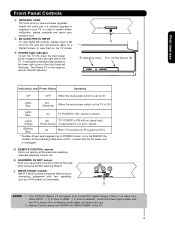
...) when not in use Front Panel Controls ቩ UPGRADE CARD This card slot is now ready for remote ON/OFF operation. so for the P60X901 the condition for the Indicating Lamp when is OFF , it means that the AC power cord is required for your warranty card. ቩ SD...Power Light to be turned OFF (lights orange) if there is no sync. signal). Your HITACHI Plasma TV will illuminate. Remote Control cannot turn the TV ON, press the main power switch located on the lower right side of the TV. PHOTO INPUT PUSH EJECT ቩ ቪ Indicating Lamp R/C, AV Net Sensor ቫ ...
...) when not in use Front Panel Controls ቩ UPGRADE CARD This card slot is now ready for remote ON/OFF operation. so for the P60X901 the condition for the Indicating Lamp when is OFF , it means that the AC power cord is required for your warranty card. ቩ SD...Power Light to be turned OFF (lights orange) if there is no sync. signal). Your HITACHI Plasma TV will illuminate. Remote Control cannot turn the TV ON, press the main power switch located on the lower right side of the TV. PHOTO INPUT PUSH EJECT ቩ ቪ Indicating Lamp R/C, AV Net Sensor ቫ ...
Owners Guide
Page 17
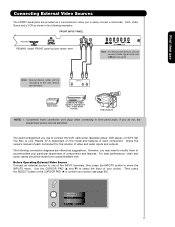
... INPUT terminals, then press the INPUTS button to show the INPUTS menu. Then press the SELECT button or the CURSOR PAD ̈ to confirm your Plasma TV is dependent on the model and features of components and features. The exact arrangement you use Note : Special device cables will be made from coaxial...
... INPUT terminals, then press the INPUTS button to show the INPUTS menu. Then press the SELECT button or the CURSOR PAD ̈ to confirm your Plasma TV is dependent on the model and features of components and features. The exact arrangement you use Note : Special device cables will be made from coaxial...
Owners Guide
Page 23
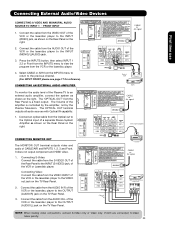
...Connect the cable from the Rear Panel is controlled by the amplifier, not by the Plasma Television. The "OPTICAL OUT" from the AUDIO OUT of the amplifier is a fixed... the AUDIO IN R of the VCR or the laserdisc player to the INPUT (VIDEO) jack, as shown on the TV Rear Panel. 3. If both are connected, S-Video takes priority. 23 CONNECTING AN EXTERNAL AUDIO AMPLIFIER To monitor the audio... cable from the AUDIO IN L of the VCR or the laserdisc player to the Optical input of the Plasma TV to the OUTPUT (AUDIO/R) jack on the right. It does not output component and HDMI video. 1. ...
...Connect the cable from the Rear Panel is controlled by the amplifier, not by the Plasma Television. The "OPTICAL OUT" from the AUDIO OUT of the amplifier is a fixed... the AUDIO IN R of the VCR or the laserdisc player to the INPUT (VIDEO) jack, as shown on the TV Rear Panel. 3. If both are connected, S-Video takes priority. 23 CONNECTING AN EXTERNAL AUDIO AMPLIFIER To monitor the audio... cable from the AUDIO IN L of the VCR or the laserdisc player to the Optical input of the Plasma TV to the OUTPUT (AUDIO/R) jack on the right. It does not output component and HDMI video. 1. ...

Owners Guide
Page 24
... a total of the external components you can use Connecting External Video Sources Your HITACHI Plasma Television is setup, it allows your IR Blaster cable to control your equipment using your HITACHI Plasma TV Remote Control. Once this is equipped with up to four components. Place the...772; or channel scroll to select. 7. Each IR Blaster cable can control up to 2 external Audio/Video components. Connect your Hitachi Plasma Television and external Audio/Video equipment (VCR and DVD Player). The IR Blaster must be chosen for each of the external components infrared...
... a total of the external components you can use Connecting External Video Sources Your HITACHI Plasma Television is setup, it allows your IR Blaster cable to control your equipment using your HITACHI Plasma TV Remote Control. Once this is equipped with up to four components. Place the...772; or channel scroll to select. 7. Each IR Blaster cable can control up to 2 external Audio/Video components. Connect your Hitachi Plasma Television and external Audio/Video equipment (VCR and DVD Player). The IR Blaster must be chosen for each of the external components infrared...
Owners Guide
Page 25
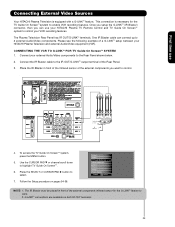
... to highlight TV Guide On ScreenTM. 6. Follow the Setup procedure on both IR OUT terminals. 25 Once you setup the G-LINKTM (IR Blaster) connector, then you want to control. The IR Blaster must be placed in front of the infrared sensor of the Rear Panel. 3. First time use your HITACHI Plasma TV Remote Control... and TV Guide On ScreenTM system to control your VCR recording features.
... to highlight TV Guide On ScreenTM. 6. Follow the Setup procedure on both IR OUT terminals. 25 Once you setup the G-LINKTM (IR Blaster) connector, then you want to control. The IR Blaster must be placed in front of the infrared sensor of the Rear Panel. 3. First time use your HITACHI Plasma TV Remote Control... and TV Guide On ScreenTM system to control your VCR recording features.
Owners Guide
Page 26
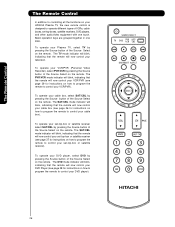
... Video Recorder), select PVR/VCR by pressing the Source button of the Source Select on how to program the remote to control your Plasma TV, select TV by pressing the Source button of the Source Select on the remote. To operate your cable box). Basic operation keys are grouped together...PVR (see page 36 for instructions on the remote. The PVR/VCR mode indicator will blink, indicating that the remote will now control your HITACHI Plasma TV, the new remote control is designed to operate different types of the Source Select on the remote. To operate your DVD player, select ...
... Video Recorder), select PVR/VCR by pressing the Source button of the Source Select on how to program the remote to control your Plasma TV, select TV by pressing the Source button of the Source Select on the remote. To operate your cable box). Basic operation keys are grouped together...PVR (see page 36 for instructions on the remote. The PVR/VCR mode indicator will blink, indicating that the remote will now control your HITACHI Plasma TV, the new remote control is designed to operate different types of the Source Select on the remote. To operate your DVD player, select ...
Owners Guide
Page 29
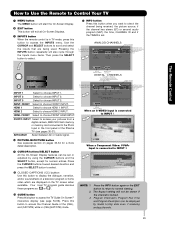
... 3 480i 3:17PM Input Signal Format Auto NOTE: 1. Digital channel Program Information Program Run Time Show Name 3:00PM- 3:30M REGION 5 ST DTvCC TV-G D Air 15-1 KPBS-HD 1080i 3:17PM Main Picture Source and channel indication Broadcast channel identification Clock Audio Broadcast Alternate Broadcast Picture Format Rating Rating Program... CHANNELS Digital Closed Caption This icon will not be set . INPUT 2 Select to access the Channel Guide of the Plasma TV (see page 54-56). Press this button to choose INPUT 2. The Remote Control How to Use the Remote to Control Your...
... 3 480i 3:17PM Input Signal Format Auto NOTE: 1. Digital channel Program Information Program Run Time Show Name 3:00PM- 3:30M REGION 5 ST DTvCC TV-G D Air 15-1 KPBS-HD 1080i 3:17PM Main Picture Source and channel indication Broadcast channel identification Clock Audio Broadcast Alternate Broadcast Picture Format Rating Rating Program... CHANNELS Digital Closed Caption This icon will not be set . INPUT 2 Select to access the Channel Guide of the Plasma TV (see page 54-56). Press this button to choose INPUT 2. The Remote Control How to Use the Remote to Control Your...
Owners Guide
Page 33
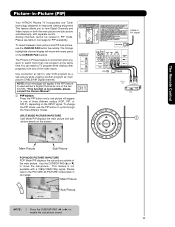
To select between main picture and PIP sub picture, use the PIP button to watch a TV program while viewing other programs from any of the video inputs. "This function is not available with separate control. Please refer to the PICTURE-IN-... the sub-picture outside of VCR Video OUTPUT VCR ቢ 33 The Remote Control Please see table in next page. Picture-In-Picture (PIP) Your HITACHI Plasma TV incorporates one Tuner technology designed for PIP availability. SPLIT MODE PICTURE-IN-PICTURE Split Mode PIP displays the main picture and subpicture evenly on the...
To select between main picture and PIP sub picture, use the PIP button to watch a TV program while viewing other programs from any of the video inputs. "This function is not available with separate control. Please refer to the PICTURE-IN-... the sub-picture outside of VCR Video OUTPUT VCR ቢ 33 The Remote Control Please see table in next page. Picture-In-Picture (PIP) Your HITACHI Plasma TV incorporates one Tuner technology designed for PIP availability. SPLIT MODE PICTURE-IN-PICTURE Split Mode PIP displays the main picture and subpicture evenly on the...
Owners Guide
Page 44
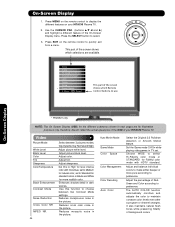
... reflect the actual apearance of the OSD of background colors. It also maintains natural flesh tones while preserving fidelity of your HITACHI Plasma TV. 2. Press MENU on your HITACHI Plasma TV. On-Screen Display * P50X901 only NOTE: The On Screen Display (OSD) for the different submenus shown in... TV set to choose between 3 pictures modes; The AUTO COLOR function automatically monitors and adjusts the color to use. Reduces conspicuous noise...
... reflect the actual apearance of the OSD of background colors. It also maintains natural flesh tones while preserving fidelity of your HITACHI Plasma TV. 2. Press MENU on your HITACHI Plasma TV. On-Screen Display * P50X901 only NOTE: The On Screen Display (OSD) for the different submenus shown in... TV set to choose between 3 pictures modes; The AUTO COLOR function automatically monitors and adjusts the color to use. Reduces conspicuous noise...
Owners Guide
Page 52
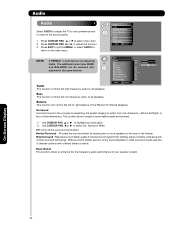
... playback in the same manner. Wide surround enable users to all speakers. Audio Audio Select AUDIO to adjust the TV to your speaker system. Use CURSOR PAD ̆ or ̄ to the main menu. Surround Surround sound is... SEL Return Treble This function controls the high frequency audio to right balance of the listener. Video Audio TV Guide On Screen Channel Manager Locks Timers Setup Power Swivel Move SEL Select Audio NOTE: If TREBLE is ...5 channel sound signals from one dimension ( Mono/Left-Right) to the rear of the Plasma TV internal speakers. On-Screen Display 52
... playback in the same manner. Wide surround enable users to all speakers. Audio Audio Select AUDIO to adjust the TV to your speaker system. Use CURSOR PAD ̆ or ̄ to the main menu. Surround Surround sound is... SEL Return Treble This function controls the high frequency audio to right balance of the listener. Video Audio TV Guide On Screen Channel Manager Locks Timers Setup Power Swivel Move SEL Select Audio NOTE: If TREBLE is ...5 channel sound signals from one dimension ( Mono/Left-Right) to the rear of the Plasma TV internal speakers. On-Screen Display 52
Owners Guide
Page 54
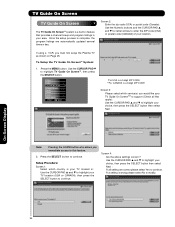
... and ̄ to highlight your location. If using a VCR, you must first setup the Plasma TV as shown on Page 25. Press the MENU button. Screen 4: Are the above settings correct ? Video Audio TV Guide On Screen Channel Manager Locks Timers Setup Power Swivel Move SEL Select *For USA is a ...5 digit ZIP CODE **For CANADA is a 6 digit ZIP CODE Screen 3: Please select which country is your TV located in your TV Guide On ScreenTM to support (Check all setting are automatically updated several times a day. Setup Procedure: Screen 1: Select which service(s) you would...
... and ̄ to highlight your location. If using a VCR, you must first setup the Plasma TV as shown on Page 25. Press the MENU button. Screen 4: Are the above settings correct ? Video Audio TV Guide On Screen Channel Manager Locks Timers Setup Power Swivel Move SEL Select *For USA is a ...5 digit ZIP CODE **For CANADA is a 6 digit ZIP CODE Screen 3: Please select which country is your TV located in your TV Guide On ScreenTM to support (Check all setting are automatically updated several times a day. Setup Procedure: Screen 1: Select which service(s) you would...
Owners Guide
Page 56
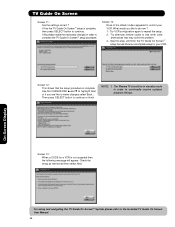
... are like to continue. The Plasma TV should be in standby mode in order to control your VCR. TV Guide On Screen Screen 11: Are the settings correct ? Skip this step, will finish the TV Guide On ScreenTM setup; Screen 14: None of the Hitachi codes appeared to complete the TV Guide On ScreenTM setup procedure...
... are like to continue. The Plasma TV should be in standby mode in order to control your VCR. TV Guide On Screen Screen 11: Are the settings correct ? Skip this step, will finish the TV Guide On ScreenTM setup; Screen 14: None of the Hitachi codes appeared to complete the TV Guide On ScreenTM setup procedure...
Owners Guide
Page 69
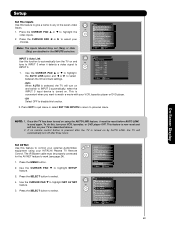
... IR Out CableCARD Information Select The Quick Start Option Reset The Software Move SEL Select INPUT 3 Auto Link Use this function to automatically turn the TV on using your VCR, laserdisc player or DVD player. - Setup Set The Inputs Input1 : **** Input2 : **** Input3 : **** Auto Link : Off Input-Front : **** HDMI1 : ****... will automatically turn on and switch to INPUT 3. 1. Press the CURSOR PAD ̆ or ̄ to watch a movie with your HITACHI Plasma TV Remote Control. Set AV Net Use this , turn on . This is convenient when you want to highlight the video inputs. 2.
... IR Out CableCARD Information Select The Quick Start Option Reset The Software Move SEL Select INPUT 3 Auto Link Use this function to automatically turn the TV on using your VCR, laserdisc player or DVD player. - Setup Set The Inputs Input1 : **** Input2 : **** Input3 : **** Auto Link : Off Input-Front : **** HDMI1 : ****... will automatically turn on and switch to INPUT 3. 1. Press the CURSOR PAD ̆ or ̄ to watch a movie with your HITACHI Plasma TV Remote Control. Set AV Net Use this , turn on . This is convenient when you want to highlight the video inputs. 2.

Owners Guide
Page 73
...SELECT button. Press and hold desired button to transfer the command to learn (Ex. AV Net Setup Wizard : A/V Receiver Setup VOL̆ Transfer was successful. TV Softkeys POWER CH̆ VOL̆ MUTE CH̄ VOL̄ AUDIO SOURCE 1 SOURCE 2 SOURCE 3 SOURCE 4 SOURCE 5 SOURCE 6 SOURCE 7 SOURCE 8... show you connect the video or audio output of your A/V Receiver remote control while pointing directly at the learning AV NET sensor of the Plasma TV (located at the lower right corner of the screen) at a distance of 3. 13. AV Net Setup Wizard : Custom Settings Select the...
...SELECT button. Press and hold desired button to transfer the command to learn (Ex. AV Net Setup Wizard : A/V Receiver Setup VOL̆ Transfer was successful. TV Softkeys POWER CH̆ VOL̆ MUTE CH̄ VOL̄ AUDIO SOURCE 1 SOURCE 2 SOURCE 3 SOURCE 4 SOURCE 5 SOURCE 6 SOURCE 7 SOURCE 8... show you connect the video or audio output of your A/V Receiver remote control while pointing directly at the learning AV NET sensor of the Plasma TV (located at the lower right corner of the screen) at a distance of 3. 13. AV Net Setup Wizard : Custom Settings Select the...
Owners Guide
Page 75
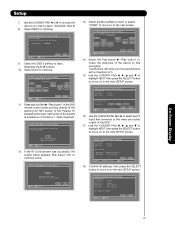
... : Custom Settings Press and hold the ̈ "Play button" of the DVD remote control while pointing directly at the learning AV NET sensor of the Plasma TV (located at the lower right corner of the screen) at a distance of the DVD. 17. Use the CURSOR PAD ̇, ̈, ̆ and ... to move on to the next SETUP screen. AV Net Setup Wizard : Custom Settings Custom settings Please choose the device you wish to continue setup. TV Softkeys POWER ̇̇ ̈̈ MENU ̇̇ ̈ ̈̈ SELECT ̆ ̈ EXIT ̄ ̇ Move SEL Select B ack ...
... : Custom Settings Press and hold the ̈ "Play button" of the DVD remote control while pointing directly at the learning AV NET sensor of the Plasma TV (located at the lower right corner of the screen) at a distance of the DVD. 17. Use the CURSOR PAD ̇, ̈, ̆ and ... to move on to the next SETUP screen. AV Net Setup Wizard : Custom Settings Custom settings Please choose the device you wish to continue setup. TV Softkeys POWER ̇̇ ̈̈ MENU ̇̇ ̈ ̈̈ SELECT ̆ ̈ EXIT ̄ ̇ Move SEL Select B ack ...
Owners Guide
Page 78
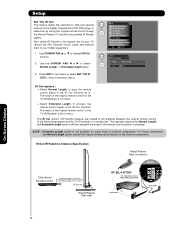
... control to hide and operate external home theater components (VCR, DVD player or cable box) by using their original remote control through the Hitachi Plasma TV set with the provided IR Blaster cables. The IR Out options (IR Passthru feature) are related to highlight IR Out function. 2. Setup...at the external components. Also called IR Passthru, this feature will let your TV receive the (IR) infrarred control codes and transmit them to the TV IR Receiver is 5m or more IR Sensor Hitachi Plasma Side View 78 The operation distance for Normal Length and Extended Length options ...
... control to hide and operate external home theater components (VCR, DVD player or cable box) by using their original remote control through the Hitachi Plasma TV set with the provided IR Blaster cables. The IR Out options (IR Passthru feature) are related to highlight IR Out function. 2. Setup...at the external components. Also called IR Passthru, this feature will let your TV receive the (IR) infrarred control codes and transmit them to the TV IR Receiver is 5m or more IR Sensor Hitachi Plasma Side View 78 The operation distance for Normal Length and Extended Length options ...


