Owners Guide
Page 2
... connected to the receiver be connected to the point of HITACHI plasma televisions. plasma television. 1. Do not use Please fill out your HITACHI plasma television. Do not block any way, such as close to the grounding grounding-type plug. Do not install near water. 6. apparatus. 11. Refer all warnings. 4. If an outside antenna is intended to alert the user to the presence of important operating and maintenance (servicing) instructions...
... connected to the receiver be connected to the point of HITACHI plasma televisions. plasma television. 1. Do not use Please fill out your HITACHI plasma television. Do not block any way, such as close to the grounding grounding-type plug. Do not install near water. 6. apparatus. 11. Refer all warnings. 4. If an outside antenna is intended to alert the user to the presence of important operating and maintenance (servicing) instructions...

Owners Guide
Page 3
... plasma television. Important Safety Instructions Power source This plasma television is designed to a cable system providing such programming. For more than the specified voltage. Note • There are no user serviceable parts inside the plasma television. • Model and serial numbers are left on plasma display panel. Never connect the plasma television to minimize image retention on the screen for home and other outlet unless the blades and ground terminal can expose you to view encrypted digital programming...
... plasma television. Important Safety Instructions Power source This plasma television is designed to a cable system providing such programming. For more than the specified voltage. Note • There are no user serviceable parts inside the plasma television. • Model and serial numbers are left on plasma display panel. Never connect the plasma television to minimize image retention on the screen for home and other outlet unless the blades and ground terminal can expose you to view encrypted digital programming...
Owners Guide
Page 5
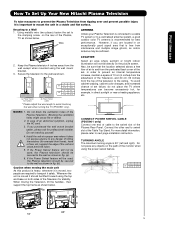
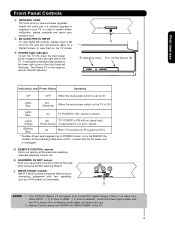
... color changes, and increased chance of set to the clamping screw on the picture screen. Connect the other end to the wall as shown in direct sunlight or near a heating appliance, etc. 30 cm (12 inches) 10 cm (4 inches) 10 cm (4 inches) CONNECT POWER SWIVEL CABLE (P50X901 only) Connect one end of cable to mount the unit in a stable and flat surface. First time use How To Set Up Your New Hitachi Plasma Television...
... color changes, and increased chance of set to the clamping screw on the picture screen. Connect the other end to the wall as shown in direct sunlight or near a heating appliance, etc. 30 cm (12 inches) 10 cm (4 inches) 10 cm (4 inches) CONNECT POWER SWIVEL CABLE (P50X901 only) Connect one end of cable to mount the unit in a stable and flat surface. First time use How To Set Up Your New Hitachi Plasma Television...
Owners Guide
Page 11
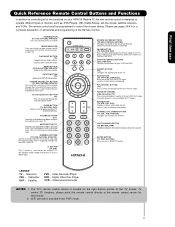
... controlling all features and programming of TV and other devices when the remote is displayed. Cable Box SAT - GUIDE BUTTON (TV, SAT/CBL, PVR) Accesses the program guide of the Remote Control. Press it a third time to control the device selected. SOURCE ACCESS BUTTONS (TV, DVD, PVR/VCR, SAT/CBL) Changes the mode of devices, such as channel information. PIP CONTROL BUTTON (TV) Press to show and change the Closed Caption mode. Digital Video Disc Player VCR - The TV's remote control sensor is located on your HITACHI Plasma TV, the new remote control...
... controlling all features and programming of TV and other devices when the remote is displayed. Cable Box SAT - GUIDE BUTTON (TV, SAT/CBL, PVR) Accesses the program guide of the Remote Control. Press it a third time to control the device selected. SOURCE ACCESS BUTTONS (TV, DVD, PVR/VCR, SAT/CBL) Changes the mode of devices, such as channel information. PIP CONTROL BUTTON (TV) Press to show and change the Closed Caption mode. Digital Video Disc Player VCR - The TV's remote control sensor is located on your HITACHI Plasma TV, the new remote control...
Owners Guide
Page 12
... this button is pressed for power ON, the function of the TV screen. NOTE: The Main Power button is located on the TV screen. After this button to turn the Plasma Television ON/OFF. When the "MAIN POWER" button is unplugged, the clock will stop and may eventually reset itself. For P60X901 model this button to access the INPUT menu. The "MAIN POWER" button must unplug AC cord from TV set to ON condition (lights red) for stand-by remote control.
... this button is pressed for power ON, the function of the TV screen. NOTE: The Main Power button is located on the TV screen. After this button to turn the Plasma Television ON/OFF. When the "MAIN POWER" button is unplugged, the clock will stop and may eventually reset itself. For P60X901 model this button to access the INPUT menu. The "MAIN POWER" button must unplug AC cord from TV set to ON condition (lights red) for stand-by remote control.
Owners Guide
Page 13
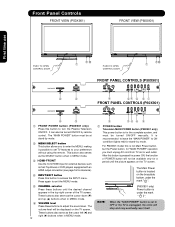
... view them on the lower right side of the TV. 13 A red stand-by mode (lights red) when not in use Front Panel Controls ቩ UPGRADE CARD This card slot is for remote ON/OFF operation. When the main power switch is shown. picture is set to receive written notification, please complete and return your equipment's remote control at this capability, such as a DVD player or Camcorders. ቭ NOTES: 1. In order to Off. Blinking Blue...
... view them on the lower right side of the TV. 13 A red stand-by mode (lights red) when not in use Front Panel Controls ቩ UPGRADE CARD This card slot is for remote ON/OFF operation. When the main power switch is shown. picture is set to receive written notification, please complete and return your equipment's remote control at this capability, such as a DVD player or Camcorders. ቭ NOTES: 1. In order to Off. Blinking Blue...
Owners Guide
Page 14
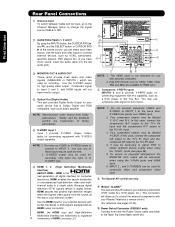
...; Antenna Input To switch between Cable and Air input, go to the Channel Manager option to change the signal source CABLE or AIR. ቭ ባ Audio/Video Inputs 1, 2 and 3 ቦ ቢ By using the INPUTS button, the CURSOR PAD (̆ ቩ and ̄), and the SELECT button or CURSOR PAD ቪ ̈ of Dolby Laboratories. ቦ S-VIDEO Input 1 Input 1 provide S-VIDEO (Super Video) jacks for connecting equipment with S-VIDEO output capability. Component signal to the Table Top Stand Base...
...; Antenna Input To switch between Cable and Air input, go to the Channel Manager option to change the signal source CABLE or AIR. ቭ ባ Audio/Video Inputs 1, 2 and 3 ቦ ቢ By using the INPUTS button, the CURSOR PAD (̆ ቩ and ̄), and the SELECT button or CURSOR PAD ቪ ̈ of Dolby Laboratories. ቦ S-VIDEO Input 1 Input 1 provide S-VIDEO (Super Video) jacks for connecting equipment with S-VIDEO output capability. Component signal to the Table Top Stand Base...
Owners Guide
Page 17
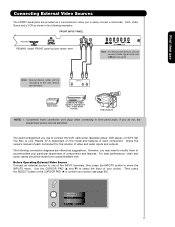
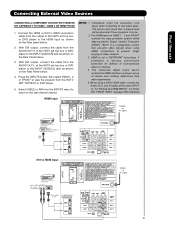
... external source to your particular assortment of video and audio inputs and outputs. First time use to connect the VCR, camcorder, laserdisc player, DVD player, or HDTV Set Top Box to one of your choice (see page 29). The exact arrangement you do not, the played back picture may need to modify them to show the INPUTS menu. If you use Note : Special device cables will be according to confirm your choice. HDMI...
... external source to your particular assortment of video and audio inputs and outputs. First time use to connect the VCR, camcorder, laserdisc player, DVD player, or HDTV Set Top Box to one of your choice (see page 29). The exact arrangement you do not, the played back picture may need to modify them to show the INPUTS menu. If you use Note : Special device cables will be according to confirm your choice. HDMI...
Owners Guide
Page 21
... HDTV set top box or DVD player to a display. 4. With DVI output, connect the cable from the AUDIO OUT R of video contents. 3. Select CABLE or AIR from the INPUTS menu to return to view the program from the output of the HDTV set -up of HDTV Set-Top-Box or DVD Player OUTPUT LR DIGITAL OUTPUT DVI to -point connection for reference). NOTE: 1. Completely insert the connection cord plugs when connecting to the HDMI input as shown on the Rear panel below . 3. The picture and sound that encrypts video signals when using a DVI to HDMI cable, connect...
... HDTV set top box or DVD player to a display. 4. With DVI output, connect the cable from the AUDIO OUT R of video contents. 3. Select CABLE or AIR from the INPUTS menu to return to view the program from the output of the HDTV set -up of HDTV Set-Top-Box or DVD Player OUTPUT LR DIGITAL OUTPUT DVI to -point connection for reference). NOTE: 1. Completely insert the connection cord plugs when connecting to the HDMI input as shown on the Rear panel below . 3. The picture and sound that encrypts video signals when using a DVI to HDMI cable, connect...

Owners Guide
Page 24
... of four external components. 2. First time use your HITACHI remote control to control the Audio/Video equipment command without the equipment's remote control. Therefore, you wish to work. Connect the IR Blaster cable to the IR OUT terminal of the external components infrared sensor for the AV Net to control. Video Audio TV Guide On Screen Channel Manager Locks Timers Setup Power Swivel Move SEL Select Setup Set the Menu Options Set The Screen Saver Set The Inputs Set The AV NET Set The Closed Captions Set The...
... of four external components. 2. First time use your HITACHI remote control to control the Audio/Video equipment command without the equipment's remote control. Therefore, you wish to work. Connect the IR Blaster cable to the IR OUT terminal of the external components infrared sensor for the AV Net to control. Video Audio TV Guide On Screen Channel Manager Locks Timers Setup Power Swivel Move SEL Select Setup Set the Menu Options Set The Screen Saver Set The Inputs Set The AV NET Set The Closed Captions Set The...
Owners Guide
Page 29
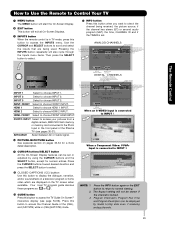
... with Closed Captioning. HDMI- The Remote Control How to Use the Remote to Control Your TV ¶ MENU button The MENU button will start the On-Screen Display. º EXIT button This button will exit all On-Screen Displays. ¾ INPUTS button When the remote control is in TV mode, press this button to display the dialogue, narration, and/or sound effects of a television program or home video which are being received, the picture source, if the channel has stereo (ST) or second audio program (SAP), the time, CHANNEL...
... with Closed Captioning. HDMI- The Remote Control How to Use the Remote to Control Your TV ¶ MENU button The MENU button will start the On-Screen Display. º EXIT button This button will exit all On-Screen Displays. ¾ INPUTS button When the remote control is in TV mode, press this button to display the dialogue, narration, and/or sound effects of a television program or home video which are being received, the picture source, if the channel has stereo (ST) or second audio program (SAP), the time, CHANNEL...
Owners Guide
Page 37
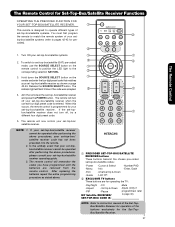
... TV buttons These buttons are removed from the remote control. To switch to set -top-box/satellite receiver when the correct four digit preset code is entered. The remote will remember the codes you have programmed until the batteries are for operating the TV : -Day/Night -Aspect -PIP -CC -Vol Up & Down -Pause MY Satellite RECEIVER/ SET-TOP-BOX CODE IS: -Mute -Inputs (Only if programmed, refer to page 40). The remote will flash 3 times if...
... TV buttons These buttons are removed from the remote control. To switch to set -top-box/satellite receiver when the correct four digit preset code is entered. The remote will remember the codes you have programmed until the batteries are for operating the TV : -Day/Night -Aspect -PIP -CC -Vol Up & Down -Pause MY Satellite RECEIVER/ SET-TOP-BOX CODE IS: -Mute -Inputs (Only if programmed, refer to page 40). The remote will flash 3 times if...
Owners Guide
Page 45
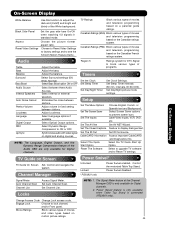
...Adjust volume in standard mode. Set Sleep Timer intervals Audio Source Internal Speakers Select between three Audio Sources. Set The IR Out Set IR Out source. Set Day/Night picture mode settings. Adjust Loudness. Change Access Code Change Lock access code. Feature to prevent screen burn. TV Guide on digital and analog sources. Set Channel List. Set The Menu Options Set The Screen Saver Set The Inputs Set The AV Net Set The Closed Captions Choose English, French, or Spanish text and Background. Reset Video Settings Choose to Reset Video Settings to factory settings...
...Adjust volume in standard mode. Set Sleep Timer intervals Audio Source Internal Speakers Select between three Audio Sources. Set The IR Out Set IR Out source. Set Day/Night picture mode settings. Adjust Loudness. Change Access Code Change Lock access code. Feature to prevent screen burn. TV Guide on digital and analog sources. Set Channel List. Set The Menu Options Set The Screen Saver Set The Inputs Set The AV Net Set The Closed Captions Choose English, French, or Spanish text and Background. Reset Video Settings Choose to Reset Video Settings to factory settings...
Owners Guide
Page 46
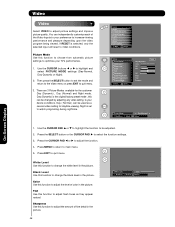
.... Black Level Use this can be changed by adjusting any video setting to optimize your TV's performance. 1. You can be adjusted. 2. Video Audio TV Guide On Screen Channel Manager Locks Timers Setup Power Swivel Move SEL Select Video Cable Picture Mode Day (Dynamic) OR White Level Black Level 100% 50% Color 62% Tint Sharpness 50% Color Temperature High Black Enhancement High Contrast Mode Dynamic Move SEL Select OR Picture Mode Day (Dynamic) Next/Prev Select SEL Return On-Screen Display 1. If RESET is...
.... Black Level Use this can be changed by adjusting any video setting to optimize your TV's performance. 1. You can be adjusted. 2. Video Audio TV Guide On Screen Channel Manager Locks Timers Setup Power Swivel Move SEL Select Video Cable Picture Mode Day (Dynamic) OR White Level Black Level 100% 50% Color 62% Tint Sharpness 50% Color Temperature High Black Enhancement High Contrast Mode Dynamic Move SEL Select OR Picture Mode Day (Dynamic) Next/Prev Select SEL Return On-Screen Display 1. If RESET is...
Owners Guide
Page 56
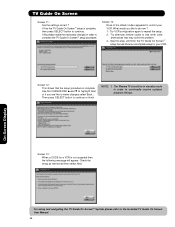
... that may solve the problem. 3.- What would you are like to control your VCR. Then press SELECT button to repeat the setup. 2.- Check the setup as mentioned then select Next. Screen 14: None of the Hitachi codes appeared to do now ? 1.- The Plasma TV should be in standby mode in order to continually receive updated program listings. If Yes the TV Guide On ScreenTM setup is not accepted then...
... that may solve the problem. 3.- What would you are like to control your VCR. Then press SELECT button to repeat the setup. 2.- Check the setup as mentioned then select Next. Screen 14: None of the Hitachi codes appeared to do now ? 1.- The Plasma TV should be in standby mode in order to continually receive updated program listings. If Yes the TV Guide On ScreenTM setup is not accepted then...
Owners Guide
Page 69
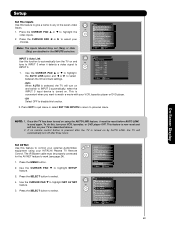
... no remote control button is turned on by AUTO LINK, the TV will turn your TV as described above. 2. Setup Set The Inputs Use this function. 2. Press the SELECT button to highlight the video inputs. 2. Auto When AUTO is convenient when you want to work (see page 24). 1. This is selected, the TV will automatically turn the TV on using the AUTO LINK feature, it detects a video signal to control your external Audio/Video equipment using your HITACHI Plasma TV Remote Control. The IR Blaster cable...
... no remote control button is turned on by AUTO LINK, the TV will turn your TV as described above. 2. Setup Set The Inputs Use this function. 2. Press the SELECT button to highlight the video inputs. 2. Auto When AUTO is convenient when you want to work (see page 24). 1. This is selected, the TV will automatically turn the TV on using the AUTO LINK feature, it detects a video signal to control your external Audio/Video equipment using your HITACHI Plasma TV Remote Control. The IR Blaster cable...
Owners Guide
Page 72
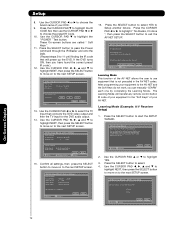
... Hitachi (26/77) IR Code Set 1 (1/5) 16. The Learning Mode will power up the DVD. Learning Mode (Example: A/V Receiver Setup) 1. Press the SELECT button to select. 4. Inputs settings Video Input Audio Input Not Connected Not Connected Move Change Source B ack SEL Select Next 15. Press the SELECT button to start the SETUP WIZARD. AV Net Setup Wizard : Device Settings DVD Settings Brand Name Hitachi (26/77) IR Code Set 1 (1/5) Transmission Test Test Button POWER Move Change Brand Name CH Back Next 13. Use...
... Hitachi (26/77) IR Code Set 1 (1/5) 16. The Learning Mode will power up the DVD. Learning Mode (Example: A/V Receiver Setup) 1. Press the SELECT button to select. 4. Inputs settings Video Input Audio Input Not Connected Not Connected Move Change Source B ack SEL Select Next 15. Press the SELECT button to start the SETUP WIZARD. AV Net Setup Wizard : Device Settings DVD Settings Brand Name Hitachi (26/77) IR Code Set 1 (1/5) Transmission Test Test Button POWER Move Change Brand Name CH Back Next 13. Use...
Owners Guide
Page 85
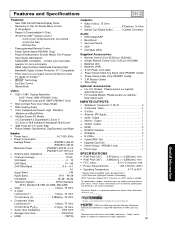
... are subject to change without prior notice. Control your Digital Camera SD Memory Card) • TV Guide On ScreenTM • Technology • Lip Sync Control • Game Mode Video: • 1920 x 1080 Display Resolution ALIS 2 Panel 1080i (P50X901 Only) Progressive Scan panel 1080P (P60X901 Only) • High-Contrast Pure-Color Glass Shield • Wide Viewing Angle • Color Temperature Presets: High, Standard, Medium and Black/White. • Multiple Screen Fill Modes (4:3 Standard/4:3 Expanded/4:3 Zoom...
... are subject to change without prior notice. Control your Digital Camera SD Memory Card) • TV Guide On ScreenTM • Technology • Lip Sync Control • Game Mode Video: • 1920 x 1080 Display Resolution ALIS 2 Panel 1080i (P50X901 Only) Progressive Scan panel 1080P (P60X901 Only) • High-Contrast Pure-Color Glass Shield • Wide Viewing Angle • Color Temperature Presets: High, Standard, Medium and Black/White. • Multiple Screen Fill Modes (4:3 Standard/4:3 Expanded/4:3 Zoom...
Owners Guide
Page 180
... SOFTWARE. loss of use of the Software in any person or entity who intends to transmit or transport the Software back to such country; (ii) to return such flash card or other intellectual property laws and treaties. End User License Agreement for HITACHI DTV Software (this Agreement, except to you " or "your"), in your capacity as the owner of a HITACHI brand digital television...
... SOFTWARE. loss of use of the Software in any person or entity who intends to transmit or transport the Software back to such country; (ii) to return such flash card or other intellectual property laws and treaties. End User License Agreement for HITACHI DTV Software (this Agreement, except to you " or "your"), in your capacity as the owner of a HITACHI brand digital television...
Owners Guide
Page 191
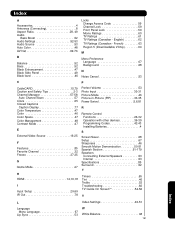
... Perfect Volume 53 Photo Input 30-31 Picture Mode 46 Picture-in-Pictur e (PIP 33-35 Power Swivel 5,6,81 R Remote Control Functions 26-32 Operation with other devices 36-39 Programming Codes 42-43 Installing Batteries 4 S Screen Saver 68 Setup 67 Sharpness 46 Smooth Motion Demonstration 50-51 Spanish Section 91-179 Speakers Connecting External Speakers 53 Internal 53 Specifications 85 Surround 52 T Timers 65 Tint 46 Treble 52 Troubleshooting 82 TV Guide On...
... Perfect Volume 53 Photo Input 30-31 Picture Mode 46 Picture-in-Pictur e (PIP 33-35 Power Swivel 5,6,81 R Remote Control Functions 26-32 Operation with other devices 36-39 Programming Codes 42-43 Installing Batteries 4 S Screen Saver 68 Setup 67 Sharpness 46 Smooth Motion Demonstration 50-51 Spanish Section 91-179 Speakers Connecting External Speakers 53 Internal 53 Specifications 85 Surround 52 T Timers 65 Tint 46 Treble 52 Troubleshooting 82 TV Guide On...


