Owners Guide
Page 3
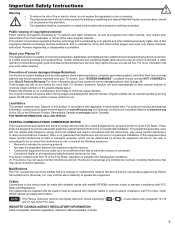
...other sources, may require prior authorization from the broadcaster or owner of the FCC Rules. For more information call your Plasma TV This digital television is intended for more of this copyright protection technology must be replaced with a protective earthing connection.... to minimize image retention. Reverse engineering or disassembly is not a malfunction but it helps to correct the interference by Hitachi Home Electronics (America), Inc, may cause undesired operation. INDUSTRY CANADA AGENCY REGULATORY INFORMATION Cable Compatible Television Apparatus- The ...
...other sources, may require prior authorization from the broadcaster or owner of the FCC Rules. For more information call your Plasma TV This digital television is intended for more of this copyright protection technology must be replaced with a protective earthing connection.... to minimize image retention. Reverse engineering or disassembly is not a malfunction but it helps to correct the interference by Hitachi Home Electronics (America), Inc, may cause undesired operation. INDUSTRY CANADA AGENCY REGULATORY INFORMATION Cable Compatible Television Apparatus- The ...
Owners Guide
Page 6
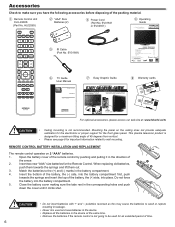
... for a maximum tilting angle of the battery, the (+) side, into place. This plasma television product is located on the back and right side of the packing material. When replacing... in the device. • Replace all the batteries in the device at : www.hitachi.us/tv CAUTION • Ceiling mounting is not going to swell or rupture resulting in the battery... batteries for P50X902 IMPORTANT SAFETY INSTRUCTIONS 2-4 FIRST TIME USE 5-17 THE REMOTE CONTROL 18-32 ON-SCREEN DISPLAY 33-49 USEFUL INFORMATION 50-57 LIMITED WARRANTY 58 END USER LICENSE AGREEMENT FOR HITACHI DTV SOFTWARE ...
... for a maximum tilting angle of the battery, the (+) side, into place. This plasma television product is located on the back and right side of the packing material. When replacing... in the device. • Replace all the batteries in the device at : www.hitachi.us/tv CAUTION • Ceiling mounting is not going to swell or rupture resulting in the battery... batteries for P50X902 IMPORTANT SAFETY INSTRUCTIONS 2-4 FIRST TIME USE 5-17 THE REMOTE CONTROL 18-32 ON-SCREEN DISPLAY 33-49 USEFUL INFORMATION 50-57 LIMITED WARRANTY 58 END USER LICENSE AGREEMENT FOR HITACHI DTV SOFTWARE ...
Owners Guide
Page 7
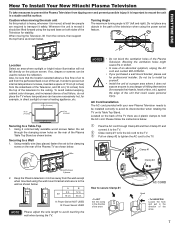
... wire length to secure Clamp #1 • To SET Set the clamp in the direction of the TV there are required to the ceiling. NOTES • Do not block the ventilation holes of the Plasma TV as shown below . Do not try to install by yourself. • Install the unit at least... TIME USE 30° How To Install Your New Hitachi Plasma Television To take measures to prevent the Plasma Television from tipping over and prevent possible injury it is important to avoid its disconnection when rotating the TV on its Table Top Stand. Wire 50" 10 cm. 30 cm. Please follow the instructions ...
... wire length to secure Clamp #1 • To SET Set the clamp in the direction of the TV there are required to the ceiling. NOTES • Do not block the ventilation holes of the Plasma TV as shown below . Do not try to install by yourself. • Install the unit at least... TIME USE 30° How To Install Your New Hitachi Plasma Television To take measures to prevent the Plasma Television from tipping over and prevent possible injury it is important to avoid its disconnection when rotating the TV on its Table Top Stand. Wire 50" 10 cm. 30 cm. Please follow the instructions ...
Owners Guide
Page 8
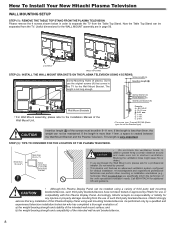
...be maintained. Spring Washer (C) Plane Washer (D) Wall Mount Bracket (E) Example : A = B+C+D+E A: 13~15 mm. Do not install by Hitachi for any installation of this Plasma Display Panel. Screw Length (A) Screw Mounting Holes (4 places). B: 9~11 mm. This length is less than 9mm, the weight can be ... Stand. C: 1 mm. How To Install Your New Hitachi Plasma Television WALL MOUNTING SETUP STEP (1) : REMOVE THE TABLE TOP STAND FROM THE PLASMA TELEVISION Please remove the 4 screws shown below in order to separate the TV from the use of such third party brackets/devices. Now...
...be maintained. Spring Washer (C) Plane Washer (D) Wall Mount Bracket (E) Example : A = B+C+D+E A: 13~15 mm. Do not install by Hitachi for any installation of this Plasma Display Panel. Screw Length (A) Screw Mounting Holes (4 places). B: 9~11 mm. This length is less than 9mm, the weight can be ... Stand. C: 1 mm. How To Install Your New Hitachi Plasma Television WALL MOUNTING SETUP STEP (1) : REMOVE THE TABLE TOP STAND FROM THE PLASMA TELEVISION Please remove the 4 screws shown below in order to separate the TV from the use of such third party brackets/devices. Now...
Owners Guide
Page 9
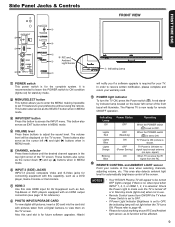
...when selecting channels, adjusting volume, etc. picture is ON; REMOTE CONTROL and AMBIENT LIGHT sensor Point your warranty card. NOTES • Your HITACHI Plasma TV will be displayed on the TV screen. Side Panel Jacks & Controls FRONT VIEW FIRST TIME USE CH t i CURSOR + VO_L r u INPUT/ EXIT e MENU / ... input when INPUT 1, 2, 3, or HDMI 1, 2, 3 is for future software upgrades. CHANNEL selector Press these buttons to your TV. The Plasma TV is for the complete system. This button also serves as EXIT button when in MENU mode. These buttons also serve as the cursor...
...when selecting channels, adjusting volume, etc. picture is ON; REMOTE CONTROL and AMBIENT LIGHT sensor Point your warranty card. NOTES • Your HITACHI Plasma TV will be displayed on the TV screen. Side Panel Jacks & Controls FRONT VIEW FIRST TIME USE CH t i CURSOR + VO_L r u INPUT/ EXIT e MENU / ... input when INPUT 1, 2, 3, or HDMI 1, 2, 3 is for future software upgrades. CHANNEL selector Press these buttons to your TV. The Plasma TV is for the complete system. This button also serves as EXIT button when in MENU mode. These buttons also serve as the cursor...

Owners Guide
Page 10
... output to your audio device that pristine high-definition images retain the highest video quality from a HDMI source or digital program channel to the TV's PR input. • Your component outputs may use with their original remote through your AV Equipment such as a DVD player or Set ... be used for connecting equipment with an HDMI output connection. 10 HDMI, the HDMI logo and High-Definition Multimedia Interface are available for your Hitachi Plasma Television. (For more detail see page 41). NOTES • The HDMI input is Dolby® Digital and PCM compatible, such as an...
... output to your audio device that pristine high-definition images retain the highest video quality from a HDMI source or digital program channel to the TV's PR input. • Your component outputs may use with their original remote through your AV Equipment such as a DVD player or Set ... be used for connecting equipment with an HDMI output connection. 10 HDMI, the HDMI logo and High-Definition Multimedia Interface are available for your Hitachi Plasma Television. (For more detail see page 41). NOTES • The HDMI input is Dolby® Digital and PCM compatible, such as an...
Owners Guide
Page 11
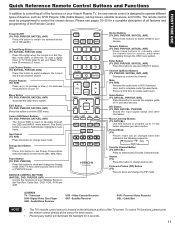
...complete mute if pressed twice. Television DVD- Menu Button (TV, DVD, PVR/VCR, SAT/CBL, AVR) Accesses the OSD menu system. Mute (TV, AVR) Reduces the audio level to 50% if pressed once, and to enter/access Favorite Channel mode. Macro Learning Buttons (TV, SAT/CBL) Use this button to use as , DVD... Please see pages 18~32 for numeric entry when navigating through the OSD and INPUT menu system, The Select button is located on your Hitachi Plasma TV, the new remote control is designed to increase or down the channel. Also used to Set/Activate highlighted menu items. Input Select...
...complete mute if pressed twice. Television DVD- Menu Button (TV, DVD, PVR/VCR, SAT/CBL, AVR) Accesses the OSD menu system. Mute (TV, AVR) Reduces the audio level to 50% if pressed once, and to enter/access Favorite Channel mode. Macro Learning Buttons (TV, SAT/CBL) Use this button to use as , DVD... Please see pages 18~32 for numeric entry when navigating through the OSD and INPUT menu system, The Select button is located on your Hitachi Plasma TV, the new remote control is designed to increase or down the channel. Also used to Set/Activate highlighted menu items. Input Select...
Owners Guide
Page 12
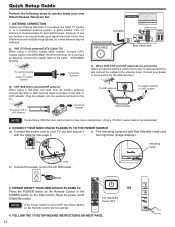
...set and secure it c). POWER ON/OFF YOUR NEW HITACHI PLASMA TV. Quick Setup Guide Perform the following steps to the AC Wall outlet . 3. CONNECT YOUR NEW HITACHI PLASMA TV TO THE POWER SOURCE a). Connect the power cord to quickly setup your Plasma Television is recommended for best performance. Plug the adapter ...(Standby mode) and with the cable tie (see page 7) . or For Stand-By Power OFF 4. ANTENNA CONNECTION Unless your new Hitachi Plasma Television Set. 1. However, if you have an antenna, connect the coaxial cable to your dealer or service store for power on the...
...set and secure it c). POWER ON/OFF YOUR NEW HITACHI PLASMA TV. Quick Setup Guide Perform the following steps to the AC Wall outlet . 3. CONNECT YOUR NEW HITACHI PLASMA TV TO THE POWER SOURCE a). Connect the power cord to quickly setup your Plasma Television is recommended for best performance. Plug the adapter ...(Standby mode) and with the cable tie (see page 7) . or For Stand-By Power OFF 4. ANTENNA CONNECTION Unless your new Hitachi Plasma Television Set. 1. However, if you have an antenna, connect the coaxial cable to your dealer or service store for power on the...
Owners Guide
Page 13
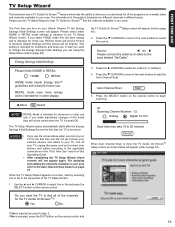
...available in this will not be brighter. Press the q CURSOR to move to the next window to find the channels available in your Hitachi Plasma TV the Energy Savings Initial Settings screen will appear (refer to 20 minutes Cancel When Auto Channel Scan is turned Off. Press the q CURSOR... you make adjustment changes in your area refer to select the source. Source: t Air u Please connect the antenna or cable to the TV Setup Wizard screen. If you want to change the Energy Savings Initial Settings you turn on a weekly basis and channels available in your devices...
...available in this will not be brighter. Press the q CURSOR to move to the next window to find the channels available in your Hitachi Plasma TV the Energy Savings Initial Settings screen will appear (refer to 20 minutes Cancel When Auto Channel Scan is turned Off. Press the q CURSOR... you make adjustment changes in your area refer to select the source. Source: t Air u Please connect the antenna or cable to the TV Setup Wizard screen. If you want to change the Energy Savings Initial Settings you turn on a weekly basis and channels available in your devices...

Owners Guide
Page 14
...) OR VIDEO (Yellow) L (White) R (Red) L (White) OUTPUT VIDEO L R R (Red) Home video game system NOTES • Completely insert connection cord plugs when connecting to accommodate your Plasma TV is dependent on the model and features of video and audio inputs and outputs. If both are often color-coded. The exact arrangement you may...
...) OR VIDEO (Yellow) L (White) R (Red) L (White) OUTPUT VIDEO L R R (Red) Home video game system NOTES • Completely insert connection cord plugs when connecting to accommodate your Plasma TV is dependent on the model and features of video and audio inputs and outputs. If both are often color-coded. The exact arrangement you may...

Owners Guide
Page 17
...HDMI] DIGITAVLCORUTPUT [DVI] CamAuLcdoiordOeurtRput (White) (Red) Home video game system CONNECTING AN EXTERNAL AUDIO AMPLIFIER To monitor the audio level of the Plasma TV to the HDMI input as shown on the right. 3. The OPTICAL OUT terminal outputs all audio sources to rear panel jacks. FIRST TIME...terminals, i.e. The picture and sound that is played back will be abnormal if the connection is controlled by the amplifier, not by the Plasma Television. With DVI output, connect the audio cables from the INPUTS menu. 17 Match colors of video contents. • HDMI is loose....
...HDMI] DIGITAVLCORUTPUT [DVI] CamAuLcdoiordOeurtRput (White) (Red) Home video game system CONNECTING AN EXTERNAL AUDIO AMPLIFIER To monitor the audio level of the Plasma TV to the HDMI input as shown on the right. 3. The OPTICAL OUT terminal outputs all audio sources to rear panel jacks. FIRST TIME...terminals, i.e. The picture and sound that is played back will be abnormal if the connection is controlled by the amplifier, not by the Plasma Television. With DVI output, connect the audio cables from the INPUTS menu. 17 Match colors of video contents. • HDMI is loose....

Owners Guide
Page 18
... to controlling all the functions on your Plasma TV, select TV by CHANNEL (CH) UP ( ) or CHANNEL (CH) DOWN ( ). Basic operation keys are used to operate different types of VCRs, cable boxes, set on or off when the remote is GREEN. To operate your HITACHI Plasma TV, the new remote control is designed to... select channels, lock access code, etc. The TV mode indicator will blink, indicating that the remote will know you wish to tune then press the ...
... to controlling all the functions on your Plasma TV, select TV by CHANNEL (CH) UP ( ) or CHANNEL (CH) DOWN ( ). Basic operation keys are used to operate different types of VCRs, cable boxes, set on or off when the remote is GREEN. To operate your HITACHI Plasma TV, the new remote control is designed to... select channels, lock access code, etc. The TV mode indicator will blink, indicating that the remote will know you wish to tune then press the ...
Owners Guide
Page 21
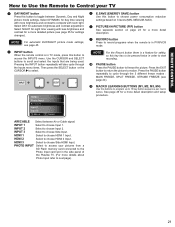
... when the remote is a feature for a more brightness and contrast to compete with room light. INPUT button When the remote control is in TV mode, press this button to choose power consumption reduction settings based on page 23 for safety; Pressing the INPUT button repeatedly will also cycle through... Use the Remote to Control your pictures from a SD Flash memory card connected to the Photo Input card slot in the side panel of the Plasma TV. (For more details about Photo Input refer to next page). 21 HDMI 2 Select to access the INPUTS menu. Press the PAUSE button repeatedly ...
... when the remote is a feature for a more brightness and contrast to compete with room light. INPUT button When the remote control is in TV mode, press this button to choose power consumption reduction settings based on page 23 for safety; Pressing the INPUT button repeatedly will also cycle through... Use the Remote to Control your pictures from a SD Flash memory card connected to the Photo Input card slot in the side panel of the Plasma TV. (For more details about Photo Input refer to next page). 21 HDMI 2 Select to access the INPUTS menu. Press the PAUSE button repeatedly ...

Owners Guide
Page 22
... from the MMC/SD memory cards using the Photo Input slot in individual photos. • The screen may not be displayed on the TV set displays only digital pictures from picture to 8th: letters. ABCD1234.jpg). 1st character: letters; 2nd to 4th: letters or numbers; ...for viewing digital still pictures from 5, 10 and 30 seconds. Next SEL Thumbnail [0-9] Jump Rotate SLIDESHOW Select this menu item to start a slideshow of your Hitachi Plasma Television. 1. Use the CURSOR PAD buttons , , or and the SELECT button to stop on a sub directory name with a "dcim" file name format...
... from the MMC/SD memory cards using the Photo Input slot in individual photos. • The screen may not be displayed on the TV set displays only digital pictures from picture to 8th: letters. ABCD1234.jpg). 1st character: letters; 2nd to 4th: letters or numbers; ...for viewing digital still pictures from 5, 10 and 30 seconds. Next SEL Thumbnail [0-9] Jump Rotate SLIDESHOW Select this menu item to start a slideshow of your Hitachi Plasma Television. 1. Use the CURSOR PAD buttons , , or and the SELECT button to stop on a sub directory name with a "dcim" file name format...

Owners Guide
Page 23
... inputs on both the main picture and sub picture simultaneously with every press of the CURSOR PAD buttons. Please refer to watch a TV program while viewing other programs from the INPUTS menu. The Orange highlighted channel display will appear in one Tuner technology designed for PIP ... the PICTURE-IN-PICTURE modes table in PIP mode. To prevent a pattern burn, occasionally move the subpicture. Picture-In Picture (PIP) Your HITACHI Plasma TV incorporates one of three different modes (POP, PIP, or SPLIT), depending on the INPUT signal. To select between main picture and PIP sub ...
... inputs on both the main picture and sub picture simultaneously with every press of the CURSOR PAD buttons. Please refer to watch a TV program while viewing other programs from the INPUTS menu. The Orange highlighted channel display will appear in one Tuner technology designed for PIP ... the PICTURE-IN-PICTURE modes table in PIP mode. To prevent a pattern burn, occasionally move the subpicture. Picture-In Picture (PIP) Your HITACHI Plasma TV incorporates one of three different modes (POP, PIP, or SPLIT), depending on the INPUT signal. To select between main picture and PIP sub ...
Owners Guide
Page 33
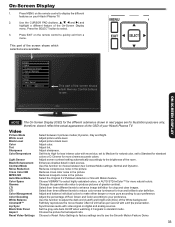
...with more blue, set to Medium for natural color, set to Standard for standard colors or D.Cinema for more pure according to your Hitachi Plasma TV. Use the CURSOR PAD (buttons, , , and ) and highlight a different feature of the screen shows which Remote Control buttons to ...pictures of the screen shows which selections are for true and brilliant color definition. Adjust and balance individual colors to your Hitachi Plasma TV. 2. Video Picture Mode White Level Black Level Color Tint Sharpness ColorTemperature Light Sensor Black Enhancement Contrast Mode Noise Reduction Cross...
...with more blue, set to Medium for natural color, set to Standard for standard colors or D.Cinema for more pure according to your Hitachi Plasma TV. Use the CURSOR PAD (buttons, , , and ) and highlight a different feature of the screen shows which Remote Control buttons to ...pictures of the screen shows which selections are for true and brilliant color definition. Adjust and balance individual colors to your Hitachi Plasma TV. 2. Video Picture Mode White Level Black Level Color Tint Sharpness ColorTemperature Light Sensor Black Enhancement Contrast Mode Noise Reduction Cross...

Owners Guide
Page 39
...1 [Unknown] Dolby Digital On Internal Speakers This function is noisy, it will control the left to the rear of the Plasma TV internal speakers. Auto Noise Cancel This function eliminates the noise between Dolby®Digital and PCM. Language Some programs transmit more speakers...decoder; Select this function to ON to two or three dimensions. PCM.- Video Audio TV Guide On Screen Channel Manager Locks + Timers Setup Power Swivel Move SEL Select Audio Treble 50% Bass 50% Balance L R Surround Off OR Bass Boost Audio Source Off Stereo Internal Speakers ...
...1 [Unknown] Dolby Digital On Internal Speakers This function is noisy, it will control the left to the rear of the Plasma TV internal speakers. Auto Noise Cancel This function eliminates the noise between Dolby®Digital and PCM. Language Some programs transmit more speakers...decoder; Select this function to ON to two or three dimensions. PCM.- Video Audio TV Guide On Screen Channel Manager Locks + Timers Setup Power Swivel Move SEL Select Audio Treble 50% Bass 50% Balance L R Surround Off OR Bass Boost Audio Source Off Stereo Internal Speakers ...
Owners Guide
Page 40
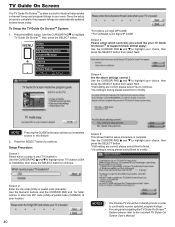
... the SELECT button then select Next: Screen 4: Are the above settings correct ? To Setup the TV Guide On ScreenTM System: 1. Press the MENU button. Press the SELECT button to this feature. 2. Video Audio TV Guide On Screen Channel Manager Locks + Timers Setup Power Swivel Move SEL Select *For USA is... NOTE Pressing the GUIDE button also allows you would like your TV Guide On ScreenTM to highlight your location. 40 NOTES • The Plasma TV should be in standby mode in : Use the CURSOR PAD and to highlight your TV location (USA or CANADA), then press the SELECT button to ...
... the SELECT button then select Next: Screen 4: Are the above settings correct ? To Setup the TV Guide On ScreenTM System: 1. Press the MENU button. Press the SELECT button to this feature. 2. Video Audio TV Guide On Screen Channel Manager Locks + Timers Setup Power Swivel Move SEL Select *For USA is... NOTE Pressing the GUIDE button also allows you would like your TV Guide On ScreenTM to highlight your location. 40 NOTES • The Plasma TV should be in standby mode in : Use the CURSOR PAD and to highlight your TV location (USA or CANADA), then press the SELECT button to ...

Owners Guide
Page 46
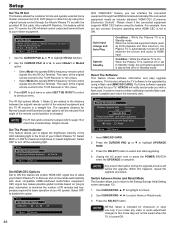
...the option. 4. Picture Energy Saving This function allows you to change the contrast of three different languages for all on-screen displays. 1. Video Audio TV Guide On Screen Channel Manager Locks + Timers Setup Power Swivel Move SEL Select Setup Setup The Menu Options Set The Screen Saver Set The Energy.... Option 1 The whole picture will shift every 20 minutes by one pixel. Setup Select SETUP when setting your Hitachi Plasma TV. Set The Menu Options Setup the Language and Contrast of time. Set The Energy Options Use this feature to highlight Energy Options. 2. Use the...
...the option. 4. Picture Energy Saving This function allows you to change the contrast of three different languages for all on-screen displays. 1. Video Audio TV Guide On Screen Channel Manager Locks + Timers Setup Power Swivel Move SEL Select Setup Setup The Menu Options Set The Screen Saver Set The Energy.... Option 1 The whole picture will shift every 20 minutes by one pixel. Setup Select SETUP when setting your Hitachi Plasma TV. Set The Menu Options Setup the Language and Contrast of time. Set The Energy Options Use this feature to highlight Energy Options. 2. Use the...
Owners Guide
Page 48
...Move SEL Return 48 With "HDMI-CEC" feature, you can interface the connected equipment through the Hitachi Plasma TV set with the provided IR Out cable. Condition : While the Plasma TV is 10m (max). • Select Mode 2 to operate 56KHz frequency remote control signals thru the...Upgrade Now Please Insert MMC card before using this happens, repeat the upgrade procedure. Switch between the original remote control of your Hitachi Plasma TV to discover and communicate automatically with a flash card. Insert MMC/SD CARD. 2. Press the SELECT button to previous menu. ...
...Move SEL Return 48 With "HDMI-CEC" feature, you can interface the connected equipment through the Hitachi Plasma TV set with the provided IR Out cable. Condition : While the Plasma TV is 10m (max). • Select Mode 2 to operate 56KHz frequency remote control signals thru the...Upgrade Now Please Insert MMC card before using this happens, repeat the upgrade procedure. Switch between the original remote control of your Hitachi Plasma TV to discover and communicate automatically with a flash card. Insert MMC/SD CARD. 2. Press the SELECT button to previous menu. ...


