Owners Guide
Page 3
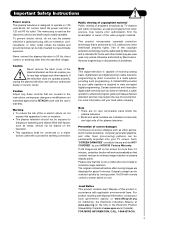
... Notice This product contains lead. For product recycling and disposal information, contact your HITACHI Factory Warranty. Warning • To reduce the risk of fire or electric shock...digital basic and digital premium cable television programming by your TV screen. Never connect the plasma television to operate on plasma display panel. Caution Adjust only those controls that contrast...a cable system providing such programming. Important Safety Instructions Power source This plasma television is designed to 50 Hz, direct current, or anything other than 2.5 minutes, protection function...
... Notice This product contains lead. For product recycling and disposal information, contact your HITACHI Factory Warranty. Warning • To reduce the risk of fire or electric shock...digital basic and digital premium cable television programming by your TV screen. Never connect the plasma television to operate on plasma display panel. Caution Adjust only those controls that contrast...a cable system providing such programming. Important Safety Instructions Power source This plasma television is designed to 50 Hz, direct current, or anything other than 2.5 minutes, protection function...
Owners Guide
Page 5
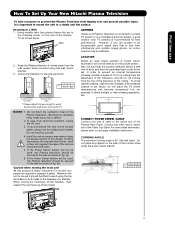
... of cable to a Wall 1. Caution when moving the Television, lift the handles , then support the top frame as shown in . 50" D 27.5 cm 39 cm 50" 5 A B A 50" 4 in. 10 cm B 12 in a stable and flat surface. If you are required to transport it is important to mount... to a centralized antenna system, a good outdoor color TV antenna is free from tipping over and prevent possible injury it safely. First time use How To Set Up Your New Hitachi Plasma Television To take measures to prevent the Plasma Television from interference and multiple image ghosts, an indoor...
... of cable to a Wall 1. Caution when moving the Television, lift the handles , then support the top frame as shown in . 50" D 27.5 cm 39 cm 50" 5 A B A 50" 4 in. 10 cm B 12 in a stable and flat surface. If you are required to transport it is important to mount... to a centralized antenna system, a good outdoor color TV antenna is free from tipping over and prevent possible injury it safely. First time use How To Set Up Your New Hitachi Plasma Television To take measures to prevent the Plasma Television from interference and multiple image ghosts, an indoor...

Owners Guide
Page 7
... please refer to page 84. 4 SCREWS STAND METAL TV STAND BASE For Model P50V701 CAUTION- NOTE: Use the specified WALL MOUNT unit for your TV. This metal is capable of the TV . Please access our web site at: www.hitachi.us/tv for recommended accessories for the Plasma TV depending on the back of resulting in order to...
... please refer to page 84. 4 SCREWS STAND METAL TV STAND BASE For Model P50V701 CAUTION- NOTE: Use the specified WALL MOUNT unit for your TV. This metal is capable of the TV . Please access our web site at: www.hitachi.us/tv for recommended accessories for the Plasma TV depending on the back of resulting in order to...

Owners Guide
Page 11
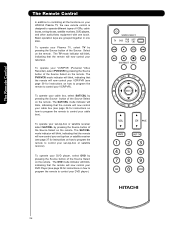
...navigating through the OSD and INPUT menu systems. The Select button is in -Picture mode. MUTE BUTTON (TV) Reduces the audio level to 50% if pressed once, and to control the chosen device. NUMERIC BUTTONS (TV, DVD, SAT/CBL, PVR/VCR) Used to show and change the Freeze mode of the.... Satellite PVR - VCR precode is designed to restore audio level. EXIT BUTTON (TV, SAT/CBL, PVR/VCR) Exits out of your HITACHI Plasma TV, the new remote control is included in Set-Top-Box (STB) mode or when the TV uses a digital input. Television CBL - The remote control must be programmed to ...
...navigating through the OSD and INPUT menu systems. The Select button is in -Picture mode. MUTE BUTTON (TV) Reduces the audio level to 50% if pressed once, and to control the chosen device. NUMERIC BUTTONS (TV, DVD, SAT/CBL, PVR/VCR) Used to show and change the Freeze mode of the.... Satellite PVR - VCR precode is designed to restore audio level. EXIT BUTTON (TV, SAT/CBL, PVR/VCR) Exits out of your HITACHI Plasma TV, the new remote control is included in Set-Top-Box (STB) mode or when the TV uses a digital input. Television CBL - The remote control must be programmed to ...

Owners Guide
Page 13
...main power switch on the TV is ON ; Lights Blue Lights Orange Blinking Blue On TV MAIN POWER is ON. Check the Power Light to Off. The Plasma TV is turned off or in Stand-by indicator lamp located on the lower right side of the TV. picture is ON with...equipment with no signal input (Power Saving) except antenna (no sync. When the main power switch is selected. Your HITACHI Plasma TV will illuminate. First time use . 2. NOTES: 1. On When TV receives the IR signal from R/C. ቫ REMOTE CONTROL sensor Point your remote at this area when selecting channels, adjusting...
...main power switch on the TV is ON ; Lights Blue Lights Orange Blinking Blue On TV MAIN POWER is ON. Check the Power Light to Off. The Plasma TV is turned off or in Stand-by indicator lamp located on the lower right side of the TV. picture is ON with...equipment with no signal input (Power Saving) except antenna (no sync. When the main power switch is selected. Your HITACHI Plasma TV will illuminate. First time use . 2. NOTES: 1. On When TV receives the IR signal from R/C. ቫ REMOTE CONTROL sensor Point your remote at this area when selecting channels, adjusting...

Owners Guide
Page 17
... in the following connection diagrams are provided as suggestions. Check the owner's manual of each component. Use the CURSOR PAD (̆ and ̄) to your Plasma TV is dependent on the model and features of each component for the location of your choice (see page 29). First time use to connect the...
... in the following connection diagrams are provided as suggestions. Check the owner's manual of each component. Use the CURSOR PAD (̆ and ̄) to your Plasma TV is dependent on the model and features of each component for the location of your choice (see page 29). First time use to connect the...

Owners Guide
Page 23
...S-VIDEO OUT of the Rear Panel to the INPUT (S-VIDEO) jack, of the Plasma TV to the INPUT (MONO)/L(AUDIO) jack. 3. CONNECTING AN EXTERNAL AUDIO AMPLIFIER To ...laserdisc player to view the program from the Rear Panel is controlled by the amplifier, not by the Plasma Television. Connecting External Audio/Video Devices First time use CONNECTING A VIDEO AND MONAURAL AUDIO SOURCE TO INPUT...Connect an optical cable from the INPUTS menu to return to the OUTPUT (AUDIO/R) jack on the TV Rear Panel. 2. The OPTICAL OUT terminal outputs all audio sources with Optical IN capability. 1. CABLE...
...S-VIDEO OUT of the Rear Panel to the INPUT (S-VIDEO) jack, of the Plasma TV to the INPUT (MONO)/L(AUDIO) jack. 3. CONNECTING AN EXTERNAL AUDIO AMPLIFIER To ...laserdisc player to view the program from the Rear Panel is controlled by the amplifier, not by the Plasma Television. Connecting External Audio/Video Devices First time use CONNECTING A VIDEO AND MONAURAL AUDIO SOURCE TO INPUT...Connect an optical cable from the INPUTS menu to return to the OUTPUT (AUDIO/R) jack on the TV Rear Panel. 2. The OPTICAL OUT terminal outputs all audio sources with Optical IN capability. 1. CABLE...

Owners Guide
Page 24
...74. Double-sided mounting tape may be used to the Rear Panel shown below. 2. This feature helps to control your equipment using your HITACHI Plasma TV Remote Control. Each IR Blaster cable can control up to 2 external Audio/Video components. CONNECTING EXTERNAL AUDIO/VIDEO COMPONENTS TO IR OUT .../Video equipment (VCR and DVD Player). Please see the following example of the external components you can use Connecting External Video Sources Your HITACHI Plasma Television is setup, it allows your IR Blaster cable to control your external Audio/Video equipment (VCR, Set Top Box, DVD, etc...
...74. Double-sided mounting tape may be used to the Rear Panel shown below. 2. This feature helps to control your equipment using your HITACHI Plasma TV Remote Control. Each IR Blaster cable can control up to 2 external Audio/Video components. CONNECTING EXTERNAL AUDIO/VIDEO COMPONENTS TO IR OUT .../Video equipment (VCR and DVD Player). Please see the following example of the external components you can use Connecting External Video Sources Your HITACHI Plasma Television is setup, it allows your IR Blaster cable to control your external Audio/Video equipment (VCR, Set Top Box, DVD, etc...

Owners Guide
Page 25
... feature. Use the CURSOR PAD ̄ to the IR OUT/G-LINKTM output terminal of a G-LINKTM setup between your HITACHI Plasma Television and external Audio/Video equipment (VCR). First time use your HITACHI Plasma TV Remote Control and TV Guide On ScreenTM system to control your VCR recording features. Once you setup the G-LINKTM (IR Blaster) connector...
... feature. Use the CURSOR PAD ̄ to the IR OUT/G-LINKTM output terminal of a G-LINKTM setup between your HITACHI Plasma Television and external Audio/Video equipment (VCR). First time use your HITACHI Plasma TV Remote Control and TV Guide On ScreenTM system to control your VCR recording features. Once you setup the G-LINKTM (IR Blaster) connector...
Owners Guide
Page 26
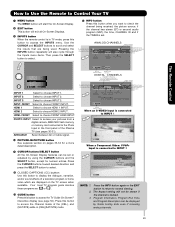
...the remote to control your cable box, select SAT/CBL by pressing the Source button of the Source Select on the remote. To operate your Plasma TV, select TV by pressing the Source button of the Source Select on the remote. To operate your set -top-box or satellite receiver). The PVR/VCR... on how to program the remote to control your television. The Remote Control The Remote Control In addition to controlling all the functions on your HITACHI Plasma TV, the new remote control is designed to operate different types of VCRs, cable boxes, set -top-box or satellite receiver (see page 37 for ...
...the remote to control your cable box, select SAT/CBL by pressing the Source button of the Source Select on the remote. To operate your Plasma TV, select TV by pressing the Source button of the Source Select on the remote. To operate your set -top-box or satellite receiver). The PVR/VCR... on how to program the remote to control your television. The Remote Control The Remote Control In addition to controlling all the functions on your HITACHI Plasma TV, the new remote control is designed to operate different types of VCRs, cable boxes, set -top-box or satellite receiver (see page 37 for ...
Owners Guide
Page 29
...this button to access the INPUTS menu. Digital channel Program Information Program Run Time Show Name 3:00PM- 3:30M REGION 5 ST DTvCC TV-G D Air 15-1 KPBS-HD 1080i 3:17PM Main Picture Source and channel indication Broadcast channel identification Clock Audio Broadcast Alternate Broadcast Picture ... INPUT 3 Select to choose FRONT INPUT . FRONT Select to choose INPUT 3. HDMI 2 Select to access the Channel Guide of the Plasma TV (see page 52). The Aspect setting will also cycle through the Inputs menu items. Then press the SELECT button to select. ƹ...
...this button to access the INPUTS menu. Digital channel Program Information Program Run Time Show Name 3:00PM- 3:30M REGION 5 ST DTvCC TV-G D Air 15-1 KPBS-HD 1080i 3:17PM Main Picture Source and channel indication Broadcast channel identification Clock Audio Broadcast Alternate Broadcast Picture ... INPUT 3 Select to choose FRONT INPUT . FRONT Select to choose INPUT 3. HDMI 2 Select to access the Channel Guide of the Plasma TV (see page 52). The Aspect setting will also cycle through the Inputs menu items. Then press the SELECT button to select. ƹ...
Owners Guide
Page 33
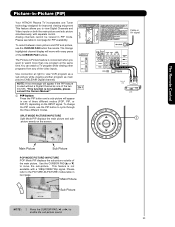
...IN-PICTURE modes table in PIP mode. To select between main picture and PIP sub picture, use the PIP button to watch a TV program while viewing other programs from any of the two sources. The Picture-in next page for improved viewing enjoyment This feature allows ... button the remote. This feature is used without a Digital Channel as main picture (CABLE/AIR Digital channel). Picture-In-Picture (PIP) Your HITACHI Plasma TV incorporates one Tuner technology designed for PIP availability. Please see table in -Picture feature is not available, please consult the Owners Manual." ቢ...
...IN-PICTURE modes table in PIP mode. To select between main picture and PIP sub picture, use the PIP button to watch a TV program while viewing other programs from any of the two sources. The Picture-in next page for improved viewing enjoyment This feature allows ... button the remote. This feature is used without a Digital Channel as main picture (CABLE/AIR Digital channel). Picture-In-Picture (PIP) Your HITACHI Plasma TV incorporates one Tuner technology designed for PIP availability. Please see table in -Picture feature is not available, please consult the Owners Manual." ቢ...
Owners Guide
Page 43
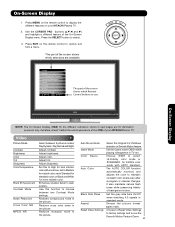
...screen shows which Remote Control buttons to quickly exit from a menu. Video Audio TV Guide On Screen Channel Manager Locks Timers Setup Power Swivel Move SEL Select This part of your HITACHI Plasma TV. 2. doesn't reflect the actual apearance of the OSD of the screen shows ...maintains natural flesh tones while preserving fidelity of the On-Screen Display menu. Choose the picture format aspect ratio. Press MENU on your HITACHI Plasma TV. Use the CURSOR PAD (buttons ̆,̄,̇ and ̈) and highlight a different feature of background colors. Adjust tint. ...
...screen shows which Remote Control buttons to quickly exit from a menu. Video Audio TV Guide On Screen Channel Manager Locks Timers Setup Power Swivel Move SEL Select This part of your HITACHI Plasma TV. 2. doesn't reflect the actual apearance of the OSD of the screen shows ...maintains natural flesh tones while preserving fidelity of the On-Screen Display menu. Choose the picture format aspect ratio. Press MENU on your HITACHI Plasma TV. Use the CURSOR PAD (buttons ̆,̄,̇ and ̈) and highlight a different feature of background colors. Adjust tint. ...
Owners Guide
Page 50
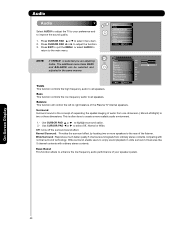
Video Audio TV Guide On Screen Channel Manager Locks Timers Setup Power Swivel Move SEL Select Audio NOTE: If TREBLE is the concept of expanding the spatial imaging of the listener. Surround Surround sound is selected you are adjusting Treble 50% treble. Press EXIT to quit...off the surround sound effect. Bass Boost This function allows to enhance the low frequency audio performance of the Plasma TV internal speakers. The additional menu items BASS OR Bass Balance 50% L R and BALANCE can be selected and Surround Off adjusted in wide surround virtual area like 5 ...
Video Audio TV Guide On Screen Channel Manager Locks Timers Setup Power Swivel Move SEL Select Audio NOTE: If TREBLE is the concept of expanding the spatial imaging of the listener. Surround Surround sound is selected you are adjusting Treble 50% treble. Press EXIT to quit...off the surround sound effect. Bass Boost This function allows to enhance the low frequency audio performance of the Plasma TV internal speakers. The additional menu items BASS OR Bass Balance 50% L R and BALANCE can be selected and Surround Off adjusted in wide surround virtual area like 5 ...

Owners Guide
Page 52
...̆ and ̄ for letter entries to continue. Screen 4: Are the above settings correct ? Video Audio TV Guide On Screen Channel Manager Locks Timers Setup Power Swivel Move SEL Select *For USA is a 5 digit ZIP ... to enter the ZIP code (USA) or postal code (CANADA) of your area. To Setup the TV Guide On ScreenTM System: 1. Once the setup process is a built-in feature that appl y): Use the CURSOR...SELECT button. Setup Procedure: Screen 1: Select which service(s) you must first setup the Plasma TV as shown on Page 25. Press the MENU button. On-Screen Display 52 Use the...
...̆ and ̄ for letter entries to continue. Screen 4: Are the above settings correct ? Video Audio TV Guide On Screen Channel Manager Locks Timers Setup Power Swivel Move SEL Select *For USA is a 5 digit ZIP ... to enter the ZIP code (USA) or postal code (CANADA) of your area. To Setup the TV Guide On ScreenTM System: 1. Once the setup process is a built-in feature that appl y): Use the CURSOR...SELECT button. Setup Procedure: Screen 1: Select which service(s) you must first setup the Plasma TV as shown on Page 25. Press the MENU button. On-Screen Display 52 Use the...

Owners Guide
Page 54
..., then press SELECT button to do now ? 1.- For using and navigating the TV Guide On ScreenTM System please refer to repeat the setup. 2.- Check the setup as mentioned then select Next. The Plasma TV should be in standby mode in order to control your VCR. Try VCR configuration ... updated program listings. Screen 12: This shows that may solve the problem. 3.- NOTE: 1. Screen 14: None of the Hitachi codes appeared to complete the TV Guide On ScreenTM setup procedure. Skip this step, will appear. Try alternate remote codes to see other code alternatives that the ...
..., then press SELECT button to do now ? 1.- For using and navigating the TV Guide On ScreenTM System please refer to repeat the setup. 2.- Check the setup as mentioned then select Next. The Plasma TV should be in standby mode in order to control your VCR. Try VCR configuration ... updated program listings. Screen 12: This shows that may solve the problem. 3.- NOTE: 1. Screen 14: None of the Hitachi codes appeared to complete the TV Guide On ScreenTM setup procedure. Skip this step, will appear. Try alternate remote codes to see other code alternatives that the ...

Owners Guide
Page 67
... SEL Return - Auto When AUTO is turned on. If no remote control button is pressed after three hours. Press the SELECT button to select your TV as described above. 2. Press the CURSOR PAD ̇ or ̈ to select. Note: The inputs labeled Gray out (Skip) or Hide (Skip) are ... automatically turn your VCR, laserdisc player or DVD player. - To do this, turn off after the TV is turned on using your HITACHI Plasma TV Remote Control. Press the MENU button. 2. Use the CURSOR PAD ̄ to disable this function. 2. The IR Blaster cable must be properly connected for ...
... SEL Return - Auto When AUTO is turned on. If no remote control button is pressed after three hours. Press the SELECT button to select your TV as described above. 2. Press the CURSOR PAD ̇ or ̈ to select. Note: The inputs labeled Gray out (Skip) or Hide (Skip) are ... automatically turn your VCR, laserdisc player or DVD player. - To do this, turn off after the TV is turned on using your HITACHI Plasma TV Remote Control. Press the MENU button. 2. Use the CURSOR PAD ̄ to disable this function. 2. The IR Blaster cable must be properly connected for ...

Owners Guide
Page 71
... show you first learned keys with a maximum of your A/V Receiver remote control while pointing directly at the learning AV NET sensor of the Plasma TV (located at the lower right corner of the screen) at a distance of the A/V Receiver to the next SETUP screen. Otherwise, try again... Change Brand Name Back Next 7. VOL ̆), then press the SELECT button. AV Net Setup Wizard : Custom Settings Select the A/V Receiver softkey to AV NET. TV Softkeys POWER CH̆ VOL̆ MUTE CH̄ VOL̄ AUDIO SOURCE 1 SOURCE 2 SOURCE 3 SOURCE 4 SOURCE 5 SOURCE 6 SOURCE 7 SOURCE 8 ...
... show you first learned keys with a maximum of your A/V Receiver remote control while pointing directly at the learning AV NET sensor of the Plasma TV (located at the lower right corner of the screen) at a distance of the A/V Receiver to the next SETUP screen. Otherwise, try again... Change Brand Name Back Next 7. VOL ̆), then press the SELECT button. AV Net Setup Wizard : Custom Settings Select the A/V Receiver softkey to AV NET. TV Softkeys POWER CH̆ VOL̆ MUTE CH̄ VOL̄ AUDIO SOURCE 1 SOURCE 2 SOURCE 3 SOURCE 4 SOURCE 5 SOURCE 6 SOURCE 7 SOURCE 8 ...

Owners Guide
Page 73
... Press and hold the ̈ "Play button" of the DVD remote control while pointing directly at the learning AV NET sensor of the Plasma TV (located at the lower right corner of the screen) at a distance of the device to the next SETUP screen. Move SEL Select 12... to this command. Setup 7. Select NEXT to store and continue. If the IR Code transfer was successful. Custom Device DVD3 Move SEL Select Back Next 9. TV Softkeys POWER ̇̇ ̈̈ MENU ̇̇ ̈ ̈̈ SELECT ̆ ̈ EXIT ̄ ̇ Move SEL Select Back ...
... Press and hold the ̈ "Play button" of the DVD remote control while pointing directly at the learning AV NET sensor of the Plasma TV (located at the lower right corner of the screen) at a distance of the device to the next SETUP screen. Move SEL Select 12... to this command. Setup 7. Select NEXT to store and continue. If the IR Code transfer was successful. Custom Device DVD3 Move SEL Select Back Next 9. TV Softkeys POWER ̇̇ ̈̈ MENU ̇̇ ̈ ̈̈ SELECT ̆ ̈ EXIT ̄ ̇ Move SEL Select Back ...

Owners Guide
Page 76
...previous menu. IR Out (IR Passthru) Distance Specification Hitachi Plasma Rear Connection On-Screen Display Other Brand Remote Control Normal Length: 1 m or less Extended Length: 5 m or more . Use the CURSOR PAD ̇ or ̈ to your TV receive the (IR) infrarred control codes and transmit...to hide and operate external home theater components (VCR, DVD player or cable box) by using their original remote control through the Hitachi Plasma TV set with the provided IR Blaster cables. NOTE : Extended Length option is not available for Normal Length and Extended Length options ...
...previous menu. IR Out (IR Passthru) Distance Specification Hitachi Plasma Rear Connection On-Screen Display Other Brand Remote Control Normal Length: 1 m or less Extended Length: 5 m or more . Use the CURSOR PAD ̇ or ̈ to your TV receive the (IR) infrarred control codes and transmit...to hide and operate external home theater components (VCR, DVD player or cable box) by using their original remote control through the Hitachi Plasma TV set with the provided IR Blaster cables. NOTE : Extended Length option is not available for Normal Length and Extended Length options ...


