Owners Guide
Page 3
...FOR MORE INFORMATION, CALL 1-800-HITACHI. 3 Important Safety Instructions Power source This plasma television is required to view encrypted digital programming. Never connect the plasma television to prevent blade exposure.... images are covered in the instructions, as this can be fully inserted to 50 Hz, direct current, or anything other intellectual property rights. Note This digital television... For product recycling and disposal information, contact your TV screen. To prevent electric shock, do not expose this is capable of a set-top box. Insert the power cord into a...
...FOR MORE INFORMATION, CALL 1-800-HITACHI. 3 Important Safety Instructions Power source This plasma television is required to view encrypted digital programming. Never connect the plasma television to prevent blade exposure.... images are covered in the instructions, as this can be fully inserted to 50 Hz, direct current, or anything other intellectual property rights. Note This digital television... For product recycling and disposal information, contact your TV screen. To prevent electric shock, do not expose this is capable of a set-top box. Insert the power cord into a...
Owners Guide
Page 5
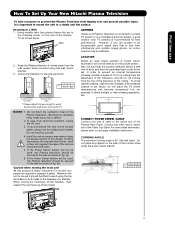
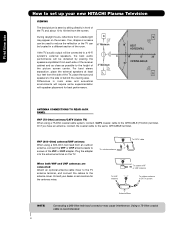
...monitor when using the power swivel feature. Wire ANTENNA Unless your Plasma Television is moved, two people are located in . 50" D 27.5 cm 39 cm 50" 5 A B A 50" 4 in. 10 cm B 12 in. 30 cm ...of set to the clamping screw on both sides of the Television for stability. First time use How To Set Up Your New Hitachi Plasma Television To take measures to prevent the Plasma Television...cm (4 inches) CONNECT POWER SWIVEL CABLE Connect one end of cable to the swivel slot of the Plasma TV as shown in a stable and flat surface. Whenever the unit is important to mount the unit in...
...monitor when using the power swivel feature. Wire ANTENNA Unless your Plasma Television is moved, two people are located in . 50" D 27.5 cm 39 cm 50" 5 A B A 50" 4 in. 10 cm B 12 in. 30 cm ...of set to the clamping screw on both sides of the Television for stability. First time use How To Set Up Your New Hitachi Plasma Television To take measures to prevent the Plasma Television...cm (4 inches) CONNECT POWER SWIVEL CABLE Connect one end of cable to the swivel slot of the Plasma TV as shown in a stable and flat surface. Whenever the unit is important to mount the unit in...
Owners Guide
Page 6
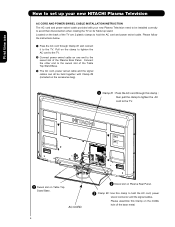
First time use How to set up your new Plasma Television need to be installed correctly to hold the AC cord and power swivel...connector and the signal cables. Please assemble this Clamp on its Table top stand. AC CORD 6 · Swivel slot on Plasma Rear Panel. » Clamp #2: Use this clamp ; Please follow the instructions below. ³ Pass the AC cord through ... disconnection when rotating the TV on the middle hole of the Table Top Stand Base. » The AC cord, power swivel cable and the signal cables can all be held together with your new HITACHI Plasma Television AC CORD AND ...
First time use How to set up your new Plasma Television need to be installed correctly to hold the AC cord and power swivel...connector and the signal cables. Please assemble this Clamp on its Table top stand. AC CORD 6 · Swivel slot on Plasma Rear Panel. » Clamp #2: Use this clamp ; Please follow the instructions below. ³ Pass the AC cord through ... disconnection when rotating the TV on the middle hole of the Table Top Stand Base. » The AC cord, power swivel cable and the signal cables can all be held together with your new HITACHI Plasma Television AC CORD AND ...

Owners Guide
Page 7
First time use How to set up your new HITACHI Plasma Television SETTING FOR WALL MOUNTING STEP (1) : Please locate the STAND METAL on the size of the WALL MOUNT assembly please refer to page 84. 4 SCREWS STAND METAL TV STAND BASE For Model P50V701 CAUTION- so it needs to remove 4 screws from the STAND base in instability...
First time use How to set up your new HITACHI Plasma Television SETTING FOR WALL MOUNTING STEP (1) : Please locate the STAND METAL on the size of the WALL MOUNT assembly please refer to page 84. 4 SCREWS STAND METAL TV STAND BASE For Model P50V701 CAUTION- so it needs to remove 4 screws from the STAND base in instability...
Owners Guide
Page 8
... be located in a different section of the picture screen center. Consult your new HITACHI Plasma Television VIEWING The best picture is recommended. R 4" Minimum If the TV's audio output will be connected to a Hi-Fi system's external speakers, the best audio performance will require some ...Ohm) terminal. During daylight hours, reflections from the screen. Plug the adapter into the antenna terminal on the screen. First time use How to set up your dealer or service store for best performance. 4" Minimum L S 70 BEST HORIZONTAL 5' 10' 15' 20' VIEWING ANGLE 70 S ANTENNA...
... be located in a different section of the picture screen center. Consult your new HITACHI Plasma Television VIEWING The best picture is recommended. R 4" Minimum If the TV's audio output will be connected to a Hi-Fi system's external speakers, the best audio performance will require some ...Ohm) terminal. During daylight hours, reflections from the screen. Plug the adapter into the antenna terminal on the screen. First time use How to set up your dealer or service store for best performance. 4" Minimum L S 70 BEST HORIZONTAL 5' 10' 15' 20' VIEWING ANGLE 70 S ANTENNA...

Owners Guide
Page 9
... guide is broadcast on different channels in different areas. Please use How to set up your new HITACHI Plasma Television TV SETUP WIZARD This television has a TV Guide On ScreenTM feature which has the ability to your TV, turn on your TV for your area. If you see this screen when you want the... TV to find the channels with the information for the first time and did ...
... guide is broadcast on different channels in different areas. Please use How to set up your new HITACHI Plasma Television TV SETUP WIZARD This television has a TV Guide On ScreenTM feature which has the ability to your TV, turn on your TV for your area. If you see this screen when you want the... TV to find the channels with the information for the first time and did ...
Owners Guide
Page 10
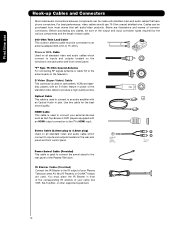
... a high quality picture. "F" Type 75-Ohm Coaxial Antenna For connecting RF signals (antenna or cable TV) to the antenna jack on camcorders, VCRs and laserdisc players with an HDMI output connection to the TV's HDMI input. S-Video (Super Video) Cable This connector is used on the television. Use this... connectors. HDMI Cable This cable is used to connect your external devices such as Set-Top-Boxes or DVD players equipped with an S-Video feature in front of the corresponding IR window of your Plasma Television when AV Net, IR Passthru or G-LINKTM feature are illustrations and names of...
... a high quality picture. "F" Type 75-Ohm Coaxial Antenna For connecting RF signals (antenna or cable TV) to the antenna jack on camcorders, VCRs and laserdisc players with an HDMI output connection to the TV's HDMI input. S-Video (Super Video) Cable This connector is used on the television. Use this... connectors. HDMI Cable This cable is used to connect your external devices such as Set-Top-Boxes or DVD players equipped with an S-Video feature in front of the corresponding IR window of your Plasma Television when AV Net, IR Passthru or G-LINKTM feature are illustrations and names of...

Owners Guide
Page 11
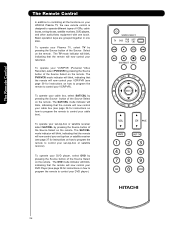
... of all of the functions on the right bottom portion of the TV. VCR precode is located on your HITACHI Plasma TV, the new remote control is in -Picture mode. MUTE BUTTON (TV) Reduces the audio level to 50% if pressed once, and to control the device selected. Press it... Displays various information on and off. Television CBL - DAY/NIGHT BUTTON (TV) Toggles picture mode settings between the current and last channel viewed. GUIDE BUTTON (TV, SAT/CBL, PVR) Accesses the program guide of TV and other devices when the remote is used to Select/Activate highlighted menu ...
... of all of the functions on the right bottom portion of the TV. VCR precode is located on your HITACHI Plasma TV, the new remote control is in -Picture mode. MUTE BUTTON (TV) Reduces the audio level to 50% if pressed once, and to control the device selected. Press it... Displays various information on and off. Television CBL - DAY/NIGHT BUTTON (TV) Toggles picture mode settings between the current and last channel viewed. GUIDE BUTTON (TV, SAT/CBL, PVR) Accesses the program guide of TV and other devices when the remote is used to Select/Activate highlighted menu ...
Owners Guide
Page 12
...appears in MENU mode. ቨ POWER button Television MAIN POWER button This power button is recommended to leave the "MAIN POWER" to turn the Plasma Television ON/OFF. This button also serves as the SELECT button when in MENU mode. ቤ HDMI-FRONT Use the front HDMI input for ...(lights red) for the complete system, and must be displayed on the broadside bottom, under the mark " ". Hitachi will notify you to enter the MENU, making it possible to set to your TV. The Main Power button is required for future software upgrades. The "MAIN POWER" button must be turned ON/OFF...
...appears in MENU mode. ቨ POWER button Television MAIN POWER button This power button is recommended to leave the "MAIN POWER" to turn the Plasma Television ON/OFF. This button also serves as the SELECT button when in MENU mode. ቤ HDMI-FRONT Use the front HDMI input for ...(lights red) for the complete system, and must be displayed on the broadside bottom, under the mark " ". Hitachi will notify you to enter the MENU, making it possible to set to your TV. The Main Power button is required for future software upgrades. The "MAIN POWER" button must be turned ON/OFF...

Owners Guide
Page 13
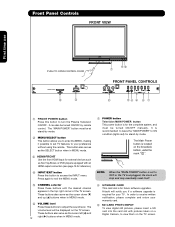
Your HITACHI Plasma TV will illuminate. Lights Red OFF. (Stand-by mode (lights red) when not in use Front Panel Controls ቪ POWER light indicator To turn ON/OFF the "MAIN POWER" of the TV. NOTES: 1. When the main power switch is shown. picture is set to Off.... adjusting volume, etc. ቫ LEARNING AV NET sensor Point your equipment's remote control at this capability, such as a DVD player or Camcorders. The Plasma TV is now ready for connecting equipment with no signal input (Power Saving) except antenna (no video input when INPUT : 1, 2, 3, Front or HDMI ...
Your HITACHI Plasma TV will illuminate. Lights Red OFF. (Stand-by mode (lights red) when not in use Front Panel Controls ቪ POWER light indicator To turn ON/OFF the "MAIN POWER" of the TV. NOTES: 1. When the main power switch is shown. picture is set to Off.... adjusting volume, etc. ቫ LEARNING AV NET sensor Point your equipment's remote control at this capability, such as a DVD player or Camcorders. The Plasma TV is now ready for connecting equipment with no signal input (Power Saving) except antenna (no video input when INPUT : 1, 2, 3, Front or HDMI ...
Owners Guide
Page 14
...1 provide S-VIDEO (Super Video) jacks for recording, only when the input is Dolby® Digital and PCM compatible, such as a DVD player or Set Top Box. Do not connect composite VIDEO and S-VIDEO to INPUT 1 at a time. 2. In this capability, such as an audio amplifier. Component ... input and the components R-Y output to the TV's PR input. 4. Use the HDMI input for your external components (VCR, Cable box, DVD player, etc.). To ensure no copyright infringement, the MONITOR OUT output will allow you to your Plasma Television's remote control. (For reference see page 45). ...
...1 provide S-VIDEO (Super Video) jacks for recording, only when the input is Dolby® Digital and PCM compatible, such as a DVD player or Set Top Box. Do not connect composite VIDEO and S-VIDEO to INPUT 1 at a time. 2. In this capability, such as an audio amplifier. Component ... input and the components R-Y output to the TV's PR input. 4. Use the HDMI input for your external components (VCR, Cable box, DVD player, etc.). To ensure no copyright infringement, the MONITOR OUT output will allow you to your Plasma Television's remote control. (For reference see page 45). ...

Owners Guide
Page 16
...will be according to front panel jacks. FRONT INPUT PANEL PHOTO INPUT PUSH EJECT First time use HDMI DIGITAL OUTPUT CAPABILITY DVD , Set Top Box, Video Game Console. Completely insert connection cord plugs when connecting to the own device specifications. B) Connecting DVI signal. DVI... DIGITAL OUTPUT CAPABILITY DVD , Set Top Box, Video Game Console. Connecting External Video Sources The FRONT panel jacks are provided as shown in the following examples (When...
...will be according to front panel jacks. FRONT INPUT PANEL PHOTO INPUT PUSH EJECT First time use HDMI DIGITAL OUTPUT CAPABILITY DVD , Set Top Box, Video Game Console. Completely insert connection cord plugs when connecting to the own device specifications. B) Connecting DVI signal. DVI... DIGITAL OUTPUT CAPABILITY DVD , Set Top Box, Video Game Console. Connecting External Video Sources The FRONT panel jacks are provided as shown in the following examples (When...

Owners Guide
Page 17
... Video Source Connect an external source to show the INPUTS menu. Then press the SELECT button or the CURSOR PAD ̈ to confirm your Plasma TV is dependent on the model and features of each component for the location of the INPUT terminals, then press the INPUTS button to one of...will be according to select the Input of components and features. First time use to connect the VCR, camcorder, laserdisc player, DVD player, or HDTV Set Top Box to front panel jacks. Video Camera NOTE: 1. Completely insert connection cord plugs when connecting to your choice (see page 29). The exact ...
... Video Source Connect an external source to show the INPUTS menu. Then press the SELECT button or the CURSOR PAD ̈ to confirm your Plasma TV is dependent on the model and features of each component for the location of the INPUT terminals, then press the INPUTS button to one of...will be according to select the Input of components and features. First time use to connect the VCR, camcorder, laserdisc player, DVD player, or HDTV Set Top Box to front panel jacks. Video Camera NOTE: 1. Completely insert connection cord plugs when connecting to your choice (see page 29). The exact ...

Owners Guide
Page 18
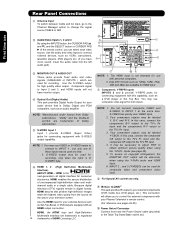
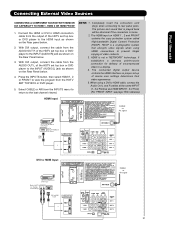
First time use Rear Panel Connections (IR BLASTER CABLE PROVIDED) CONNECT TO G-LINKTM/IR OUT Outside Antenna or Cable TV coaxial cable 2-Way signal splitter VCR #2 S-VIDEO V L R INPUT Optional VCR #1 ANT OUTPUT IN S-VIDEO V L R Optional HDMI to HDMI HDMI OUTPUT DVI to HDMI DIGITAL OUTPUT AUDIO OUT HDMI DIGITAL OUTPUT CAPABILITY DIGITAL OUTPUT CAPABILITY CONNECT TO IR OUT (IR BLASTER CABLE PROVIDED) NOTE: Cables are optional, except when specified. 18 OUTPUT Y PB/CB PR/CR L R Y PB PR L R OUTPUT DVD Player HDTV Set-Top Box
First time use Rear Panel Connections (IR BLASTER CABLE PROVIDED) CONNECT TO G-LINKTM/IR OUT Outside Antenna or Cable TV coaxial cable 2-Way signal splitter VCR #2 S-VIDEO V L R INPUT Optional VCR #1 ANT OUTPUT IN S-VIDEO V L R Optional HDMI to HDMI HDMI OUTPUT DVI to HDMI DIGITAL OUTPUT AUDIO OUT HDMI DIGITAL OUTPUT CAPABILITY DIGITAL OUTPUT CAPABILITY CONNECT TO IR OUT (IR BLASTER CABLE PROVIDED) NOTE: Cables are optional, except when specified. 18 OUTPUT Y PB/CB PR/CR L R Y PB PR L R OUTPUT DVD Player HDTV Set-Top Box

Owners Guide
Page 19
... VCR operating guide for high performance components, such as DVD players and set-top-boxes. In this case, connect the components B-Y output to the TV's PB input and the components R-Y output to the Audio /Video output of a Set-Top-Box will be distorted on Rear Panel Connections • S-VIDEO,...Input HDMI 1, HDMI 2 or HDMI FRONT can be used for recording only when the input is of S-VIDEO type. • When using a HDMI input from a Set-Top-Box, it is recommended to each input jack. • COMPONENT: Y-PBPR (Input 2 & 3) connections are provided for VCR #1 and VCR #2, but note...
... VCR operating guide for high performance components, such as DVD players and set-top-boxes. In this case, connect the components B-Y output to the TV's PB input and the components R-Y output to the Audio /Video output of a Set-Top-Box will be distorted on Rear Panel Connections • S-VIDEO,...Input HDMI 1, HDMI 2 or HDMI FRONT can be used for recording only when the input is of S-VIDEO type. • When using a HDMI input from a Set-Top-Box, it is recommended to each input jack. • COMPONENT: Y-PBPR (Input 2 & 3) connections are provided for VCR #1 and VCR #2, but note...
Owners Guide
Page 21
... that is played back will be abnormal if the connection is not a "NETWORK" technology. When using HDMI connections to prevent illegal copying of the HDTV set top box or DVD player to the HDMI input as shown on the Rear panel below. 2. Press the INPUTS button, then select HDMI 1, 2 or FRONT... cord plugs when connecting to the INPUT (AUDIO/L) jack as your HDMI INPUT(1 , 2 or Front). (For FRONT INPUT see page 16 for delivery of HDTV Set-Top-Box or DVD Player OUTPUT LR DIGITAL OUTPUT DVI to HDMI cable, connect the Audio Out L and R cables at the same INPUT (1 , 2 or Front...
... that is played back will be abnormal if the connection is not a "NETWORK" technology. When using HDMI connections to prevent illegal copying of the HDTV set top box or DVD player to the HDMI input as shown on the Rear panel below. 2. Press the INPUTS button, then select HDMI 1, 2 or FRONT... cord plugs when connecting to the INPUT (AUDIO/L) jack as your HDMI INPUT(1 , 2 or Front). (For FRONT INPUT see page 16 for delivery of HDTV Set-Top-Box or DVD Player OUTPUT LR DIGITAL OUTPUT DVI to HDMI cable, connect the Audio Out L and R cables at the same INPUT (1 , 2 or Front...

Owners Guide
Page 22
... jack. 4. See page 19 for tips on the Rear panel below. 2. CABLE or Air signal DVD Player Back of the Laserdisc/DVD player or HDTV set top box to rear panel jacks. First time use Connecting External Audio/Video Devices CONNECTING A COMPONENT AND STEREO AUDIO SOURCE TO INPUT 2 or 3:Y-PBPR. ...to the INPUT (Y) jack, as shown on REAR PANEL CONNECTIONS. 5. Connect the cable from the AUDIO OUT L of the Laserdisc/DVD player or HDTV set top box. 7. The picture and sound that is played back will be abnormal if the connection is loose. 2. Completely insert the connection cord plugs ...
... jack. 4. See page 19 for tips on the Rear panel below. 2. CABLE or Air signal DVD Player Back of the Laserdisc/DVD player or HDTV set top box to rear panel jacks. First time use Connecting External Audio/Video Devices CONNECTING A COMPONENT AND STEREO AUDIO SOURCE TO INPUT 2 or 3:Y-PBPR. ...to the INPUT (Y) jack, as shown on REAR PANEL CONNECTIONS. 5. Connect the cable from the AUDIO OUT L of the Laserdisc/DVD player or HDTV set top box. 7. The picture and sound that is played back will be abnormal if the connection is loose. 2. Completely insert the connection cord plugs ...

Owners Guide
Page 24
... two IR OUT terminals which can use Connecting External Video Sources Your HITACHI Plasma Television is setup, it allows your IR Blaster cable to select. 7. Double-sided mounting tape may be used to highlight the SET THE AV NET feature then press the SELECT button. 8. This feature...button to control your equipment using your HITACHI Plasma TV Remote Control. Video Audio TV Guide On Screen Channel Manager Locks Timers Setup Power Swivel Move SEL Select Setup Set the Menu Options Set The Screen Saver Set The Inputs Set The AV NET Set The Closed Captions Set The IR Out Select The Quick Start...
... two IR OUT terminals which can use Connecting External Video Sources Your HITACHI Plasma Television is setup, it allows your IR Blaster cable to select. 7. Double-sided mounting tape may be used to highlight the SET THE AV NET feature then press the SELECT button. 8. This feature...button to control your equipment using your HITACHI Plasma TV Remote Control. Video Audio TV Guide On Screen Channel Manager Locks Timers Setup Power Swivel Move SEL Select Setup Set the Menu Options Set The Screen Saver Set The Inputs Set The AV NET Set The Closed Captions Set The IR Out Select The Quick Start...
Owners Guide
Page 26
...Player (see page 37 for instructions on how to program the remote to control your HITACHI Plasma TV, the new remote control is designed to operate different types of the Source Select on the remote. The TV mode indicator will blink, indicating that the remote will now control your cable box (...Select on the remote. The SAT/CBL mode indicator will blink, indicating that the remote will now control your set -top-box or satellite receiver). To operate your Plasma TV, select TV by pressing the Source button of the Source Select on the remote. The Remote Control The Remote Control In ...
...Player (see page 37 for instructions on how to program the remote to control your HITACHI Plasma TV, the new remote control is designed to operate different types of the Source Select on the remote. The TV mode indicator will blink, indicating that the remote will now control your cable box (...Select on the remote. The SAT/CBL mode indicator will blink, indicating that the remote will now control your set -top-box or satellite receiver). To operate your Plasma TV, select TV by pressing the Source button of the Source Select on the remote. The Remote Control The Remote Control In ...

Owners Guide
Page 27
Select NIGHT for night time viewing with room light. The Remote Control How to Use the Remote to Control Your TV ³ POWER button Press this button to turn the TV set the remote control to TV mode). ³ · MODE Indicator · » Turns on or blinks three times to show remote control ...viewing with more brightness and contrast to compete with less brightness and contrast for a more detailed picture (see page 45 for instructions on how to set on or off when the remote is in TV mode. (See page 26 for settings changes). Press the PAUSE button repeatedly to motion.
Select NIGHT for night time viewing with room light. The Remote Control How to Use the Remote to Control Your TV ³ POWER button Press this button to turn the TV set the remote control to TV mode). ³ · MODE Indicator · » Turns on or blinks three times to show remote control ...viewing with more brightness and contrast to compete with less brightness and contrast for a more detailed picture (see page 45 for instructions on how to set on or off when the remote is in TV mode. (See page 26 for settings changes). Press the PAUSE button repeatedly to motion.


