Owners Guide
Page 3
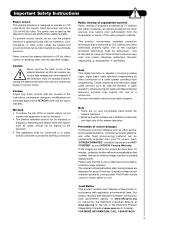
... shall be permanently imprinted onto your HITACHI Factory Warranty. Certain advanced and interactive digital cable services such as video-on-demand, a cable operator's enhanced program guide and data-enhanced television services may require the use the plasma television's (polarized) plug with an...accordance with a protective earthing connection. This product incorporates copyright protection technology that this can be restored quickly by your TV screen. The original contrast will work automatically so that contrast reduces to very high voltages and other hazards. For product...
... shall be permanently imprinted onto your HITACHI Factory Warranty. Certain advanced and interactive digital cable services such as video-on-demand, a cable operator's enhanced program guide and data-enhanced television services may require the use the plasma television's (polarized) plug with an...accordance with a protective earthing connection. This product incorporates copyright protection technology that this can be restored quickly by your TV screen. The original contrast will work automatically so that contrast reduces to very high voltages and other hazards. For product...
Owners Guide
Page 4
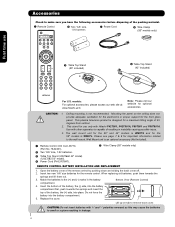
...42" model) (UX27282 50" model). ¿ Power Cord (P# EV01841). ´ Wire Clamp (50" models only) REMOTE CONTROL BATTERY INSTALLATION AND REPLACEMENT 1. Replace the cover. models: For optional accessories, please access our web site at: www.hitachi.us/tv.... 4 This plasma television product is...42" included) For U.S. Accessories Check to make sure you have the following accessories before disposing of the packing material. ³ Remote Control · Two "AA" size, 1.5V batteries ¿ Power Cord ´ Wire Clamp (50" models only) First time use only with Hitachi P42T501...
...42" model) (UX27282 50" model). ¿ Power Cord (P# EV01841). ´ Wire Clamp (50" models only) REMOTE CONTROL BATTERY INSTALLATION AND REPLACEMENT 1. Replace the cover. models: For optional accessories, please access our web site at: www.hitachi.us/tv.... 4 This plasma television product is...42" included) For U.S. Accessories Check to make sure you have the following accessories before disposing of the packing material. ³ Remote Control · Two "AA" size, 1.5V batteries ¿ Power Cord ´ Wire Clamp (50" models only) First time use only with Hitachi P42T501...
Owners Guide
Page 5
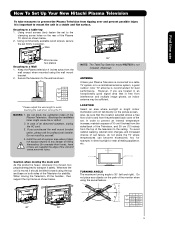
...places Securing to avoid touching the wall when turning the TV. Keep the Plasma television 4 inches away from the wall except when mounted using the swivel feature. 42" 50" C C D D 42" 10.59 in. 13.93 in. 27 cm...yourself. 4. NOTES: 1. Blocking the ventilation holes might cause fire or defect. 2. In case of the Plasma Television. However, if you purchased the wall mount bracket option, please ask for example their hands, head...How To Set Up Your New Hitachi Plasma Television To take measures to prevent the Plasma Television from tipping over and prevent possible injury it safely.
...places Securing to avoid touching the wall when turning the TV. Keep the Plasma television 4 inches away from the wall except when mounted using the swivel feature. 42" 50" C C D D 42" 10.59 in. 13.93 in. 27 cm...yourself. 4. NOTES: 1. Blocking the ventilation holes might cause fire or defect. 2. In case of the Plasma Television. However, if you purchased the wall mount bracket option, please ask for example their hands, head...How To Set Up Your New Hitachi Plasma Television To take measures to prevent the Plasma Television from tipping over and prevent possible injury it safely.
Owners Guide
Page 6
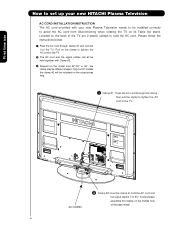
... disconnecting when rotating the TV on its Table top ...HITACHI Plasma Television AC CORD INSTALLATION INSTRUCTION The AC cord provided with Clamp #2. » Depend on the middle hole of the TV... are 2 plastic clamps to hold the AC cord and the signal cables. Pull on the clamp to tighten the AC cord to the TV.... then pull the clamp to tighten the AC cord to the TV. · The AC cord and the signal cables can all be held together with your new Plasma... Television needs to be included on the accessories bag. ³ Clamp #1 : Pass the AC cord through Clamp #1 and connect it to the TV...
... disconnecting when rotating the TV on its Table top ...HITACHI Plasma Television AC CORD INSTALLATION INSTRUCTION The AC cord provided with Clamp #2. » Depend on the middle hole of the TV... are 2 plastic clamps to hold the AC cord and the signal cables. Pull on the clamp to tighten the AC cord to the TV.... then pull the clamp to tighten the AC cord to the TV. · The AC cord and the signal cables can all be held together with your new Plasma... Television needs to be included on the accessories bag. ³ Clamp #1 : Pass the AC cord through Clamp #1 and connect it to the TV...
Owners Guide
Page 7
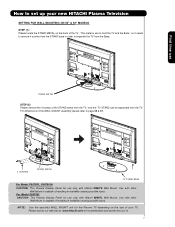
... possible injury. This Plasma Display Panel for the Plasma TV depending on the back of your TV. Use with Hitachi WM07L Wall Mount. For dimensions of the STAND metal from the TV, now the TV STAND can be separated from the TV. First time use to separate the TV from the STAND base... of the WALL MOUNT assembly please refer to page 68 & 69. 4 SCREWS STAND METAL TV STAND BASE For Model P50T501, P50T501A CAUTION- This Plasma Display Panel for your tv. 7 How to set up your new HITACHI Plasma Television SETTING FOR WALL MOUNTING ON 50" & 55" MODELS STEP (1) : Please locate the...
... possible injury. This Plasma Display Panel for the Plasma TV depending on the back of your TV. Use with Hitachi WM07L Wall Mount. For dimensions of the STAND metal from the TV, now the TV STAND can be separated from the TV. First time use to separate the TV from the STAND base... of the WALL MOUNT assembly please refer to page 68 & 69. 4 SCREWS STAND METAL TV STAND BASE For Model P50T501, P50T501A CAUTION- This Plasma Display Panel for your tv. 7 How to set up your new HITACHI Plasma Television SETTING FOR WALL MOUNTING ON 50" & 55" MODELS STEP (1) : Please locate the...
Owners Guide
Page 8
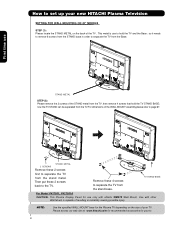
... can be separated from the TV.For dimensions of your TV. Then put these 4 screws to separate the TV from the stand base. Remove these 2 screws back to the TV. TV STAND BASE For Model P42T501, P42 T501A CAUTION- How to set up your new HITACHI Plasma Television SETTING FOR WALL MOUNTING ON 42" MODELS STEP (1) : Please locate the...
... can be separated from the TV.For dimensions of your TV. Then put these 4 screws to separate the TV from the stand base. Remove these 2 screws back to the TV. TV STAND BASE For Model P42T501, P42 T501A CAUTION- How to set up your new HITACHI Plasma Television SETTING FOR WALL MOUNTING ON 42" MODELS STEP (1) : Please locate the...
Owners Guide
Page 9
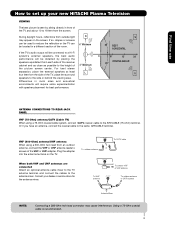
... antenna When using a 75-Ohm coaxial cable system, connect CATV coaxial cable to the AIR/CABLE (75-Ohm) terminal. Consult your new HITACHI Plasma Television VIEWING The best picture is recommended. 9 Differences in room sizes and acoustical environments will be located in front of the room. For ...Minimum L S 80 BEST HORIZONTAL 5' 10' 15' 20' VIEWING ANGLE 80 S ANTENNA CONNECTIONS TO REAR JACK PANEL VHF (75-Ohm) antenna/CATV (Cable TV) When using a 300-Ohm twin lead from the side of the VHF or UHF adapter. Plug the adapter into the antenna terminal on the screen...
... antenna When using a 75-Ohm coaxial cable system, connect CATV coaxial cable to the AIR/CABLE (75-Ohm) terminal. Consult your new HITACHI Plasma Television VIEWING The best picture is recommended. 9 Differences in room sizes and acoustical environments will be located in front of the room. For ...Minimum L S 80 BEST HORIZONTAL 5' 10' 15' 20' VIEWING ANGLE 80 S ANTENNA CONNECTIONS TO REAR JACK PANEL VHF (75-Ohm) antenna/CATV (Cable TV) When using a 300-Ohm twin lead from the side of the VHF or UHF adapter. Plug the adapter into the antenna terminal on the screen...
Owners Guide
Page 10
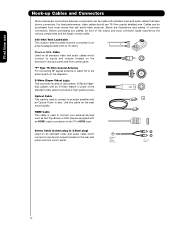
... components can be made with an S-Video feature in place of common connectors. "F" Type 75-Ohm Coaxial Antenna For connecting RF signals (antenna or cable TV) to an audio amplifier with an HDMI output connection to inputs and outputs located on the television. Phono or RCA Cable Used on all standard... video and audio cable which connect to the TV's HDMI input. Cables can be purchased from most stores that have phono connectors. Use this cable for the best sound quality.
... components can be made with an S-Video feature in place of common connectors. "F" Type 75-Ohm Coaxial Antenna For connecting RF signals (antenna or cable TV) to an audio amplifier with an HDMI output connection to inputs and outputs located on the television. Phono or RCA Cable Used on all standard... video and audio cable which connect to the TV's HDMI input. Cables can be purchased from most stores that have phono connectors. Use this cable for the best sound quality.
Owners Guide
Page 11
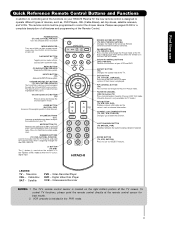
... the PVR mode. 11 GUIDE BUTTON (SAT/CBL, PVR) Accesses the program guide of your HITACHI Plasma TV, the new remote control is displayed. NUMERIC BUTTONS (TV, DVD, SAT/CBL, PVR/VCR) Used to manually enter the TV channel, and used for a complete description of all of the functions on and off. DVD/.../VCR, SAT/CBL) Changes the mode of the Universal Remote Control to adjust the audio level of the TV screen. Cable Box SAT - VCR precode is in -Picture mode. CURSOR PAD/SELECT BUTTON (TV, DVD, SAT/CBL,PVR/VCR) The Cursor Pad is used to navigate through the the OSD, INPUTS. ...
... the PVR mode. 11 GUIDE BUTTON (SAT/CBL, PVR) Accesses the program guide of your HITACHI Plasma TV, the new remote control is displayed. NUMERIC BUTTONS (TV, DVD, SAT/CBL, PVR/VCR) Used to manually enter the TV channel, and used for a complete description of all of the functions on and off. DVD/.../VCR, SAT/CBL) Changes the mode of the Universal Remote Control to adjust the audio level of the TV screen. Cable Box SAT - VCR precode is in -Picture mode. CURSOR PAD/SELECT BUTTON (TV, DVD, SAT/CBL,PVR/VCR) The Cursor Pad is used to navigate through the the OSD, INPUTS. ...
Owners Guide
Page 12
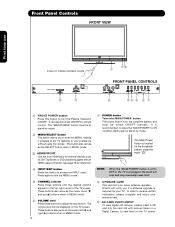
... required for reference). ብ INPUT/EXIT button Press this button to turn the Plasma Television ON/OFF. In order to receive written notification, please complete and return your preference without using the remote. Hitachi will stop and may eventually reset itself. ቩ UPGRADE CARD This card slot ... mark " ". These buttons also serve as the cursor left (̇) and right (̈) buttons when in the top right corner of the TV screen. Press again to exit the MENU mode. ቦ CHANNEL selector Press these buttons to adjust the sound level. It is recommended to leave...
... required for reference). ብ INPUT/EXIT button Press this button to turn the Plasma Television ON/OFF. In order to receive written notification, please complete and return your preference without using the remote. Hitachi will stop and may eventually reset itself. ቩ UPGRADE CARD This card slot ... mark " ". These buttons also serve as the cursor left (̇) and right (̈) buttons when in the top right corner of the TV screen. Press again to exit the MENU mode. ቦ CHANNEL selector Press these buttons to adjust the sound level. It is recommended to leave...
Owners Guide
Page 13
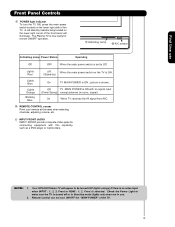
...input (Power Saving) except antenna (no video input when INPUT : 1, 2, 3, Front or HDMI : 1, 2, Front is selected. First time use . 2. The Plasma TV is set to be turned OFF (lights orange) if there is shown. picture is no sync. NOTES: 1. A red stand-by mode (lights red) when not... right side of the TV. 13 Remote Control can not turn the TV ON, press the main power switch located on the TV is ON. (Stand-by) Lights Blue Lights Orange Blinking Blue On TV MAIN POWER is ON ; Your HITACHI Plasma TV will illuminate. signal). On When TV receives the IR signal from...
...input (Power Saving) except antenna (no video input when INPUT : 1, 2, 3, Front or HDMI : 1, 2, Front is selected. First time use . 2. The Plasma TV is set to be turned OFF (lights orange) if there is shown. picture is no sync. NOTES: 1. A red stand-by mode (lights red) when not... right side of the TV. 13 Remote Control can not turn the TV ON, press the main power switch located on the TV is ON. (Stand-by) Lights Blue Lights Orange Blinking Blue On TV MAIN POWER is ON ; Your HITACHI Plasma TV will illuminate. signal). On When TV receives the IR signal from...
Owners Guide
Page 14
...may use only. The HDMI input is not intended for connecting equipment with personal computers. 2. In this case, connect the component CB output to the TV's PB input and the component CR output to Input 2 and 3, and HDMI inputs will be labeled Y-CBCR. INPUT 2 , and 3 (Y/VIDEO).... NOTE: *Manufactured under license from the source all digital interface for consumer electronics. In this case, connect the components B-Y output to the TV's PB input and the components R-Y output to your external devices such as an audio amplifier. NOTE: 1. It may be necessary to adjust ...
...may use only. The HDMI input is not intended for connecting equipment with personal computers. 2. In this case, connect the component CB output to the TV's PB input and the component CR output to Input 2 and 3, and HDMI inputs will be labeled Y-CBCR. INPUT 2 , and 3 (Y/VIDEO).... NOTE: *Manufactured under license from the source all digital interface for consumer electronics. In this case, connect the components B-Y output to the TV's PB input and the components R-Y output to your external devices such as an audio amplifier. NOTE: 1. It may be necessary to adjust ...
Owners Guide
Page 16
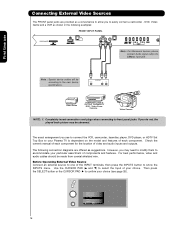
The following connection diagrams are provided as a convenience to allow you do not, the played back picture may need to modify them to accommodate your Plasma TV is dependent on the model and features of each component for the location of your choice (see page 26). For best performance, video and audio ...
The following connection diagrams are provided as a convenience to allow you do not, the played back picture may need to modify them to accommodate your Plasma TV is dependent on the model and features of each component for the location of your choice (see page 26). For best performance, video and audio ...
Owners Guide
Page 17
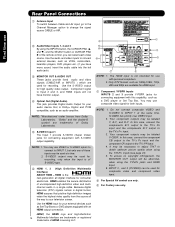
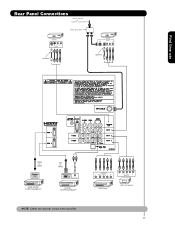
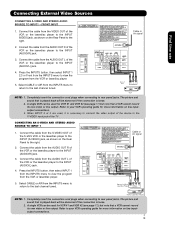
First time use Rear Panel Connections Outside Antenna or Cable TV coaxial cable 2-Way signal splitter VCR #2 S-VIDEO V L R INPUT Optional VCR #1 ANT OUTPUT IN S-VIDEO V L R Optional HDMI to HDMI HDMI OUTPUT HDMI DIGITAL OUTPUT CAPABILITY DVI to HDMI DIGITAL OUTPUT AUDIO OUT DIGITAL OUTPUT CAPABILITY NOTE: Cables are optional, except when specified. OUTPUT Y PB/CB PR/CR L R Y PB PR L R OUTPUT DVD Player HDTV Set-Top Box 17
First time use Rear Panel Connections Outside Antenna or Cable TV coaxial cable 2-Way signal splitter VCR #2 S-VIDEO V L R INPUT Optional VCR #1 ANT OUTPUT IN S-VIDEO V L R Optional HDMI to HDMI HDMI OUTPUT HDMI DIGITAL OUTPUT CAPABILITY DVI to HDMI DIGITAL OUTPUT AUDIO OUT DIGITAL OUTPUT CAPABILITY NOTE: Cables are optional, except when specified. OUTPUT Y PB/CB PR/CR L R Y PB PR L R OUTPUT DVD Player HDTV Set-Top Box 17
Owners Guide
Page 18
...your device has only one audio output (mono sound), connect it to the left audio jack on (L/(MONO)) the Rear Panel. • Refer to the TV's PR input. • Your component outputs may be used for VCR #1 and VCR #2, but note that the length of the standard video connection if your... device has this feature. In this case, connect the components B-Y output to the TV's PB input and the components R-Y output to the operating guide of S-VIDEO type. • When using the Y-PBPR inputs. (See page 41). • To ensure...
...your device has only one audio output (mono sound), connect it to the left audio jack on (L/(MONO)) the Rear Panel. • Refer to the TV's PR input. • Your component outputs may be used for VCR #1 and VCR #2, but note that the length of the standard video connection if your... device has this feature. In this case, connect the components B-Y output to the TV's PB input and the components R-Y output to the operating guide of S-VIDEO type. • When using the Y-PBPR inputs. (See page 41). • To ensure...
Owners Guide
Page 19
... picture and sound that is played back will be abnormal if the connection is loose. 2. Select CABLE or AIR from the AUDIO OUT R of the TV . Cable or Air signal Back of VCR Video OUTPUT VCR NOTE: 1. The picture and sound that is played back will be abnormal if the connection...
... picture and sound that is played back will be abnormal if the connection is loose. 2. Select CABLE or AIR from the AUDIO OUT R of the TV . Cable or Air signal Back of VCR Video OUTPUT VCR NOTE: 1. The picture and sound that is played back will be abnormal if the connection...
Owners Guide
Page 22
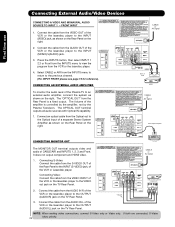
... or AIR from the INPUTS menu to return to view the program from the Optical out to the Optical input of the Plasma TV to the OUTPUT (AUDIO/R) jack on the TV Rear Panel. 2. Connecting Video: Connect the cable from the AUDIO IN R of the VCR or the laserdisc player to the ...INPUT (VIDEO) jack, as shown on the TV Rear Panel. The OPTICAL OUT terminal outputs all audio sources with Optical IN capability. 1. It does not output component and HDMI video. Connecting External Audio...
... or AIR from the INPUTS menu to return to view the program from the Optical out to the Optical input of the Plasma TV to the OUTPUT (AUDIO/R) jack on the TV Rear Panel. 2. Connecting Video: Connect the cable from the AUDIO IN R of the VCR or the laserdisc player to the ...INPUT (VIDEO) jack, as shown on the TV Rear Panel. The OPTICAL OUT terminal outputs all audio sources with Optical IN capability. 1. It does not output component and HDMI video. Connecting External Audio...

Owners Guide
Page 23
... cable box). The Remote Control The Remote Control In addition to controlling all the functions on your HITACHI Plasma TV, the new remote control is designed to operate different types of VCRs, CATV (Cable TV) converters, set-top-box, satellite receiver, DVD players, and other audio/video equipment with one ... the remote to control your VCR/PVR). The SAT/CBL mode indicator will blink, indicating that the remote will now control your Plasma TV, select TV by pressing the Source button of the Source Select on the remote. To operate your television. The PVR/VCR mode indicator will blink...
... cable box). The Remote Control The Remote Control In addition to controlling all the functions on your HITACHI Plasma TV, the new remote control is designed to operate different types of VCRs, CATV (Cable TV) converters, set-top-box, satellite receiver, DVD players, and other audio/video equipment with one ... the remote to control your VCR/PVR). The SAT/CBL mode indicator will blink, indicating that the remote will now control your Plasma TV, select TV by pressing the Source button of the Source Select on the remote. To operate your television. The PVR/VCR mode indicator will blink...

Owners Guide
Page 24
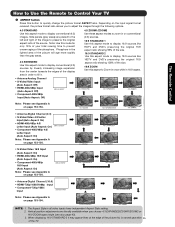
... a more detailed picture (see page 55. 24 The Remote Control How to Use the Remote to Control Your TV ³ POWER button Press this button to turn the TV set on or off when the remote is in TV mode. (See page 23 for instructions on how to set the remote control to... TV mode). ³ · MODE Indicator · » Turns on or blinks three times to show remote control mode. ¿ » SOURCE SELECT button 19 Press ...
... a more detailed picture (see page 55. 24 The Remote Control How to Use the Remote to Control Your TV ³ POWER button Press this button to turn the TV set on or off when the remote is in TV mode. (See page 23 for instructions on how to set the remote control to... TV mode). ³ · MODE Indicator · » Turns on or blinks three times to show remote control mode. ¿ » SOURCE SELECT button 19 Press ...
Owners Guide
Page 25
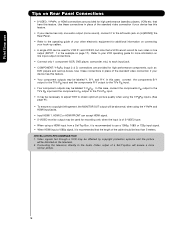
...; ASPECT button Press this mode for only 15% of your total viewing time to prevent uneven aging of the TV. Phosphors in the lighted area of the picture will age more rapidly than the gray areas. 4:3 EXPANDED Use this aspect mode to display conventional (4:3) sources ...
...; ASPECT button Press this mode for only 15% of your total viewing time to prevent uneven aging of the TV. Phosphors in the lighted area of the picture will age more rapidly than the gray areas. 4:3 EXPANDED Use this aspect mode to display conventional (4:3) sources ...


