Owners Guide
Page 1
Change 1 Page 30, Added note about PIP message Spanish Section 73~143 Click Here PLASMA TELEVISION Operating Guide for energy efficiency. has determined that this product meets the Energy Star® guidelines for P42T501, P42T501A P50T501, P50T501A and P55T551 IMPORTANT SAFETY INSTRUCTIONS 2-3 FIRST TIME USE ...4-22 THE REMOTE CONTROL ...23-38 ON-SCREEN DISPLAY ...39-61 USEFUL INFORMATION ...62-71 OPERATING GUIDE IN SPANISH 73-143 END USER LICENSE AGREEMENT FOR HITACHI DTV SOFTWARE 144-152 APPENDIXES ...153-154 INDEX ...155 As an Energy Star® Partner, Hitachi, Ltd.
Change 1 Page 30, Added note about PIP message Spanish Section 73~143 Click Here PLASMA TELEVISION Operating Guide for energy efficiency. has determined that this product meets the Energy Star® guidelines for P42T501, P42T501A P50T501, P50T501A and P55T551 IMPORTANT SAFETY INSTRUCTIONS 2-3 FIRST TIME USE ...4-22 THE REMOTE CONTROL ...23-38 ON-SCREEN DISPLAY ...39-61 USEFUL INFORMATION ...62-71 OPERATING GUIDE IN SPANISH 73-143 END USER LICENSE AGREEMENT FOR HITACHI DTV SOFTWARE 144-152 APPENDIXES ...153-154 INDEX ...155 As an Energy Star® Partner, Hitachi, Ltd.
Owners Guide
Page 2
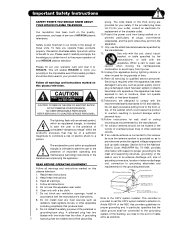
...moisture, does not operate RISK OF ELECTRIC SHOCK DO NOT OPEN normally, or has been dropped. 15.Televisions are YOUR HITACHI PLASMA TELEVISION provided for Our reputation has been built on or pinched particularly at plugs, convenience receptacles, and the point where ..., grounding of the lead-in the vicinity of important operating and maintenance (servicing) instructions in your product model. Section 810 of HITACHI plasma televisions. Read these instructions. 3. proper grounding and, in the design of these products properly, this unit, connection to proper grounding...
...moisture, does not operate RISK OF ELECTRIC SHOCK DO NOT OPEN normally, or has been dropped. 15.Televisions are YOUR HITACHI PLASMA TELEVISION provided for Our reputation has been built on or pinched particularly at plugs, convenience receptacles, and the point where ..., grounding of the lead-in the vicinity of important operating and maintenance (servicing) instructions in your product model. Section 810 of HITACHI plasma televisions. Read these instructions. 3. proper grounding and, in the design of these products properly, this unit, connection to proper grounding...
Owners Guide
Page 3
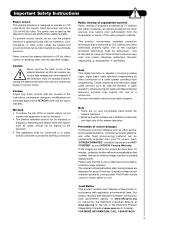
...inserted to 50 Hz, direct current, or anything other sources, may require the use the plasma television's (polarized) plug with a protective earthing connection. FOR MORE INFORMATION, CALL 1-800-HITACHI. 3 Caution Never remove the back cover of screen damages Continuous on the screen for about ...product in the instructions, as improper changes or modifications not expressly approved by your HITACHI Factory Warranty. If the television does not operate properly, unplug the plasma television and call your TV screen. Warning • To reduce the risk of fire or electric shock, ...
...inserted to 50 Hz, direct current, or anything other sources, may require the use the plasma television's (polarized) plug with a protective earthing connection. FOR MORE INFORMATION, CALL 1-800-HITACHI. 3 Caution Never remove the back cover of screen damages Continuous on the screen for about ...product in the instructions, as improper changes or modifications not expressly approved by your HITACHI Factory Warranty. If the television does not operate properly, unplug the plasma television and call your TV screen. Warning • To reduce the risk of fire or electric shock, ...
Owners Guide
Page 4
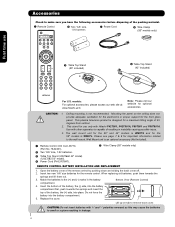
... 1.5V batteries ¿ Power Cord ´ Wire Clamp (50" models only) First time use only with Hitachi P42T501, P42T501A, P50T501 and P50T501A. Replace the cover. Mounting the panel on tab to make sure you have the ... the battery, the (+) side, into the battery compartment. 5. This plasma television product is WM07L. HL02401). · Two "AA" size, 1.5V batteries. » Table Top Stand (UX27662 42" model) (UX27282 50" model). ¿ Power Cord (P# EV01841)....accessories, please access our web site at: www.hitachi.us/tv Note: Please visit our website for optional accessories.
... 1.5V batteries ¿ Power Cord ´ Wire Clamp (50" models only) First time use only with Hitachi P42T501, P42T501A, P50T501 and P50T501A. Replace the cover. Mounting the panel on tab to make sure you have the ... the battery, the (+) side, into the battery compartment. 5. This plasma television product is WM07L. HL02401). · Two "AA" size, 1.5V batteries. » Table Top Stand (UX27662 42" model) (UX27282 50" model). ¿ Power Cord (P# EV01841)....accessories, please access our web site at: www.hitachi.us/tv Note: Please visit our website for optional accessories.
Owners Guide
Page 5
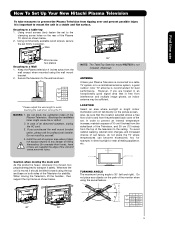
...wall when turning the TV. LOCATION Select an area where sunlight or bright indoor illumination will not fall directly on both sides of set . Also, be sure that is not included (Optional). How To Set Up Your New Hitachi Plasma Television To take measures to prevent the Plasma Television from tipping ...from the wall except when mounted using the wall mount bracket. 2. In order to any objects on the rear of the television to the ceiling. A A 42" 4 in. 10 cm 50" 4 in. 10 cm 55" 4 in an exceptionally good signal area that the location selected allows a free flow of ...
...wall when turning the TV. LOCATION Select an area where sunlight or bright indoor illumination will not fall directly on both sides of set . Also, be sure that is not included (Optional). How To Set Up Your New Hitachi Plasma Television To take measures to prevent the Plasma Television from tipping ...from the wall except when mounted using the wall mount bracket. 2. In order to any objects on the rear of the television to the ceiling. A A 42" 4 in. 10 cm 50" 4 in. 10 cm 55" 4 in an exceptionally good signal area that the location selected allows a free flow of ...
Owners Guide
Page 6
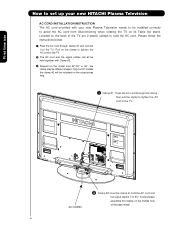
...the back of the base metal. 6 Pull on the clamp to tighten the AC cord to the TV. · The AC cord and the signal cables can all be held together with your new HITACHI Plasma Television AC CORD INSTALLATION INSTRUCTION The AC cord provided with Clamp #2. » Depend on the model ...size 42",50" or 55", the clamp may be different shapes. AC CORD · Clamp #2: Use this clamp ; ...
...the back of the base metal. 6 Pull on the clamp to tighten the AC cord to the TV. · The AC cord and the signal cables can all be held together with your new HITACHI Plasma Television AC CORD INSTALLATION INSTRUCTION The AC cord provided with Clamp #2. » Depend on the model ...size 42",50" or 55", the clamp may be different shapes. AC CORD · Clamp #2: Use this clamp ; ...
Owners Guide
Page 7
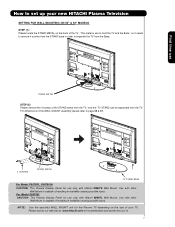
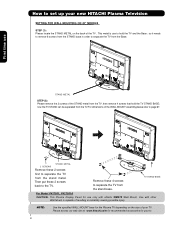
... is use STAND METAL STEP (2): Please remove the 4 screws of the TV . Please access our web site at: www.hitachi.us/tv for recommended accessories for use only with Hitachi WM07L Wall Mount. For Model P55T551 CAUTION- This Plasma Display Panel for your TV. For dimensions of your tv. 7 so it needs to remove 4 screws from the...
... is use STAND METAL STEP (2): Please remove the 4 screws of the TV . Please access our web site at: www.hitachi.us/tv for recommended accessories for use only with Hitachi WM07L Wall Mount. For Model P55T551 CAUTION- This Plasma Display Panel for your TV. For dimensions of your tv. 7 so it needs to remove 4 screws from the...
Owners Guide
Page 8
... metal from the STAND base in instability causing possible injury. TV STAND BASE For Model P42T501, P42 T501A CAUTION- This Plasma Display Panel for use to hold the TV STAND BASE; now the TV STAND can be separated from the TV.For dimensions of the WALL MOUNT assembly please refer to page...Then put these 2 screws back to the TV. Use with Hitachi WM07S Wall Mount. so it needs to remove 6 screws from the TV, then remove 4 screws that hold the TV and the Base ; How to set up your new HITACHI Plasma Television SETTING FOR WALL MOUNTING ON 42" MODELS STEP (1) : Please locate the STAND...
... metal from the STAND base in instability causing possible injury. TV STAND BASE For Model P42T501, P42 T501A CAUTION- This Plasma Display Panel for use to hold the TV STAND BASE; now the TV STAND can be separated from the TV.For dimensions of the WALL MOUNT assembly please refer to page...Then put these 2 screws back to the TV. Use with Hitachi WM07S Wall Mount. so it needs to remove 6 screws from the TV, then remove 4 screws that hold the TV and the Base ; How to set up your new HITACHI Plasma Television SETTING FOR WALL MOUNTING ON 42" MODELS STEP (1) : Please locate the STAND...
Owners Guide
Page 9
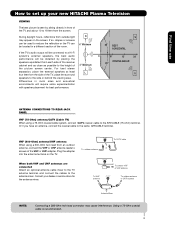
...Minimum L S 80 BEST HORIZONTAL 5' 10' 15' 20' VIEWING ANGLE 80 S ANTENNA CONNECTIONS TO REAR JACK PANEL VHF (75-Ohm) antenna/CATV (Cable TV) When using a 300-Ohm twin lead from the side of the room. When both VHF and UHF antennas are connected Attach an optional antenna cable... mixer to the TV antenna terminal, and connect the cables to the same AIR/CABLE terminal. Consult your new HITACHI Plasma Television VIEWING The best picture is recommended. 9 Plug the adapter into the antenna terminal on...
...Minimum L S 80 BEST HORIZONTAL 5' 10' 15' 20' VIEWING ANGLE 80 S ANTENNA CONNECTIONS TO REAR JACK PANEL VHF (75-Ohm) antenna/CATV (Cable TV) When using a 300-Ohm twin lead from the side of the room. When both VHF and UHF antennas are connected Attach an optional antenna cable... mixer to the TV antenna terminal, and connect the cables to the same AIR/CABLE terminal. Consult your new HITACHI Plasma Television VIEWING The best picture is recommended. 9 Plug the adapter into the antenna terminal on...
Owners Guide
Page 11
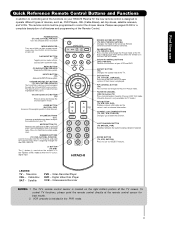
The remote control must be programmed to show and change the Freeze mode of your TV. POWER BUTTON (TV, DVD, SAT/CBL,PVR/VCR) Turns the selected device on your HITACHI Plasma TV, the new remote control is designed to show remote control mode when the SOURCE ACCESS buttons are pressed. ...MODE INDICATOR Turns on or blinks to control the chosen device. VOLUME BUTTONS (TV ) Increase up or down to restore audio level...
The remote control must be programmed to show and change the Freeze mode of your TV. POWER BUTTON (TV, DVD, SAT/CBL,PVR/VCR) Turns the selected device on your HITACHI Plasma TV, the new remote control is designed to show remote control mode when the SOURCE ACCESS buttons are pressed. ...MODE INDICATOR Turns on or blinks to control the chosen device. VOLUME BUTTONS (TV ) Increase up or down to restore audio level...
Owners Guide
Page 12
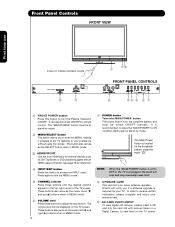
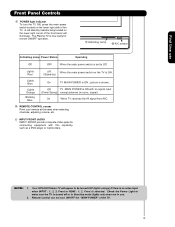
... Camera, to ON condition (lights red) for future software upgrades. It is for reference). ብ INPUT/EXIT button Press this button to turn the Plasma Television ON/OFF. These buttons also serve as the cursor left (̇) and right (̈) buttons when in MENU mode. ቤ HDMI-FRONT Use...ቢ FRONT POWER button Press this button to access the INPUT menu. Hitachi will stop and may eventually reset itself. ቩ UPGRADE CARD This card slot is located on the TV screen. In order to OFF or the TV is unplugged, the clock will notify you to enter the MENU, making it...
... Camera, to ON condition (lights red) for future software upgrades. It is for reference). ብ INPUT/EXIT button Press this button to turn the Plasma Television ON/OFF. These buttons also serve as the cursor left (̇) and right (̈) buttons when in MENU mode. ቤ HDMI-FRONT Use...ቢ FRONT POWER button Press this button to access the INPUT menu. Hitachi will stop and may eventually reset itself. ቩ UPGRADE CARD This card slot is located on the TV screen. In order to OFF or the TV is unplugged, the clock will notify you to enter the MENU, making it...
Owners Guide
Page 13
...IR signal from R/C. ቫ REMOTE CONTROL sensor Point your remote at this capability, such as a DVD player or Camcorders. NOTES: 1. Your HITACHI Plasma TV will illuminate. A red stand-by indicator lamp located on the lower right corner of the front bezel will appear to be turned OFF (lights ... 1, 2, 3, Front or HDMI : 1, 2, Front is now ready for connecting equipment with no signal input (Power Saving) except antenna (no sync. The Plasma TV is selected. When the main power switch is set to make sure the TV is turned off or in Stand-by ) Lights Blue Lights Orange Blinking Blue On...
...IR signal from R/C. ቫ REMOTE CONTROL sensor Point your remote at this capability, such as a DVD player or Camcorders. NOTES: 1. Your HITACHI Plasma TV will illuminate. A red stand-by indicator lamp located on the lower right corner of the front bezel will appear to be turned OFF (lights ... 1, 2, 3, Front or HDMI : 1, 2, Front is now ready for connecting equipment with no signal input (Power Saving) except antenna (no sync. The Plasma TV is selected. When the main power switch is set to make sure the TV is turned off or in Stand-by ) Lights Blue Lights Orange Blinking Blue On...
Owners Guide
Page 16
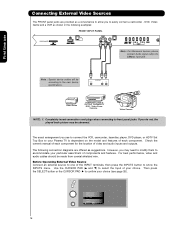
... and audio cables should be abnormal. First time use to connect the VCR, camcorder, laserdisc player, DVD player, or HDTV Set Top Box to your Plasma TV is dependent on the model and features of each component for the location of video and audio inputs and outputs. Note : Special device cables will...
... and audio cables should be abnormal. First time use to connect the VCR, camcorder, laserdisc player, DVD player, or HDTV Set Top Box to your Plasma TV is dependent on the model and features of each component for the location of video and audio inputs and outputs. Note : Special device cables will...
Owners Guide
Page 22
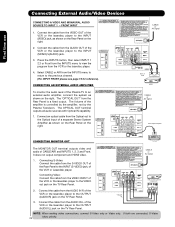
Select CABLE or AIR from the VIDEO INPUT of the Plasma TV to the INPUT (MONO)/L(AUDIO) jack. 3. Connecting Video: Connect the cable from...to the INPUT (S-VIDEO) jack, of the VCR or the laserdisc player to the OUTPUT (AUDIO/R) jack on the TV Rear Panel. Connecting External Audio/Video Devices First time use CONNECTING A VIDEO AND MONAURAL AUDIO SOURCE TO INPUT 1 ~... Connecting S-Video: Connect the cable from the Rear Panel is controlled by the amplifier, not by the Plasma Television. Connect an optical cable from the Optical out to view the program from the INPUTS menu to the...
Select CABLE or AIR from the VIDEO INPUT of the Plasma TV to the INPUT (MONO)/L(AUDIO) jack. 3. Connecting Video: Connect the cable from...to the INPUT (S-VIDEO) jack, of the VCR or the laserdisc player to the OUTPUT (AUDIO/R) jack on the TV Rear Panel. Connecting External Audio/Video Devices First time use CONNECTING A VIDEO AND MONAURAL AUDIO SOURCE TO INPUT 1 ~... Connecting S-Video: Connect the cable from the Rear Panel is controlled by the amplifier, not by the Plasma Television. Connect an optical cable from the Optical out to view the program from the INPUTS menu to the...

Owners Guide
Page 23
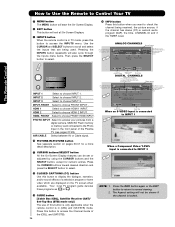
...to control your DVD player, select DVD by pressing the Source button of the Source Select on your HITACHI Plasma TV, the new remote control is designed to operate different types of VCRs, CATV (Cable TV) converters, set -top-box or satellite receiver select SAT/CBL by pressing the Source button of .../CBL by pressing the Source button of the Source Select on the remote. The TV mode indicator will blink, indicating that the remote will now control your DVD player). 23 To operate your Plasma TV, select TV by pressing the Source button of the Source Select on the remote. To operate ...
...to control your DVD player, select DVD by pressing the Source button of the Source Select on your HITACHI Plasma TV, the new remote control is designed to operate different types of VCRs, CATV (Cable TV) converters, set -top-box or satellite receiver select SAT/CBL by pressing the Source button of .../CBL by pressing the Source button of the Source Select on the remote. The TV mode indicator will blink, indicating that the remote will now control your DVD player). 23 To operate your Plasma TV, select TV by pressing the Source button of the Source Select on the remote. To operate ...
Owners Guide
Page 26
... receiving a Digital Broadcast with Closed Captioning. Program Information Program Run Time ANALOG CHANNELS Analog Channel Show Name 3:00PM- 3:30PM ST TV-G A 480i Air 8 KXYZ-HD 3:17PM Main Picture Source and channel indication Broadcast channel identification Clock Audio Broadcast Broadcast Rating Picture ...)/ Set-Top-Box (STB) mode only] The use of this button to display the dialogue, narration, and/or sound effects of the Plasma TV (see pages 27-28). INPUT 3 Select to choose INPUT 1. HDMI 2 Select to normal viewing. 2. Press the INFO button again or...
... receiving a Digital Broadcast with Closed Captioning. Program Information Program Run Time ANALOG CHANNELS Analog Channel Show Name 3:00PM- 3:30PM ST TV-G A 480i Air 8 KXYZ-HD 3:17PM Main Picture Source and channel indication Broadcast channel identification Clock Audio Broadcast Broadcast Rating Picture ...)/ Set-Top-Box (STB) mode only] The use of this button to display the dialogue, narration, and/or sound effects of the Plasma TV (see pages 27-28). INPUT 3 Select to choose INPUT 1. HDMI 2 Select to normal viewing. 2. Press the INFO button again or...

Owners Guide
Page 30
...CABLE or Air signal Back of the CURSOR PAD buttons. The Picture-in PIP mode. Use connection at the same time.You can watch a TV program while viewing other programs from any of the two sources. Yes Yes Yes Yes Yes Yes Yes - - - - - - Analog channels... Yes Yes Yes Yes Yes Yes - - - - - - Yes Yes Yes Yes Yes Yes Yes - - - - - - - - - - - - Picture-In-Picture (PIP) Your HITACHI Plasma TV incorporates one of the video inputs. Yes Yes Yes Yes Yes Yes - - - - - -- (*) HDMI Input only NOTE: 1. SPLIT MODE PICTURE-IN-PICTURE Split Mode PIP displays...
...CABLE or Air signal Back of the CURSOR PAD buttons. The Picture-in PIP mode. Use connection at the same time.You can watch a TV program while viewing other programs from any of the two sources. Yes Yes Yes Yes Yes Yes Yes - - - - - - Analog channels... Yes Yes Yes Yes Yes Yes - - - - - - Yes Yes Yes Yes Yes Yes Yes - - - - - - - - - - - - Picture-In-Picture (PIP) Your HITACHI Plasma TV incorporates one of the video inputs. Yes Yes Yes Yes Yes Yes - - - - - -- (*) HDMI Input only NOTE: 1. SPLIT MODE PICTURE-IN-PICTURE Split Mode PIP displays...
Owners Guide
Page 39
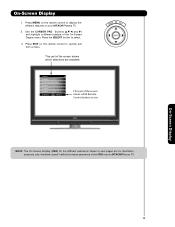
... Channel Manager Locks Timers Setup Move SEL Select This part of the screen shows which Remote Control buttons to display the different features on your HITACHI Plasma TV. On-Screen Display 39 NOTE: The On Screen Display (OSD) for the different submenus shown in next pages are available. This part of the screen... Display 1. Press MENU on the remote control to select. 3. Use the CURSOR PAD (buttons ̆,̄,̇ and ̈) and highlight a different feature of your HITACHI Plasma TV. 2.
... Channel Manager Locks Timers Setup Move SEL Select This part of the screen shows which Remote Control buttons to display the different features on your HITACHI Plasma TV. On-Screen Display 39 NOTE: The On Screen Display (OSD) for the different submenus shown in next pages are available. This part of the screen... Display 1. Press MENU on the remote control to select. 3. Use the CURSOR PAD (buttons ̆,̄,̇ and ̈) and highlight a different feature of your HITACHI Plasma TV. 2.
Owners Guide
Page 42
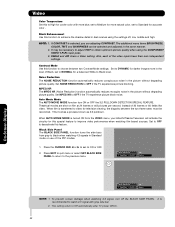
... picture block noise. Set MPEG NR to OFF if the TV experiences picture blocking. This involves a process known as 3:2 pulldown. Press the CURSOR PAD ̇ or &#...sources. Press EXIT to quit menu or select SET BLACK SIDE PANEL to return to Off automatically after TV power Off/On. 42 Black Enhancement Use this function to obtain optimum picture quality when using the settings off the BLACK SIDE ... The BLACK SIDE PANEL function turns the side bars from the VIDEO menu, your Hitachi Plasma Television will activate the circuitry for darker images more natural color, set to ON or OFF. 2.
... picture block noise. Set MPEG NR to OFF if the TV experiences picture blocking. This involves a process known as 3:2 pulldown. Press the CURSOR PAD ̇ or &#...sources. Press EXIT to quit menu or select SET BLACK SIDE PANEL to return to Off automatically after TV power Off/On. 42 Black Enhancement Use this function to obtain optimum picture quality when using the settings off the BLACK SIDE ... The BLACK SIDE PANEL function turns the side bars from the VIDEO menu, your Hitachi Plasma Television will activate the circuitry for darker images more natural color, set to ON or OFF. 2.

Owners Guide
Page 44
... function will control the left to the main menu. Press EXIT to quit the MENU, or select AUDIO to return to right balance of the Plasma TV internal speakers. Normal Surround: : Provides the surround effect by locating two or more realistic audio environment. 1.- Audio Audio Select AUDIO to adjust the...
... function will control the left to the main menu. Press EXIT to quit the MENU, or select AUDIO to return to right balance of the Plasma TV internal speakers. Normal Surround: : Provides the surround effect by locating two or more realistic audio environment. 1.- Audio Audio Select AUDIO to adjust the...


