Owners Guide
Page 2
... you . REFER SERVICING TO QUALIFIED SERVICE PERSONNEL. recommended safety standards for wall, shelf or ceiling mounting as power-supply cord or plug is required when the apparatus has been damaged in the vicinity of antenna discharge READ BEFORE OPERATING EQUIPMENT Follow all warnings and instructions marked on this unit, connection to an antenna discharge unit, size of grounding connectors, location of overhead power lines or other...
... you . REFER SERVICING TO QUALIFIED SERVICE PERSONNEL. recommended safety standards for wall, shelf or ceiling mounting as power-supply cord or plug is required when the apparatus has been damaged in the vicinity of antenna discharge READ BEFORE OPERATING EQUIPMENT Follow all warnings and instructions marked on this unit, connection to an antenna discharge unit, size of grounding connectors, location of overhead power lines or other...
Owners Guide
Page 3
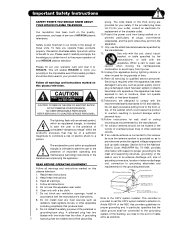
... 1-800-HITACHI. 3 Important Safety Instructions Power source This plasma television is not a malfunction but it helps to minimize image retention. The power cord is protected by turning power On/Off with an extension cord, receptacle, or other sources, may require the use the plasma television's (polarized) plug with remote control or power switch on plasma display panel. If the television does not operate properly, unplug the plasma television and call your local cable company. Caution Adjust only those controls that...
... 1-800-HITACHI. 3 Important Safety Instructions Power source This plasma television is not a malfunction but it helps to minimize image retention. The power cord is protected by turning power On/Off with an extension cord, receptacle, or other sources, may require the use the plasma television's (polarized) plug with remote control or power switch on plasma display panel. If the television does not operate properly, unplug the plasma television and call your local cable company. Caution Adjust only those controls that...
Owners Guide
Page 5
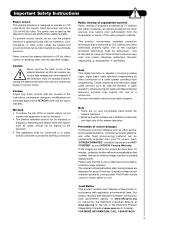
... good signal area that the location selected allows a free flow of air to the clamping screw holes on the picture screen. Keep the Plasma television 4 inches away from interference and multiple image ghosts, an indoor antenna may be lifted forward using the top and base on the path of set to and from the perforated back cover of the unit and cause personal injury. A A 42...
... good signal area that the location selected allows a free flow of air to the clamping screw holes on the picture screen. Keep the Plasma television 4 inches away from interference and multiple image ghosts, an indoor antenna may be lifted forward using the top and base on the path of set to and from the perforated back cover of the unit and cause personal injury. A A 42...
Owners Guide
Page 9
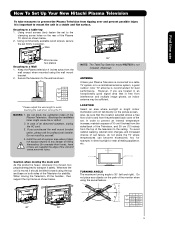
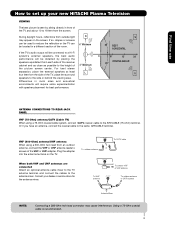
... room. Differences in room sizes and acoustical environments will be located in front of the TV, place the surround speakers to the side or behind the viewing area. First time use How to set up your dealer or service store for best performance. 4" Minimum L S 80 BEST HORIZONTAL 5' 10' 15' 20' VIEWING ANGLE 80 S ANTENNA CONNECTIONS TO REAR JACK PANEL VHF (75-Ohm) antenna/CATV (Cable TV) When using a 300-Ohm twin...
... room. Differences in room sizes and acoustical environments will be located in front of the TV, place the surround speakers to the side or behind the viewing area. First time use How to set up your dealer or service store for best performance. 4" Minimum L S 80 BEST HORIZONTAL 5' 10' 15' 20' VIEWING ANGLE 80 S ANTENNA CONNECTIONS TO REAR JACK PANEL VHF (75-Ohm) antenna/CATV (Cable TV) When using a 300-Ohm twin...
Owners Guide
Page 11
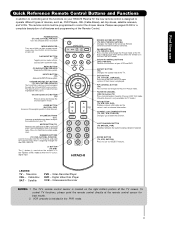
..., and to adjust the audio level of your VCR and DVD. Press it a third time to show and change the Closed Caption mode. Also used when the remote is located on and off. ASPECT BUTTON (TV) Changes the aspect ratio of the OSD, INPUTS menu systems if their menu is included in Set-Top-Box (STB) mode or when the TV uses a digital input. Cable Box SAT - MODE INDICATOR Turns on the screen, such as SELECT feature. SOURCE ACCESS BUTTONS (TV, DVD, PVR...
..., and to adjust the audio level of your VCR and DVD. Press it a third time to show and change the Closed Caption mode. Also used when the remote is located on and off. ASPECT BUTTON (TV) Changes the aspect ratio of the OSD, INPUTS menu systems if their menu is included in Set-Top-Box (STB) mode or when the TV uses a digital input. Cable Box SAT - MODE INDICATOR Turns on the screen, such as SELECT feature. SOURCE ACCESS BUTTONS (TV, DVD, PVR...
Owners Guide
Page 12
... (lights red) for future software upgrades. The volume level will be turned ON/OFF manually. NOTE: When the "MAIN POWER" button is set to OFF or the TV is unplugged, the clock will notify you to enter the MENU, making it possible to set TV features to your preference without using the remote. These buttons also serve as Set-Top-Boxes or DVD players equipped with pictures taken on a Digital Camera, to receive written...
... (lights red) for future software upgrades. The volume level will be turned ON/OFF manually. NOTE: When the "MAIN POWER" button is set to OFF or the TV is unplugged, the clock will notify you to enter the MENU, making it possible to set TV features to your preference without using the remote. These buttons also serve as Set-Top-Boxes or DVD players equipped with pictures taken on a Digital Camera, to receive written...
Owners Guide
Page 13
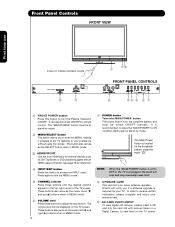
... remote at this capability, such as a DVD player or Camcorders. Your HITACHI Plasma TV will illuminate. picture is turned off or in use Front Panel Controls ቪ POWER light indicator To turn ON/OFF the "MAIN POWER" of the TV. NOTES: 1. signal). Check the Power Light to Off. The Plasma TV is set to make sure the TV is shown. A red stand-by indicator lamp located on the TV is ON. (Stand-by mode (lights red) when not in Stand-by ) Lights Blue Lights Orange Blinking Blue...
... remote at this capability, such as a DVD player or Camcorders. Your HITACHI Plasma TV will illuminate. picture is turned off or in use Front Panel Controls ቪ POWER light indicator To turn ON/OFF the "MAIN POWER" of the TV. NOTES: 1. signal). Check the Power Light to Off. The Plasma TV is set to make sure the TV is shown. A red stand-by indicator lamp located on the TV is ON. (Stand-by mode (lights red) when not in Stand-by ) Lights Blue Lights Orange Blinking Blue...
Owners Guide
Page 16
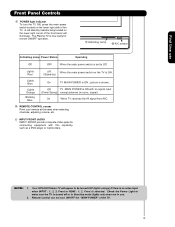
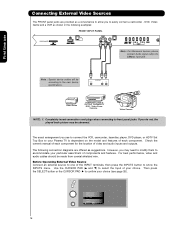
... specifications. HDMI-Front Photo Input Air /Cable Input 1 Input 2 Move SEL Sel. 16 OUTPUT Video L R Video Game COMPOSITE VIDEO OUTPUT CAPABILITY DVD , Video Game Console. Before Operating External Video Source Connect an external source to one of the INPUT terminals, then press the INPUTS button to front panel jacks. Then press the SELECT button or the CURSOR PAD ̈ to confirm your choice (see page 26). First time use to connect the VCR, camcorder, laserdisc player, DVD player, or HDTV Set Top Box to your Plasma TV...
... specifications. HDMI-Front Photo Input Air /Cable Input 1 Input 2 Move SEL Sel. 16 OUTPUT Video L R Video Game COMPOSITE VIDEO OUTPUT CAPABILITY DVD , Video Game Console. Before Operating External Video Source Connect an external source to one of the INPUT terminals, then press the INPUTS button to front panel jacks. Then press the SELECT button or the CURSOR PAD ̈ to confirm your choice (see page 26). First time use to connect the VCR, camcorder, laserdisc player, DVD player, or HDTV Set Top Box to your Plasma TV...
Owners Guide
Page 20
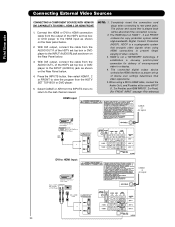
... AUDIO OUT L of video contents. 3. Completely insert the connection cord plugs when connecting to the last channel viewed. HDCP is loose. 2. With DVI output, connect the cable from the INPUTS menu to return to rear panel jacks. The picture and sound that is played back will be abnormal if the connection is a cryptographic system that encrypts video signals when using a DVI to view the program from the output of device user settings determines final video appearance. 5. HDMI input CABLE or Air signal HDTV Set-Top-Box or DVD Player DIGITAL OUTPUT...
... AUDIO OUT L of video contents. 3. Completely insert the connection cord plugs when connecting to the last channel viewed. HDCP is loose. 2. With DVI output, connect the cable from the INPUTS menu to return to rear panel jacks. The picture and sound that is played back will be abnormal if the connection is a cryptographic system that encrypts video signals when using a DVI to view the program from the output of device user settings determines final video appearance. 5. HDMI input CABLE or Air signal HDTV Set-Top-Box or DVD Player DIGITAL OUTPUT...
Owners Guide
Page 21
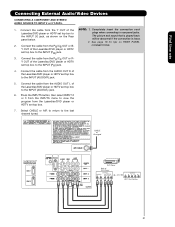
... the INPUTS button, then select INPUT 2 or 3 from the INPUTS menu to view the program from the Y OUT of the Laserdisc/DVD player or HDTV set top box to the INPUT (Y) jack, as shown on REAR PANEL CONNECTIONS. 5. First time use Connecting External Audio/Video Devices CONNECTING A COMPONENT AND STEREO AUDIO SOURCE TO INPUT 2 or 3:Y-PBPR. 1. Connect the cable from the Laserdisc/DVD player or HDTV set top box to the INPUT (PB) jack. 3. Connect the cable from the AUDIO OUT R of the Laserdisc/DVD player or HDTV set top box. 7. Connect the cable...
... the INPUTS button, then select INPUT 2 or 3 from the INPUTS menu to view the program from the Y OUT of the Laserdisc/DVD player or HDTV set top box to the INPUT (Y) jack, as shown on REAR PANEL CONNECTIONS. 5. First time use Connecting External Audio/Video Devices CONNECTING A COMPONENT AND STEREO AUDIO SOURCE TO INPUT 2 or 3:Y-PBPR. 1. Connect the cable from the Laserdisc/DVD player or HDTV set top box to the INPUT (PB) jack. 3. Connect the cable from the AUDIO OUT R of the Laserdisc/DVD player or HDTV set top box. 7. Connect the cable...
Owners Guide
Page 26
... Auto When a Component Video: Y-PbPr Input is connected to choose FRONT HDMI INPUT. FRONT Select to INPUT 3 Y-PBPR: 3 480i 3:17PM Input Signal Format Auto NOTE: 1. Your local TV program guide denotes these programs as or . Ƹ GUIDE button [Cable Box (CBL), Satellite Receiver (SAT)/ Set-Top-Box (STB) mode only] The use of this button to access the Channel Guide of a television program or home video which are being received, the picture source, if the channel has stereo (ST) or second audio program (SAP), the time, CHANNEL ID...
... Auto When a Component Video: Y-PbPr Input is connected to choose FRONT HDMI INPUT. FRONT Select to INPUT 3 Y-PBPR: 3 480i 3:17PM Input Signal Format Auto NOTE: 1. Your local TV program guide denotes these programs as or . Ƹ GUIDE button [Cable Box (CBL), Satellite Receiver (SAT)/ Set-Top-Box (STB) mode only] The use of this button to access the Channel Guide of a television program or home video which are being received, the picture source, if the channel has stereo (ST) or second audio program (SAP), the time, CHANNEL ID...
Owners Guide
Page 29
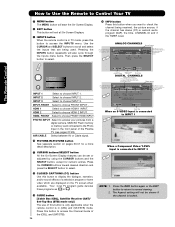
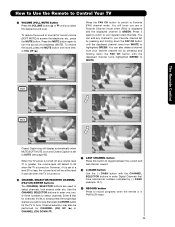
... channels. Cable 6 Volume 8 Soft Mute 8 FAV Cable 6 The Remote Control Cable 6 Mute 8 Closed Captioning will be performed by CHANNEL (CH) UP (̆) or CHANNEL (CH) DOWN (̄). 17 LAST CHANNEL button Press this button to toggle between the current and last channel viewed. 18 (-) DASH button Use the (-) DASH button with the CHANNEL SELECTOR buttons to enter Digital Channels that have subchannel numbers indicated by pressing and holding down the FAV CH button until the displayed channel turns...
... channels. Cable 6 Volume 8 Soft Mute 8 FAV Cable 6 The Remote Control Cable 6 Mute 8 Closed Captioning will be performed by CHANNEL (CH) UP (̆) or CHANNEL (CH) DOWN (̄). 17 LAST CHANNEL button Press this button to toggle between the current and last channel viewed. 18 (-) DASH button Use the (-) DASH button with the CHANNEL SELECTOR buttons to enter Digital Channels that have subchannel numbers indicated by pressing and holding down the FAV CH button until the displayed channel turns...

Owners Guide
Page 30
... separate control. Use connection at the same time.You can watch more than one program at right to view Digital Channels and Video inputs on the screen. SPLIT MODE PICTURE-IN-PICTURE Split Mode PIP displays the main picture and subpicture evenly on both the main picture and sub picture simultaneously, with every press of VCR VIDEOOUT AUDIOOUT OUTPUT VCR ቢ The Remote Control Main Picture SWAP Sub Picture PIP Specifications Table PIP Mode SPLIT Main Picture Sub Picture Digital Channel (Air or Cable) 1080i...
... separate control. Use connection at the same time.You can watch more than one program at right to view Digital Channels and Video inputs on the screen. SPLIT MODE PICTURE-IN-PICTURE Split Mode PIP displays the main picture and subpicture evenly on both the main picture and sub picture simultaneously, with every press of VCR VIDEOOUT AUDIOOUT OUTPUT VCR ቢ The Remote Control Main Picture SWAP Sub Picture PIP Specifications Table PIP Mode SPLIT Main Picture Sub Picture Digital Channel (Air or Cable) 1080i...
Owners Guide
Page 33
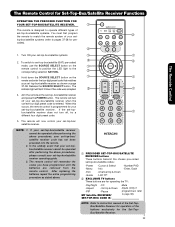
... -Guide -Last CH ባ EXCLUSIVE TV buttons These buttons are removed from the remote control. Aim the remote at the set -top-box/satellite receiver. If the set-topbox/satellite receiver does not turn off , try a ቢ different four digit preset code. 5. NOTE: 1. After replacing the batteries repeat the entire programming procedure as shown on page 37-38. codes). ባ 1. When this occurs, the remote control is programmed for your set- The remote control will flash 3 times...
... -Guide -Last CH ባ EXCLUSIVE TV buttons These buttons are removed from the remote control. Aim the remote at the set -top-box/satellite receiver. If the set-topbox/satellite receiver does not turn off , try a ቢ different four digit preset code. 5. NOTE: 1. After replacing the batteries repeat the entire programming procedure as shown on page 37-38. codes). ባ 1. When this occurs, the remote control is programmed for your set- The remote control will flash 3 times...
Owners Guide
Page 40
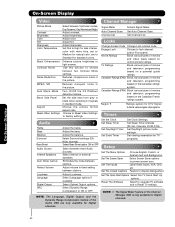
... Adjust sharpness. Use this to High for less intense color with more blue, set to Medium for natural color, set to prevent screen burn. Set Day/Night picture mode settings. Select internal or external speakers. Select Language options if available. Engage Lock Choose to ON or OFF. Set Sleep Timer intervals (30 min. Feature to Reset TV settings. Reset The Software Select to upgrade TV software and to display dialogue/text. Set Auto Channel Scan. Set viewing reservation for Digital channels. Label Video Inputs, VCR, DVD, etc. Color Tint Adjust color. TV...
... Adjust sharpness. Use this to High for less intense color with more blue, set to Medium for natural color, set to prevent screen burn. Set Day/Night picture mode settings. Select internal or external speakers. Select Language options if available. Engage Lock Choose to ON or OFF. Set Sleep Timer intervals (30 min. Feature to Reset TV settings. Reset The Software Select to upgrade TV software and to display dialogue/text. Set Auto Channel Scan. Set viewing reservation for Digital channels. Label Video Inputs, VCR, DVD, etc. Color Tint Adjust color. TV...
Owners Guide
Page 42
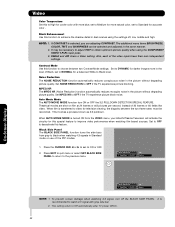
... reduces conspicuous noise in Standard mode or use of Black, set to Standard for a balanced White to Black level. Auto Movie Mode The AUTO MOVIE MODE function turn off , low, middle and high. Theatrical movies are adjusting CONTRAST. Black Side Panel The BLACK SIDE PANEL function turns the side bars from the VIDEO menu, your Hitachi Plasma Television will activate the circuitry for television viewing, the disparity between two Contrast Mode settings. Press the CURSOR PAD...
... reduces conspicuous noise in Standard mode or use of Black, set to Standard for a balanced White to Black level. Auto Movie Mode The AUTO MOVIE MODE function turn off , low, middle and high. Theatrical movies are adjusting CONTRAST. Black Side Panel The BLACK SIDE PANEL function turns the side bars from the VIDEO menu, your Hitachi Plasma Television will activate the circuitry for television viewing, the disparity between two Contrast Mode settings. Press the CURSOR PAD...

Owners Guide
Page 61
... card before upgrading. If YES is selected. Digital signals often change and this feature is selected, ALL TV MENU SETTINGS will not work with a flash card. Setup Setup The Menu Options Set The Screen Saver Set The Inputs Set The Closed Captions Set The Quick Start Options Reset The Software Move SEL Select Setup Set The Quick Start Options OR Select ON to quickly present a picture. Insert MMC/SD CARD. 2. Unplug the AC power cord when the UPGRADE is used to continually monitor signals...
... card before upgrading. If YES is selected. Digital signals often change and this feature is selected, ALL TV MENU SETTINGS will not work with a flash card. Setup Setup The Menu Options Set The Screen Saver Set The Inputs Set The Closed Captions Set The Quick Start Options Reset The Software Move SEL Select Setup Set The Quick Start Options OR Select ON to quickly present a picture. Insert MMC/SD CARD. 2. Unplug the AC power cord when the UPGRADE is used to continually monitor signals...
Owners Guide
Page 66
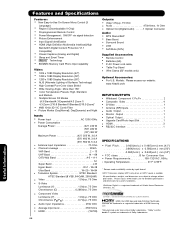
....1 Compatible) • Closed Captions (Analog and Digital) • Sleep and Event Timer • Technology • SD/MMC Memory Card Photo Input capability Video: • 1024 x 1080 Display Resolution (42") • 1280 x 1080 Display Resolution (50") • 1280 x 1080 Display Resolution (55") • ALiS (Alternate Lighting of HDMI Licensing LLC. *Manufactured under license from Dolby Laboratories. Models: Please access our website: www.hitachi.us /tv for detailed specifications and dimensions for Consumer Use • Power...
....1 Compatible) • Closed Captions (Analog and Digital) • Sleep and Event Timer • Technology • SD/MMC Memory Card Photo Input capability Video: • 1024 x 1080 Display Resolution (42") • 1280 x 1080 Display Resolution (50") • 1280 x 1080 Display Resolution (55") • ALiS (Alternate Lighting of HDMI Licensing LLC. *Manufactured under license from Dolby Laboratories. Models: Please access our website: www.hitachi.us /tv for detailed specifications and dimensions for Consumer Use • Power...
Owners Guide
Page 144
... a HITACHI brand digital television (the "DTV"), and HITACHI America, Ltd., Home Electronics Division ("HITACHI"). You understand and agree that your DTV's serial number on a "No Further Upgrades" list, which the U.S. The software is licensed, not sold, to you hereunder are hereby expressly disclaimed to the DTV Software (each, an "Upgrade"). You agree that if you decide to install or use any Upgrade, your installation and use of...
... a HITACHI brand digital television (the "DTV"), and HITACHI America, Ltd., Home Electronics Division ("HITACHI"). You understand and agree that your DTV's serial number on a "No Further Upgrades" list, which the U.S. The software is licensed, not sold, to you hereunder are hereby expressly disclaimed to the DTV Software (each, an "Upgrade"). You agree that if you decide to install or use any Upgrade, your installation and use of...
Owners Guide
Page 155
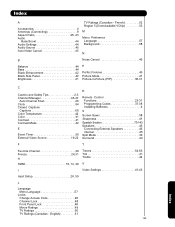
... 5 (Downloadable VChip 53 M Menu Preference Language 57 Background 58 N B Noise Cancel 45 Balance 44 Bass 44 Black Enhancement 42 Black Side Panel 42 Brightness 41 P Perfect Volume 45 Picture Mode 41 Picture-in-Picture (PIP 30-31 C Caution and Safety Tips 2-3 Channel Manager 46-47 Auto Channel Scan 46 Clock 54 Closed Captions Captions 60 Color Temperature 42 Color 41 Contrast 41 Contrast Mode 42 E Event Timer 56 External Video Source 19-22 R Remote Control Functions 23-31 Programming Codes 37-38 Installing Batteries 4 S Screen...
... 5 (Downloadable VChip 53 M Menu Preference Language 57 Background 58 N B Noise Cancel 45 Balance 44 Bass 44 Black Enhancement 42 Black Side Panel 42 Brightness 41 P Perfect Volume 45 Picture Mode 41 Picture-in-Picture (PIP 30-31 C Caution and Safety Tips 2-3 Channel Manager 46-47 Auto Channel Scan 46 Clock 54 Closed Captions Captions 60 Color Temperature 42 Color 41 Contrast 41 Contrast Mode 42 E Event Timer 56 External Video Source 19-22 R Remote Control Functions 23-31 Programming Codes 37-38 Installing Batteries 4 S Screen...


