
Owners Guide
Page 1
LCD Flat Panel TELEVISION Operating Guide for L47V651 & L42V651 IMPORTANT SAFETY INSTRUCTIONS 2-3 FIRST TIME USE ...4-21 THE REMOTE CONTROL...22-37 ON-SCREEN DISPLAY ...38-61 USEFUL INFORMATION...62-68 OPERATING GUIDE IN SPANISH 69-136 END USER LICENSE AGREEMENT FOR HITACHI DTV SOFTWARE 137-145 APPENDIXES...146-147 INDEX...148
LCD Flat Panel TELEVISION Operating Guide for L47V651 & L42V651 IMPORTANT SAFETY INSTRUCTIONS 2-3 FIRST TIME USE ...4-21 THE REMOTE CONTROL...22-37 ON-SCREEN DISPLAY ...38-61 USEFUL INFORMATION...62-68 OPERATING GUIDE IN SPANISH 69-136 END USER LICENSE AGREEMENT FOR HITACHI DTV SOFTWARE 137-145 APPENDIXES...146-147 INDEX...148
Owners Guide
Page 4
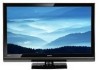
This LCD television product is designed for the 47" & 42" models is WM07S. The wall mount unit for a maximum ...www.hitachi.ca/tv CAUTION: 1. Wall Mount unit is not recommended. Match the batteries to swell or rupture resulting in the battery Bottom View (Remote Control) compartment. 4. Ceiling mounting is an optional accessory (Not Included). ³ Remote ... support for important information related to make sure you have the following accessories before disposing of the remote control by pushing down and sliding the back cover off. 2. EV01841). ¿ Power Swivel Cable...
This LCD television product is designed for the 47" & 42" models is WM07S. The wall mount unit for a maximum ...www.hitachi.ca/tv CAUTION: 1. Wall Mount unit is not recommended. Match the batteries to swell or rupture resulting in the battery Bottom View (Remote Control) compartment. 4. Ceiling mounting is an optional accessory (Not Included). ³ Remote ... support for important information related to make sure you have the following accessories before disposing of the remote control by pushing down and sliding the back cover off. 2. EV01841). ¿ Power Swivel Cable...
Owners Guide
Page 10
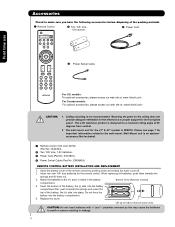
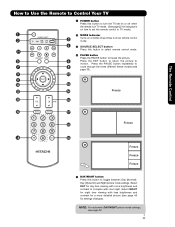
...channel. To control TV functions, please point the remote control directly at the remote control sensor for a complete description of all of the functions on and off. SOURCE ACCESS BUTTONS (TV, DVD, PVR/VCR, SAT/CBL) Changes the mode of your HITACHI LCD TV, the new remote control is designed ...to manually enter the TV channel, and used for TV mode.) INFO BUTTON (TV, STB, CBL, PVR) Displays various information on the ...
...channel. To control TV functions, please point the remote control directly at the remote control sensor for a complete description of all of the functions on and off. SOURCE ACCESS BUTTONS (TV, DVD, PVR/VCR, SAT/CBL) Changes the mode of your HITACHI LCD TV, the new remote control is designed ...to manually enter the TV channel, and used for TV mode.) INFO BUTTON (TV, STB, CBL, PVR) Displays various information on the ...
Owners Guide
Page 11
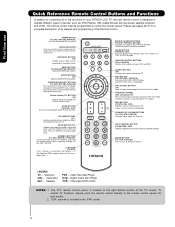
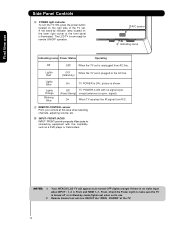
...digital still pictures, please insert an SD/MMC card in the top right corner of the TV screen. Hitachi will stop and may eventually reset itself. ባ MENU/SELECT button This button allows ...adjust the sound level. After this button is pressed to turn the LCD Television ON/OFF. NOTE: When the TV is unplugged, the clock will notify you to enter the MENU, ...by unplugging the power cord from the outlet. It can only be available for your preference without using the remote. Side Panel Controls FRONT VIEW ቢ SIDE PANEL ቦ CONTROLS ቧ ብ ባ First...
...digital still pictures, please insert an SD/MMC card in the top right corner of the TV screen. Hitachi will stop and may eventually reset itself. ባ MENU/SELECT button This button allows ...adjust the sound level. After this button is pressed to turn the LCD Television ON/OFF. NOTE: When the TV is unplugged, the clock will notify you to enter the MENU, ...by unplugging the power cord from the outlet. It can only be available for your preference without using the remote. Side Panel Controls FRONT VIEW ቢ SIDE PANEL ቦ CONTROLS ቧ ብ ባ First...
Owners Guide
Page 12
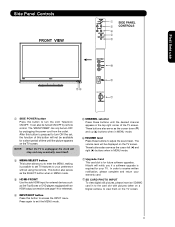
... OFF. NOTES: 1. Remote Control can not turn the TV ON, press the power button located on the lower right corner of the TV. 12 Lights Red Lights Blue Lights Orange Blinking Blue OFF. signal). A red stand-by indicator lamp located on the right side of the TV set is illuminated. Your HITACHI LCD TV will appear to...
... OFF. NOTES: 1. Remote Control can not turn the TV ON, press the power button located on the lower right corner of the TV. 12 Lights Red Lights Blue Lights Orange Blinking Blue OFF. signal). A red stand-by indicator lamp located on the right side of the TV set is illuminated. Your HITACHI LCD TV will appear to...
Owners Guide
Page 13
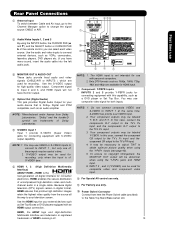
... 2 and 3 By using the INPUTS button, the CURSOR PAD (̆ and ̄), and the SELECT button or CURSOR PAD ̈ of the remote control, you have monitor output. ብ Optical Out (Digital Audio) This jack provides Digital Audio Output for your audio device that pristine high-definition images... be necessary to adjust TINT to connect external devices, such as an audio amplifier. In this case, connect the components B-Y output to the TV's PB input and the components R-Y output to INPUT 1 , but only one of uncompressed high-definition video and multichannel audio in digital format,...
... 2 and 3 By using the INPUTS button, the CURSOR PAD (̆ and ̄), and the SELECT button or CURSOR PAD ̈ of the remote control, you have monitor output. ብ Optical Out (Digital Audio) This jack provides Digital Audio Output for your audio device that pristine high-definition images... be necessary to adjust TINT to connect external devices, such as an audio amplifier. In this case, connect the components B-Y output to the TV's PB input and the components R-Y output to INPUT 1 , but only one of uncompressed high-definition video and multichannel audio in digital format,...

Owners Guide
Page 22
...The PVR/VCR mode indicator will blink, indicating that the remote will now control your set-top-box or satellite receiver (see page 34 for instructions on how to program the remote to control your VCR/PVR). To operate your LCD TV, select TV by pressing the Source button of the Source Select on... operate your set -top-boxes, satellite receivers, DVD players, and other audio/video equipment with one area. To operate your HITACHI LCD TV, the new remote control is designed to operate different types of VCRs, cable boxes, set -top-box or satellite receiver select SAT/CBL by pressing the ...
...The PVR/VCR mode indicator will blink, indicating that the remote will now control your set-top-box or satellite receiver (see page 34 for instructions on how to program the remote to control your VCR/PVR). To operate your LCD TV, select TV by pressing the Source button of the Source Select on... operate your set -top-boxes, satellite receivers, DVD players, and other audio/video equipment with one area. To operate your HITACHI LCD TV, the new remote control is designed to operate different types of VCRs, cable boxes, set -top-box or satellite receiver select SAT/CBL by pressing the ...
Owners Guide
Page 23
... 40 for settings changes). Select NIGHT for night time viewing with room light. The Remote Control How to Use the Remote to Control Your TV ³ POWER button Press this button to turn the TV set on or off when the remote is in TV mode. (See page 22 for instructions on how to set the... remote control to TV mode). ³ · MODE Indicator · » Turns on or blinks three times to show remote control mode. ¿ » SOURCE SELECT button...
... 40 for settings changes). Select NIGHT for night time viewing with room light. The Remote Control How to Use the Remote to Control Your TV ³ POWER button Press this button to turn the TV set on or off when the remote is in TV mode. (See page 22 for instructions on how to set the... remote control to TV mode). ³ · MODE Indicator · » Turns on or blinks three times to show remote control mode. ¿ » SOURCE SELECT button...

Owners Guide
Page 24
... fill it may appear lines at the edge of the size. 16:9 ZOOM Use this button to quickly change the picture format ASPECT ratio. The Remote Control • Antenna-Analog Channel • S-Video/Video Input (Auto Aspect: Off) • HDMI-480i/480p Input (Auto Aspect: Off) • Component-480i...Aspect: On) • Component-480i/480p 16:9 Input (Auto Aspect: On) Note: Please see also page 42). 24 3. How to Use the Remote to Control Your TV ² ASPECT button Press this aspect to Zoom-in once while in all video inputs have independent Aspect Style setting. 2. The Aspect Style in...
... fill it may appear lines at the edge of the size. 16:9 ZOOM Use this button to quickly change the picture format ASPECT ratio. The Remote Control • Antenna-Analog Channel • S-Video/Video Input (Auto Aspect: Off) • HDMI-480i/480p Input (Auto Aspect: Off) • Component-480i...Aspect: On) • Component-480i/480p 16:9 Input (Auto Aspect: On) Note: Please see also page 42). 24 3. How to Use the Remote to Control Your TV ² ASPECT button Press this aspect to Zoom-in once while in all video inputs have independent Aspect Style setting. 2. The Aspect Style in...

Owners Guide
Page 25
... through the Inputs menu items. Then press the SELECT button to select. ƹ INFO button Press this button to access the Channel Guide of the LCD TV (see pages 26-27). Press the INFO button again or the EXIT button to return to choose INPUT 2. INPUT 2 Select to normal viewing. 2. INPUT- ... Use this button to display the dialogue, narration, and/or sound effects of this button to access the INPUTS menu. How to Use the Remote to Control Your TV ¶ MENU button The MENU button will start the On-Screen Display. º EXIT button This button will not be set . Use ...
... through the Inputs menu items. Then press the SELECT button to select. ƹ INFO button Press this button to access the Channel Guide of the LCD TV (see pages 26-27). Press the INFO button again or the EXIT button to return to choose INPUT 2. INPUT 2 Select to normal viewing. 2. INPUT- ... Use this button to display the dialogue, narration, and/or sound effects of this button to access the INPUTS menu. How to Use the Remote to Control Your TV ¶ MENU button The MENU button will start the On-Screen Display. º EXIT button This button will not be set . Use ...

Owners Guide
Page 26
...̆, ̄, ̇ or ̈ and the SELECT button to access the next or previous photo. 3. Picture No. The Remote Control How to Use the Remote to Control Your TV PHOTO INPUT This feature is useful for viewing digital still pictures from picture to view Photo information. 7. Press the CURSOR PAD...cards using the Photo Input in individual photos. 3. Press the INFO button to access PHOTO Input menu and to picture. The maximum number of the TV. 1. Press the CURSOR PAD ̆ or ̄ and the SELECT button to show "Input device not detected" if the MMC/SD memory card...
...̆, ̄, ̇ or ̈ and the SELECT button to access the next or previous photo. 3. Picture No. The Remote Control How to Use the Remote to Control Your TV PHOTO INPUT This feature is useful for viewing digital still pictures from picture to view Photo information. 7. Press the CURSOR PAD...cards using the Photo Input in individual photos. 3. Press the INFO button to access PHOTO Input menu and to picture. The maximum number of the TV. 1. Press the CURSOR PAD ̆ or ̄ and the SELECT button to show "Input device not detected" if the MMC/SD memory card...
Owners Guide
Page 27
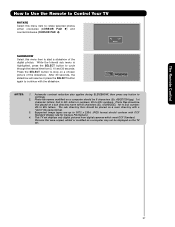
...File System). 4. Automatic contrast reduction also applies during SLIDESHOW, then press any button to 3072 x 2304; The Remote Control How to Use the Remote to Control Your TV ROTATE Select this menu item to start a slideshow of the slideshow. While the Interval sub menu is highlighted, press... on a chosen picture of the digital photos. Press the SELECT button to 8th: letters. Rotate Slideshow Start Interval 5sec NOTES: 1. This TV set . 27 Photo files should conform with the slideshow. ABCD1234.jpg). 1st character: letters; 2nd to 4th: letters or numbers; 5th ...
...File System). 4. Automatic contrast reduction also applies during SLIDESHOW, then press any button to 3072 x 2304; The Remote Control How to Use the Remote to Control Your TV ROTATE Select this menu item to start a slideshow of the slideshow. While the Interval sub menu is highlighted, press... on a chosen picture of the digital photos. Press the SELECT button to 8th: letters. Rotate Slideshow Start Interval 5sec NOTES: 1. This TV set . 27 Photo files should conform with the slideshow. ABCD1234.jpg). 1st character: letters; 2nd to 4th: letters or numbers; 5th ...

Owners Guide
Page 28
... any channel to your regular tuned channels. Press the MUTE button again to turn the sound off at the level it was set when the TV is turned on . Use the CHANNEL SELECTOR buttons to enter one more time, or VOL UP (̆). Press the FAV CH button to switch ... CHANNEL SELECTOR buttons to enter Digital Channels that have subchannel numbers indicated by (-) DASH (example 15-1). 19 RECORD button Press to record programs when the remote is turned on . ƻ CHANNEL SELECTOR/FAVORITE CHANNEL (FAV CH)/ENTER buttons The CHANNEL SELECTOR buttons are in PVR/VCR mode. 28 However, if ...
... any channel to your regular tuned channels. Press the MUTE button again to turn the sound off at the level it was set when the TV is turned on . Use the CHANNEL SELECTOR buttons to enter one more time, or VOL UP (̆). Press the FAV CH button to switch ... CHANNEL SELECTOR buttons to enter Digital Channels that have subchannel numbers indicated by (-) DASH (example 15-1). 19 RECORD button Press to record programs when the remote is turned on . ƻ CHANNEL SELECTOR/FAVORITE CHANNEL (FAV CH)/ENTER buttons The CHANNEL SELECTOR buttons are in PVR/VCR mode. 28 However, if ...

Owners Guide
Page 29
The Remote Control Picture-In-Picture (PIP) Your HITACHI LCD TV ...between main picture and PIP sub picture, use the CURSOR PAD button the remote. To change back to enable the sub-picture sound. 29 The Orange highlighted... -- - - - - - -- - - - - - -- - - - - - -- (*) HDMI Input only NOTE: 1. The Picture-in PIP mode. Please see table below for improved viewing enjoyment This feature allows you want to watch a TV program while viewing other programs from any of the video inputs. Use connection at the same time.You can watch more than one Tuner technology...
The Remote Control Picture-In-Picture (PIP) Your HITACHI LCD TV ...between main picture and PIP sub picture, use the CURSOR PAD button the remote. To change back to enable the sub-picture sound. 29 The Orange highlighted... -- - - - - - -- - - - - - -- - - - - - -- (*) HDMI Input only NOTE: 1. The Picture-in PIP mode. Please see table below for improved viewing enjoyment This feature allows you want to watch a TV program while viewing other programs from any of the video inputs. Use connection at the same time.You can watch more than one Tuner technology...

Owners Guide
Page 30
... sub-picture will be the one frame of the picture you are currently viewing (only the 3 sub-pictures will show in the Main Picture. The Remote Control PHiocwturteo-UIns-ePitchteurRee(mPIoPt)e to Control Your TV ባ PAUSE button Press the PAUSE button repeatedly to normal viewing.
... sub-picture will be the one frame of the picture you are currently viewing (only the 3 sub-pictures will show in the Main Picture. The Remote Control PHiocwturteo-UIns-ePitchteurRee(mPIoPt)e to Control Your TV ባ PAUSE button Press the PAUSE button repeatedly to normal viewing.

Owners Guide
Page 31
...: -Power -Menu -Exit -Guide -Cursor & Select -Info -Channel Up & Down -Last CH -Number PAD -Enter ባ EXCLUSIVE TV buttons These buttons are removed from the remote control. If the cable box does not turn off , try a different four digit preset code. ቢ 5. In the unlikely event that... manual of the Cable Box for operation of cable boxes. Release the SOURCE SELECT button. The Remote Control ባ 1. The remote will remember the codes you have programmed until the batteries are for operating the TV : -Day/Night -Aspect -PIP -Pause -CC -Vol Up & Down -Mute -Inputs ...
...: -Power -Menu -Exit -Guide -Cursor & Select -Info -Channel Up & Down -Last CH -Number PAD -Enter ባ EXCLUSIVE TV buttons These buttons are removed from the remote control. If the cable box does not turn off , try a different four digit preset code. ቢ 5. In the unlikely event that... manual of the Cable Box for operation of cable boxes. Release the SOURCE SELECT button. The Remote Control ባ 1. The remote will remember the codes you have programmed until the batteries are for operating the TV : -Day/Night -Aspect -PIP -Pause -CC -Vol Up & Down -Mute -Inputs ...
Owners Guide
Page 32
...set-top-box/satellite receiver when the correct four digit preset code is programmed for pre- The remote will remember the codes you have programmed until the batteries are for operating the TV : -Day/Night -Aspect -PIP -CC -Vol Up & Down -Pause MY Satellite RECEIVER/ ...-Cursor & Select -Number PAD -Menu -Exit -Info -Enter, Dash -Channel Up & Down -Guide -Last CH ባ EXCLUSIVE TV buttons These buttons are removed from the remote control. NOTE: 1. top-box/satellite systems (refer to the corresponding selection SAT/CBL. ባ 3. Release the SOURCE SELECT button. ...
...set-top-box/satellite receiver when the correct four digit preset code is programmed for pre- The remote will remember the codes you have programmed until the batteries are for operating the TV : -Day/Night -Aspect -PIP -CC -Vol Up & Down -Pause MY Satellite RECEIVER/ ...-Cursor & Select -Number PAD -Menu -Exit -Info -Enter, Dash -Channel Up & Down -Guide -Last CH ባ EXCLUSIVE TV buttons These buttons are removed from the remote control. NOTE: 1. top-box/satellite systems (refer to the corresponding selection SAT/CBL. ባ 3. Release the SOURCE SELECT button. ...

Owners Guide
Page 33
... codes : -Power -Number PAD -Menu -Play, Stop, Pause, -Info RWD, FWD, Skip RWD, -Cursor & Select Skip FWD. ባ EXCLUSIVE TV Buttons These buttons are removed from the remote control. The indicator light will remember the codes you have programmed until the batteries are for operating the... TV : -Day/Night -Aspect -PIP -Exit -CC -Inputs (Only if -Vol Up & Down programmed, refer -Mute to page 35) MY DVD ...
... codes : -Power -Number PAD -Menu -Play, Stop, Pause, -Info RWD, FWD, Skip RWD, -Cursor & Select Skip FWD. ባ EXCLUSIVE TV Buttons These buttons are removed from the remote control. The indicator light will remember the codes you have programmed until the batteries are for operating the... TV : -Day/Night -Aspect -PIP -Exit -CC -Inputs (Only if -Vol Up & Down programmed, refer -Mute to page 35) MY DVD ...

Owners Guide
Page 34
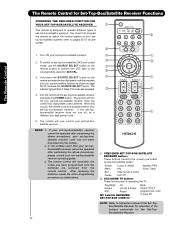
...-Play,Pause,Stop -FWD,Skip FWD ባ EXCLUSIVE TV Buttons These buttons are removed from the remote control. Release the SOURCE SELECT button. NOTE: 1. When this occurs, the remote control is programmed for pre-codes). ቢ The Remote Control 1. Turn ON your VCR/PVR. If your... the above procedures, your VCR/PVR operating guide. 3. THhoewRteomUostee tfhoer RVCemR/oPtVeRtoFuCnocnttiroonlsYour TV OPERATING THE PRECODED FUNCTION FOR YOUR VCR/PVR (Personal Video Recorder). ቢ This remote is designed to operate different types of the buttons exclusively for the VCR/PVR....
...-Play,Pause,Stop -FWD,Skip FWD ባ EXCLUSIVE TV Buttons These buttons are removed from the remote control. Release the SOURCE SELECT button. NOTE: 1. When this occurs, the remote control is programmed for pre-codes). ቢ The Remote Control 1. Turn ON your VCR/PVR. If your... the above procedures, your VCR/PVR operating guide. 3. THhoewRteomUostee tfhoer RVCemR/oPtVeRtoFuCnocnttiroonlsYour TV OPERATING THE PRECODED FUNCTION FOR YOUR VCR/PVR (Personal Video Recorder). ቢ This remote is designed to operate different types of the buttons exclusively for the VCR/PVR....

Owners Guide
Page 35
... Assigned input numbers can be used more than once if applicable. ᕈ The remote will blink 3 times to INPUT 1 of the TV) ᕃ Select DVD mode by using your DVD on the remote and enter the four digit preset code that the device is related to (refer ... numbers 0, 5, 7 and 3. ᕅ Then press the number 1 for this feature is optional 2. Release the SOURCE SELECT button. 5. SETUP EXAMPLE (Hitachi DVD with precode 0573 connected to confirm proper setup. FRONT 7 ᕆ Release SOURCE SELECT button. ᕇ If done correctly, the device LED indicator will...
... Assigned input numbers can be used more than once if applicable. ᕈ The remote will blink 3 times to INPUT 1 of the TV) ᕃ Select DVD mode by using your DVD on the remote and enter the four digit preset code that the device is related to (refer ... numbers 0, 5, 7 and 3. ᕅ Then press the number 1 for this feature is optional 2. Release the SOURCE SELECT button. 5. SETUP EXAMPLE (Hitachi DVD with precode 0573 connected to confirm proper setup. FRONT 7 ᕆ Release SOURCE SELECT button. ᕇ If done correctly, the device LED indicator will...


