
User Guide
Page 1
...zoom and power focus. (5) P in a safe place for purchasing the Hitachi liquid crystal projector. After reading, store this user's manual thoroughly to ensure correct usage through understanding. Outline This liquid crystal projector is required for installation and large images can be realized. Little space is...to the USB 25 Connection to project various computer signals as well as NTSC/PAL/SECAM video signals onto a screen. Liquid Crystal Projector Model CP-X960W/E USER'S GUIDE Thank you think something wrong. . . . . . 33 Specifications 34 About the warranty and ...
...zoom and power focus. (5) P in a safe place for purchasing the Hitachi liquid crystal projector. After reading, store this user's manual thoroughly to ensure correct usage through understanding. Outline This liquid crystal projector is required for installation and large images can be realized. Little space is...to the USB 25 Connection to project various computer signals as well as NTSC/PAL/SECAM video signals onto a screen. Liquid Crystal Projector Model CP-X960W/E USER'S GUIDE Thank you think something wrong. . . . . . 33 Specifications 34 About the warranty and ...
User Guide
Page 10
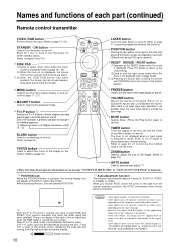
...only during freezing. VOLUME button Adjusts the volume of the image on and off . Press [ ] to increase the volume and ( ) to the right from the manual operation position), the AUTO confirmation menu shown below is out of the remote control, displaying the audio bar and moving display icon will change in... the timer. In P in P function, signals are active. *1 (3) After the POSITION button has been pressed, the screen can operate POSITION. *3 Auto adjustment function The projector automatically adjusts 4 items (V. This function operates only when the RGB signal has been selected.
...only during freezing. VOLUME button Adjusts the volume of the image on and off . Press [ ] to increase the volume and ( ) to the right from the manual operation position), the AUTO confirmation menu shown below is out of the remote control, displaying the audio bar and moving display icon will change in... the timer. In P in P function, signals are active. *1 (3) After the POSITION button has been pressed, the screen can operate POSITION. *3 Auto adjustment function The projector automatically adjusts 4 items (V. This function operates only when the RGB signal has been selected.

User Guide
Page 25
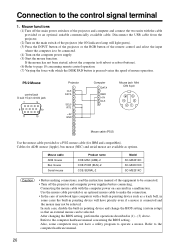
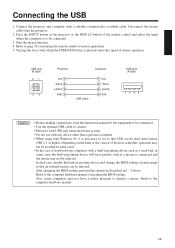
... that USB can be connected. 3. Varying the force with Windows 95, it is pressed varies the speed of mouse operation. USB jack (B type) 21 34 Projector +5V 1 -DATA 2 +DATA 3 GND 4 Computer USB cable 1 +5V 2 -DATA 3 +DATA 4 GND USB jack (A type) 1234 Caution • Before making ... a personal computer. • When using with which the DISK PAD button is necessary to be selected. Refer to the computer hardware manual. 25 Start the mouse function. 4. Connect the projector and computer with version OSR 2.1 or higher. Connecting the USB 1. Press the INPUT button of the...
... that USB can be connected. 3. Varying the force with Windows 95, it is pressed varies the speed of mouse operation. USB jack (B type) 21 34 Projector +5V 1 -DATA 2 +DATA 3 GND 4 Computer USB cable 1 +5V 2 -DATA 3 +DATA 4 GND USB jack (A type) 1234 Caution • Before making ... a personal computer. • When using with which the DISK PAD button is necessary to be selected. Refer to the computer hardware manual. 25 Start the mouse function. 4. Connect the projector and computer with version OSR 2.1 or higher. Connecting the USB 1. Press the INPUT button of the...
User Guide
Page 26
... (system setup) so that an external mouse can result in (1) - (3) above. Connection to the computer hardware manual concerning the BIOS setting. Disconnect the USB cable from the projector. (2) Turn on can be connected. • Turn off the main power switches of notebook type computers with the... computer power on the main switch of the projector (the ON indicator lamp will have a utility program to the computer hardware manual. 26 Connecting the mouse cable with a built-in some computers may not be connected. (4) ...
... (system setup) so that an external mouse can result in (1) - (3) above. Connection to the computer hardware manual concerning the BIOS setting. Disconnect the USB cable from the projector. (2) Turn on can be connected. • Turn off the main power switches of notebook type computers with the... computer power on the main switch of the projector (the ON indicator lamp will have a utility program to the computer hardware manual. 26 Connecting the mouse cable with a built-in some computers may not be connected. (4) ...

User Guide
Page 31
... MAIN POWER switch of each device before connecting. Cleaning the Air filter Clean the air filter about every 100 hours . 1 Turn off to the instruction manual of the projector and pull out the power cord. 2 Remove the front air filter. Refer to all devices before connecting.
... MAIN POWER switch of each device before connecting. Cleaning the Air filter Clean the air filter about every 100 hours . 1 Turn off to the instruction manual of the projector and pull out the power cord. 2 Remove the front air filter. Refer to all devices before connecting.
User Guide
Page 1
... images can be realized. Outline This liquid crystal projector is required for purchasing the Hitachi liquid crystal projector. Little space is used to ensure correct usage through understanding. Liquid Crystal Projector Model CP-X958W/E CP-X960W/E USER'S GUIDE ...Thank you think something wrong............33 Specifications 34 About the warranty and after-service 35 1 Please read this instruction manual...
... images can be realized. Outline This liquid crystal projector is required for purchasing the Hitachi liquid crystal projector. Little space is used to ensure correct usage through understanding. Liquid Crystal Projector Model CP-X958W/E CP-X960W/E USER'S GUIDE ...Thank you think something wrong............33 Specifications 34 About the warranty and after-service 35 1 Please read this instruction manual...

User Guide
Page 10
...to adjust the image position (RGB mode only). (Refer to decrease the volume. POSIT, H. When you can operate POSITION. *3 Auto adjustment function The projector automatically adjusts 4 items (V. Press this button after scrolling the screen with the Timer on the Menu screen on and off . Refer to page 21 ... the freeze (still) image display on and off . While displaying the icon, you choose AUTO (move the cursor to the right from the manual operation position), the AUTO confirmation menu shown below is not displayed (refer to page 25,26). *1 (3)Pressing this button to return to the ...
...to adjust the image position (RGB mode only). (Refer to decrease the volume. POSIT, H. When you can operate POSITION. *3 Auto adjustment function The projector automatically adjusts 4 items (V. Press this button after scrolling the screen with the Timer on the Menu screen on and off . Refer to page 21 ... the freeze (still) image display on and off . While displaying the icon, you choose AUTO (move the cursor to the right from the manual operation position), the AUTO confirmation menu shown below is not displayed (refer to page 25,26). *1 (3)Pressing this button to return to the ...
User Guide
Page 25
...to be selected. USB jack (B type) 21 34 Projector +5V 1 -DATA 2 +DATA 3 GND 4 Computer USB cable 1 +5V 2 -DATA 3 +DATA 4 GND USB jack (A type) 1234 Caution • Before making connections, read the instruction manual of the equipment to be selected. Depending on the...operations. 5. Refer to the computer hardware manual concerning the BIOS setting. Press the INPUT button of the projector or the RGB 1/2 button of mouse operation. Disconnect the mouse cable from the projector. 2. Connecting the USB 1. Connect the projector and computer with a built-in pointing ...
...to be selected. USB jack (B type) 21 34 Projector +5V 1 -DATA 2 +DATA 3 GND 4 Computer USB cable 1 +5V 2 -DATA 3 +DATA 4 GND USB jack (A type) 1234 Caution • Before making connections, read the instruction manual of the equipment to be selected. Depending on the...operations. 5. Refer to the computer hardware manual concerning the BIOS setting. Press the INPUT button of the projector or the RGB 1/2 button of mouse operation. Disconnect the mouse cable from the projector. 2. Connecting the USB 1. Connect the projector and computer with a built-in pointing ...

User Guide
Page 26
...main switch of mouse operation. Refer to the computer hardware manual concerning the BIOS setting. In such case, disable the built-in pointing device will light green). (3) Press the INPUT button of the projector or the RGB button of the remote control and select ...cable to operate a mouse. Caution • Before making connections, read the instruction manual of the equipment to the control signal terminal 1. Refer to the computer hardware manual. 26 Disconnect the USB cable from the projector. (2) Turn on can be selected. Connection to be connected. • Turn...
...main switch of mouse operation. Refer to the computer hardware manual concerning the BIOS setting. In such case, disable the built-in pointing device will light green). (3) Press the INPUT button of the projector or the RGB button of the remote control and select ...cable to operate a mouse. Caution • Before making connections, read the instruction manual of the equipment to the control signal terminal 1. Refer to the computer hardware manual. 26 Disconnect the USB cable from the projector. (2) Turn on can be selected. Connection to be connected. • Turn...

User Guide
Page 31
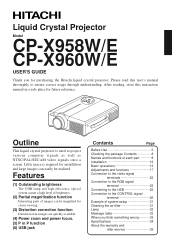
.... Filter Air Filter Parts Number MU00831 31 Cleaning the Air filter Clean the air filter about every 100 hours . 1 Turn off to the instruction manual of the projector and pull out the power cord. 2 Remove the front air filter. Example of system setup Computer (notebook type) Computer (desktop type) AC input 1 RGB...
.... Filter Air Filter Parts Number MU00831 31 Cleaning the Air filter Clean the air filter about every 100 hours . 1 Turn off to the instruction manual of the projector and pull out the power cord. 2 Remove the front air filter. Example of system setup Computer (notebook type) Computer (desktop type) AC input 1 RGB...


