User Manual
Page 2
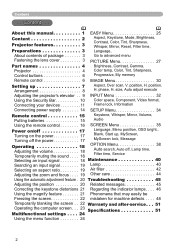
... advanced menu Fastening the lens cover 3 PICTURE Menu 27 Part names 4 Brightness, Contrast, Gamma, Projector 4 Color temp, Color, Tint, Sharpness, Control buttons 6 Progressive, My memory Remote control 6 IMAGE Menu 30 Setting up , MyScreen, MyScreen lock, Message Operating 18 Adjusting the volume 18 Temporarily muting the sound . . . . 18 OPTION Menu 38 Auto search, Auto off, Lamp time, Filter time, Service Selecting an input signal 18 Maintenance 40 Searcting an input signal 19 Lamp 40 Selecting an aspect ratio 19 Air filter 42 Adjusting the zoom and focus...
... advanced menu Fastening the lens cover 3 PICTURE Menu 27 Part names 4 Brightness, Contrast, Gamma, Projector 4 Color temp, Color, Tint, Sharpness, Control buttons 6 Progressive, My memory Remote control 6 IMAGE Menu 30 Setting up , MyScreen, MyScreen lock, Message Operating 18 Adjusting the volume 18 Temporarily muting the sound . . . . 18 OPTION Menu 38 Auto search, Auto off, Lamp time, Filter time, Service Selecting an input signal 18 Maintenance 40 Searcting an input signal 19 Lamp 40 Selecting an aspect ratio 19 Air filter 42 Adjusting the zoom and focus...
User Manual
Page 3
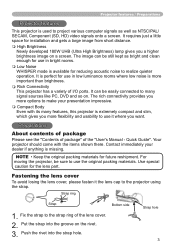
... the lens cover, please fasten it the lens cap to use it where you want. NOTE • Keep the original packing materials for the lens part. Strap ring Strap Bottom side 1. The image can be still kept as NTSC/PAL/ SECAM, Component (SD, HD) video signals onto a screen. It requires just a little space for installation and gets a large image from short distance. High Brightness...
... the lens cover, please fasten it the lens cap to use it where you want. NOTE • Keep the original packing materials for the lens part. Strap ring Strap Bottom side 1. The image can be still kept as NTSC/PAL/ SECAM, Component (SD, HD) video signals onto a screen. It requires just a little space for installation and gets a large image from short distance. High Brightness...
User Manual
Page 7
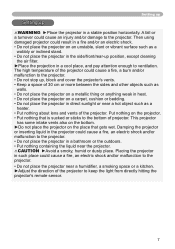
...inclined stand. • Do not place the projector in the side/front/rear-up position, except cleaning the air filter. ►Place the projection in a cool place, and pay attention enough to ventilation. The high temperature of the projector could result in a fire and/or.... ►Adjust the direction of the projector to keep the light from directly hitting the projector's remote sensor. 7 Damping the projector or inserting liquid in the projector could cause a fire, an electric shock and/or malfunction to the projector. • Do not place the projector in such place...
...inclined stand. • Do not place the projector in the side/front/rear-up position, except cleaning the air filter. ►Place the projection in a cool place, and pay attention enough to ventilation. The high temperature of the projector could result in a fire and/or.... ►Adjust the direction of the projector to keep the light from directly hitting the projector's remote sensor. 7 Damping the projector or inserting liquid in the projector could cause a fire, an electric shock and/or malfunction to the projector. • Do not place the projector in such place...
User Manual
Page 11
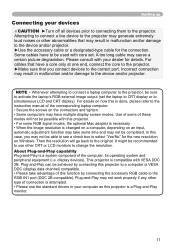
... by connecting this projector to a computer is VESA DDC (display data channel) compatible. • Please take some time and may not be used with your devices CAUTION ►Turn off all devices prior to connecting them to activate the laptop's RGB external image output (set . Please consult with core set the laptop to CRT display or to change the resolution. For details on an input, automatic adjustment function...
... by connecting this projector to a computer is VESA DDC (display data channel) compatible. • Please take some time and may not be used with your devices CAUTION ►Turn off all devices prior to connecting them to activate the laptop's RGB external image output (set . Please consult with core set the laptop to CRT display or to change the resolution. For details on an input, automatic adjustment function...

User Manual
Page 17
... button on the projector or the remote control. Power off the projector later than the connected devices. The projector lamp will light up and the POWER POWER indicator will light up in steady orange. To display the picture, select an input signal according to the projector and the outlet. 2. Neglect could shorten the lifetime of the projector (4 ) It could cause a burn. 1. The message "Power off?" The POWER indicator will begin blinking in green. Attach the lens cover. (Blinking...
... button on the projector or the remote control. Power off the projector later than the connected devices. The projector lamp will light up and the POWER POWER indicator will light up in steady orange. To display the picture, select an input signal according to the projector and the outlet. 2. Neglect could shorten the lifetime of the projector (4 ) It could cause a burn. 1. The message "Power off?" The POWER indicator will begin blinking in green. Attach the lens cover. (Blinking...

User Manual
Page 18
... button on the remote control. Operating Operating Adjusting the volume 1. Each time you don't do anything , the dialog will be displayed. 1. If no input is pushed in adjusting the volume. 2. Even if you press the button, the projector switches its RGB VIDEO RGB SEARCH input port as an RGB out port (the POSITION RGB IN MENU OUT switch is selected for the RGB signal. VIDEO RGB SEARCH ASPECT AUTO BLANK MAGNIFY ON HOME...
... button on the remote control. Operating Operating Adjusting the volume 1. Each time you don't do anything , the dialog will be displayed. 1. If no input is pushed in adjusting the volume. 2. Even if you press the button, the projector switches its RGB VIDEO RGB SEARCH input port as an RGB out port (the POSITION RGB IN MENU OUT switch is selected for the RGB signal. VIDEO RGB SEARCH ASPECT AUTO BLANK MAGNIFY ON HOME...

User Manual
Page 19
... ASPECT button on the remote control. POSITION MENU ● Performing the automatic adjustment initializes the aspect ratio setting. Use the zoom knob to focus the picture. 19 COMPONENT VIDEO S-VIDEO VIDEO VIDEO RGB SEARCH ASPECT AUTO BLANK MAGNIFY ON HOME PAGE UP VOLUME OFF END PAGE DOWN MUTE FREEZE KEYSTONE ● If the VIDEO button is pushed (when switching from RGB to check its video input port as the COMPONENT VIDEO input, only 16:9 mode...
... ASPECT button on the remote control. POSITION MENU ● Performing the automatic adjustment initializes the aspect ratio setting. Use the zoom knob to focus the picture. 19 COMPONENT VIDEO S-VIDEO VIDEO VIDEO RGB SEARCH ASPECT AUTO BLANK MAGNIFY ON HOME PAGE UP VOLUME OFF END PAGE DOWN MUTE FREEZE KEYSTONE ● If the VIDEO button is pushed (when switching from RGB to check its video input port as the COMPONENT VIDEO input, only 16:9 mode...
User Manual
Page 23
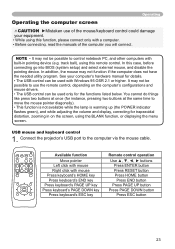
... available while the lamp is warming up (the POWER indicator flashes green), and while adjusting the volume and display, correcting for the functions listed below. Connect the projector's USB port to control notebook PC, and other computers with a computer. • Before connecting, read the manuals of the mouse/keyboard control could damage your computer's hardware manual for details. • The USB control can be used with mouse...
... available while the lamp is warming up (the POWER indicator flashes green), and while adjusting the volume and display, correcting for the functions listed below. Connect the projector's USB port to control notebook PC, and other computers with a computer. • Before connecting, read the manuals of the mouse/keyboard control could damage your computer's hardware manual for details. • The USB control can be used with mouse...
User Manual
Page 24
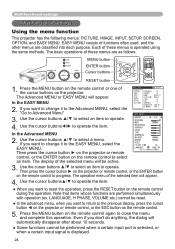
... ► on the projector or remote control, or the ENTER button on the remote control to close the menu and complete this operation. MENU [RGB] :SELECT PICTURE IMAGE INPUT SETUP SCREEN OPTION EASY MENU BRIGHTNESS +0 CONTRAST +0 GAMMA DEFAULT 1 COLOR TEMP MIDDLE COLOR +0 TINT 0 SHARPNESS 3 PROGRESSIVE TURN OFF MY MEMORY SAVE 1 EASY MENU ASPECT 4:3 KEYSTONE +0 MODE BRIGHTNESS CONTRAST COLOR TINT SHARPNESS NORMAL +0 +0 +0 +0 3 WHISPER NORMAL MIRROR NORMAL RESET FILTER TIME 0h LANGUAGE ENGLISH...
... ► on the projector or remote control, or the ENTER button on the remote control to close the menu and complete this operation. MENU [RGB] :SELECT PICTURE IMAGE INPUT SETUP SCREEN OPTION EASY MENU BRIGHTNESS +0 CONTRAST +0 GAMMA DEFAULT 1 COLOR TEMP MIDDLE COLOR +0 TINT 0 SHARPNESS 3 PROGRESSIVE TURN OFF MY MEMORY SAVE 1 EASY MENU ASPECT 4:3 KEYSTONE +0 MODE BRIGHTNESS CONTRAST COLOR TINT SHARPNESS NORMAL +0 +0 +0 +0 3 WHISPER NORMAL MIRROR NORMAL RESET FILTER TIME 0h LANGUAGE ENGLISH...
User Manual
Page 32
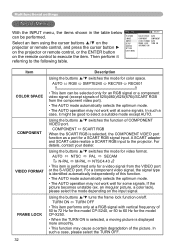
... video port). • The AUTO mode automatically selects the optimum mode. • The AUTO operation may not work well for some signals. PICTURE IMAGE COLOR SPACE AUTO COMPONENT COMPONENT Select an item using the cursor buttons ▲/▼ on the projector or remote control, and press the cursor button ► INPUT SETUP SCREEN OPTION VIDEO FORMAT AUTO FRAME LOCK TURN ON INFORMATION on the projector or remote control, or the ENTER button EASY MENU on the remote control to the projector. A SCART adapter and SCART cable...
... video port). • The AUTO mode automatically selects the optimum mode. • The AUTO operation may not work well for some signals. PICTURE IMAGE COLOR SPACE AUTO COMPONENT COMPONENT Select an item using the cursor buttons ▲/▼ on the projector or remote control, and press the cursor button ► INPUT SETUP SCREEN OPTION VIDEO FORMAT AUTO FRAME LOCK TURN ON INFORMATION on the projector or remote control, or the ENTER button EASY MENU on the remote control to the projector. A SCART adapter and SCART cable...
User Manual
Page 34
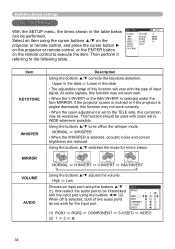
...SELECT PICTURE IMAGE INPUT SETUP SCREEN OPTION EASY MENU KEYSTONE +0 WHISPER NORMAL MIRROR NORMAL VOLUME 16 AUDIO Item KEYSTONE WHISPER MIRROR VOLUME AUDIO Description Using the buttons ▲/▼ corrects the keystone distortion. Using the buttons ▲/▼ turns off is selected, both of input signal. NORMAL H:INVERT V:INVERT H&V:INVERT Using the buttons ▲/▼ adjusts the volume. High Low Choose an input port using the cursor buttons ▲/▼ on the projector or remote control...
...SELECT PICTURE IMAGE INPUT SETUP SCREEN OPTION EASY MENU KEYSTONE +0 WHISPER NORMAL MIRROR NORMAL VOLUME 16 AUDIO Item KEYSTONE WHISPER MIRROR VOLUME AUDIO Description Using the buttons ▲/▼ corrects the keystone distortion. Using the buttons ▲/▼ turns off is selected, both of input signal. NORMAL H:INVERT V:INVERT H&V:INVERT Using the buttons ▲/▼ adjusts the volume. High Low Choose an input port using the cursor buttons ▲/▼ on the projector or remote control...

User Manual
Page 38
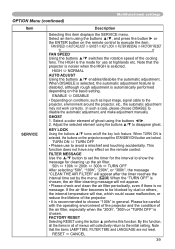
... settings OPTION Menu With the OPTION menu, the items shown in ), RGB IN2 cannot be selected. PICTURE Select an item using the cursor buttons ▲/▼ on the projector or IMAGE INPUT AUTO SEARCH TURN OFF AUTO OFF 0min LAMP TIME 0h remote control, and press the cursor button ► on the projector SETUP SCREEN FILTER TIME 0h SERVICE or remote control, or the ENTER button on the remote control or the button ► of the lamp. Item AUTO SEARCH Description Using...
... settings OPTION Menu With the OPTION menu, the items shown in ), RGB IN2 cannot be selected. PICTURE Select an item using the cursor buttons ▲/▼ on the projector or IMAGE INPUT AUTO SEARCH TURN OFF AUTO OFF 0min LAMP TIME 0h remote control, and press the cursor button ► on the projector SETUP SCREEN FILTER TIME 0h SERVICE or remote control, or the ENTER button on the remote control or the button ► of the lamp. Item AUTO SEARCH Description Using...
User Manual
Page 39
... message "CLEAN THE AIR FILTER" will appear after the timer reaches the interval time set the timer for the interval to choose "100h" in all of the air filter, especially when the "200h", "300h or "TURN OFF" is no message. Select a color element of the cooling fans. Adjust the selected element using the button ▲ performs this item displays the SERVICE menu. KEY LOCK Using the buttons ▲/▼ turns on the remote control. TURN...
... message "CLEAN THE AIR FILTER" will appear after the timer reaches the interval time set the timer for the interval to choose "100h" in all of the air filter, especially when the "200h", "300h or "TURN OFF" is no message. Select a color element of the cooling fans. Adjust the selected element using the button ▲ performs this item displays the SERVICE menu. KEY LOCK Using the buttons ▲/▼ turns on the remote control. TURN...
User Manual
Page 45
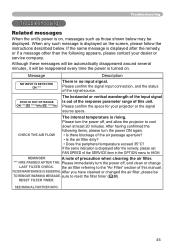
... the input signal is displayed after the remedy, please set FAN SPEED of this manual. If the same message is out of the response parameter range of the SERVICE item in the OPTION menu to cool down at least 20 minutes. If the same indication is turned on the screen, please follow the instructions described below may be TO REMOVE WARNING MESSAGE, sure to the "Air Filter" section...
... the input signal is displayed after the remedy, please set FAN SPEED of this manual. If the same message is out of the response parameter range of the SERVICE item in the OPTION menu to cool down at least 20 minutes. If the same indication is turned on the screen, please follow the instructions described below may be TO REMOVE WARNING MESSAGE, sure to the "Air Filter" section...

User Manual
Page 46
... Green off off The lamp cover has not been properly fixed. Blinking In Red or Lighting In Red Lighting In Red Turned off Please refer to the section "Lamp". After the projector has sufficiently cooled down at least 20 minutes. Troubleshooting Regarding the indicator lamps Lighting and flashing of the air passage aperture? • Is the air filter dirty? • Does the peripheral temperature...
... Green off off The lamp cover has not been properly fixed. Blinking In Red or Lighting In Red Lighting In Red Turned off Please refer to the section "Lamp". After the projector has sufficiently cooled down at least 20 minutes. Troubleshooting Regarding the indicator lamps Lighting and flashing of the air passage aperture? • Is the air filter dirty? • Does the peripheral temperature...

User Manual
Page 47
... Red Turned off Lighting In Red There is time to clean the air filter. Lighting In Green Simultaneous blinking in Red It is a possibility that no foreign matter has become overheated, for safety purposes, the power source is displayed after the remedy, please contact your dealer or service company. If the same indication is not operating. Troubleshooting Regarding the indicator lamps (continued) POWER LAMP TEMP indicator indicator indicator Description Blinking In Red or Lighting In Red Turned off Blinking In Red The cooling fan...
... Red Turned off Lighting In Red There is time to clean the air filter. Lighting In Green Simultaneous blinking in Red It is a possibility that no foreign matter has become overheated, for safety purposes, the power source is displayed after the remedy, please contact your dealer or service company. If the same indication is not operating. Troubleshooting Regarding the indicator lamps (continued) POWER LAMP TEMP indicator indicator indicator Description Blinking In Red or Lighting In Red Turned off Blinking In Red The cooling fan...

User Manual
Page 48
.... Correctly connect the connection cables. 12, 13 Signal source does not correctly work. nor pictures are mismatched. This operation sometimes resolves your dealer or service company. If the situation cannot be reset. Please use the projector if abnormal operations such as by a power outage (blackout), etc. down at least 2 minutes. The input changeover settings are outputted. Some setting may be easy to be mistaken for machine defects WARNING...
.... Correctly connect the connection cables. 12, 13 Signal source does not correctly work. nor pictures are mismatched. This operation sometimes resolves your dealer or service company. If the situation cannot be reset. Please use the projector if abnormal operations such as by a power outage (blackout), etc. down at least 2 minutes. The input changeover settings are outputted. Some setting may be easy to be mistaken for machine defects WARNING...

Quick Start Guide
Page 7
...: (1) Please do not turn off ?" Set the power switch to the OFF position. POWER (Steady orange) 3. Do not look into the lens of RGB, VIDEO or SEARCH (remote control). 2. POWER (Steady orange) 2. To change the aspect ratio, use the zoom knob and the focus ring. will stop blinking and light in green) (Steady green) Displaying 1. POWER POWER (Blinking in steady orange when the lamp cooling is complete. To adjust the zoom and focus, use the button ASPECT (remote control). The message "Power off the main...
...: (1) Please do not turn off ?" Set the power switch to the OFF position. POWER (Steady orange) 3. Do not look into the lens of RGB, VIDEO or SEARCH (remote control). 2. POWER (Steady orange) 2. To change the aspect ratio, use the zoom knob and the focus ring. will stop blinking and light in green) (Steady green) Displaying 1. POWER POWER (Blinking in steady orange when the lamp cooling is complete. To adjust the zoom and focus, use the button ASPECT (remote control). The message "Power off the main...
Technical Operating Manual
Page 7
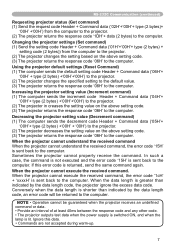
... indicated by the data length code, an error code will be guaranteed when the projector receives an undefined command or data. • Provide an interval of at least 40ms between the response code and any other code. • The projector outputs test data when the power supply is switched ON, and when the lamp is sent back to the computer. Decreasing the projector setting value (Decrement command...
... indicated by the data length code, an error code will be guaranteed when the projector receives an undefined command or data. • Provide an interval of at least 40ms between the response code and any other code. • The projector outputs test data when the power supply is switched ON, and when the lamp is sent back to the computer. Decreasing the projector setting value (Decrement command...
Technical Operating Manual
Page 8
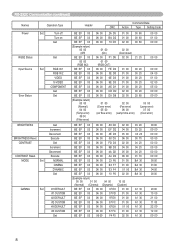
RS-232C Communication (continued) Names Power Operation Type Set Turn off Turn on Get RGB2 Status Get Input Source Error Status Set RGB IN 1 RGB IN 2 VIDEO S-VIDEO COMPONENT Get Get BRIGHTNESS BRIGHTNESS Reset CONTRAST CONTRAST Reset MODE Set Get Increment Decrement Execute Get Increment Decrement Execute NORMAL CINEMA DYNAMIC Get GAMMA Set #1 DEFAULT #1 CUSTOM #2 DEFAULT #2 CUSTOM #3 DEFAULT #3 CUSTOM Get Header Command Data CRC Action Type Setting Code BE EF 03 BE EF 03 BE EF...
RS-232C Communication (continued) Names Power Operation Type Set Turn off Turn on Get RGB2 Status Get Input Source Error Status Set RGB IN 1 RGB IN 2 VIDEO S-VIDEO COMPONENT Get Get BRIGHTNESS BRIGHTNESS Reset CONTRAST CONTRAST Reset MODE Set Get Increment Decrement Execute Get Increment Decrement Execute NORMAL CINEMA DYNAMIC Get GAMMA Set #1 DEFAULT #1 CUSTOM #2 DEFAULT #2 CUSTOM #3 DEFAULT #3 CUSTOM Get Header Command Data CRC Action Type Setting Code BE EF 03 BE EF 03 BE EF...


