
Owners Guide
Page 1
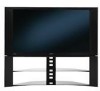
LCD REAR PROJECTION TELEVISION Operating Guide for energy efficiency. has determined that this product meets the Energy Star® guidelines for 50VG825, 55VG825, 60VG825 IMPORTANT SAFETY INSTRUCTIONS 2-3 FIRST TIME USE ...4-20 THE REMOTE CONTROL ...21-38 ON-SCREEN DISPLAY ...39-88 LAMP REPLACEMENT ...88-91 USEFUL INFORMATION...92-97 LICENSE AGREEMENT...98 APPENDIXES ...99-100 INDEX ...101 As an Energy Star® Partner, Hitachi, Ltd.
LCD REAR PROJECTION TELEVISION Operating Guide for energy efficiency. has determined that this product meets the Energy Star® guidelines for 50VG825, 55VG825, 60VG825 IMPORTANT SAFETY INSTRUCTIONS 2-3 FIRST TIME USE ...4-20 THE REMOTE CONTROL ...21-38 ON-SCREEN DISPLAY ...39-88 LAMP REPLACEMENT ...88-91 USEFUL INFORMATION...92-97 LICENSE AGREEMENT...98 APPENDIXES ...99-100 INDEX ...101 As an Energy Star® Partner, Hitachi, Ltd.

Owners Guide
Page 4
...Mouse Cable / For U.S. Insert two new "AA" size batteries for the remote control. Replace the cover. Accessories Check to make sure you have the following accessories before disposing of the remote control by pushing down and slide back to remove. HL02065). · Two... resulting in the battery compartment. 4. BOTTOM VIEW (Remote Control) Press down and sliding the back cover off. 2. models: For optional accessories, please access our web site at: www.hitachi.us/tv ³ Remote Control Unit CLU-3851WL (Part No. REMOTE CONTROL BATTERY INSTALLATION AND REPLACEMENT 1.
...Mouse Cable / For U.S. Insert two new "AA" size batteries for the remote control. Replace the cover. Accessories Check to make sure you have the following accessories before disposing of the remote control by pushing down and slide back to remove. HL02065). · Two... resulting in the battery compartment. 4. BOTTOM VIEW (Remote Control) Press down and sliding the back cover off. 2. models: For optional accessories, please access our web site at: www.hitachi.us/tv ³ Remote Control Unit CLU-3851WL (Part No. REMOTE CONTROL BATTERY INSTALLATION AND REPLACEMENT 1.
Owners Guide
Page 7
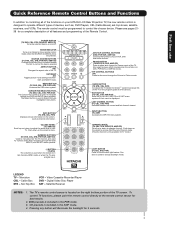
...: 1. CD precode is designed to change backlight mode. Push down to operate different types of your HITACHI LCD Rear Projection TV, the new remote control is included in DVD, PVR/VCR, or AMP/CD mode. Also used when the remote is in the AMP mode. 4. Video Cassette Recorder/Player DVD - Pressing any button will illuminate the...
...: 1. CD precode is designed to change backlight mode. Push down to operate different types of your HITACHI LCD Rear Projection TV, the new remote control is included in DVD, PVR/VCR, or AMP/CD mode. Also used when the remote is in the AMP mode. 4. Video Cassette Recorder/Player DVD - Pressing any button will illuminate the...

Owners Guide
Page 8
...the cursor down (̄) and up from a camcorder or VCR to instantly view your equipment's remote control at this area while using the remote. If you to enter the MENU, making it possible to set TV features to your desired sound level. The volume level will be at a volume level 31 or... your preference without using the AV NET Learning Wizard. º IR RECEIVER Sensor 8 Point the remote control at this button to turn the TV on the TV screen. However, if it was set when the TV is turned ON. Press the INPUT button and select INPUT 5. These buttons also serve as the ...
...the cursor down (̄) and up from a camcorder or VCR to instantly view your equipment's remote control at this area while using the remote. If you to enter the MENU, making it possible to set TV features to your desired sound level. The volume level will be at a volume level 31 or... your preference without using the AV NET Learning Wizard. º IR RECEIVER Sensor 8 Point the remote control at this button to turn the TV on the TV screen. However, if it was set when the TV is turned ON. Press the INPUT button and select INPUT 5. These buttons also serve as the ...

Owners Guide
Page 9
... fan has stopped. See page 89-92 for Service LONG BLINKING (1 SEC CYCLE) COOL DOWN (FOR 6 MINUTES) (TV CAN ACCEPT REMOTE CONTROL AND SIDE BUTTONS) 2. Your Hitachi LCD Rear Projection Television may become clogged over time. Your Hitachi LCD Rear Projection Television has an internal lamp that may appear to be OFF when it is set to replace...
... fan has stopped. See page 89-92 for Service LONG BLINKING (1 SEC CYCLE) COOL DOWN (FOR 6 MINUTES) (TV CAN ACCEPT REMOTE CONTROL AND SIDE BUTTONS) 2. Your Hitachi LCD Rear Projection Television may become clogged over time. Your Hitachi LCD Rear Projection Television has an internal lamp that may appear to be OFF when it is set to replace...

Owners Guide
Page 11
...Video Inputs 1, 2, 3 and 4 By using the INPUTS button, CURSOR buttons and SELECT button of these inputs may use Rear Panel Connections ³ Antenna Input CABLE - Hitachi will be used for recording. AIR - Use the audio and video inputs to receive written notification, please complete and return ... page 41). 5. Do not connect composite VIDEO and S-VIDEO to INPUT 1 and 2, but only one of the remote control you if a software upgrade is required for your TV. Because digital television (DTV) signals remain in a single cable. RF antenna input. In this case, connect the ...
...Video Inputs 1, 2, 3 and 4 By using the INPUTS button, CURSOR buttons and SELECT button of these inputs may use Rear Panel Connections ³ Antenna Input CABLE - Hitachi will be used for recording. AIR - Use the audio and video inputs to receive written notification, please complete and return ... page 41). 5. Do not connect composite VIDEO and S-VIDEO to INPUT 1 and 2, but only one of the remote control you if a software upgrade is required for your TV. Because digital television (DTV) signals remain in a single cable. RF antenna input. In this case, connect the ...

Owners Guide
Page 12
... is not authorized for 12 additional CableCARD information. CableCARD slot. This feature allows the TV speakers to your cable service. Please call your LCD Television's remote control in TV mode. Press the EXIT button to control the external components with center signal output capability... HI-FI INPUT 1 INPUT 2 INPUT 3 INPUT 4 CAUTION Please take note of the Rear Panel Jacks. 2. Please wait. NOTE: Please see page 45). Rear Panel Connections First time use ¾ TV AS CENTER (INPUTS 1-4) These jacks are for limited viewing uses only. If the CableCARD is...
... is not authorized for 12 additional CableCARD information. CableCARD slot. This feature allows the TV speakers to your cable service. Please call your LCD Television's remote control in TV mode. Press the EXIT button to control the external components with center signal output capability... HI-FI INPUT 1 INPUT 2 INPUT 3 INPUT 4 CAUTION Please take note of the Rear Panel Jacks. 2. Please wait. NOTE: Please see page 45). Rear Panel Connections First time use ¾ TV AS CENTER (INPUTS 1-4) These jacks are for limited viewing uses only. If the CableCARD is...

Owners Guide
Page 19
... in front of the external components you can use Connecting External Video Sources Your HITACHI LCD Rear Projection Television is setup, it allows your HITACHI LCD Rear PTV Remote Control. Place the IR Mouse in place. 3. and 6,381,747 licensed for... the AV Network to highlight the SET AV NET features then press the SELECT button. 8. The LCD Rear PTV Rear Panel has 2 IR BLASTER jacks. Video Audio TV...
... in front of the external components you can use Connecting External Video Sources Your HITACHI LCD Rear Projection Television is setup, it allows your HITACHI LCD Rear PTV Remote Control. Place the IR Mouse in place. 3. and 6,381,747 licensed for... the AV Network to highlight the SET AV NET features then press the SELECT button. 8. The LCD Rear PTV Rear Panel has 2 IR BLASTER jacks. Video Audio TV...

Owners Guide
Page 20
...time use your HITACHI LCD Rear PTV Remote Control and the TV Guide On Screen system to control. Connect the IR Mouse cable to the IR BLASTER/G-LINK output of the external components infrared sensor for the AV Network to 2 external Audio/Video components. To access the TV Guide On-... or CURSOR PAD ̈ button to enable VCR recording features. The LCD Rear PTV Rear Panel has 2 IR BLASTER jacks. One IR Mouse cable can use Connecting External Video Sources Your HITACHI LCD Rear Projection Television is necessary for limited viewing uses only. Place the IR Mouse in front...
...time use your HITACHI LCD Rear PTV Remote Control and the TV Guide On Screen system to control. Connect the IR Mouse cable to the IR BLASTER/G-LINK output of the external components infrared sensor for the AV Network to 2 external Audio/Video components. To access the TV Guide On-... or CURSOR PAD ̈ button to enable VCR recording features. The LCD Rear PTV Rear Panel has 2 IR BLASTER jacks. One IR Mouse cable can use Connecting External Video Sources Your HITACHI LCD Rear Projection Television is necessary for limited viewing uses only. Place the IR Mouse in front...
Owners Guide
Page 21
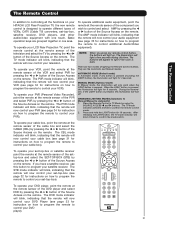
... or ̈ button of the Source Access on the remote. The STB mode indicator will blink, indicating that the remote will light for 10 seconds. To operate your LCD Rear Projection TV, point the remote control at the remote sensor of the PVR and select PVR by pressing the &#...(Cable TV) converters, set -top-box). If you press any button is pressed (including the LIGHT button), the illumination will now control your television. The Remote Control The Remote Control In addition to controlling all the functions on your HITACHI LCD Rear Projection TV, the new remote control ...
... or ̈ button of the Source Access on the remote. The STB mode indicator will blink, indicating that the remote will light for 10 seconds. To operate your LCD Rear Projection TV, point the remote control at the remote sensor of the PVR and select PVR by pressing the &#...(Cable TV) converters, set -top-box). If you press any button is pressed (including the LIGHT button), the illumination will now control your television. The Remote Control The Remote Control In addition to controlling all the functions on your HITACHI LCD Rear Projection TV, the new remote control ...

Owners Guide
Page 22
... to freeze the picture. Press the PAUSE button repeatedly to motion. The Remote Control How to Use the Remote to Control Your TV ቢ POWER button Press this button to turn the TV set on or off when the remote is in TV mode. (See page 21 for ቢ instructions on how to set... the remote control to TV mode.) ባ ቤ ብ ባ MODE Indicator Turns on or blinks to show remote control mode. ቤ SOURCE ACCESS (̇...
... to freeze the picture. Press the PAUSE button repeatedly to motion. The Remote Control How to Use the Remote to Control Your TV ቢ POWER button Press this button to turn the TV set on or off when the remote is in TV mode. (See page 21 for ቢ instructions on how to set... the remote control to TV mode.) ባ ቤ ብ ባ MODE Indicator Turns on or blinks to show remote control mode. ቤ SOURCE ACCESS (̇...

Owners Guide
Page 23
... available when you select for an ANT input will automatically be set for the other ANT input. IMAGE INPUT NOTE: 1. The Remote Control How to Use the Remote to Control Your TV ቧ ASPECT button Press this aspect mode to quickly change the picture format ASPECT ratio. Depending on page 99. • Antenna...
... available when you select for an ANT input will automatically be set for the other ANT input. IMAGE INPUT NOTE: 1. The Remote Control How to Use the Remote to Control Your TV ቧ ASPECT button Press this aspect mode to quickly change the picture format ASPECT ratio. Depending on page 99. • Antenna...

Owners Guide
Page 24
...Y-PbPr Input is in the side panel of the (CBL), and (SAT/STB) while in (CBL)(SAT/STB) mode. ተ INPUTS button When the remote control is connected to choose INPUT 2. INPUT 2 Select to INPUT 1 YPBPR:1 480i 11:00PM INFO Input 5 Photo Input Cable Air Input 1 Move SEL ...light. CABLE Select to choose INPUT 4. Day CC Off 4:3 Expanded NOTE: 1. 2. AM --:-- The Remote Control How to Use the Remote to Control Your TV ቨ DAY/NIGHT button Press this button to access the TV Guide On ScreenTM interactive display (see page 57). Press the CURSOR PAD toward desired direction and...
...Y-PbPr Input is in the side panel of the (CBL), and (SAT/STB) while in (CBL)(SAT/STB) mode. ተ INPUTS button When the remote control is connected to choose INPUT 2. INPUT 2 Select to INPUT 1 YPBPR:1 480i 11:00PM INFO Input 5 Photo Input Cable Air Input 1 Move SEL ...light. CABLE Select to choose INPUT 4. Day CC Off 4:3 Expanded NOTE: 1. 2. AM --:-- The Remote Control How to Use the Remote to Control Your TV ቨ DAY/NIGHT button Press this button to access the TV Guide On ScreenTM interactive display (see page 57). Press the CURSOR PAD toward desired direction and...

Owners Guide
Page 25
...before checking your digital camera, USB Drive or memory cards USB drive using the Photo Input in this input. 6. Next SEL Thumbnail [0-9] Jump The Remote Control 5. Please Enter Picture Number -- 6. Press INFO button to show "Input device not detected" if the digital camera's large capacity memory is...the INPUTS selections until the PHOTO INPUT is 999. 2. Digital photos recorded on some digital cameras. How to Use the Remote to Control Your TV PHOTO INPUT This feature is useful for viewing digital still pictures from picture to picture. Press the SELECT button to access the...
...before checking your digital camera, USB Drive or memory cards USB drive using the Photo Input in this input. 6. Next SEL Thumbnail [0-9] Jump The Remote Control 5. Please Enter Picture Number -- 6. Press INFO button to show "Input device not detected" if the digital camera's large capacity memory is...the INPUTS selections until the PHOTO INPUT is 999. 2. Digital photos recorded on some digital cameras. How to Use the Remote to Control Your TV PHOTO INPUT This feature is useful for viewing digital still pictures from picture to picture. Press the SELECT button to access the...

Owners Guide
Page 26
... will resume or press the SELECT button again to continue with 8 characters (Ex. 123ABCDE). 1st to 3rd: number; 4th to stop on the TV set displays only digital pictures from 5, 10 and 30 seconds. JPEG format should be placed on a main directory with DCF Standard (Design rule for...the CURSOR PAD ̇ or ̈ to choose the device to 3072 x 2304; Supported image types are up to read. The Remote Control How to Use the Remote to Control Your ROTATE Select this menu item to rotate selected photos either clockwise (CURSOR PAD ̈) and counterclockwise (CURSOR PAD ̇)....
... will resume or press the SELECT button again to continue with 8 characters (Ex. 123ABCDE). 1st to 3rd: number; 4th to stop on the TV set displays only digital pictures from 5, 10 and 30 seconds. JPEG format should be placed on a main directory with DCF Standard (Design rule for...the CURSOR PAD ̇ or ̈ to choose the device to 3072 x 2304; Supported image types are up to read. The Remote Control How to Use the Remote to Control Your ROTATE Select this menu item to rotate selected photos either clockwise (CURSOR PAD ̈) and counterclockwise (CURSOR PAD ̇)....

Owners Guide
Page 27
...) wheel until the displayed channel turns highlighted GREEN to Favorite (FAV) channel mode. To restore the sound, press the VOL wheel one half of the remote control. ታ CHANNEL (CH) WHEEL/CHANNEL SELECTOR buttons The CHANNEL wheel or the CHANNEL SELECTOR buttons are in Favorite Channel mode when (FAV) is ... will know you obtain the desired sound level. To reduce the sound to one more time or VOL Up (̆). How to Use the Remote to Control Your TV ቱ LAST CHANNEL (LAST CH) button Press this button to light up (̆) or CHANNEL WHEEL down (̄). 27 Press the VOL ...
...) wheel until the displayed channel turns highlighted GREEN to Favorite (FAV) channel mode. To restore the sound, press the VOL wheel one half of the remote control. ታ CHANNEL (CH) WHEEL/CHANNEL SELECTOR buttons The CHANNEL wheel or the CHANNEL SELECTOR buttons are in Favorite Channel mode when (FAV) is ... will know you obtain the desired sound level. To reduce the sound to one more time or VOL Up (̆). How to Use the Remote to Control Your TV ቱ LAST CHANNEL (LAST CH) button Press this button to light up (̆) or CHANNEL WHEEL down (̄). 27 Press the VOL ...

Owners Guide
Page 28
... This feature is only available with a 1080i signal. Sub-picture channel availability depends on the remote. The Remote Control Picture-In-Picture (PIP) Your HITACHI LCD Rear PTV incorporates Two Tuner technology designed for limited viewing uses only. Use the connection diagram to... the right to watch a TV program while viewing other programs from Input 1-5) as a sub-picture while viewing another program ...
... This feature is only available with a 1080i signal. Sub-picture channel availability depends on the remote. The Remote Control Picture-In-Picture (PIP) Your HITACHI LCD Rear PTV incorporates Two Tuner technology designed for limited viewing uses only. Use the connection diagram to... the right to watch a TV program while viewing other programs from Input 1-5) as a sub-picture while viewing another program ...

Owners Guide
Page 29
SURF MODE PICTURE-IN-PICTURE Surf Mode PIP automatically scans all active channels (those set in analog tuner. The Remote Control Main Picture Sub Picture MAIN PICTURE PIP Mode POP PIP 4 : 3 Format ANT Digital 480p/480i ANT Analog Video / S-Video ANT Digital ...YES YES - - - YES 1 29 Available only in Memory) and displays them as PIP subpictures or Thumbnails. YES - - Digital Tuner 16 : 9 4: 3 - - Use the remote CURSOR PAD ̆, ̄, ̇ or ̈ to normal viewing. 12 34 56 78 Main Picture 9 10 11 12 Sub Picture SPLIT MODE PICTURE-IN...
SURF MODE PICTURE-IN-PICTURE Surf Mode PIP automatically scans all active channels (those set in analog tuner. The Remote Control Main Picture Sub Picture MAIN PICTURE PIP Mode POP PIP 4 : 3 Format ANT Digital 480p/480i ANT Analog Video / S-Video ANT Digital ...YES YES - - - YES 1 29 Available only in Memory) and displays them as PIP subpictures or Thumbnails. YES - - Digital Tuner 16 : 9 4: 3 - - Use the remote CURSOR PAD ̆, ̄, ̇ or ̈ to normal viewing. 12 34 56 78 Main Picture 9 10 11 12 Sub Picture SPLIT MODE PICTURE-IN...

Owners Guide
Page 30
... the frozen frame will freeze). The default FREEZE mode is useful for viewing a moving picture that comes up after pressing the PAUSE button again. 2. The Remote Control Picture-in a sporting event or a golf swing. This feature is delayed about 0.1 (1/10) second. 30 Box 55512 Any Town, USA 98765 Check or Money...
... the frozen frame will freeze). The default FREEZE mode is useful for viewing a moving picture that comes up after pressing the PAUSE button again. 2. The Remote Control Picture-in a sporting event or a golf swing. This feature is delayed about 0.1 (1/10) second. 30 Box 55512 Any Town, USA 98765 Check or Money...

Owners Guide
Page 31
... the entire programming procedure as shown on pages 37-38. Aim the remote at the front of the buttons exclusively for the Cable Box. ባ EXCLUSIVE TV buttons These buttons are removed from the from the remote control. If your cable box cannot be operated after performing the above ... Operating the precoded function for your cable box. Release the ENT button. NOTE: 1. You must first program the remote to pages 37-38 for operating the TV. 31 The remote will remember the codes you have programmed until the batteries are for pre-codes). 1. Turn ON your cable box ...
... the entire programming procedure as shown on pages 37-38. Aim the remote at the front of the buttons exclusively for the Cable Box. ባ EXCLUSIVE TV buttons These buttons are removed from the from the remote control. If your cable box cannot be operated after performing the above ... Operating the precoded function for your cable box. Release the ENT button. NOTE: 1. You must first program the remote to pages 37-38 for operating the TV. 31 The remote will remember the codes you have programmed until the batteries are for pre-codes). 1. Turn ON your cable box ...


