
Owners Guide
Page 25
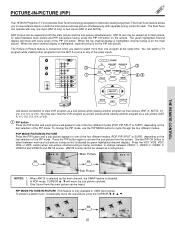
THE REMOTE CONTROL PICTURE-IN-PICTURE (PIP) Your HITACHI Projection TV incorporates Dual Tuner technology designed for the main picture. To select between VIDEO: ...MUTE EXIT LAST CH VCR Use above connection to select between main and sub-picture tuning control (indicated by green highlighted channel display.) Press the VID1, VID2, VID3, VID4 or VID5 button when sub-picture channel tuning ... Tuner can only be heard. ANT B can operate with every press of the PIP mode. The green highlighted channel display will move the sub-picture up/down. 3. The Picture-in-Picture feature is only...
THE REMOTE CONTROL PICTURE-IN-PICTURE (PIP) Your HITACHI Projection TV incorporates Dual Tuner technology designed for the main picture. To select between VIDEO: ...MUTE EXIT LAST CH VCR Use above connection to select between main and sub-picture tuning control (indicated by green highlighted channel display.) Press the VID1, VID2, VID3, VID4 or VID5 button when sub-picture channel tuning ... Tuner can only be heard. ANT B can operate with every press of the PIP mode. The green highlighted channel display will move the sub-picture up/down. 3. The Picture-in-Picture feature is only...

Owners Guide
Page 33
... TV Ratings Canadian Ratings (ENG) Canadian Ratings (FRN) Change Lock access code. Choose to make white. Adjust brightness. Centering top and bottom of the Red, Green and Blue colors to lock channel, video input, and front panel. Block various types of movies and television programming based on and off once, daily...
... TV Ratings Canadian Ratings (ENG) Canadian Ratings (FRN) Change Lock access code. Choose to make white. Adjust brightness. Centering top and bottom of the Red, Green and Blue colors to lock channel, video input, and front panel. Block various types of movies and television programming based on and off once, daily...
Owners Guide
Page 36
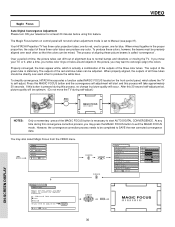
Your HITACHI Projection TV has three color projection tubes: one for red, one for green, one for at least 20 minutes before using this ... so that the colors can be completed to SAVE the new corrected convergence data. To simplify convergence, HITACHI incorporates a function called "convergence". However, the convergence correction process needs to be adjusted. You may ...seconds. The Magic Focus button on the front control panel, which is stationary. The output of the green tube is actually a combination of the outputs of the MAGIC FOCUS button is set to self-adjust...
Your HITACHI Projection TV has three color projection tubes: one for red, one for green, one for at least 20 minutes before using this ... so that the colors can be completed to SAVE the new corrected convergence data. To simplify convergence, HITACHI incorporates a function called "convergence". However, the convergence correction process needs to be adjusted. You may ...seconds. The Magic Focus button on the front control panel, which is stationary. The output of the green tube is actually a combination of the outputs of the MAGIC FOCUS button is set to self-adjust...
Owners Guide
Page 37
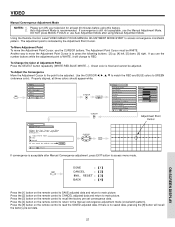
.... Use the CURSOR to match the RED and BLUE colors to main picture. Manager Locks Setup Move SEL Sel Video Magic Focus Aligns the Red, Green, and Blue colors to access menu mode. Press the [2] button on the remote control to CANCEL adjusted data and return to... Point To move the Adjustment Point Cursor is recommended. MENU Video Audio Ch. Press the [3] button on the remote control to access convergence crosshatch pattern. Green color is indicated by the Adjustment Point Cursor. Auto Adjustment Mode is to main picture. Press the [4] button on the remote control to SAVE adjusted...
.... Use the CURSOR to match the RED and BLUE colors to main picture. Manager Locks Setup Move SEL Sel Video Magic Focus Aligns the Red, Green, and Blue colors to access menu mode. Press the [2] button on the remote control to CANCEL adjusted data and return to... Point To move the Adjustment Point Cursor is recommended. MENU Video Audio Ch. Press the [3] button on the remote control to access convergence crosshatch pattern. Green color is indicated by the Adjustment Point Cursor. Auto Adjustment Mode is to main picture. Press the [4] button on the remote control to SAVE adjusted...


