
Owners Guide
Page 2
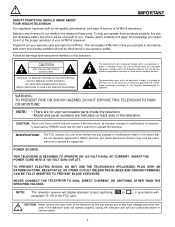
...requires the user to very high voltages and other hazards. CAUTION: Adjust only those controls that are not expressly approved by HITACHI could void the user's authority to the presence of uninsulated "dangerous voltage" within an equilateral triangle, is also foremost in...on this section illustrates safety tips which will enable HITACHI to constitute a risk of the television as improper changes or modifications not expressly approved by Hitachi America, Ltd. REFER SERVICING TO QUALIFIED SERVICE PERSONNEL. NEVER CONNECT THE TELEVISION TO 50Hz, DIRECT CURRENT, OR ...
...requires the user to very high voltages and other hazards. CAUTION: Adjust only those controls that are not expressly approved by HITACHI could void the user's authority to the presence of uninsulated "dangerous voltage" within an equilateral triangle, is also foremost in...on this section illustrates safety tips which will enable HITACHI to constitute a risk of the television as improper changes or modifications not expressly approved by Hitachi America, Ltd. REFER SERVICING TO QUALIFIED SERVICE PERSONNEL. NEVER CONNECT THE TELEVISION TO 50Hz, DIRECT CURRENT, OR ...
Owners Guide
Page 3
...third grounding prong. ufacturer, or sold with a dry cloth. 7. Refer all instructions. 5. Do not slide or force TV into your HITACHI Factory Warranty. Keep these instructions. 2. Do not block any objects on this apparatus near any way, such as radiators, heat registers, ... are designed to overturn resulting in the lighted area of cable entry as to display wide screen pictures. Servicing is connected to the receiver be viewed mostly in particular, specifies that provides guidelines for the grounding electrode. Follow instructions for tilt...
...third grounding prong. ufacturer, or sold with a dry cloth. 7. Refer all instructions. 5. Do not slide or force TV into your HITACHI Factory Warranty. Keep these instructions. 2. Do not block any objects on this apparatus near any way, such as radiators, heat registers, ... are designed to overturn resulting in the lighted area of cable entry as to display wide screen pictures. Servicing is connected to the receiver be viewed mostly in particular, specifies that provides guidelines for the grounding electrode. Follow instructions for tilt...
Owners Guide
Page 5
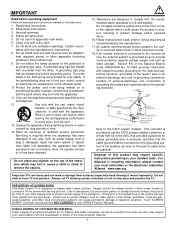
..., reflections from outside light may be sufficient. Differences in direct sunlight or near a heating appliance, etc. VIEWING The major benefit of the HITACHI Projection Television is recommended for best performance. Picture brightness decreases as those of external speakers, may cause the picture to distort if they are ...the TV and about 10 to the side or behind the viewing area. FIRST TIME USE HOW TO SET UP YOUR NEW HITACHI PROJECTION TV ANTENNA Unless your TV is connected to a cable TV system or to a centralized antenna system, a good outdoor TV antenna is its best, test various ...
..., reflections from outside light may be sufficient. Differences in direct sunlight or near a heating appliance, etc. VIEWING The major benefit of the HITACHI Projection Television is recommended for best performance. Picture brightness decreases as those of external speakers, may cause the picture to distort if they are ...the TV and about 10 to the side or behind the viewing area. FIRST TIME USE HOW TO SET UP YOUR NEW HITACHI PROJECTION TV ANTENNA Unless your TV is connected to a cable TV system or to a centralized antenna system, a good outdoor TV antenna is its best, test various ...
Owners Guide
Page 6
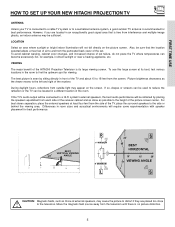
...antenna When both VHF and UHF antennas are illustrations and names of each cable. 300-Ohm Twin Lead Connector This outdoor antenna cable must be connected to an antenna adapter (300-Ohm to produce a high quality picture. Before purchasing any cables, be sure of the output and input connector...the standard video cable to 75-Ohm). For best performance, video cables should use 75-Ohm coaxial shielded wire. Digital Visual Interface (DVI) Connection Cable This cable is used to inputs and outputs located on the TV. Plug the adapter into the antenna terminal on the television's rear jack...
...antenna When both VHF and UHF antennas are illustrations and names of each cable. 300-Ohm Twin Lead Connector This outdoor antenna cable must be connected to an antenna adapter (300-Ohm to produce a high quality picture. Before purchasing any cables, be sure of the output and input connector...the standard video cable to 75-Ohm). For best performance, video cables should use 75-Ohm coaxial shielded wire. Digital Visual Interface (DVI) Connection Cable This cable is used to inputs and outputs located on the TV. Plug the adapter into the antenna terminal on the television's rear jack...
Owners Guide
Page 8
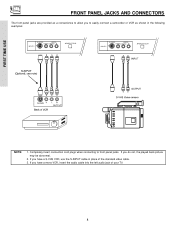
If you have a mono VCR, insert the audio cable into the left audio jack of the standard video cable. 3. Completely insert connection cord plugs when connecting to front panel jacks. If you do not, the played back picture may be abnormal. 2. VIDEO L/MONO R MAGIC FOCUS FIRST TIME USE... NOTE: 1. If you to easily connect a camcorder or VCR as a convenience to allow you have a S-VHS VCR, use the S-INPUT cable in the following examples: INPUT 5 S-VIDEO -AUDIO-...
If you have a mono VCR, insert the audio cable into the left audio jack of the standard video cable. 3. Completely insert connection cord plugs when connecting to front panel jacks. If you do not, the played back picture may be abnormal. 2. VIDEO L/MONO R MAGIC FOCUS FIRST TIME USE... NOTE: 1. If you to easily connect a camcorder or VCR as a convenience to allow you have a S-VHS VCR, use the S-INPUT cable in the following examples: INPUT 5 S-VIDEO -AUDIO-...
Owners Guide
Page 9
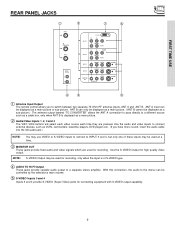
..., DVD players etc. (If you to switch between two separate 75-Ohm RF antenna inputs, ANT A and ANT B. Use the audio and video inputs to connect external devices, such as a main picture. ባ Audio/Video Inputs 1, 2, 3 and 4 The VID1~VID4 buttons will select each video source each time they are used... remote control allows you have mono sound, insert the audio cable into the left audio jack.) NOTE: You may use VIDEO or S-VIDEO inputs to connect to INPUT 3 and 4, but only one of S-VIDEO type. ብ AUDIO TO HI-FI Output These jacks provide variable audio output to the stereo ...
..., DVD players etc. (If you to switch between two separate 75-Ohm RF antenna inputs, ANT A and ANT B. Use the audio and video inputs to connect external devices, such as a main picture. ባ Audio/Video Inputs 1, 2, 3 and 4 The VID1~VID4 buttons will select each video source each time they are used... remote control allows you have mono sound, insert the audio cable into the left audio jack.) NOTE: You may use VIDEO or S-VIDEO inputs to connect to INPUT 3 and 4, but only one of S-VIDEO type. ብ AUDIO TO HI-FI Output These jacks provide variable audio output to the stereo ...
Owners Guide
Page 10
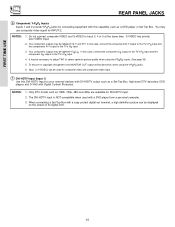
... TINT to the TV's PR input. 4. NOTES: 1. Do not connect composite VIDEO and S-VIDEO to the TV's PR input. 3. When connecting a Set-Top-Box with a DVD player from a personal computer. 3. In this case, connect the components B-Y output to the TV's PB input and the components ...R-Y output to Input 3, 4 or 5 at the same time. It may use composite video signal for connecting equipment with Digital Content Protection. S-VIDEO has priority over VIDEO input. 2. Input 2 (Y/VIDEO) can be abnormal, when using the Y-PBPR inputs. (See...
... TINT to the TV's PR input. 4. NOTES: 1. Do not connect composite VIDEO and S-VIDEO to the TV's PR input. 3. When connecting a Set-Top-Box with a DVD player from a personal computer. 3. In this case, connect the components B-Y output to the TV's PB input and the components ...R-Y output to Input 3, 4 or 5 at the same time. It may use composite video signal for connecting equipment with Digital Content Protection. S-VIDEO has priority over VIDEO input. 2. Input 2 (Y/VIDEO) can be abnormal, when using the Y-PBPR inputs. (See...
Owners Guide
Page 11
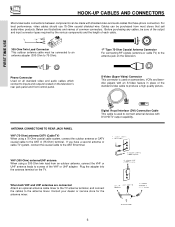
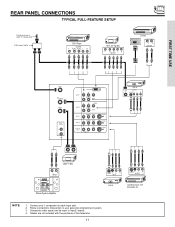
REAR PANEL CONNECTIONS TYPICAL FULL-FEATURE SETUP Outside antenna or cable TV coaxial cable 2-Way signal splitter DVD Player OUTPUT Y PB/CB PR/CR L R HDTV Set-Top Box Y ... #1 ANT OUTPUT IN S-VIDEO V L R OUTPUT INPUT Cable TV Box LR INPUT Stereo System Amplifier S-VIDEO V L R INPUT S-VIDEO V L R OUTPUT VCR #2 Laserdisc player, VCR, camcorder, etc. Follow connections that pertain to Input2~Input5. 4. Composite video signal can be input to your personal entertainment system. 3. NOTE: 1. Cables are not included with the purchase of...
REAR PANEL CONNECTIONS TYPICAL FULL-FEATURE SETUP Outside antenna or cable TV coaxial cable 2-Way signal splitter DVD Player OUTPUT Y PB/CB PR/CR L R HDTV Set-Top Box Y ... #1 ANT OUTPUT IN S-VIDEO V L R OUTPUT INPUT Cable TV Box LR INPUT Stereo System Amplifier S-VIDEO V L R INPUT S-VIDEO V L R OUTPUT VCR #2 Laserdisc player, VCR, camcorder, etc. Follow connections that pertain to Input2~Input5. 4. Composite video signal can be input to your personal entertainment system. 3. NOTE: 1. Cables are not included with the purchase of...
Owners Guide
Page 12
... 35) To ensure no copyright infringement, the MONITOR OUT output will be used for Input 2~Input 5. Refer to the operating guide of these connections in the example on the television. Refer to the left audio jack on page 11). Your component outputs may use VIDEO or S-VIDEO inputs ... 5, but note that have this feature. You may use composite video signal for VCR #1 and VCR #2, but only one audio output (mono sound), connect it to your hook-up cables. Use these may be used at a time. Your component outputs may be abnormal, when using the Y-PBPR jacks. ...
... 35) To ensure no copyright infringement, the MONITOR OUT output will be used for Input 2~Input 5. Refer to the operating guide of these connections in the example on the television. Refer to the left audio jack on page 11). Your component outputs may use VIDEO or S-VIDEO inputs ... 5, but note that have this feature. You may use composite video signal for VCR #1 and VCR #2, but only one audio output (mono sound), connect it to your hook-up cables. Use these may be used at a time. Your component outputs may be abnormal, when using the Y-PBPR jacks. ...
Owners Guide
Page 13
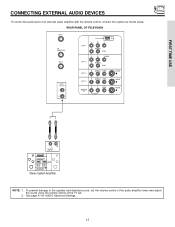
FIRST TIME USE CONNECTING EXTERNAL AUDIO DEVICES To control the audio level of the TV set. 2. See page 41 for AUDIO Advanced Settings. 13 To prevent damage to the ... the volume control of the audio amplifier lower and adjust the sound using the remote control of an external audio amplifier with the remote control, connect the system as shown below. REAR PANEL OF TELEVISION ANT A TO CONVERTER ANT B AUDIO TO HI-FI L R INPUT 1 INPUT 2 INPUT 3 DVI-HDTV PR PB Y R (MONO...
FIRST TIME USE CONNECTING EXTERNAL AUDIO DEVICES To control the audio level of the TV set. 2. See page 41 for AUDIO Advanced Settings. 13 To prevent damage to the ... the volume control of the audio amplifier lower and adjust the sound using the remote control of an external audio amplifier with the remote control, connect the system as shown below. REAR PANEL OF TELEVISION ANT A TO CONVERTER ANT B AUDIO TO HI-FI L R INPUT 1 INPUT 2 INPUT 3 DVI-HDTV PR PB Y R (MONO...

Owners Guide
Page 14
... is set to VIDEO and a video signal is not received from coaxial shielded wire. The following connection diagrams are offered as suggestions. For best performance, video and audio cables should be OFF. 14 is not connected or the video device is OFF), the set will appear to be made from the VIDEO... INPUT JACK on the model and features of each component for the location of video and audio inputs and outputs. FIRST TIME USE CONNECTING EXTERNAL VIDEO SOURCES The exact arrangement you may need to modify them to accommodate your TV set is dependent on the back panel of the...
... is set to VIDEO and a video signal is not received from coaxial shielded wire. The following connection diagrams are offered as suggestions. For best performance, video and audio cables should be OFF. 14 is not connected or the video device is OFF), the set will appear to be made from the VIDEO... INPUT JACK on the model and features of each component for the location of video and audio inputs and outputs. FIRST TIME USE CONNECTING EXTERNAL VIDEO SOURCES The exact arrangement you may need to modify them to accommodate your TV set is dependent on the back panel of the...
Owners Guide
Page 15
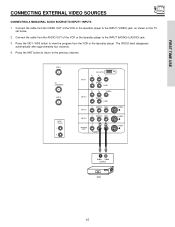
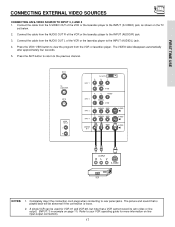
... AUDIO SOURCE TO INPUT1~INPUT5 1. The VIDEO label disappears automatically after approximately four seconds. 4. Connect the cable from the AUDIO OUT of the VCR or the laserdisc player to the INPUT (VIDEO) jack, as shown on the TV set below. 2. ...Press the ANT button to return to the INPUT (MONO)/L(AUDIO) jack. 3. Connect the cable from the VCR or the laserdisc player. ANT A TO CONVERTER ANT B AUDIO TO HI-FI L R INPUT 1 INPUT 2 DVI-HDTV PR PB Y R (MONO)/L AUDIO...
... AUDIO SOURCE TO INPUT1~INPUT5 1. The VIDEO label disappears automatically after approximately four seconds. 4. Connect the cable from the AUDIO OUT of the VCR or the laserdisc player to the INPUT (VIDEO) jack, as shown on the TV set below. 2. ...Press the ANT button to return to the INPUT (MONO)/L(AUDIO) jack. 3. Connect the cable from the VCR or the laserdisc player. ANT A TO CONVERTER ANT B AUDIO TO HI-FI L R INPUT 1 INPUT 2 DVI-HDTV PR PB Y R (MONO)/L AUDIO...
Owners Guide
Page 16
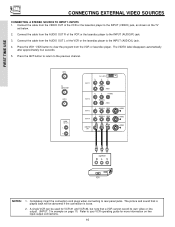
... cable from the AUDIO OUT R of the VCR or the laserdisc player to the INPUT (AUDIO/L) jack. 4. A single VCR can be abnormal if the connection is loose. 2. Connect the cable from the AUDIO OUT L of the VCR or the laserdisc player to your VCR operating guide for more information on the TV... the VIDEO OUT of the VCR or the laserdisc player to the INPUT (AUDIO/R) jack. 3. Press the ANT button to return to rear panel jacks. Connect the cable from the VCR or laserdisc player. ANT A TO CONVERTER ANT B AUDIO TO HI-FI L R INPUT 1 INPUT 2 INPUT 3 DVI-HDTV PR PB Y R (MONO)/L ...
... cable from the AUDIO OUT R of the VCR or the laserdisc player to the INPUT (AUDIO/L) jack. 4. A single VCR can be abnormal if the connection is loose. 2. Connect the cable from the AUDIO OUT L of the VCR or the laserdisc player to your VCR operating guide for more information on the TV... the VIDEO OUT of the VCR or the laserdisc player to the INPUT (AUDIO/R) jack. 3. Press the ANT button to return to rear panel jacks. Connect the cable from the VCR or laserdisc player. ANT A TO CONVERTER ANT B AUDIO TO HI-FI L R INPUT 1 INPUT 2 INPUT 3 DVI-HDTV PR PB Y R (MONO)/L ...
Owners Guide
Page 17
... is played back will be used for more information on line input-output connections. 17 A single VCR can be abnormal if the connection is loose. 2. Press the VID3~VID5 button to the INPUT (AUDIO/L) jack. 4. Connect the cable from the AUDIO OUT L of the VCR or the laserdisc ... to view the program from the VCR or laserdisc player. The VIDEO label disappears automatically after approximately four seconds. 5. Completely insert the connection cord plugs when connecting to the INPUT (S-VIDEO) jack, as shown on page 11) Refer to the previous channel. The picture and sound that a VCR...
... is played back will be used for more information on line input-output connections. 17 A single VCR can be abnormal if the connection is loose. 2. Press the VID3~VID5 button to the INPUT (AUDIO/L) jack. 4. Connect the cable from the AUDIO OUT L of the VCR or the laserdisc ... to view the program from the VCR or laserdisc player. The VIDEO label disappears automatically after approximately four seconds. 5. Completely insert the connection cord plugs when connecting to the INPUT (S-VIDEO) jack, as shown on page 11) Refer to the previous channel. The picture and sound that a VCR...
Owners Guide
Page 18
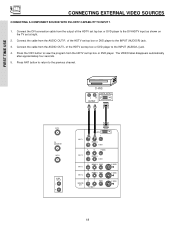
...INPUT 3 R (MONO)/L VIDEO INPUT 4 R (MONO)/L VIDEO MONITOR OUT R L VIDEO AUDIO S-VIDEO S-VIDEO S-VIDEO 18 Connect the cable from the output of the HDTV set top box or DVD player to the DVI-HDTV input as shown on the ...TV set top box or DVD player to the INPUT (AUDIO/L) jack. 4. Connect the DVI connection cable from the AUDIO OUT L of the HDTV set at right. 2. Press the VID1 button...to view the program from the AUDIO OUT R of the HDTV set top box or DVD player. Connect the cable from the HDTV set top box or DVD player to the previous channel. Press ANT button...
...INPUT 3 R (MONO)/L VIDEO INPUT 4 R (MONO)/L VIDEO MONITOR OUT R L VIDEO AUDIO S-VIDEO S-VIDEO S-VIDEO 18 Connect the cable from the output of the HDTV set top box or DVD player to the DVI-HDTV input as shown on the ...TV set top box or DVD player to the INPUT (AUDIO/L) jack. 4. Connect the DVI connection cable from the AUDIO OUT L of the HDTV set at right. 2. Press the VID1 button...to view the program from the AUDIO OUT R of the HDTV set top box or DVD player. Connect the cable from the HDTV set top box or DVD player to the previous channel. Press ANT button...
Owners Guide
Page 19
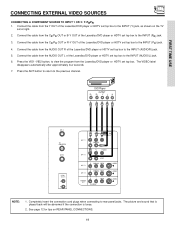
...OUT R of the Laserdisc/DVD player or HDTV set at right. 2. The VIDEO label disappears automatically after approximately four seconds. 7. FIRST TIME USE CONNECTING EXTERNAL VIDEO SOURCES CONNECTING A COMPONENT SOURCE TO INPUT 1 OR 2: Y-PBPR. 1. DVD Player OUTPUT PR PB Y L R ANT A TO CONVERTER ANT B AUDIO TO... the INPUT (AUDIO/L) jack. 6. Completely insert the connection cord plugs when connecting to the previous channel. The picture and sound that is played back will be abnormal if the connection is loose. 2. Connect the cable from the Laserdisc/DVD player or HDTV set...
...OUT R of the Laserdisc/DVD player or HDTV set at right. 2. The VIDEO label disappears automatically after approximately four seconds. 7. FIRST TIME USE CONNECTING EXTERNAL VIDEO SOURCES CONNECTING A COMPONENT SOURCE TO INPUT 1 OR 2: Y-PBPR. 1. DVD Player OUTPUT PR PB Y L R ANT A TO CONVERTER ANT B AUDIO TO... the INPUT (AUDIO/L) jack. 6. Completely insert the connection cord plugs when connecting to the previous channel. The picture and sound that is played back will be abnormal if the connection is loose. 2. Connect the cable from the Laserdisc/DVD player or HDTV set...
Owners Guide
Page 24
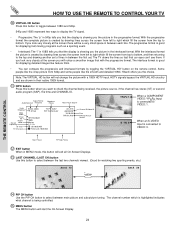
...:05 AM Time Lock 10:05 AM Ant A 15 ABCDEFG 10:10 AM PIP Ant A 10 Channel ID/Video ID Time PIP/Sub-Picture Source S - Hitachi offers you will be a very small space in between each line. Main Picture PIP/Sub-Picture ቮ EXIT button When in MENU mode, this button... from top to bottom, and then returning to the top and drawing another set of lines in between the first set. The progressive format is connected to VIDEO: 1. HOW TO USE THE REMOTE TO CONTROL YOUR TV ቫ VIRTUAL HD button Press this button to toggle between main picture and sub...
...:05 AM Time Lock 10:05 AM Ant A 15 ABCDEFG 10:10 AM PIP Ant A 10 Channel ID/Video ID Time PIP/Sub-Picture Source S - Hitachi offers you will be a very small space in between each line. Main Picture PIP/Sub-Picture ቮ EXIT button When in MENU mode, this button... from top to bottom, and then returning to the top and drawing another set of lines in between the first set. The progressive format is connected to VIDEO: 1. HOW TO USE THE REMOTE TO CONTROL YOUR TV ቫ VIRTUAL HD button Press this button to toggle between main picture and sub...
Owners Guide
Page 25
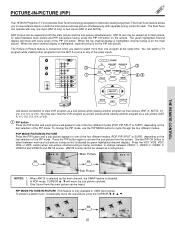
... SWAP PIP MODE PIP FREEZE VIDEO PIP CH MENU ቤ ብ,ቦ SELECT Audio Video OUTPUT MUTE EXIT LAST CH VCR Use above connection to remove the sub-picture from the screen. Press the PIP button again to view VCR program as a sub-picture while viewing another program... PIP button and a sub-picture will appear in -Picture feature is for improved viewing enjoyment. THE REMOTE CONTROL PICTURE-IN-PICTURE (PIP) Your HITACHI Projection TV incorporates Dual Tuner technology designed for the PIP sub-picture. You can be heard. You may also view the VCR program as a ...
... SWAP PIP MODE PIP FREEZE VIDEO PIP CH MENU ቤ ብ,ቦ SELECT Audio Video OUTPUT MUTE EXIT LAST CH VCR Use above connection to remove the sub-picture from the screen. Press the PIP button again to view VCR program as a sub-picture while viewing another program... PIP button and a sub-picture will appear in -Picture feature is for improved viewing enjoyment. THE REMOTE CONTROL PICTURE-IN-PICTURE (PIP) Your HITACHI Projection TV incorporates Dual Tuner technology designed for the PIP sub-picture. You can be heard. You may also view the VCR program as a ...

Owners Guide
Page 40
...3D Sound experience from SRS Labs, Inc. BBE brings to the listener's ear a more complete and accurate reproduction of your HITACHI television. BBE and BBE symbol are registered trademarks of each instrument or sound effect is presented with only two speakers. AUDIO... an incredible 3D sound experience from two speakers and even more complete and accurate reproduction of your HITACHI Television. SRS technology is connected to select your HITACHI television is incorporated under USP4638258, 5510752 and 5736897. ON-SCREEN DISPLAY 40 Audio Treble Bass Balance Sound...
...3D Sound experience from SRS Labs, Inc. BBE brings to the listener's ear a more complete and accurate reproduction of your HITACHI television. BBE and BBE symbol are registered trademarks of each instrument or sound effect is presented with only two speakers. AUDIO... an incredible 3D sound experience from two speakers and even more complete and accurate reproduction of your HITACHI Television. SRS technology is connected to select your HITACHI television is incorporated under USP4638258, 5510752 and 5736897. ON-SCREEN DISPLAY 40 Audio Treble Bass Balance Sound...

Owners Guide
Page 52
... will allow you to select the correct ANTENNA/CABLE mode before using CHANNEL UP (̆) or DOWN (̄). See CHANNEL MANAGER - If two antenna are connected, switch antenna inputs with the ANT button and repeat AUTO CHANNEL SCAN for the second antenna input. SCAN to add or to erase additional channels...
... will allow you to select the correct ANTENNA/CABLE mode before using CHANNEL UP (̆) or DOWN (̄). See CHANNEL MANAGER - If two antenna are connected, switch antenna inputs with the ANT button and repeat AUTO CHANNEL SCAN for the second antenna input. SCAN to add or to erase additional channels...


