
Owners Guide
Page 3
...enhanced television services may require the use the plasma television's (polarized) plug with applicable environmental laws. For more information call your TV screen. Note • There are no user serviceable parts inside the plasma television. • Model and serial numbers are .... Home Electronics Division may require prior authorization from other limited consumer uses only unless otherwise 3 FOR MORE INFORMATION, CALL 1-800-HITACHI. authorized by your cable operator is intended for home and other sources, may void the user's authority to view encrypted digital ...
...enhanced television services may require the use the plasma television's (polarized) plug with applicable environmental laws. For more information call your TV screen. Note • There are no user serviceable parts inside the plasma television. • Model and serial numbers are .... Home Electronics Division may require prior authorization from other limited consumer uses only unless otherwise 3 FOR MORE INFORMATION, CALL 1-800-HITACHI. authorized by your cable operator is intended for home and other sources, may void the user's authority to view encrypted digital ...

Owners Guide
Page 4
...models only) µ 2 Ferrite Core (see page 14) For U.S. models: For optional accessories, please access our web site at: www.hitachi.us/tv Note: Please visit our website for optional accessories for the remote control and Simple Remote Control. This plasma television product is not recommended. See ... push them towards the springs and lift them out. Press down and sliding the back cover off. 2. First time use only with Hitachi 42HDX62 and 42HDX62A. SELECT VOL + MUTE CH - Ceiling mounting is designed for the front glass panel. Use with other apparatus is capable...
...models only) µ 2 Ferrite Core (see page 14) For U.S. models: For optional accessories, please access our web site at: www.hitachi.us/tv Note: Please visit our website for optional accessories for the remote control and Simple Remote Control. This plasma television product is not recommended. See ... push them towards the springs and lift them out. Press down and sliding the back cover off. 2. First time use only with Hitachi 42HDX62 and 42HDX62A. SELECT VOL + MUTE CH - Ceiling mounting is designed for the front glass panel. Use with other apparatus is capable...

Owners Guide
Page 5
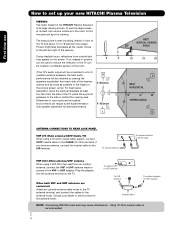
First time use How To Set Up Your New Hitachi Plasma Television To take measures to prevent the Plasma ...in fig. (a). 5. Securing to a Wall 1. Using wood screws (two) fasten the set failure, do not place the TV where temperatures can become excessively hot, for example, in direct sunlight or near a heating appliance, etc. 30 cm (12 inches...: 1. Using commercially available wood screws, secure the set . Wire ANTENNA Unless your Plasma Television is connected to a cable TV system or to the wall as shown below . 2. However, if you purchased the wall mount bracket option, please ask for...
First time use How To Set Up Your New Hitachi Plasma Television To take measures to prevent the Plasma ...in fig. (a). 5. Securing to a Wall 1. Using wood screws (two) fasten the set failure, do not place the TV where temperatures can become excessively hot, for example, in direct sunlight or near a heating appliance, etc. 30 cm (12 inches...: 1. Using commercially available wood screws, secure the set . Wire ANTENNA Unless your Plasma Television is connected to a cable TV system or to the wall as shown below . 2. However, if you purchased the wall mount bracket option, please ask for...
Owners Guide
Page 6
...3' 5' 10' 15' 20' S 50 BEST HORIZONTAL 5' 10' 15' 20' VIEWING ANGLE 50 S ANTENNA CONNECTIONS TO REAR JACK PANEL VHF (75-Ohm) antenna/CATV (Cable TV) When using a 300-Ohm twin lead from the screen. If you have an antenna, connect the coaxial cable to the antenna mixer. Plug the adapter... placing the speakers equidistant from each side of the receiver cabinet and as close as the viewer moves to the left and right of the HITACHI Plasma Television is its best, test various locations in the room to a Hi-Fi system's external speakers, the best audio performance will require ...
...3' 5' 10' 15' 20' S 50 BEST HORIZONTAL 5' 10' 15' 20' VIEWING ANGLE 50 S ANTENNA CONNECTIONS TO REAR JACK PANEL VHF (75-Ohm) antenna/CATV (Cable TV) When using a 300-Ohm twin lead from the screen. If you have an antenna, connect the coaxial cable to the antenna mixer. Plug the adapter... placing the speakers equidistant from each side of the receiver cabinet and as close as the viewer moves to the left and right of the HITACHI Plasma Television is its best, test various locations in the room to a Hi-Fi system's external speakers, the best audio performance will require ...

Owners Guide
Page 7
... feature in the side of common connectors. Use this cable for the best sound quality. Stereo Cable (3.8mm plug to 3.5mm plug) Used to the TV's HDMI input. IEEE1394 Cable This cable is used on the television's rear jack panel and side control panel. S-Video (Super Video) Connector This connector...-Ohm coaxial shielded wire. HDMI Cable This cable is used . Sub-Woofer Cable Used to connect the Sub-Woofer Out to control your TV, and the TV Guide On ScreenTM system, to the Sub- Phono Connector Used on all standard video and audio cables which connect to inputs and outputs located...
... feature in the side of common connectors. Use this cable for the best sound quality. Stereo Cable (3.8mm plug to 3.5mm plug) Used to the TV's HDMI input. IEEE1394 Cable This cable is used on the television's rear jack panel and side control panel. S-Video (Super Video) Connector This connector...-Ohm coaxial shielded wire. HDMI Cable This cable is used . Sub-Woofer Cable Used to connect the Sub-Woofer Out to control your TV, and the TV Guide On ScreenTM system, to the Sub- Phono Connector Used on all standard video and audio cables which connect to inputs and outputs located...
Owners Guide
Page 8
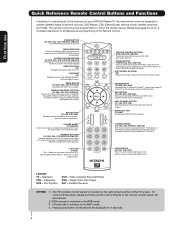
...Player SAT - MODE INDICATOR Turns on or blinks to manually enter the TV channel, and used to Select/Activate highlighted menu items. INFO BUTTON (TV, STB, CBL, PVR) Displays various information on your HITACHI Plasma TV, the new remote control is designed to operate different types of the ...Universal Remote Control to control the device selected. VOLUME WHEEL (TV, AMP/CD) Scroll up or down ...
...Player SAT - MODE INDICATOR Turns on or blinks to manually enter the TV channel, and used to Select/Activate highlighted menu items. INFO BUTTON (TV, STB, CBL, PVR) Displays various information on your HITACHI Plasma TV, the new remote control is designed to operate different types of the ...Universal Remote Control to control the device selected. VOLUME WHEEL (TV, AMP/CD) Scroll up or down ...

Owners Guide
Page 9
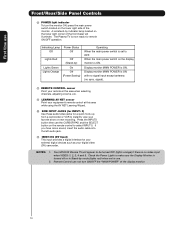
...cursor left (̇) and 9 right (̈) buttons when in MENU mode. ቤ PHOTO INPUT Insert USB cable from the 42" models. One of the TV screen. The volume level will stop and may eventually reset itself. ቧ VOLUME level Press these buttons until the desired channel appears in MENU mode...down (̄) and up (̆) buttons when in the top right corner of the differences are the handles that are only present on the TV screen. Thread the band through the square hole. Press again to the claw. Front/Rear/Side Panel Controls FRONT VIEW First time use CURSOR ...
...cursor left (̇) and 9 right (̈) buttons when in MENU mode. ቤ PHOTO INPUT Insert USB cable from the 42" models. One of the TV screen. The volume level will stop and may eventually reset itself. ቧ VOLUME level Press these buttons until the desired channel appears in MENU mode...down (̄) and up (̆) buttons when in the top right corner of the differences are the handles that are only present on the TV screen. Thread the band through the square hole. Press again to the claw. Front/Rear/Side Panel Controls FRONT VIEW First time use CURSOR ...
Owners Guide
Page 10
... then use Front/Rear/Side Panel Controls ቩ POWER light indicator To turn ON/OFF the "MAIN POWER" of the display monitor. 10 Your HITACHI Plasma TV will illuminate. First time use the CURSOR PAD and the SELECT button on the remote control to select INPUT 5. If you have mono sound, insert...
... then use Front/Rear/Side Panel Controls ቩ POWER light indicator To turn ON/OFF the "MAIN POWER" of the display monitor. 10 Your HITACHI Plasma TV will illuminate. First time use the CURSOR PAD and the SELECT button on the remote control to select INPUT 5. If you have mono sound, insert...
Owners Guide
Page 11
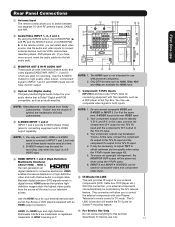
...Inputs INPUTS 3 and 4 provide Y-PBPR jacks for recording, only when the input is the next-generation all the way to the TV's PR input. 4. You may be used for connecting equipment with your external components can automatically be labeled Y-CBCR. In this connection,... your Plasma Television's remote control in TV mode. To ensure no copyright infringement, the MONITOR OUT output will allow you have monitor output. ብ ቮ ተ NOTE...
...Inputs INPUTS 3 and 4 provide Y-PBPR jacks for recording, only when the input is the next-generation all the way to the TV's PR input. 4. You may be used for connecting equipment with your external components can automatically be labeled Y-CBCR. In this connection,... your Plasma Television's remote control in TV mode. To ensure no copyright infringement, the MONITOR OUT output will allow you have monitor output. ብ ቮ ተ NOTE...
Owners Guide
Page 12
HITACHI will allow you to chosen cable channels. When using the sub woofer cable (not provided). CableCARD is not ... cable terminal of a single cable (see pages 20 and 30). Please call your TV. Insert the CableCARD into the CableCARD slot. If the CableCARD is properly installed or not installed, the TV will appear if a channel is installed ቮ To Power Swivel Connector Connects to ...audio digital data exchange between a compatible device. Call your cable operator and give them the information from your TV On-Screen Display. ተ CableCARD Slot This slot is required. 2.
HITACHI will allow you to chosen cable channels. When using the sub woofer cable (not provided). CableCARD is not ... cable terminal of a single cable (see pages 20 and 30). Please call your TV. Insert the CableCARD into the CableCARD slot. If the CableCARD is properly installed or not installed, the TV will appear if a channel is installed ቮ To Power Swivel Connector Connects to ...audio digital data exchange between a compatible device. Call your cable operator and give them the information from your TV On-Screen Display. ተ CableCARD Slot This slot is required. 2.
Owners Guide
Page 13
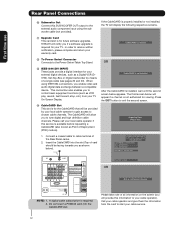
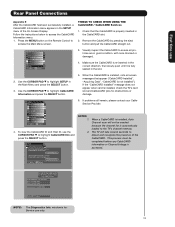
...the CableCARD Information menu. 1. Select the button below to acess CableCARD ID and Host ID. When a CableCARD is accessed. The TV will not be completed before any CableCARD information or Channel listings is installed, Auto Channel scan will take several seconds to return NOTE...use Rear Panel Connections Appendix E After the CableCARD has been successfully installed, a CableCARD Information menu appears in the slot. 2. Video Audio TV Guide On Screen Channel Manager Locks Timers Setup Move SEL Select 3. Use the CURSOR PAD ̄ to highlight CableCARD Information and press ...
...the CableCARD Information menu. 1. Select the button below to acess CableCARD ID and Host ID. When a CableCARD is accessed. The TV will not be completed before any CableCARD information or Channel listings is installed, Auto Channel scan will take several seconds to return NOTE...use Rear Panel Connections Appendix E After the CableCARD has been successfully installed, a CableCARD Information menu appears in the slot. 2. Video Audio TV Guide On Screen Channel Manager Locks Timers Setup Move SEL Select 3. Use the CURSOR PAD ̄ to highlight CableCARD Information and press ...

Owners Guide
Page 14
...NOTE: 1. The exact arrangement you use to connect the VCR, camcorder, laserdisc player, DVD player, or HDTV Set Top Box to accommodate your TV. 4. Completely insert connection cord plugs when connecting to left audio jack of your particular assortment of components and features. For best performance, video ... of the standard video cable. 3. If you have a VHS or 8mm camcorder, use the S-VIDEO cable in place of your Plasma TV is dependent on the Ferrite ferrite core near the Photo Input Core or IEEE 1394 Input as shown in the following connection diagrams are provided...
...NOTE: 1. The exact arrangement you use to connect the VCR, camcorder, laserdisc player, DVD player, or HDTV Set Top Box to accommodate your TV. 4. Completely insert connection cord plugs when connecting to left audio jack of your particular assortment of components and features. For best performance, video ... of the standard video cable. 3. If you have a VHS or 8mm camcorder, use the S-VIDEO cable in place of your Plasma TV is dependent on the Ferrite ferrite core near the Photo Input Core or IEEE 1394 Input as shown in the following connection diagrams are provided...

Owners Guide
Page 15
CONNECT TO IR BLASTER (PROVIDED) NOTE: Cables are optional, except when specified. First time use Rear Panel Connections Outside Antenna Cable TV coaxial cable 2-Way signal splitter VCR #1 ANT OUTPUT IN S-VIDEO V L R Optional / G-LINK DIGITAL OUTPUT CAPABILITY DIGITAL OUTPUT AUDIO OUT DVI to HDMI IEEE1394 DV INPUT Optional OUTPUT Y PB/CB PR/CR L R S-VIDEO V L R INPUT S-VIDEO V L R OUTPUT Y PB PR L R OUTPUT DVD Player (PROVIDED) VCR #2 Laserdisc player, VCR, camcorder, etc. HDTV Set-Top Box CONNECT TO IR BLASTER/ G-LINK 15
CONNECT TO IR BLASTER (PROVIDED) NOTE: Cables are optional, except when specified. First time use Rear Panel Connections Outside Antenna Cable TV coaxial cable 2-Way signal splitter VCR #1 ANT OUTPUT IN S-VIDEO V L R Optional / G-LINK DIGITAL OUTPUT CAPABILITY DIGITAL OUTPUT AUDIO OUT DVI to HDMI IEEE1394 DV INPUT Optional OUTPUT Y PB/CB PR/CR L R S-VIDEO V L R INPUT S-VIDEO V L R OUTPUT Y PB PR L R OUTPUT DVD Player (PROVIDED) VCR #2 Laserdisc player, VCR, camcorder, etc. HDTV Set-Top Box CONNECT TO IR BLASTER/ G-LINK 15

Owners Guide
Page 16
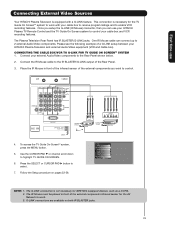
that have this case, connect the components B-Y output to the TV's PB input and the components R-Y output to the TV's PR input. • Your component outputs may be used for recording only when the input is of S-VIDEO type. • When using a HDMI input from a ...; S-VIDEO monitor output may be labeled Y-CBCR. In this feature. In this case, connect the components CB output to the TV's PB input and the components CR output to the TV's PR input. • It may be affected by copyright protection systems and the picture will assure a more information on Rear Panel...
that have this case, connect the components B-Y output to the TV's PB input and the components R-Y output to the TV's PR input. • Your component outputs may be used for recording only when the input is of S-VIDEO type. • When using a HDMI input from a ...; S-VIDEO monitor output may be labeled Y-CBCR. In this feature. In this case, connect the components CB output to the TV's PB input and the components CR output to the TV's PR input. • It may be affected by copyright protection systems and the picture will assure a more information on Rear Panel...

Owners Guide
Page 17
... #2 (see page 15), but note that a VCR cannot record its own video or line output. Select CABLE or AIR from the AUDIO OUT L of the TV. Completely insert the connection cord plugs when connecting to view the program from the AUDIO OUT L of VCR or R L V S-VIDEO Laserdisc Player OUTPUT VCR or...
... #2 (see page 15), but note that a VCR cannot record its own video or line output. Select CABLE or AIR from the AUDIO OUT L of the TV. Completely insert the connection cord plugs when connecting to view the program from the AUDIO OUT L of VCR or R L V S-VIDEO Laserdisc Player OUTPUT VCR or...

Owners Guide
Page 20
...as VCR play, rewind, fast forward, stop, etc.) from the output of the component with one another. It will be received by the TV. Select the IEEE1394 option (see page 30). 2. The IEEE1394 interface contains the copy protection standard called 5C or Digital Transmission Content Protection (...connection, video and audio will enable you enable video and audio digital data exchange between a compatible device. Connect the IEEE1394 cable from your TV On-Screen Display. Press the INPUTS button on the Remote Control. 3. IEEE 1394 allows the plasma television and the external device to ...
...as VCR play, rewind, fast forward, stop, etc.) from the output of the component with one another. It will be received by the TV. Select the IEEE1394 option (see page 30). 2. The IEEE1394 interface contains the copy protection standard called 5C or Digital Transmission Content Protection (...connection, video and audio will enable you enable video and audio digital data exchange between a compatible device. Connect the IEEE1394 cable from your TV On-Screen Display. Press the INPUTS button on the Remote Control. 3. IEEE 1394 allows the plasma television and the external device to ...

Owners Guide
Page 21
... OUT" from the VIDEO INPUT of the Rear Panel to an external audio amplifier, connect the system as shown on the Rear Panel on the TV Rear Panel. Connecting Video: Connect the cable from the Rear Panel is controlled by the amplifier, not by the Plasma Television. VCR / G-LINK ... the cable from the Optical out to the OUTPUT (AUDIO/R) jack on the right. The Volume of a separate Stereo System Amplifier as shown on the TV Rear Panel. / G-LINK Optional R L V S-VIDEO INPUT 2. Connect an optical cable from the AUDIO IN R of the VCR or the laserdisc player to the Optical...
... OUT" from the VIDEO INPUT of the Rear Panel to an external audio amplifier, connect the system as shown on the Rear Panel on the TV Rear Panel. Connecting Video: Connect the cable from the Rear Panel is controlled by the amplifier, not by the Plasma Television. VCR / G-LINK ... the cable from the Optical out to the OUTPUT (AUDIO/R) jack on the right. The Volume of a separate Stereo System Amplifier as shown on the TV Rear Panel. / G-LINK Optional R L V S-VIDEO INPUT 2. Connect an optical cable from the AUDIO IN R of the VCR or the laserdisc player to the Optical...
Owners Guide
Page 22
... 2. The correct codes must be placed in place. 3. First time use your HITACHI remote control to control the Audio/Video equipment command without the equipment's remote control. Video Audio TV Guide On Screen Channel Manager Locks Timers Setup Power Swivel Move SEL Select Setup Menu...BLASTER output of the external components you can use Connecting External Video Sources Your HITACHI Plasma Television is setup, it allows your IR Mouse connector to control your equipment using your HITACHI Plasma TV Remote Control. Double-sided mounting tape may be chosen for each of four ...
... 2. The correct codes must be placed in place. 3. First time use your HITACHI remote control to control the Audio/Video equipment command without the equipment's remote control. Video Audio TV Guide On Screen Channel Manager Locks Timers Setup Power Swivel Move SEL Select Setup Menu...BLASTER output of the external components you can use Connecting External Video Sources Your HITACHI Plasma Television is setup, it allows your IR Mouse connector to control your equipment using your HITACHI Plasma TV Remote Control. Double-sided mounting tape may be chosen for each of four ...
Owners Guide
Page 23
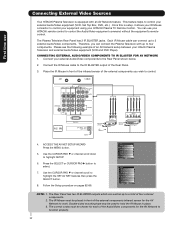
...Connect your external Audio/Video components to enable VCR recording features. To access the TV Guide On-ScreenTM system, press the MENU button. 5. First time use your HITACHI Plasma TV Remote Control and the TV Guide On Screen system to control your cable box and VCR recording features. Place ... the AV Network to the IR BLASTER/G-LINK output of a G-LINK setup between your HITACHI Plasma Television and external Audio/Video equipment (VCR and Cable box). This connection is not necessary for the TV Guide On ScreenTM system to work . 3. Please see the following example of the Rear...
...Connect your external Audio/Video components to enable VCR recording features. To access the TV Guide On-ScreenTM system, press the MENU button. 5. First time use your HITACHI Plasma TV Remote Control and the TV Guide On Screen system to control your cable box and VCR recording features. Place ... the AV Network to the IR BLASTER/G-LINK output of a G-LINK setup between your HITACHI Plasma Television and external Audio/Video equipment (VCR and Cable box). This connection is not necessary for the TV Guide On ScreenTM system to work . 3. Please see the following example of the Rear...
Owners Guide
Page 24
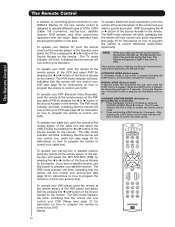
...). When the LIGHT button is pressed (including the LIGHT button), the illumination will blink 3 times to Automatic) 1. After releasing the LIGHT button, the TV mode indicator will light for instructions on how to program the remote to control your set -top-box or satellite receiver point the remote at...your PVR). Place the Remote Control in one touch. The Remote Control The Remote Control In addition to controlling all the functions on your HITACHI Plasma TV, the new remote control is dark. Basic operation keys are the Automatic and Manual modes. To operate your Plasma...
...). When the LIGHT button is pressed (including the LIGHT button), the illumination will blink 3 times to Automatic) 1. After releasing the LIGHT button, the TV mode indicator will light for instructions on how to program the remote to control your set -top-box or satellite receiver point the remote at...your PVR). Place the Remote Control in one touch. The Remote Control The Remote Control In addition to controlling all the functions on your HITACHI Plasma TV, the new remote control is dark. Basic operation keys are the Automatic and Manual modes. To operate your Plasma...

