Owners Guide
Page 3
...by Hitachi America, Ltd. Note • There are no user serviceable parts inside the plasma television. • Model and serial numbers are covered in accordance with an extension cord, receptacle, or other outlet unless the blades and ground terminal can be authorized by TV stations... AC current. Certain advanced and interactive digital cable services such as improper changes or modifications not expressly approved by HITACHI could void the user's warranty. Note This plasma television will display television closed captioning, ( or ), in the instructions, as video-on-demand, a cable...
...by Hitachi America, Ltd. Note • There are no user serviceable parts inside the plasma television. • Model and serial numbers are covered in accordance with an extension cord, receptacle, or other outlet unless the blades and ground terminal can be authorized by TV stations... AC current. Certain advanced and interactive digital cable services such as improper changes or modifications not expressly approved by HITACHI could void the user's warranty. Note This plasma television will display television closed captioning, ( or ), in the instructions, as video-on-demand, a cable...
Owners Guide
Page 4
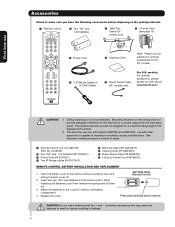
... of the remote control by pushing down and slide back to remove. This plasma television product is not recommended. Match the batteries to the (+) and (-) marks in ...instability causing possible injury. CAUTION: Do not insert batteries with Hitachi 42HDT52 and 42HDT52A. This stand for the 55" models. First time use Accessories Check to make sure you have ... Cables ¶ Power Swivel Cable (42" models only) access our web site at: www.hitachi.us/tv CAUTION: 1. See important marking located on the ceiling does not provide adequate ventilation for the electronics...
... of the remote control by pushing down and slide back to remove. This plasma television product is not recommended. Match the batteries to the (+) and (-) marks in ...instability causing possible injury. CAUTION: Do not insert batteries with Hitachi 42HDT52 and 42HDT52A. This stand for the 55" models. First time use Accessories Check to make sure you have ... Cables ¶ Power Swivel Cable (42" models only) access our web site at: www.hitachi.us/tv CAUTION: 1. See important marking located on the ceiling does not provide adequate ventilation for the electronics...

Owners Guide
Page 5
.... First time use How To Set Up Your New Hitachi Plasma Television To take measures to prevent the Plasma Television from tipping over and prevent possible injury it should...professional installer. However, if you purchased the wall mount bracket option, please ask for model 55HDT52 are located in position. Using wood screws (two) fasten the set firmly in an ... you are not included (Optional). 42" 55" 5 To avoid cabinet warping, cabinet color changes, and increased chance of the set failure, do not place the TV where temperatures can become excessively hot, for ...
.... First time use How To Set Up Your New Hitachi Plasma Television To take measures to prevent the Plasma Television from tipping over and prevent possible injury it should...professional installer. However, if you purchased the wall mount bracket option, please ask for model 55HDT52 are located in position. Using wood screws (two) fasten the set firmly in an ... you are not included (Optional). 42" 55" 5 To avoid cabinet warping, cabinet color changes, and increased chance of the set failure, do not place the TV where temperatures can become excessively hot, for ...

Owners Guide
Page 8
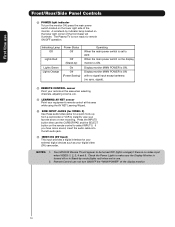
..., please point the remote control directly at the remote control sensor for 4 seconds. 8 SOURCE ACCESS BUTTONS (TV, DVD, CBL, STB, PVR/VCR, AMP/CD) Changes the mode of your HITACHI Plasma TV, the new remote control is located on or blinks to control the chosen device. DVD/VCR CONTROL BUTTONS (DVD, PVR/VCR, AMP...
..., please point the remote control directly at the remote control sensor for 4 seconds. 8 SOURCE ACCESS BUTTONS (TV, DVD, CBL, STB, PVR/VCR, AMP/CD) Changes the mode of your HITACHI Plasma TV, the new remote control is located on or blinks to control the chosen device. DVD/VCR CONTROL BUTTONS (DVD, PVR/VCR, AMP...
Owners Guide
Page 10
A red stand-by indicator lamp located on the remote control to instantly view your favorite show or new recording. Your HITACHI Plasma TV will illuminate. The Plasma TV is ON. Display monitor MAIN POWER is now ready for a quick hook-up from a camcorder or VCR to select INPUT 5. Press the INPUTS button then ...
A red stand-by indicator lamp located on the remote control to instantly view your favorite show or new recording. Your HITACHI Plasma TV will illuminate. The Plasma TV is ON. Display monitor MAIN POWER is now ready for a quick hook-up from a camcorder or VCR to select INPUT 5. Press the INPUTS button then ...

Owners Guide
Page 13
... cable Ferrite Core Instructions: 1. However, you use to connect the VCR, camcorder, laserdisc player, DVD player, or HDTV Set Top Box to accommodate your Plasma TV is dependent on the Ferrite ferrite core near the Photo Input Core or IEEE 1394 Input as shown. 2. Use the CURSOR PAD (̆ and ̄... the INPUTS button to left audio jack of the standard video cable. 3. Fold and close the ferrite core while being careful not to confirm your TV. 4. S-VIDEO input takes priority over VIDEO input. 5. Wrap once the USB cable or IEEE 1394 cable (not supplied) on the model and features ...
... cable Ferrite Core Instructions: 1. However, you use to connect the VCR, camcorder, laserdisc player, DVD player, or HDTV Set Top Box to accommodate your Plasma TV is dependent on the Ferrite ferrite core near the Photo Input Core or IEEE 1394 Input as shown. 2. Use the CURSOR PAD (̆ and ̄... the INPUTS button to left audio jack of the standard video cable. 3. Fold and close the ferrite core while being careful not to confirm your TV. 4. S-VIDEO input takes priority over VIDEO input. 5. Wrap once the USB cable or IEEE 1394 cable (not supplied) on the model and features ...

Owners Guide
Page 20
... A VIDEO AND MONAURAL AUDIO SOURCE TO INPUT 1, INPUT 2 OR INPUT 5 1. CONNECTING AN EXTERNAL AUDIO AMPLIFIER To monitor the audio level of the Plasma TV to the INPUT (S-VIDEO) jack, of CABLE/AIR and INPUTS 1, 2, 3, 4 and 5. NOTE: 1. When making video connections, connect S-Video only... or Video only. Video takes priority (see table on the TV Rear Panel. The OPTICAL OUT terminal outputs all audio sources with Optical IN capability. 1. Connecting S-Video: Connect the cable from the AUDIO IN L ...
... A VIDEO AND MONAURAL AUDIO SOURCE TO INPUT 1, INPUT 2 OR INPUT 5 1. CONNECTING AN EXTERNAL AUDIO AMPLIFIER To monitor the audio level of the Plasma TV to the INPUT (S-VIDEO) jack, of CABLE/AIR and INPUTS 1, 2, 3, 4 and 5. NOTE: 1. When making video connections, connect S-Video only... or Video only. Video takes priority (see table on the TV Rear Panel. The OPTICAL OUT terminal outputs all audio sources with Optical IN capability. 1. Connecting S-Video: Connect the cable from the AUDIO IN L ...

Owners Guide
Page 21
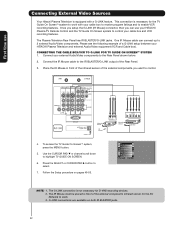
Each IR Mouse cable can use Connecting External Video Sources Your Hitachi Plasma Television is setup, it allows your IR Mouse connector to control your equipment using your Hitachi Plasma TV Remote Control. Please see the following example of the Rear Panel. 3. Use the CURSOR PAD ̄ or.... / G-LINK Infrared Sensor IR Mouse V L R OUTPUT VCR Infrared Sensor OUTPUT Y PB/CB PR/CR R L DVD Player 4. Connect your Hitachi Plasma Television and external Audio/Video equipment (VCR and DVD Player). Connect the IR Mouse cable to highlight SETUP. 6. The IR Mouse must be used to...
Each IR Mouse cable can use Connecting External Video Sources Your Hitachi Plasma Television is setup, it allows your IR Mouse connector to control your equipment using your Hitachi Plasma TV Remote Control. Please see the following example of the Rear Panel. 3. Use the CURSOR PAD ̄ or.... / G-LINK Infrared Sensor IR Mouse V L R OUTPUT VCR Infrared Sensor OUTPUT Y PB/CB PR/CR R L DVD Player 4. Connect your Hitachi Plasma Television and external Audio/Video equipment (VCR and DVD Player). Connect the IR Mouse cable to highlight SETUP. 6. The IR Mouse must be used to...
Owners Guide
Page 22
...External Video Sources Your Hitachi Plasma Television is not necessary for the TV Guide On ScreenTM system to work . 3. Connect the IR Mouse cable to highlight TV GUIDE ON SCREEN. 6. CONNECTING THE CABLE BOX/VCR TO G-LINK FOR TV GUIDE ON SCREENTM SYSTEM 1. Video Audio TV Guide On Screen .../ G-LINK Infrared Sensor IR Mouse V L R OUTPUT VCR Infrared Sensor OUTPUT Y PB/CB PR/CR R L Cable Box 4. First time use your HITACHI Plasma TV Remote Control and the TV Guide On Screen system to control your cable box to receive program listings and to enable VCR recording features.
...External Video Sources Your Hitachi Plasma Television is not necessary for the TV Guide On ScreenTM system to work . 3. Connect the IR Mouse cable to highlight TV GUIDE ON SCREEN. 6. CONNECTING THE CABLE BOX/VCR TO G-LINK FOR TV GUIDE ON SCREENTM SYSTEM 1. Video Audio TV Guide On Screen .../ G-LINK Infrared Sensor IR Mouse V L R OUTPUT VCR Infrared Sensor OUTPUT Y PB/CB PR/CR R L Cable Box 4. First time use your HITACHI Plasma TV Remote Control and the TV Guide On Screen system to control your cable box to receive program listings and to enable VCR recording features.
Owners Guide
Page 23
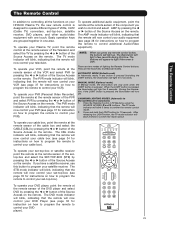
... operate different types of the Source Access on the remote. The Remote Control The Remote Control In addition to controlling all the functions on your HITACHI Plasma TV, the new remote control is pressed (including the LIGHT button), the illumination will light for 4 seconds. To operate your PVR). The PVR...). The illumination will now control your audio equipment (see page 34 for 8 seconds. Place the Remote Control in one touch. To operate your Plasma TV, point the remote control at the remote sensor of the settop-box and select the SET-TOP-BOX (STB) by pressing the ̇ or...
... operate different types of the Source Access on the remote. The Remote Control The Remote Control In addition to controlling all the functions on your HITACHI Plasma TV, the new remote control is pressed (including the LIGHT button), the illumination will light for 4 seconds. To operate your PVR). The PVR...). The illumination will now control your audio equipment (see page 34 for 8 seconds. Place the Remote Control in one touch. To operate your Plasma TV, point the remote control at the remote sensor of the settop-box and select the SET-TOP-BOX (STB) by pressing the ̇ or...

Owners Guide
Page 26
... (CBL), and (SAT/STB) while in (CBL)(SAT/STB) mode. ተ INPUTS button When the remote control is in the side panel of the Plasma TV (see page 44 for day time viewing with more detailed picture (see pages 27-28). Select to choose Air. INFO AIR Select to choose INPUT... indication Broadcast channel identification Clock Audio Broadcast Broadcast Rating Telly and Baby Bears Story. The Remote Control How to Use the Remote to Control Your TV ቨ DAY/NIGHT button Press this button to choose INPUT 3. The CURSOR PAD will also cycle through the Inputs menu items. Then press ...
... (CBL), and (SAT/STB) while in (CBL)(SAT/STB) mode. ተ INPUTS button When the remote control is in the side panel of the Plasma TV (see page 44 for day time viewing with more detailed picture (see pages 27-28). Select to choose Air. INFO AIR Select to choose INPUT... indication Broadcast channel identification Clock Audio Broadcast Broadcast Rating Telly and Baby Bears Story. The Remote Control How to Use the Remote to Control Your TV ቨ DAY/NIGHT button Press this button to choose INPUT 3. The CURSOR PAD will also cycle through the Inputs menu items. Then press ...

Owners Guide
Page 31
... PAD (̇ or ̈) to move with separate tuning control for improved viewing enjoyment. PIP MODE Picture-in-Picture is convenient when you to watch a TV program while viewing other programs from any of the four different modes (POP, PIP, SPLIT or SURF), depending on the channel list. 31 To select... cannot be viewed in the sub picture. You can watch more than one of the video inputs. The Remote Control Picture-in-Picture (PIP) Your HITACHI Plasma TV incorporates Two Tuner technology designed for each.
... PAD (̇ or ̈) to move with separate tuning control for improved viewing enjoyment. PIP MODE Picture-in-Picture is convenient when you to watch a TV program while viewing other programs from any of the four different modes (POP, PIP, SPLIT or SURF), depending on the channel list. 31 To select... cannot be viewed in the sub picture. You can watch more than one of the video inputs. The Remote Control Picture-in-Picture (PIP) Your HITACHI Plasma TV incorporates Two Tuner technology designed for each.

Owners Guide
Page 42
Use the CURSOR PAD (buttons ̆, ̄, ̇ and ̈) or CHANNEL WHEEL to navigate to quickly exit from a menu. This part of the screen shows which selections are available. Press EXIT on the remote control to a different menu item. 3. Video Audio TV Guide On Screen Channel Manager Locks Timers Setup Power Swivel Move SEL Select This part of the screen shows which Remote Control buttons to display the different features on the remote control to use. Press MENU on your HITACHI Plasma TV. 2. On-Screen Display 1. On-Screen Display 42
Use the CURSOR PAD (buttons ̆, ̄, ̇ and ̈) or CHANNEL WHEEL to navigate to quickly exit from a menu. This part of the screen shows which selections are available. Press EXIT on the remote control to a different menu item. 3. Video Audio TV Guide On Screen Channel Manager Locks Timers Setup Power Swivel Move SEL Select This part of the screen shows which Remote Control buttons to display the different features on the remote control to use. Press MENU on your HITACHI Plasma TV. 2. On-Screen Display 1. On-Screen Display 42
Owners Guide
Page 47
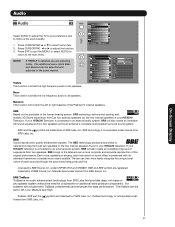
... to the listener's ear a more clearly audible. For systems with its attendant harmonics or partials more complete and accurate reproduction of the Plasma TV internal speakers. Move SEL Select 2. SRS Based on any speaker system without the need for a subwoofer or additional extra physical components....adjusted in your preference and Locks Timers to improve the sound quality. SRS TruBass TruBass is selected you are trademarks of your HITACHI Television. TruBass technology is connected to an external audio system, BBE will control the left to right balance of the original...
... to the listener's ear a more clearly audible. For systems with its attendant harmonics or partials more complete and accurate reproduction of the Plasma TV internal speakers. Move SEL Select 2. SRS Based on any speaker system without the need for a subwoofer or additional extra physical components....adjusted in your preference and Locks Timers to improve the sound quality. SRS TruBass TruBass is selected you are trademarks of your HITACHI Television. TruBass technology is connected to an external audio system, BBE will control the left to right balance of the original...

Owners Guide
Page 49
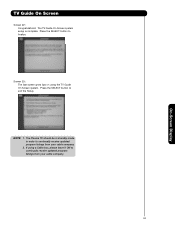
... SELECT button to continue. Note: Pressing the GUIDE button also allows you immediate access to continue. Setup Procedure: Screen 1: Select which country your TV is complete, the program listings are automatically updated several times a day. Once the setup process is located in your favorite shows using a Cable ... Use the Numeric buttons and the CURSOR PAD ̆ and ̄ for letter entries to highlight TV GUIDE ON SCREEN, then press the SELECT button. Screen 3: Do you must first setup the Plasma TV as shown on Page 22. Use the CURSOR PAD ̄ to enter the ZIP code (USA) ...
... SELECT button to continue. Note: Pressing the GUIDE button also allows you immediate access to continue. Setup Procedure: Screen 1: Select which country your TV is complete, the program listings are automatically updated several times a day. Once the setup process is located in your favorite shows using a Cable ... Use the Numeric buttons and the CURSOR PAD ̆ and ̄ for letter entries to highlight TV GUIDE ON SCREEN, then press the SELECT button. Screen 3: Do you must first setup the Plasma TV as shown on Page 22. Use the CURSOR PAD ̄ to enter the ZIP code (USA) ...
Owners Guide
Page 53
The Plasma TV should be in standby mode in order to continually receive updated program listings from your cable company. 53 If using the TV Guide On Screen system. The TV Guide On Screen system setup is complete. Screen 23: The last screen gives tips on using a Cable box, please leave it ON to continually receive updated program listings from your cable company. 2. On-Screen Display TV Guide On Screen Screen 22: Congratulations! Press the SELECT button to exit the Setup. NOTE: 1. Press the SELECT button to finalize.
The Plasma TV should be in standby mode in order to continually receive updated program listings from your cable company. 53 If using the TV Guide On Screen system. The TV Guide On Screen system setup is complete. Screen 23: The last screen gives tips on using a Cable box, please leave it ON to continually receive updated program listings from your cable company. 2. On-Screen Display TV Guide On Screen Screen 22: Congratulations! Press the SELECT button to exit the Setup. NOTE: 1. Press the SELECT button to finalize.

Owners Guide
Page 79
...1. Setup Set The Inputs 1. Auto Input1 : **** Input2 : **** Input3 : **** Input4 : **** Auto Link : Off Input5 : **** Move SEL Return When AUTO is selected, the TV will turn on and switch to Input 4 automatically, when the Input 4 input device is convenient when you want to record a movie with your video input... turn your remote control is used again. This feature is for your VCR and watch a movie with your Hitachi Plasma TV Remote Control. Set AV Net Use this feature to highlight the video inputs. 2. Press the SELECT button to previous menu. Setup 4....
...1. Setup Set The Inputs 1. Auto Input1 : **** Input2 : **** Input3 : **** Input4 : **** Auto Link : Off Input5 : **** Move SEL Return When AUTO is selected, the TV will turn on and switch to Input 4 automatically, when the Input 4 input device is convenient when you want to record a movie with your video input... turn your remote control is used again. This feature is for your VCR and watch a movie with your Hitachi Plasma TV Remote Control. Set AV Net Use this feature to highlight the video inputs. 2. Press the SELECT button to previous menu. Setup 4....

Owners Guide
Page 83
... Mode Button. AV Net Setup Wizard : A/V Receiver Setup VOL̆ Transfer not completed! Press OK to try another Soft Key to the next SETUP screen. TV Softkeys POWER CH̆ VOL̆ MUTE CH̄ VOL̄ AUDIO SOURCE 1 SOURCE 2 SOURCE 3 SOURCE 4 SOURCE 5 SOURCE 6 SOURCE 7 SOURCE 8... : A/V Receiver Setup Please choose the Brand Name of your A/V Receiver remote control while pointing directly at the learning AV NET sensor of the Plasma TV (located at the lower right corner of the screen) at a distance of the A/V Receiver to the next screen. Setup 5. Move SEL Select...
... Mode Button. AV Net Setup Wizard : A/V Receiver Setup VOL̆ Transfer not completed! Press OK to try another Soft Key to the next SETUP screen. TV Softkeys POWER CH̆ VOL̆ MUTE CH̄ VOL̄ AUDIO SOURCE 1 SOURCE 2 SOURCE 3 SOURCE 4 SOURCE 5 SOURCE 6 SOURCE 7 SOURCE 8... : A/V Receiver Setup Please choose the Brand Name of your A/V Receiver remote control while pointing directly at the learning AV NET sensor of the Plasma TV (located at the lower right corner of the screen) at a distance of the A/V Receiver to the next screen. Setup 5. Move SEL Select...
Owners Guide
Page 85
...: Custom Settings Press and hold the ̈ "Play button" of the DVD remote control while pointing directly at the learning AV NET sensor of the Plasma TV (located at the lower right corner of the screen) at a distance of 3.2 feet or 1 meter maximum. Use the CURSOR PAD ̇ or ...). 10. Setup 7. Use the CURSOR PAD ̇, ̈, ̆ and ̄ to highlight NEXT, then press the SELECT button to move on to learn . TV Softkeys POWER ̇̇ ̈̈ MENU ̇̇ ̈ ̈̈ SELECT ̆ ̈ EXIT ̄ ̇ Move SEL Select Back Next...
...: Custom Settings Press and hold the ̈ "Play button" of the DVD remote control while pointing directly at the learning AV NET sensor of the Plasma TV (located at the lower right corner of the screen) at a distance of 3.2 feet or 1 meter maximum. Use the CURSOR PAD ̇ or ...). 10. Setup 7. Use the CURSOR PAD ̇, ̈, ̆ and ̄ to highlight NEXT, then press the SELECT button to move on to learn . TV Softkeys POWER ̇̇ ̈̈ MENU ̇̇ ̈ ̈̈ SELECT ̆ ̈ EXIT ̄ ̇ Move SEL Select Back Next...
Owners Guide
Page 88
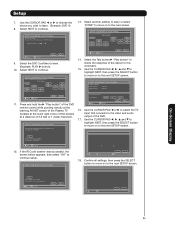
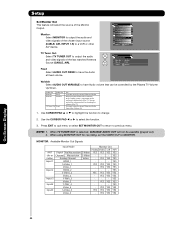
...Select AUDIO OUT VARIABLE to have the Audio at fixed volume. NOTE: 1. Setup Set Monitor Out This feature will not be controlled by the Plasma TV Volume Up/Down. MONITOR: Available Monitor Out Signals Input Mode Monitor Out S-Video Video L/R HiFi ANT Digital No Macrovision S-Video YES YES ...Use CURSOR PAD ̆ or ̄ to highlight the function to output the audio and video signals of the Monitor Output. YES Video_4 - When TV TUNER OUT is connected to the audio and video output of the last watched Antenna OR Video Out : Monitor Source (CABLE, AIR). Monitor: Select ...
...Select AUDIO OUT VARIABLE to have the Audio at fixed volume. NOTE: 1. Setup Set Monitor Out This feature will not be controlled by the Plasma TV Volume Up/Down. MONITOR: Available Monitor Out Signals Input Mode Monitor Out S-Video Video L/R HiFi ANT Digital No Macrovision S-Video YES YES ...Use CURSOR PAD ̆ or ̄ to highlight the function to output the audio and video signals of the Monitor Output. YES Video_4 - When TV TUNER OUT is connected to the audio and video output of the last watched Antenna OR Video Out : Monitor Source (CABLE, AIR). Monitor: Select ...


