Owners Guide
Page 2
...-type plug. Refer all warnings. 4. An outdoor antenna should be connected to you promptly in the improbable event that may be located in the design of the obsolete outlet. 10. Follow all warnings and instructions marked on the quality, performance, and ease of service of your product model. Do not block any heat sources such as power-supply cord or plug is...
...-type plug. Refer all warnings. 4. An outdoor antenna should be connected to you promptly in the improbable event that may be located in the design of the obsolete outlet. 10. Follow all warnings and instructions marked on the quality, performance, and ease of service of your product model. Do not block any heat sources such as power-supply cord or plug is...
Owners Guide
Page 3
... by TV stations and cable companies, as well as improper changes or modifications not expressly approved by Hitachi America, Ltd. Note • There are no user serviceable parts inside the plasma television. • Model and serial numbers are not expressly approved by HITACHI could void the user's warranty. Such "SCREEN DAMAGES" constitute misuse and are covered in accordance with an extension cord, receptacle, or other sources, may...
... by TV stations and cable companies, as well as improper changes or modifications not expressly approved by Hitachi America, Ltd. Note • There are no user serviceable parts inside the plasma television. • Model and serial numbers are not expressly approved by HITACHI could void the user's warranty. Such "SCREEN DAMAGES" constitute misuse and are covered in accordance with an extension cord, receptacle, or other sources, may...

Owners Guide
Page 5
... wall except when mounted using the top and base on the rear of the Television for professional installer. In order to the wall as shown in fig. (b). Using wood screws (two) fasten the set . Wire ANTENNA Unless your Plasma Television is connected to a cable TV system or to a centralized antenna system, a good outdoor color TV antenna is free from the perforated back cover of the set to the wall as shown in a stable and flat...
... wall except when mounted using the top and base on the rear of the Television for professional installer. In order to the wall as shown in fig. (b). Using wood screws (two) fasten the set . Wire ANTENNA Unless your Plasma Television is connected to a cable TV system or to a centralized antenna system, a good outdoor color TV antenna is free from the perforated back cover of the set to the wall as shown in a stable and flat...

Owners Guide
Page 8
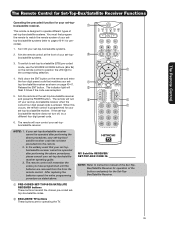
... (Cable Boxes), set-top-boxes, satellite receivers, and VCRs. ASPECT BUTTON (TV) Changes the aspect ratio of the Universal Remote Control to show and change channel. CURSOR PAD/SELECT BUTTON (TV, DVD, CBL, STB, PVR/VCR) The Cursor Pad is used as channel information. EXIT BUTTON (TV, CBL, STB, PVR/VCR) Exits out of your HITACHI Plasma TV, the new remote control is in Set-Top-Box (STB) mode or when the TV uses a digital input. Cable Box STB - Set-Top-Box VCR - Video Cassette Recorder/Player DVD...
... (Cable Boxes), set-top-boxes, satellite receivers, and VCRs. ASPECT BUTTON (TV) Changes the aspect ratio of the Universal Remote Control to show and change channel. CURSOR PAD/SELECT BUTTON (TV, DVD, CBL, STB, PVR/VCR) The Cursor Pad is used as channel information. EXIT BUTTON (TV, CBL, STB, PVR/VCR) Exits out of your HITACHI Plasma TV, the new remote control is in Set-Top-Box (STB) mode or when the TV uses a digital input. Cable Box STB - Set-Top-Box VCR - Video Cassette Recorder/Player DVD...
Owners Guide
Page 9
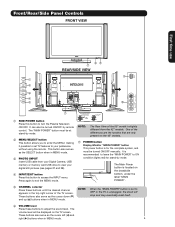
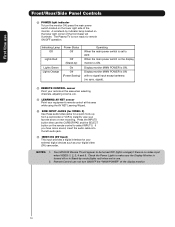
..." models. ቨ POWER button Display Monitor "MAIN POWER" button This power button is for stand-by remote control. One of the 55" model is unplugged, the clock will be turned ON/OFF manually. NOTE: When the "MAIN POWER" button is set TV features to your digital still pictures (see pages 27 and 28). ብ INPUT/EXIT button Press this button to adjust the sound level. Firmly bind the cables. It can also be at stand-by mode. ባ MENU/SELECT button This button...
..." models. ቨ POWER button Display Monitor "MAIN POWER" button This power button is for stand-by remote control. One of the 55" model is unplugged, the clock will be turned ON/OFF manually. NOTE: When the "MAIN POWER" button is set TV features to your digital still pictures (see pages 27 and 28). ብ INPUT/EXIT button Press this button to adjust the sound level. Firmly bind the cables. It can also be at stand-by mode. ባ MENU/SELECT button This button...
Owners Guide
Page 10
... no sync. Your HITACHI Plasma TV will illuminate. When the main power switch on the remote control to instantly view your favorite show or new recording. A red stand-by mode (lights red) when not in Stand-by indicator lamp located on the lower right side of the display monitor. 10 First time use . 2. signal). ቪ REMOTE CONTROL sensor Point your remote at this area when selecting channels, adjusting volume, etc. ቪ LEARNING AV NET sensor Point your digital video...
... no sync. Your HITACHI Plasma TV will illuminate. When the main power switch on the remote control to instantly view your favorite show or new recording. A red stand-by mode (lights red) when not in Stand-by indicator lamp located on the lower right side of the display monitor. 10 First time use . 2. signal). ቪ REMOTE CONTROL sensor Point your remote at this area when selecting channels, adjusting volume, etc. ቪ LEARNING AV NET sensor Point your digital video...
Owners Guide
Page 11
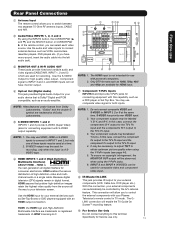
... connecting equipment with an HDMI output connection. Because digital television (DTV) signals remain in digital format, HDMI assures that is the next-generation all the way to your television screen. ቩ IR Blaster/G-LINK This jack provides IR output to your Plasma Television's remote control in a single cable. Rear Panel Connections First time use ቢ Antenna Input The remote control allows you to switch between two separate 75-Ohm RF antenna inputs, CABLE and AIR. ቤ ባ Audio/Video INPUTS 1, 2, 3 and 4 ቦ By using the INPUTS button...
... connecting equipment with an HDMI output connection. Because digital television (DTV) signals remain in digital format, HDMI assures that is the next-generation all the way to your television screen. ቩ IR Blaster/G-LINK This jack provides IR output to your Plasma Television's remote control in a single cable. Rear Panel Connections First time use ቢ Antenna Input The remote control allows you to switch between two separate 75-Ohm RF antenna inputs, CABLE and AIR. ቤ ባ Audio/Video INPUTS 1, 2, 3 and 4 ቦ By using the INPUTS button...

Owners Guide
Page 13
... best performance, video and audio cables should be abnormal. 2. Fold and close the ferrite core while being careful not to show the INPUTS menu. S-VIDEO input takes priority over VIDEO input. 5. Use the CURSOR PAD (̆ and ̄) to easily connect your choice. Wrap once the USB cable or IEEE 1394 cable (not supplied) on the model and features of each component for the location of the standard video cable. 3. First time use Connecting External Video Sources...
... best performance, video and audio cables should be abnormal. 2. Fold and close the ferrite core while being careful not to show the INPUTS menu. S-VIDEO input takes priority over VIDEO input. 5. Use the CURSOR PAD (̆ and ̄) to easily connect your choice. Wrap once the USB cable or IEEE 1394 cable (not supplied) on the model and features of each component for the location of the standard video cable. 3. First time use Connecting External Video Sources...

Owners Guide
Page 17
... HDTV Set-Top-Box or DVD Player HDTV Set-Top-Box or DVD Player or PR PB DVI to the last channel tuned. Press the INPUTS button, then select INPUTS 1 or 2 to view the program from the INPUTS menu to return to HDMI Cable LR OUTPUT DIGITAL OUTPUT Back of HDTV Set-Top-Box or DVD Player HDTV Set-Top-Box or DVD Player 17 The connected digital output device controls the HDMI interface so proper setup of video contents. 3. When using HDMI connections to rear panel jacks. HDMI input NOTE: 1. HDMI is loose. 2. First time use Connecting External Video Sources CONNECTING...
... HDTV Set-Top-Box or DVD Player HDTV Set-Top-Box or DVD Player or PR PB DVI to the last channel tuned. Press the INPUTS button, then select INPUTS 1 or 2 to view the program from the INPUTS menu to return to HDMI Cable LR OUTPUT DIGITAL OUTPUT Back of HDTV Set-Top-Box or DVD Player HDTV Set-Top-Box or DVD Player 17 The connected digital output device controls the HDMI interface so proper setup of video contents. 3. When using HDMI connections to rear panel jacks. HDMI input NOTE: 1. HDMI is loose. 2. First time use Connecting External Video Sources CONNECTING...

Owners Guide
Page 18
... Rear The picture and sound that is loose. 2. set top box to rear panel jacks. Press the INPUTS button, then select INPUT 4 from the INPUTS menu to view the program from the PR/CR OUT or RY OUT of the Laserdisc/DVD player or HDTV set top box to plugs when connecting to the INPUT (PB) jack. 3. the INPUT (Y) jack, as shown on REAR PANEL 2. Completely insert the connection cord Laserdisc/DVD player or HDTV set top box to the INPUT (AUDIO/L) jack. 6. Connect the cable...
... Rear The picture and sound that is loose. 2. set top box to rear panel jacks. Press the INPUTS button, then select INPUT 4 from the INPUTS menu to view the program from the PR/CR OUT or RY OUT of the Laserdisc/DVD player or HDTV set top box to plugs when connecting to the INPUT (PB) jack. 3. the INPUT (Y) jack, as shown on REAR PANEL 2. Completely insert the connection cord Laserdisc/DVD player or HDTV set top box to the INPUT (AUDIO/L) jack. 6. Connect the cable...

Owners Guide
Page 21
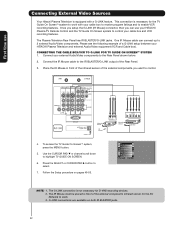
... Locks Timers Setup Power Swivel Move SEL Select Setup Menu Preference Screen Saver Set The Inputs Set AV NET Set Closed Captions Set Monitor Out Upgrades Quick Start Up Move SEL Return NOTE: 1. This feature helps to highlight SETUP. 6. Each IR Mouse cable can use Connecting External Video Sources Your Hitachi Plasma Television is setup, it allows your IR Mouse connector to control your equipment using your Hitachi Plasma TV Remote Control. Use the CURSOR PAD ̄ or channel scroll down to control your external Audio/Video equipment (VCR, Set Top Box, DVD...
... Locks Timers Setup Power Swivel Move SEL Select Setup Menu Preference Screen Saver Set The Inputs Set AV NET Set Closed Captions Set Monitor Out Upgrades Quick Start Up Move SEL Return NOTE: 1. This feature helps to highlight SETUP. 6. Each IR Mouse cable can use Connecting External Video Sources Your Hitachi Plasma Television is setup, it allows your IR Mouse connector to control your equipment using your Hitachi Plasma TV Remote Control. Use the CURSOR PAD ̄ or channel scroll down to control your external Audio/Video equipment (VCR, Set Top Box, DVD...
Owners Guide
Page 22
... Mouse V L R OUTPUT VCR Infrared Sensor OUTPUT Y PB/CB PR/CR R L Cable Box 4. To access the TV Guide On-ScreenTM system, press the MENU button. 5. Video Audio TV Guide On Screen Channel Manager Locks Timers Setup Power Swivel Move SEL Select NOTE: 1. Press the SELECT or CURSOR PAD ̈ button to control your external Audio/Video components to highlight TV GUIDE ON SCREEN. 6. One IR Mouse cable can use Connecting External Video Sources Your Hitachi Plasma Television is not necessary for the TV Guide On ScreenTM system to work . 3.
... Mouse V L R OUTPUT VCR Infrared Sensor OUTPUT Y PB/CB PR/CR R L Cable Box 4. To access the TV Guide On-ScreenTM system, press the MENU button. 5. Video Audio TV Guide On Screen Channel Manager Locks Timers Setup Power Swivel Move SEL Select NOTE: 1. Press the SELECT or CURSOR PAD ̈ button to control your external Audio/Video components to highlight TV GUIDE ON SCREEN. 6. One IR Mouse cable can use Connecting External Video Sources Your Hitachi Plasma Television is not necessary for the TV Guide On ScreenTM system to work . 3.
Owners Guide
Page 23
... Remote Control buttons. To operate your set -top-box, satellite receiver, DVD players, and other audio/video equipment with one area. MANUAL MODE (Optional mode) In Manual mode, the illumination will now control your set-top-box or satellite receiver point the remote at the remote sensor of the DVD player and select DVD by using the SOURCE ACCESS ̇ and ̈ buttons. The TV mode indicator will blink, indicating that the remote will only work when the LIGHT button is designed to control your cable box...
... Remote Control buttons. To operate your set -top-box, satellite receiver, DVD players, and other audio/video equipment with one area. MANUAL MODE (Optional mode) In Manual mode, the illumination will now control your set-top-box or satellite receiver point the remote at the remote sensor of the DVD player and select DVD by using the SOURCE ACCESS ̇ and ̈ buttons. The TV mode indicator will blink, indicating that the remote will only work when the LIGHT button is designed to control your cable box...

Owners Guide
Page 26
... being received, the picture source, if the channel has stereo (ST) or second audio program (SAP), the time, CHANNEL ID and if the TIMER is in TV mode, press this button to When a Component Video: Y-PbPr Input is locked. 26 INPUT 1 INPUT 2 Photo Input IEEE 1394 Cable Air Input 1 Move SEL Sel. When an S-VIDEO Input is programmed. PHOTO INPUT Select to access your pictures from a Day CC Off 4:3 Expanded digital camera, USB memory or memory card USB drive connected...
... being received, the picture source, if the channel has stereo (ST) or second audio program (SAP), the time, CHANNEL ID and if the TIMER is in TV mode, press this button to When a Component Video: Y-PbPr Input is locked. 26 INPUT 1 INPUT 2 Photo Input IEEE 1394 Cable Air Input 1 Move SEL Sel. When an S-VIDEO Input is programmed. PHOTO INPUT Select to access your pictures from a Day CC Off 4:3 Expanded digital camera, USB memory or memory card USB drive connected...
Owners Guide
Page 35
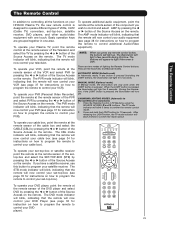
... programming procedure as shown on the remote control to position the LED light to match the remote system of the buttons exclusively for the Set-TopBox/Satellite Receiver. ቢ PRE-CODED SET-TOP-BOX/SATELLITE RECEIVER buttons These buttons transmit the chosen pre-coded settop-box/satellite codes. ባ EXCLUSIVE TV buttons These buttons are removed from the from the remote control. Turn ON your set -top-box/satellite receiver. If the set -top-box/satellite (STB) pre-coded mode, use the SOURCE ACCESS buttons...
... programming procedure as shown on the remote control to position the LED light to match the remote system of the buttons exclusively for the Set-TopBox/Satellite Receiver. ቢ PRE-CODED SET-TOP-BOX/SATELLITE RECEIVER buttons These buttons transmit the chosen pre-coded settop-box/satellite codes. ባ EXCLUSIVE TV buttons These buttons are removed from the from the remote control. Turn ON your set -top-box/satellite receiver. If the set -top-box/satellite (STB) pre-coded mode, use the SOURCE ACCESS buttons...
Owners Guide
Page 43
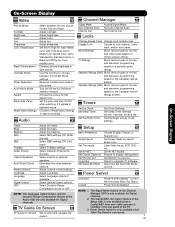
... stations. Adjust brightness. Adjust sharpness. Adjust the bass. TV Guide On Screen TV Guide On Screen Set, Control and navigate the system Setup Menu Preference Screen Saver Set The Inputs Set AV NET Set Closed Captions Set Monitor Out Upgrades Set Stand-By Mode Choose English, French, or Spanish text. NOTE: 1. The CableCARD information feature of the Setup OSD is only available when a CableCARD from your cable operator is installed in the rear panel of movies and television programming based on a parental guide ratings. Turn On...
... stations. Adjust brightness. Adjust sharpness. Adjust the bass. TV Guide On Screen TV Guide On Screen Set, Control and navigate the system Setup Menu Preference Screen Saver Set The Inputs Set AV NET Set Closed Captions Set Monitor Out Upgrades Set Stand-By Mode Choose English, French, or Spanish text. NOTE: 1. The CableCARD information feature of the Setup OSD is only available when a CableCARD from your cable operator is installed in the rear panel of movies and television programming based on a parental guide ratings. Turn On...

Owners Guide
Page 49
... favorite shows using a Cable Box or VCR, you must first setup the Plasma TV as shown on Page 22. TV Guide On Screen TV Guide On Screen The TV Guide On-Screen system is a built-in feature that provides a channel lineup and program listings in : Use the CURSOR PAD ̆ and ̄ to highlight your TV location (USA or CANADA), then press the SELECT button to continue. If using a VCR. Video Audio TV Guide On Screen Channel Manager Locks Timers Setup Power Swivel...
... favorite shows using a Cable Box or VCR, you must first setup the Plasma TV as shown on Page 22. TV Guide On Screen TV Guide On Screen The TV Guide On-Screen system is a built-in feature that provides a channel lineup and program listings in : Use the CURSOR PAD ̆ and ̄ to highlight your TV location (USA or CANADA), then press the SELECT button to continue. If using a VCR. Video Audio TV Guide On Screen Channel Manager Locks Timers Setup Power Swivel...

Owners Guide
Page 79
... MENU button. 2. Video Audio TV Guide On Screen Channel Manager Locks Timers Setup Power Swivel Move SEL Select 3. Setup 4. Press the SELECT button to or highlight SET AV NET feature. Use the CURSOR PAD ̄ or CHANNEL WHEEL to select. Press the CURSOR PAD ̇, ̈ to select your choice. Setup Menu Preference Screen Saver Set The Inputs Set AV NET Set Closed Captions Set Monitor Out Upgrades Set Stand-by Mode Move SEL Select INPUT 4 Auto Link Use this function to automatically turn on by Mode...
... MENU button. 2. Video Audio TV Guide On Screen Channel Manager Locks Timers Setup Power Swivel Move SEL Select 3. Setup 4. Press the SELECT button to or highlight SET AV NET feature. Use the CURSOR PAD ̄ or CHANNEL WHEEL to select. Press the CURSOR PAD ̇, ̈ to select your choice. Setup Menu Preference Screen Saver Set The Inputs Set AV NET Set Closed Captions Set Monitor Out Upgrades Set Stand-by Mode Move SEL Select INPUT 4 Auto Link Use this function to automatically turn on by Mode...
Owners Guide
Page 96
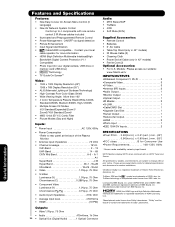
... to rear panel at the back of Hitachi Home Electronics (America), Inc. TruBass technology is a registered trademark of the Plasma Monitor • Antenna input impedance 75 Ohm • Channel coverage 191ch. Licensed by input format HDTV Monitors display HDTV when combined with one remote control 2 IR Mouse cables included • Illuminated and Preprogrammed Remote Control • Power Management: ON/OFF via signal detection • Picture Enhancement • Input Signal Identification • CableCARD compatible - W+94 • Video...
... to rear panel at the back of Hitachi Home Electronics (America), Inc. TruBass technology is a registered trademark of the Plasma Monitor • Antenna input impedance 75 Ohm • Channel coverage 191ch. Licensed by input format HDTV Monitors display HDTV when combined with one remote control 2 IR Mouse cables included • Illuminated and Preprogrammed Remote Control • Power Management: ON/OFF via signal detection • Picture Enhancement • Input Signal Identification • CableCARD compatible - W+94 • Video...
Owners Guide
Page 99
...User License Agreement for any commercial purpose. 2. LICENSE GRANT. You may not modify, adapt, translate, reverse engineer, decompile, disassemble or make derivative works from receiving any content that is accessible through use of the software or the cryptographic software, even if advised in U.S. VIOLATIONS; Except as the owner... ACCOMPANY SUCH UPGRADE, (A) DO NOT USE ANY HITACHI-PROVIDED FLASH CARD OR OTHER MEDIA, (B) DO NOT PERFORM INSTALL ANY HITACHI-PROVIDED UPGRADE SOFTWARE ON YOUR DTV, AND (C) PROMPTLY RETURN SUCH FLASH CARD OR OTHER MEDIA TO HITACHI. 5. government...
...User License Agreement for any commercial purpose. 2. LICENSE GRANT. You may not modify, adapt, translate, reverse engineer, decompile, disassemble or make derivative works from receiving any content that is accessible through use of the software or the cryptographic software, even if advised in U.S. VIOLATIONS; Except as the owner... ACCOMPANY SUCH UPGRADE, (A) DO NOT USE ANY HITACHI-PROVIDED FLASH CARD OR OTHER MEDIA, (B) DO NOT PERFORM INSTALL ANY HITACHI-PROVIDED UPGRADE SOFTWARE ON YOUR DTV, AND (C) PROMPTLY RETURN SUCH FLASH CARD OR OTHER MEDIA TO HITACHI. 5. government...


