
Owners Guide
Page 2
... not install near water. 6. Only use Please fill out your product model. Unplug this television. Do not block any heat sources such as power-supply cord or plug is intended to alert the user to a person. 16. Note to HITACHI. Important Safety Instructions SAFETY POINTS YOU SHOULD KNOW ABOUT type plug has two blades and a third grounding YOUR HITACHI LCD REAR PROJECTION prong. When...
... not install near water. 6. Only use Please fill out your product model. Unplug this television. Do not block any heat sources such as power-supply cord or plug is intended to alert the user to a person. 16. Note to HITACHI. Important Safety Instructions SAFETY POINTS YOU SHOULD KNOW ABOUT type plug has two blades and a third grounding YOUR HITACHI LCD REAR PROJECTION prong. When...
Owners Guide
Page 3
... from the broadcaster or owner of the FCC rules. 3 Note • There are no user serviceable parts inside the television. • Model and serial numbers are indicated on back side of receiving analog basic, digital basic and digital premium cable television programming by direct connection to a cable system providing such programming. Insert the power cord into a 120 volt 60 Hz outlet. Caution Never remove the back cover of fire or electric...
... from the broadcaster or owner of the FCC rules. 3 Note • There are no user serviceable parts inside the television. • Model and serial numbers are indicated on back side of receiving analog basic, digital basic and digital premium cable television programming by direct connection to a cable system providing such programming. Insert the power cord into a 120 volt 60 Hz outlet. Caution Never remove the back cover of fire or electric...
Owners Guide
Page 5
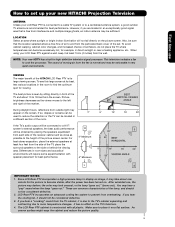
... minute for viewing. Picture brightness decreases as possible to become excessively hot, for best performance. If the TV's audio output will be connected to a Hi-Fi system's external speakers, the best audio performance will be located in an exceptionally good signal area that the location selected allows a free flow of the set up your new HITACHI Projection Television ANTENNA Unless your LCD Rear PTV against a wall, keep it on the screen. R 4" Minimum 4" Minimum BEST VERTICAL VIEWING 20 ANGLE...
... minute for viewing. Picture brightness decreases as possible to become excessively hot, for best performance. If the TV's audio output will be connected to a Hi-Fi system's external speakers, the best audio performance will be located in an exceptionally good signal area that the location selected allows a free flow of the set up your new HITACHI Projection Television ANTENNA Unless your LCD Rear PTV against a wall, keep it on the screen. R 4" Minimum 4" Minimum BEST VERTICAL VIEWING 20 ANGLE...

Owners Guide
Page 7
... or INPUTS menu systems if their menu is designed to operate different types of devices, such as, DVD Players, CBL (Cable Boxes), set-top-boxes, satellite receivers, and VCRs. Television CBL - ASPECT BUTTON (TV) Changes the aspect ratio while watching TV. First time use Quick Reference Remote Control Buttons and Functions In addition to controlling all features and programming of the Universal Remote Control to control the device selected. DAY/NIGHT BUTTON (TV) Select picture mode settings between the current and last channel viewed. VOLUME BUTTONS (TV) Adjusts the audio level...
... or INPUTS menu systems if their menu is designed to operate different types of devices, such as, DVD Players, CBL (Cable Boxes), set-top-boxes, satellite receivers, and VCRs. Television CBL - ASPECT BUTTON (TV) Changes the aspect ratio while watching TV. First time use Quick Reference Remote Control Buttons and Functions In addition to controlling all features and programming of the Universal Remote Control to control the device selected. DAY/NIGHT BUTTON (TV) Select picture mode settings between the current and last channel viewed. VOLUME BUTTONS (TV) Adjusts the audio level...

Owners Guide
Page 9
... the LCD Rear Projection Television for Service LONG BLINKING (1 SEC CYCLE) COOL DOWN (FOR 6 MINUTES) (TV CAN ACCEPT REMOTE CONTROL AND SIDE BUTTONS) 2. First time use Front Panel Controls º POWER Light When the TV is turned ON, the Power Light will first blink to indicate that the television lamp is not assembled securely after replacement. See page 56-59 for proper part. Check assembly condition of LAMP UNIT Call for longer lamp life. 9 INDICATOR LAMP LED TEMP LED POWER LED INDICATION LIGHT ON BLINKING LIGHT ON BLINKING INTERMEDIATE BLINKING...
... the LCD Rear Projection Television for Service LONG BLINKING (1 SEC CYCLE) COOL DOWN (FOR 6 MINUTES) (TV CAN ACCEPT REMOTE CONTROL AND SIDE BUTTONS) 2. First time use Front Panel Controls º POWER Light When the TV is turned ON, the Power Light will first blink to indicate that the television lamp is not assembled securely after replacement. See page 56-59 for proper part. Check assembly condition of LAMP UNIT Call for longer lamp life. 9 INDICATOR LAMP LED TEMP LED POWER LED INDICATION LIGHT ON BLINKING LIGHT ON BLINKING INTERMEDIATE BLINKING...
Owners Guide
Page 11
... way to INPUT 1, 2 or 5 at a time. » Monitor Out These jacks provide fixed or variable audio and video signals which are available for HDMI. ¶ Optical Out (Digital Audio) This jack provides Digital Audio Output for both inputs. Only DTV formats such as VCRs, camcorders, laserdisc players, DVD players etc. (If you if a software upgrade is required for high quality video output (see page 34). 5. AIR - Use the S-Video Output for your television screen. S-VIDEO has priority over VIDEO input. 2. DOLBY...
... way to INPUT 1, 2 or 5 at a time. » Monitor Out These jacks provide fixed or variable audio and video signals which are available for HDMI. ¶ Optical Out (Digital Audio) This jack provides Digital Audio Output for both inputs. Only DTV formats such as VCRs, camcorders, laserdisc players, DVD players etc. (If you if a software upgrade is required for high quality video output (see page 34). 5. AIR - Use the S-Video Output for your television screen. S-VIDEO has priority over VIDEO input. 2. DOLBY...

Owners Guide
Page 14
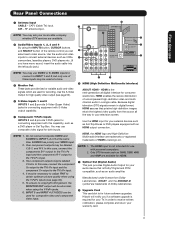
... NOTES: 1. INPUT S-VIDEO V L R OUTPUT S-VIDEO V L R OUTPUT S-VIDEO V L R OUTPUT Y PB/CB PR/CR L R • Connect only one audio output (mono sound), connect it is recommended that pertain to your personal entertainment system. 3. VCR #2 Laserdisc player, VCR, Camcorder, etc. Rear Panel Connections First time use TIPS ON REAR PANEL CONNECTIONS • S-VIDEO, Y-PBPR and HDMI connections are provided for INPUT 3 and INPUT 4. • It may be necessary to adjust TINT to obtain optimum picture quality when using an HDMI input from a Set-Top-Box, it...
... NOTES: 1. INPUT S-VIDEO V L R OUTPUT S-VIDEO V L R OUTPUT S-VIDEO V L R OUTPUT Y PB/CB PR/CR L R • Connect only one audio output (mono sound), connect it is recommended that pertain to your personal entertainment system. 3. VCR #2 Laserdisc player, VCR, Camcorder, etc. Rear Panel Connections First time use TIPS ON REAR PANEL CONNECTIONS • S-VIDEO, Y-PBPR and HDMI connections are provided for INPUT 3 and INPUT 4. • It may be necessary to adjust TINT to obtain optimum picture quality when using an HDMI input from a Set-Top-Box, it...

Owners Guide
Page 15
... connected to the Rear output of a separate audio amplifier. ¿ This subwoofer is connected to the LFE/SUB Out output of U.S. The Optical Out (Digital Audio) provides a fixed digital audio output to the diagram for speaker placement. ³ The television's internal speakers will act as an A/V receiver with optical input capability. and 6,381,747 licensed for AUDIO-Digital Output. 15 See page 39 for limited viewing uses only. INTERNAL SPEAKERS - CABLE Apparatus Claims of a separate audio amplifier. First time use Connecting External Video...
... connected to the Rear output of a separate audio amplifier. ¿ This subwoofer is connected to the LFE/SUB Out output of U.S. The Optical Out (Digital Audio) provides a fixed digital audio output to the diagram for speaker placement. ³ The television's internal speakers will act as an A/V receiver with optical input capability. and 6,381,747 licensed for AUDIO-Digital Output. 15 See page 39 for limited viewing uses only. INTERNAL SPEAKERS - CABLE Apparatus Claims of a separate audio amplifier. First time use Connecting External Video...
Owners Guide
Page 16
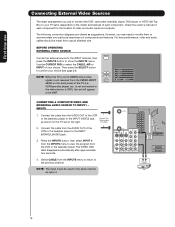
... INPUT 1 INPUT 2 INPUT 3 INPUT 4 OPTICAL OUT Digital Audio Upgrade Card HDMI INPUT 1 CAUTION Audio Video OUTPUT VCR 16 NOTE: When the TV is set to VIDEO and a video signal is OFF), the set will appear to be OFF. INPUTS Input 3 Input 4 Input 5 Cable Air Move SEL Select CONNECTING A COMPOSITE VIDEO AND MONAURAL AUDIO SOURCE TO INPUT1 - The VIDEO OSD label disappears automatically after approximately four seconds. 4. BEFORE OPERATING EXTERNAL VIDEO SOURCE Connect an external source to the INPUT terminal, then press the INPUTS button to show the INPUTS menu. Connect...
... INPUT 1 INPUT 2 INPUT 3 INPUT 4 OPTICAL OUT Digital Audio Upgrade Card HDMI INPUT 1 CAUTION Audio Video OUTPUT VCR 16 NOTE: When the TV is set to VIDEO and a video signal is OFF), the set will appear to be OFF. INPUTS Input 3 Input 4 Input 5 Cable Air Move SEL Select CONNECTING A COMPOSITE VIDEO AND MONAURAL AUDIO SOURCE TO INPUT1 - The VIDEO OSD label disappears automatically after approximately four seconds. 4. BEFORE OPERATING EXTERNAL VIDEO SOURCE Connect an external source to the INPUT terminal, then press the INPUTS button to show the INPUTS menu. Connect...
Owners Guide
Page 18
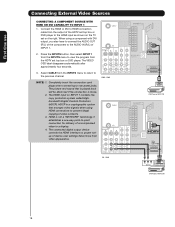
...; 4,907,093; HDMI Upgrade Card HDMI INPUT 1 DVI to rear panel jacks. NOTE: 1. It establishes a one-way point-to view the program from the HDTV set on the right. CableCARD™ (Top of card faces right) Top faces AIR MONITOR OUT S I V I D E O V I D E O (MONO) (MONO) Y/ VIDEO PB PR (MONO) Y/ VIDEO PB PR (MONO) A L U D TV AS CENTER I O R AUDIO TO HI-FI INPUT 1 INPUT 2 INPUT 3 INPUT 4 OPTICAL OUT Digital Audio HDMI - First time use Connecting External Video Sources CONNECTING A COMPONENT SOURCE WITH HDMI OR DVI CAPABILITY TO INPUT 1 1. HDCP...
...; 4,907,093; HDMI Upgrade Card HDMI INPUT 1 DVI to rear panel jacks. NOTE: 1. It establishes a one-way point-to view the program from the HDTV set on the right. CableCARD™ (Top of card faces right) Top faces AIR MONITOR OUT S I V I D E O V I D E O (MONO) (MONO) Y/ VIDEO PB PR (MONO) Y/ VIDEO PB PR (MONO) A L U D TV AS CENTER I O R AUDIO TO HI-FI INPUT 1 INPUT 2 INPUT 3 INPUT 4 OPTICAL OUT Digital Audio HDMI - First time use Connecting External Video Sources CONNECTING A COMPONENT SOURCE WITH HDMI OR DVI CAPABILITY TO INPUT 1 1. HDCP...
Owners Guide
Page 19
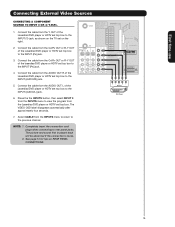
... or R-Y OUT of the Laserdisc/DVD player or HDTV set top box to the INPUT (PB) jack. 3. Press the the INPUTS button, then select INPUT 3 from the INPUTS menu to view the program from the Laserdisc/DVD player or HDTV set top box to rear panel jacks. and 6,381,747 licensed for tips on the right. 2. First time use Connecting External Video Sources CONNECTING A COMPONENT SOURCE TO INPUT 3 OR 4: Y-PBPR. 1. The picture and sound that is played back will...
... or R-Y OUT of the Laserdisc/DVD player or HDTV set top box to the INPUT (PB) jack. 3. Press the the INPUTS button, then select INPUT 3 from the INPUTS menu to view the program from the Laserdisc/DVD player or HDTV set top box to rear panel jacks. and 6,381,747 licensed for tips on the right. 2. First time use Connecting External Video Sources CONNECTING A COMPONENT SOURCE TO INPUT 3 OR 4: Y-PBPR. 1. The picture and sound that is played back will...
Owners Guide
Page 25
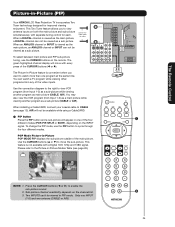
... PICTURE SUB PICTURE NOTE: 1. When a DIGITAL channel is not available with every press of the video inputs. Use the CURSOR buttons (̆ or ̄) to cycle through the four different modes. Two INPUTS can not be viewed in PIP mode. To change the PIP mode, use the CURSOR buttons on the channel list. · 3. Only one INPUT (1-5) and one program at the same time. The Remote Control Picture-in-Picture (PIP) Your HITACHI LCD Rear Projection TV incorporates Two Tuner technology designed for limited viewing uses...
... PICTURE SUB PICTURE NOTE: 1. When a DIGITAL channel is not available with every press of the video inputs. Use the CURSOR buttons (̆ or ̄) to cycle through the four different modes. Two INPUTS can not be viewed in PIP mode. To change the PIP mode, use the CURSOR buttons on the channel list. · 3. Only one INPUT (1-5) and one program at the same time. The Remote Control Picture-in-Picture (PIP) Your HITACHI LCD Rear Projection TV incorporates Two Tuner technology designed for limited viewing uses...
Owners Guide
Page 33
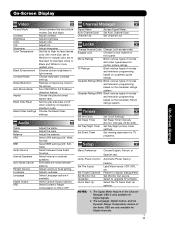
...Adjust volume in standard mode. Channel Manager Signal Meter Auto Channel Scan Channel List Access Signal Meter. TV Ratings Block various types of movies and television programming based on motion picture ratings. Adjust contrast. Set the gray side bars on a parental guide ratings. Adjust the bass. Select Dynamic Range Compression to Standard for standard colors or Black and White for Digital signals. 2. Set viewing reservation for natural color, set to Medium for TV programs. Setup Menu Preference Lamp Power Control Set The Inputs Set Closed Captions Set Monitor...
...Adjust volume in standard mode. Channel Manager Signal Meter Auto Channel Scan Channel List Access Signal Meter. TV Ratings Block various types of movies and television programming based on motion picture ratings. Adjust contrast. Set the gray side bars on a parental guide ratings. Adjust the bass. Select Dynamic Range Compression to Standard for standard colors or Black and White for Digital signals. 2. Set viewing reservation for natural color, set to Medium for TV programs. Setup Menu Preference Lamp Power Control Set The Inputs Set Closed Captions Set Monitor...
Owners Guide
Page 35
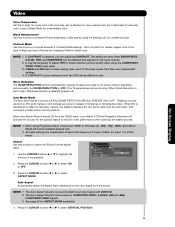
... is turned ON from the VIDEO menu, your Hitachi LCD Rear Projection Television will be adjusted. Video Aspect Auto Aspect Mode Vertical Position : Off : 16:9 Standard : 0 Move SEL Return 2. When Auto Movie Mode is disabled (grayed out). It may be reconciled. Also, each other based on an input signal with more blue, set to Medium for more natural color, set to Standard for accurate color or set to Black/White for more in light scenes using the COMPONENT VIDEO Y-PBPR input...
... is turned ON from the VIDEO menu, your Hitachi LCD Rear Projection Television will be adjusted. Video Aspect Auto Aspect Mode Vertical Position : Off : 16:9 Standard : 0 Move SEL Return 2. When Auto Movie Mode is disabled (grayed out). It may be reconciled. Also, each other based on an input signal with more blue, set to Medium for more natural color, set to Standard for accurate color or set to Black/White for more in light scenes using the COMPONENT VIDEO Y-PBPR input...

Owners Guide
Page 42
... be set . To change the ACCESS CODE NUMBER, select CHANGE ACCESS CODE to change the factory preset code (0000) to erase your preference. Use CANADIAN RATINGS to block various types of movies and television programs based on a parental guide ratings will block out the picture and sound of television programming based on the two rating systems used to enter the Locks feature is turned on motion picture ratings. The code to keep the TV from being viewed...
... be set . To change the ACCESS CODE NUMBER, select CHANGE ACCESS CODE to change the factory preset code (0000) to erase your preference. Use CANADIAN RATINGS to block various types of movies and television programs based on a parental guide ratings will block out the picture and sound of television programming based on the two rating systems used to enter the Locks feature is turned on motion picture ratings. The code to keep the TV from being viewed...

Owners Guide
Page 51
Setup Menu Preference Lamp Power Control Set The Inputs Set Closed Captions Set Monitor Out Upgrades Quick Start Up Move SEL Set Setup OR Lamp Power Control Automatic Power Saving Yes No Select yes to have the TV turned OFF automatically when a video signal is not detected for 15 minutes Move SEL Return Set The Inputs Use this featureto have the TV turn off automatically when a video signal is shown in the INPUTS selection. Setup Menu Preference Lamp Power Control Set The Inputs Set Closed Captions Set Monitor Out Upgrades Quick Start Up Move SEL...
Setup Menu Preference Lamp Power Control Set The Inputs Set Closed Captions Set Monitor Out Upgrades Quick Start Up Move SEL Set Setup OR Lamp Power Control Automatic Power Saving Yes No Select yes to have the TV turned OFF automatically when a video signal is not detected for 15 minutes Move SEL Return Set The Inputs Use this featureto have the TV turn off automatically when a video signal is shown in the INPUTS selection. Setup Menu Preference Lamp Power Control Set The Inputs Set Closed Captions Set Monitor Out Upgrades Quick Start Up Move SEL...

Owners Guide
Page 53
.... 3. When PIP SURF is selected, VARIABLE AUDIO OUT will select the source of the Monitor Output. Digital Captions Font Style are sometimes different from either Cable or Air. 1. Setup Menu Preference Lamp Power Control Set The Inputs Set Closed Captions Set Monitor Out Upgrades Quick Start Up Move SEL Set TV Tuner Out: Select TV TUNER OUT to output the audio and video signals of the chosen input source (CABLE, AIR, INPUT 1-5) to a VCR or other A/V device. When using analog channels. On-Screen Display 53 Set Monitor Out...
.... 3. When PIP SURF is selected, VARIABLE AUDIO OUT will select the source of the Monitor Output. Digital Captions Font Style are sometimes different from either Cable or Air. 1. Setup Menu Preference Lamp Power Control Set The Inputs Set Closed Captions Set Monitor Out Upgrades Quick Start Up Move SEL Set TV Tuner Out: Select TV TUNER OUT to output the audio and video signals of the chosen input source (CABLE, AIR, INPUT 1-5) to a VCR or other A/V device. When using analog channels. On-Screen Display 53 Set Monitor Out...

Owners Guide
Page 55
... TV, HITACHI will monitor any changes and prepare the television to have the TV tune channels quickly at 1st turn on . This function allows the TV software to highlight UPGRADE NOW. 3. Insert MMC CARD 2. NOTE: Any power interruption during the upgrade process will select QUICK START UP options. Quick Start Up This feature will cancel the upgrade. Setup Menu Preference Lamp Power Control Set The Inputs Set Closed Captions Set Monitor Out Upgrades Quick Start Up Move SEL Set Setup Upgrades...
... TV, HITACHI will monitor any changes and prepare the television to have the TV tune channels quickly at 1st turn on . This function allows the TV software to highlight UPGRADE NOW. 3. Insert MMC CARD 2. NOTE: Any power interruption during the upgrade process will select QUICK START UP options. Quick Start Up This feature will cancel the upgrade. Setup Menu Preference Lamp Power Control Set The Inputs Set Closed Captions Set Monitor Out Upgrades Quick Start Up Move SEL Set Setup Upgrades...

Owners Guide
Page 64
... OF ANY DIFFERENT OR SUPPLEMENTARY LICENSE THAT MAY ACCOMPANY SUCH UPGRADE, (A) DO NOT USE ANY HITACHI-PROVIDED FLASH CARD OR OTHER MEDIA, (B) DO NOT PERFORM INSTALL ANY HITACHI-PROVIDED UPGRADE SOFTWARE ON YOUR DTV, AND (C) PROMPTLY RETURN SUCH FLASH CARD OR OTHER MEDIA TO HITACHI. 5. You specifically agree not to export or reexport the Software: (i) to any country to any person or entity who...
... OF ANY DIFFERENT OR SUPPLEMENTARY LICENSE THAT MAY ACCOMPANY SUCH UPGRADE, (A) DO NOT USE ANY HITACHI-PROVIDED FLASH CARD OR OTHER MEDIA, (B) DO NOT PERFORM INSTALL ANY HITACHI-PROVIDED UPGRADE SOFTWARE ON YOUR DTV, AND (C) PROMPTLY RETURN SUCH FLASH CARD OR OTHER MEDIA TO HITACHI. 5. You specifically agree not to export or reexport the Software: (i) to any country to any person or entity who...

Owners Guide
Page 66
... 37 Black Enhancement 35 Brightness 37 C CableCARD 12 Channel Manager 40 Auto Channel Scan 41 Channel List 41 Signal Meter 40 Clock Time 47 Time Zone 47 Date 47 Closed Captions Analog Captions 52 Digital Captions 53 Color Temperature 35 Color 34 Contrast 34 Contrast Mode 35 D Date 47 Daylight Saving Correction 47 E Event Timer 49 G Guide Button 7, 23 H HDMI 11, 14, 18 I Input button 7, 23 L Lamp Replacement 56-59 Language Menu Language 50 Audio Language 39 Locks Change Access Code 42 Channel Lock 42 Front Panel Lock...
... 37 Black Enhancement 35 Brightness 37 C CableCARD 12 Channel Manager 40 Auto Channel Scan 41 Channel List 41 Signal Meter 40 Clock Time 47 Time Zone 47 Date 47 Closed Captions Analog Captions 52 Digital Captions 53 Color Temperature 35 Color 34 Contrast 34 Contrast Mode 35 D Date 47 Daylight Saving Correction 47 E Event Timer 49 G Guide Button 7, 23 H HDMI 11, 14, 18 I Input button 7, 23 L Lamp Replacement 56-59 Language Menu Language 50 Audio Language 39 Locks Change Access Code 42 Channel Lock 42 Front Panel Lock...


