
Owners Guide
Page 2
... YOU SHOULD KNOW ABOUT YOUR HITACHI LCD REAR PROJECTION TELEVISION Our reputation has been built on back side of the television. REFER SERVICING TO QUALIFIED SERVICE PERSONNEL. The exclamation point within the product's enclosure that a safety problem should be of important operating and maintenance (servicing) instructions in your HITACHI television. NOTE: • There are no user serviceable parts inside the television. • Model and serial numbers are not expressly approved by...
... YOU SHOULD KNOW ABOUT YOUR HITACHI LCD REAR PROJECTION TELEVISION Our reputation has been built on back side of the television. REFER SERVICING TO QUALIFIED SERVICE PERSONNEL. The exclamation point within the product's enclosure that a safety problem should be of important operating and maintenance (servicing) instructions in your HITACHI television. NOTE: • There are no user serviceable parts inside the television. • Model and serial numbers are not expressly approved by...
Owners Guide
Page 3
... power lines or other limited consumer uses only unless otherwise authorized by the manufacturer, or sold with respect to call "1-800-HITACHI." patents and other . Install in wire to an antenna discharge unit, size of grounding connectors, location of antenna-discharge unit, connection to avoid injury from being walked on this product and its lamp in the vicinity of this television. 1. Only use...
... power lines or other limited consumer uses only unless otherwise authorized by the manufacturer, or sold with respect to call "1-800-HITACHI." patents and other . Install in wire to an antenna discharge unit, size of grounding connectors, location of antenna-discharge unit, connection to avoid injury from being walked on this product and its lamp in the vicinity of this television. 1. Only use...
Owners Guide
Page 5
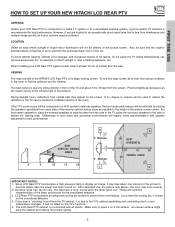
... multiple image ghosts, an indoor antenna may take about 10 to and from the perforated back cover of the receiver. If the TV's audio output will be connected to a Hi-Fi system's external speakers, the best audio performance will not fall directly on the TV's functions. 4. You may look unusual, or the lamp "goes out," (burns out). However, if you hear the cooling fan, it on the screen...
... multiple image ghosts, an indoor antenna may take about 10 to and from the perforated back cover of the receiver. If the TV's audio output will be connected to a Hi-Fi system's external speakers, the best audio performance will not fall directly on the TV's functions. 4. You may look unusual, or the lamp "goes out," (burns out). However, if you hear the cooling fan, it on the screen...

Owners Guide
Page 6
... of common connectors. Phono Connector Used on the rear panel so you have phono connectors. For best performance, video cables should use 75-Ohm coaxial shielded wire. disc players with an HDMI output connection to screws of your TV functions from most stores that have an antenna, connect the coaxial cable to inputs and outputs located on the television. When both VHF and UHF antennas are illustrations and names of...
... of common connectors. Phono Connector Used on the rear panel so you have phono connectors. For best performance, video cables should use 75-Ohm coaxial shielded wire. disc players with an HDMI output connection to screws of your TV functions from most stores that have an antenna, connect the coaxial cable to inputs and outputs located on the television. When both VHF and UHF antennas are illustrations and names of...
Owners Guide
Page 8
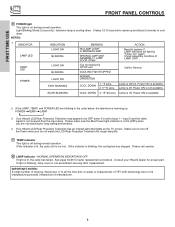
... the LAMP, TEMP, and POWER LED are not watching for Service Lamp is still on during normal operation. Your Hitachi LCD Rear Projection Television may appear to be OFF when it is set to warm up the TV screen. FIRST TIME USE FRONT PANEL CONTROLS ቩ POWER light This light is on . It takes 12-15 seconds to input 1 ~ input 5 and the video signal is available. 2. Check assembly condition of manufacturer. 8 Lamp is warming up. Power ON is not received...
... the LAMP, TEMP, and POWER LED are not watching for Service Lamp is still on during normal operation. Your Hitachi LCD Rear Projection Television may appear to be OFF when it is set to warm up the TV screen. FIRST TIME USE FRONT PANEL CONTROLS ቩ POWER light This light is on . It takes 12-15 seconds to input 1 ~ input 5 and the video signal is available. 2. Check assembly condition of manufacturer. 8 Lamp is warming up. Power ON is not received...

Owners Guide
Page 13
... on line input-output connections. • You may use a 1080i or 720p input signal. 13 Input 1 and 2 accepts both composite and component video signals. • Your component outputs may be used at a time. • Connect only 1 component (VCR, DVD player, camcorder, etc.) to the operating guide of your other electronic equipment for additional information on connecting your hook-up cables. • A single VCR can be labeled Y, B-Y, and R-Y. FIRST TIME USE TIPS ON REAR PANEL CONNECTIONS • S-VIDEO, HDMI...
... on line input-output connections. • You may use a 1080i or 720p input signal. 13 Input 1 and 2 accepts both composite and component video signals. • Your component outputs may be used at a time. • Connect only 1 component (VCR, DVD player, camcorder, etc.) to the operating guide of your other electronic equipment for additional information on connecting your hook-up cables. • A single VCR can be labeled Y, B-Y, and R-Y. FIRST TIME USE TIPS ON REAR PANEL CONNECTIONS • S-VIDEO, HDMI...
Owners Guide
Page 15
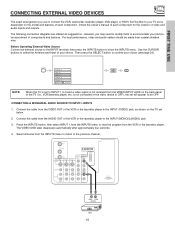
... seconds. 4. Check the owner's manual of video and audio inputs and outputs. Use the CURSOR buttons to select the Antenna and Input of your TV set is set below. 2. FIRST TIME USE CONNECTING EXTERNAL VIDEO DEVICES The exact arrangement you may need to modify them to confirm your particular assortment of the TV (i.e., VCR/laserdisc player, etc. The following connection diagrams are offered as shown on the back panel of components and features. CONNECTING A MONAURAL AUDIO SOURCE...
... seconds. 4. Check the owner's manual of video and audio inputs and outputs. Use the CURSOR buttons to select the Antenna and Input of your TV set is set below. 2. FIRST TIME USE CONNECTING EXTERNAL VIDEO DEVICES The exact arrangement you may need to modify them to confirm your particular assortment of the TV (i.e., VCR/laserdisc player, etc. The following connection diagrams are offered as shown on the back panel of components and features. CONNECTING A MONAURAL AUDIO SOURCE...
Owners Guide
Page 16
...: 1. Refer to the INPUT (AUDIO/L) jack. 4. FIRST TIME USE CONNECTING EXTERNAL VIDEO DEVICES CONNECTING A STEREO SOURCE TO INPUT1~INPUT5 1. A single VCR can be used for more information on the TV set below. 2. Press the INPUTS button, then select INPUT 3 from the INPUTS menu to view the program from the AUDIO OUT L of the VCR or the laserdisc player to rear panel jacks. Connect the cable from the VCR or laserdisc player. The picture and sound that a VCR...
...: 1. Refer to the INPUT (AUDIO/L) jack. 4. FIRST TIME USE CONNECTING EXTERNAL VIDEO DEVICES CONNECTING A STEREO SOURCE TO INPUT1~INPUT5 1. A single VCR can be used for more information on the TV set below. 2. Press the INPUTS button, then select INPUT 3 from the INPUTS menu to view the program from the AUDIO OUT L of the VCR or the laserdisc player to rear panel jacks. Connect the cable from the VCR or laserdisc player. The picture and sound that a VCR...

Owners Guide
Page 17
... program from the AUDIO OUT R of the VCR or the laserdisc player to the INPUT (AUDIO/R) jack. 3. Completely insert the connection cord plugs when connecting to the previous channel. Select Antenna from the AUDIO OUT L of the VCR or the laserdisc player to the INPUT (AUDIO/L) jack. 4. A single VCR can be abnormal if the connection is loose. 2. Connect the cable from the INPUTS menu to return to rear panel jacks. FIRST TIME USE CONNECTING EXTERNAL VIDEO...
... program from the AUDIO OUT R of the VCR or the laserdisc player to the INPUT (AUDIO/R) jack. 3. Completely insert the connection cord plugs when connecting to the previous channel. Select Antenna from the AUDIO OUT L of the VCR or the laserdisc player to the INPUT (AUDIO/L) jack. 4. A single VCR can be abnormal if the connection is loose. 2. Connect the cable from the INPUTS menu to return to rear panel jacks. FIRST TIME USE CONNECTING EXTERNAL VIDEO...

Owners Guide
Page 18
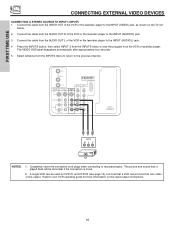
... proper set below. Select Antenna from the INPUTS menu to return to -point connection for delivery of device user settings determines final video appearance. 18 FIRST TIME USE CONNECTING EXTERNAL VIDEO DEVICES CONNECTING A COMPONENT SOURCE WITH HDMI or DVI CAPABILITY TO INPUT 1 1. The picture and sound that encrypts video signals when using a component with DVI output, you also have to connect the AUDIO OUT (R/L) of the component to a display. 4. It establishes a one-way point-to the previous channel.
... proper set below. Select Antenna from the INPUTS menu to return to -point connection for delivery of device user settings determines final video appearance. 18 FIRST TIME USE CONNECTING EXTERNAL VIDEO DEVICES CONNECTING A COMPONENT SOURCE WITH HDMI or DVI CAPABILITY TO INPUT 1 1. The picture and sound that encrypts video signals when using a component with DVI output, you also have to connect the AUDIO OUT (R/L) of the component to a display. 4. It establishes a one-way point-to the previous channel.

Owners Guide
Page 19
...DVD player or HDTV set top box to the previous channel. Completely insert the connection cord plugs when connecting to the INPUT (Y) jack, as shown on REAR PANEL CONNECTIONS. 19 ANT A TO CONVERTER ANT B MONITOR OUT S-VIDEO INPUT 4 INPUT 3 INPUT 2 Y/ VIDEO INPUT 1 Y/ VIDEO PB PB HDMI 1 VIDEO L AUDIO R AUDIO TO HI-FI PR PR (MONO) (MONO) (MONO) (MONO) TV AS CENTER RS232C 1 2 345 6 789 OUTPUT R L PR PB Y DVD Player NOTES: 1. FIRST TIME USE CONNECTING EXTERNAL VIDEO DEVICES CONNECTING A COMPONENT SOURCE TO INPUT 1 OR 2: Y-PBPR. 1. Connect the cable from the INPUTS menu...
...DVD player or HDTV set top box to the previous channel. Completely insert the connection cord plugs when connecting to the INPUT (Y) jack, as shown on REAR PANEL CONNECTIONS. 19 ANT A TO CONVERTER ANT B MONITOR OUT S-VIDEO INPUT 4 INPUT 3 INPUT 2 Y/ VIDEO INPUT 1 Y/ VIDEO PB PB HDMI 1 VIDEO L AUDIO R AUDIO TO HI-FI PR PR (MONO) (MONO) (MONO) (MONO) TV AS CENTER RS232C 1 2 345 6 789 OUTPUT R L PR PB Y DVD Player NOTES: 1. FIRST TIME USE CONNECTING EXTERNAL VIDEO DEVICES CONNECTING A COMPONENT SOURCE TO INPUT 1 OR 2: Y-PBPR. 1. Connect the cable from the INPUTS menu...
Owners Guide
Page 20
... (Cable TV) converters, set-top-box, satellite receiver (SAT) and DVD players with one area. The remote will now control your set-top-box or satellite receiver, point the remote at the remote sensor of the set -top-box or satellite receiver. To operate your set -top-box or satellite receiver and press the SAT button. The remote will now control your cable box (see page 31 for instructions on how to program the remote to control your DVD player, point the remote at...
... (Cable TV) converters, set-top-box, satellite receiver (SAT) and DVD players with one area. The remote will now control your set-top-box or satellite receiver, point the remote at the remote sensor of the set -top-box or satellite receiver. To operate your set -top-box or satellite receiver and press the SAT button. The remote will now control your cable box (see page 31 for instructions on how to program the remote to control your DVD player, point the remote at...

Owners Guide
Page 26
... the remote. Use the CURSOR button ̆ or ̄ to the PICTURE-IN-PICTURE MODES Table (see page 28). The green highlighted channel display will appear in one program at the same time. You may also view the VCR program as a main picture while viewing another program as both the main picture and sub-picture simultaneously, with a 1080i component or digital signal 4x3 Format. 2. PICTURE-IN-PICTURE (PIP) Your HITACHI LCD Rear PTV incorporates Two Tuner technology...
... the remote. Use the CURSOR button ̆ or ̄ to the PICTURE-IN-PICTURE MODES Table (see page 28). The green highlighted channel display will appear in one program at the same time. You may also view the VCR program as a main picture while viewing another program as both the main picture and sub-picture simultaneously, with a 1080i component or digital signal 4x3 Format. 2. PICTURE-IN-PICTURE (PIP) Your HITACHI LCD Rear PTV incorporates Two Tuner technology...
Owners Guide
Page 30
... settop-box/satellite receiver. To switch to SET-TOP-BOX/SATEL- ባ LITE mode. ባ PRE-CODED SET-TOP-BOX/SATELLITE RECEIVER buttons These buttons transmit the chosen pre-coded set-topbox/satellite codes. ቤ EXCLUSIVE TV buttons These buttons are removed from the remote control. Aim the remote at the front of your set-top-box/satellite receiver operating guide. 3. The remote will turn off your set-top-box/satellite receiver when the correct two digit preset code is programmed for your set -top-box/satellite...
... settop-box/satellite receiver. To switch to SET-TOP-BOX/SATEL- ባ LITE mode. ባ PRE-CODED SET-TOP-BOX/SATELLITE RECEIVER buttons These buttons transmit the chosen pre-coded set-topbox/satellite codes. ቤ EXCLUSIVE TV buttons These buttons are removed from the remote control. Aim the remote at the front of your set-top-box/satellite receiver operating guide. 3. The remote will turn off your set-top-box/satellite receiver when the correct two digit preset code is programmed for your set -top-box/satellite...
Owners Guide
Page 36
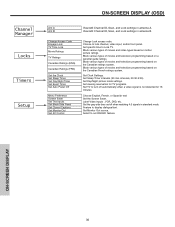
...Choose to Lock TV. Set Day/Night picture mode settings. View/edit Channel ID, Scan, and Lock settings in antenna A. Set Monitor Out source. ON-SCREEN DISPLAY 36 Change Access Code Engage Lock TV Time Lock Movie Ratings TV Ratings Canadian Ratings (ENG) Canadian Ratings (FRN) Set the Clock Set Sleep Timer Set Day/Night Timer Set Event Timer Set Auto Power Off Menu Preference Screen Saver Set The Inputs Set Black Side Panel Set Closed Captions Set Monitor Out Set AV Control Change Lock access code. Set Clock Settings. Set viewing reservation for 15 minutes. Set the gray...
...Choose to Lock TV. Set Day/Night picture mode settings. View/edit Channel ID, Scan, and Lock settings in antenna A. Set Monitor Out source. ON-SCREEN DISPLAY 36 Change Access Code Engage Lock TV Time Lock Movie Ratings TV Ratings Canadian Ratings (ENG) Canadian Ratings (FRN) Set the Clock Set Sleep Timer Set Day/Night Timer Set Event Timer Set Auto Power Off Menu Preference Screen Saver Set The Inputs Set Black Side Panel Set Closed Captions Set Monitor Out Set AV Control Change Lock access code. Set Clock Settings. Set viewing reservation for 15 minutes. Set the gray...

Owners Guide
Page 39
... not checked, the listed colors will return to the initial conditions as explained above. ON-SCREEN DISPLAY Video Picture Mode Contrast Brightness Color Tint Sharpness Color Temperature Black Enhancement Contrast Mode Reset Video Settings Move SEL Select ANT A/B Day 100% 50% 50% Night 50% High High Dynamic Video Color Management Color Decoding Auto Color Noise Reduction Auto Movie Mode Move SEL Select Off Low Off Color Management Use this input to increase viewing performance and pleasure, depending upon the video program being viewed...
... not checked, the listed colors will return to the initial conditions as explained above. ON-SCREEN DISPLAY Video Picture Mode Contrast Brightness Color Tint Sharpness Color Temperature Black Enhancement Contrast Mode Reset Video Settings Move SEL Select ANT A/B Day 100% 50% 50% Night 50% High High Dynamic Video Color Management Color Decoding Auto Color Noise Reduction Auto Movie Mode Move SEL Select Off Low Off Color Management Use this input to increase viewing performance and pleasure, depending upon the video program being viewed...

Owners Guide
Page 48
...), WEEKLY (TV will reset the access code number back to change the access code number, select Change Access Code. If MOVIE/TV Ratings Lock function settings are ON, SURF will be deactivated. 48 ON-SCREEN DISPLAY Select CHANGE ACCESS CODE to the factory preset 0000. When SET INPUT LOCK is turned on, the picture and sound for all buttons on the Front Panel will also be set . When MOVIE RATINGS is selected, SET CHANNEL LOCK, SET INPUT LOCK, and SET FRONT PANEL LOCK can set (see page 49). Picture-in-Picture will...
...), WEEKLY (TV will reset the access code number back to change the access code number, select Change Access Code. If MOVIE/TV Ratings Lock function settings are ON, SURF will be deactivated. 48 ON-SCREEN DISPLAY Select CHANGE ACCESS CODE to the factory preset 0000. When SET INPUT LOCK is turned on, the picture and sound for all buttons on the Front Panel will also be set . When MOVIE RATINGS is selected, SET CHANNEL LOCK, SET INPUT LOCK, and SET FRONT PANEL LOCK can set (see page 49). Picture-in-Picture will...

Owners Guide
Page 59
... set video names to original factory preset condition. Setup Menu Preference Screen Saver Set The Inputs Set Black Side Panel Set Closed Captions or Set Monitor Out Set AV Control Move SEL Select Use the CURSOR buttons to highlight the name of the five video inputs. This is convenient when you want to watch it must be reset before Auto Link is used again. Select Off to disable this function to automatically turn on and switch to...
... set video names to original factory preset condition. Setup Menu Preference Screen Saver Set The Inputs Set Black Side Panel Set Closed Captions or Set Monitor Out Set AV Control Move SEL Select Use the CURSOR buttons to highlight the name of the five video inputs. This is convenient when you want to watch it must be reset before Auto Link is used again. Select Off to disable this function to automatically turn on and switch to...
Owners Guide
Page 62
... the power has been switched off frequently may cause severe overheating. • Install the lamp cover correctly, otherwise power will light when lamp becomes hot. For lamp recycling and disposal information, go to the TV Set. LAMP TYPE: LM500 / LAMP PART # UX21513 • When replacing the lamp, let it is removed, do not put flammable materials and metal objects inside the lamp compartment. • When installing a new lamp, follow handling instruction included...
... the power has been switched off frequently may cause severe overheating. • Install the lamp cover correctly, otherwise power will light when lamp becomes hot. For lamp recycling and disposal information, go to the TV Set. LAMP TYPE: LM500 / LAMP PART # UX21513 • When replacing the lamp, let it is removed, do not put flammable materials and metal objects inside the lamp compartment. • When installing a new lamp, follow handling instruction included...
Owners Guide
Page 72
... Audio Settings 41-42 Audio Source 42 Auto Color 40 Auto Noise Cancel 42 B Balance 41 Bass 41 Black Enhancement 38 Brightness 38 C Channel Manager 44-47 Auto Channel Scan 45 Channel Source 44 Clock Time 53 Date 53 Closed Captions Analog Captions 60 Color Management 39 Color Temperature 38 Color 38 Contrast 38 D DVI Input 18 E Event Timer 55 H HDMI 11, 18 I Input Setup 59 Inputs Button 23 L Lamp Lamp Indicator 8 Lamp Replacement 62-65 Language Menu Language 57 Locks Change Access Code 48 Channel Lock 48 Input Lock 48 Front Panel Lock...
... Audio Settings 41-42 Audio Source 42 Auto Color 40 Auto Noise Cancel 42 B Balance 41 Bass 41 Black Enhancement 38 Brightness 38 C Channel Manager 44-47 Auto Channel Scan 45 Channel Source 44 Clock Time 53 Date 53 Closed Captions Analog Captions 60 Color Management 39 Color Temperature 38 Color 38 Contrast 38 D DVI Input 18 E Event Timer 55 H HDMI 11, 18 I Input Setup 59 Inputs Button 23 L Lamp Lamp Indicator 8 Lamp Replacement 62-65 Language Menu Language 57 Locks Change Access Code 48 Channel Lock 48 Input Lock 48 Front Panel Lock...


