Owners Guide
Page 2
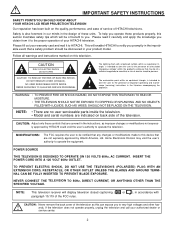
...promptly in the improbable event that a safety problem should be notified that are covered in the literature accompanying the appliance. NEVER CONNECT THE TELEVISION TO 50Hz, DIRECT CURRENT, OR ANYTHING OTHER THAN THE SPECIFIED VOLTAGE. If the television does not operate properly,...TO PREVENT BLADE EXPOSURE. REFER SERVICING TO QUALIFIED SERVICE PERSONNEL. IMPORTANT SAFETY INSTRUCTIONS SAFETY POINTS YOU SHOULD KNOW ABOUT YOUR HITACHI LCD REAR PROJECTION TELEVISION Our reputation has been built on the quality, performance, and ease of service of electric shock to persons. ...
...promptly in the improbable event that a safety problem should be notified that are covered in the literature accompanying the appliance. NEVER CONNECT THE TELEVISION TO 50Hz, DIRECT CURRENT, OR ANYTHING OTHER THAN THE SPECIFIED VOLTAGE. If the television does not operate properly,...TO PREVENT BLADE EXPOSURE. REFER SERVICING TO QUALIFIED SERVICE PERSONNEL. IMPORTANT SAFETY INSTRUCTIONS SAFETY POINTS YOU SHOULD KNOW ABOUT YOUR HITACHI LCD REAR PROJECTION TELEVISION Our reputation has been built on the quality, performance, and ease of service of electric shock to persons. ...
Owners Guide
Page 3
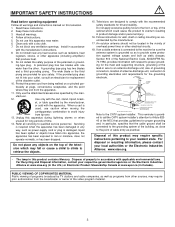
... your local authorities or the Electronic Industries Alliance: www.eiae.org. • The lamp in accordance with the apparatus. If an outside antenna is connected to the receiver be located in accordance with the cart, stand, tripod, brack- Follow all warnings. 4. The wide blade or the third prong ...on or pinched par- Do not defeat the safety purpose of cable entry as programs from the apparatus. 11. et, or table specified by TV stations and cable companies, as well as practical. Do not block any heat sources such as to the front, or top, of programs ...
... your local authorities or the Electronic Industries Alliance: www.eiae.org. • The lamp in accordance with the apparatus. If an outside antenna is connected to the receiver be located in accordance with the cart, stand, tripod, brack- Follow all warnings. 4. The wide blade or the third prong ...on or pinched par- Do not defeat the safety purpose of cable entry as programs from the apparatus. 11. et, or table specified by TV stations and cable companies, as well as practical. Do not block any heat sources such as to the front, or top, of programs ...
Owners Guide
Page 5
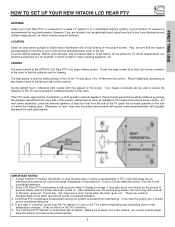
... become stable, after the power has been turned on the screen. If your LCD Rear PTV is connected to a cable TV system or to a centralized antenna system, a good outdoor TV antenna is due to the TV's cabinet expanding and contracting due to a Hi-Fi system's external speakers, the best...constructed with speaker placement for best performance. During daylight hours, reflections from the screen. FIRST TIME USE HOW TO SET UP YOUR NEW HITACHI LCD REAR PTV ANTENNA Unless your LCD has defective pixels, it on a flat surface. A small number of missing, discolored, or lit all ...
... become stable, after the power has been turned on the screen. If your LCD Rear PTV is connected to a cable TV system or to a centralized antenna system, a good outdoor TV antenna is due to the TV's cabinet expanding and contracting due to a Hi-Fi system's external speakers, the best...constructed with speaker placement for best performance. During daylight hours, reflections from the screen. FIRST TIME USE HOW TO SET UP YOUR NEW HITACHI LCD REAR PTV ANTENNA Unless your LCD has defective pixels, it on a flat surface. A small number of missing, discolored, or lit all ...
Owners Guide
Page 6
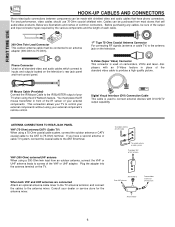
...Coaxial Antenna Connector For connecting RF signals (antenna or cable TV) to connect external devices with an S-Video feature in front of the IR sensor of common connectors. Digital Visual Interface (DVI) Connection Cable This cable is used to the antenna jack on the television's rear jack panel and ... standard video cable to the ANT B terminal. ANTENNA CONNECTIONS TO REAR JACK PANEL VHF (75-Ohm) antenna/CATV (Cable TV) When using a 300-Ohm twin lead from most stores that have a second antenna or cable TV system, connect the coaxial cable to produce a high quality picture....
...Coaxial Antenna Connector For connecting RF signals (antenna or cable TV) to connect external devices with an S-Video feature in front of the IR sensor of common connectors. Digital Visual Interface (DVI) Connection Cable This cable is used to the antenna jack on the television's rear jack panel and ... standard video cable to the ANT B terminal. ANTENNA CONNECTIONS TO REAR JACK PANEL VHF (75-Ohm) antenna/CATV (Cable TV) When using a 300-Ohm twin lead from most stores that have a second antenna or cable TV system, connect the coaxial cable to produce a high quality picture....

Owners Guide
Page 9
... VCR, use the S-INPUT cable in the following examples: INPUT 5 S-VIDEO VIDEO L/MONO R AUDIO INPUT 5 S-VIDEO VIDEO L/MONO R AUDIO NOTE: 1. Completely insert connection cord plugs when connecting to easily connect a camcorder or VCR as a convenience to allow you do not, the played back picture may be abnormal. 2. If you have a mono VCR, insert... of the standard video cable. 3. FIRST TIME USE FRONT PANEL JACKS AND CONNECTORS The front panel jacks are provided as shown in place of your TV. 9 If you to front panel jacks.
... VCR, use the S-INPUT cable in the following examples: INPUT 5 S-VIDEO VIDEO L/MONO R AUDIO INPUT 5 S-VIDEO VIDEO L/MONO R AUDIO NOTE: 1. Completely insert connection cord plugs when connecting to easily connect a camcorder or VCR as a convenience to allow you do not, the played back picture may be abnormal. 2. If you have a mono VCR, insert... of the standard video cable. 3. FIRST TIME USE FRONT PANEL JACKS AND CONNECTORS The front panel jacks are provided as shown in place of your TV. 9 If you to front panel jacks.
Owners Guide
Page 10
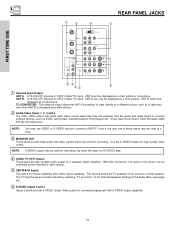
...Input) This jack is of the Audio Menu (see page 50). ቧ S-VIDEO Inputs 3 and 4 Inputs 3 and 4 provide S-VIDEO (Super Video) jacks for recording. This antenna output allows the ANT A connection to pass directly to a separate stereo amplifier. The TV must be displayed as a main picture. ባ Audio/...ANT B- A 75-Ohm RF antenna or CATV (Cable TV) input. NOTE: S-VIDEO output may be displayed as a center speaker. ANT A can be used for recording only when the input is for high quality video output. FIRST TIME USE REAR PANEL JACKS ቢ ባ ቪ ቨ...
...Input) This jack is of the Audio Menu (see page 50). ቧ S-VIDEO Inputs 3 and 4 Inputs 3 and 4 provide S-VIDEO (Super Video) jacks for recording. This antenna output allows the ANT A connection to pass directly to a separate stereo amplifier. The TV must be displayed as a main picture. ባ Audio/...ANT B- A 75-Ohm RF antenna or CATV (Cable TV) input. NOTE: S-VIDEO output may be displayed as a center speaker. ANT A can be used for recording only when the input is for high quality video output. FIRST TIME USE REAR PANEL JACKS ቢ ባ ቪ ቨ...
Owners Guide
Page 11
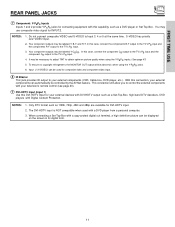
...VIDEO has priority over VIDEO input. 2. Your component outputs may be displayed on the screen in its digital form. 11 Do not connect composite VIDEO and S-VIDEO to the TV's PR input. 4. In this DVI-HDTV Input for your external devices with DVI-HDTV output such as...OUT output will allow you to the TV's PR input. 3. Your component outputs may use composite video signal for INPUT:2. FIRST TIME USE REAR PANEL JACKS ቨ Component: Y-PBPR Inputs Inputs 1 and 2 provide Y-PBPR jacks for connecting equipment with this connection, your external components can automatically be ...
...VIDEO has priority over VIDEO input. 2. Your component outputs may be displayed on the screen in its digital form. 11 Do not connect composite VIDEO and S-VIDEO to the TV's PR input. 4. In this DVI-HDTV Input for your external devices with DVI-HDTV output such as...OUT output will allow you to the TV's PR input. 3. Your component outputs may use composite video signal for INPUT:2. FIRST TIME USE REAR PANEL JACKS ቨ Component: Y-PBPR Inputs Inputs 1 and 2 provide Y-PBPR jacks for connecting equipment with this connection, your external components can automatically be ...
Owners Guide
Page 12
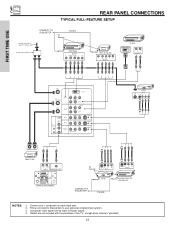
... signal can be input to your personal entertainment system. 3. Connect only 1 component to each input jack. 2. FIRST TIME USE REAR PANEL CONNECTIONS TYPICAL FULL-FEATURE SETUP Outside antenna or cable TV coaxial cable 2-Way signal splitter CONNECT TO IR BLASTER IR Sensor (Provided) DVD Player OUTPUT Y... PB/CB PR/CR L R HDTV Set-Top Box Y PB PR L R OUTPUT D-VHS DIGITAL OUTPUT LR OUTPUT ...
... signal can be input to your personal entertainment system. 3. Connect only 1 component to each input jack. 2. FIRST TIME USE REAR PANEL CONNECTIONS TYPICAL FULL-FEATURE SETUP Outside antenna or cable TV coaxial cable 2-Way signal splitter CONNECT TO IR BLASTER IR Sensor (Provided) DVD Player OUTPUT Y... PB/CB PR/CR L R HDTV Set-Top Box Y PB PR L R OUTPUT D-VHS DIGITAL OUTPUT LR OUTPUT ...

Owners Guide
Page 13
...INPUT: 3 in the example on line input-output connections. • You may be labeled Y, B-Y, and R-Y. Use these connections in place of these may be labeled Y-CBCR. FIRST TIME USE TIPS ON REAR PANEL CONNECTIONS • S-VIDEO connections are provided for high performance components, such as DVD... players and set- top-boxes. In this case, connect the components B-Y output to the TV's PB input and the components R-Y output to...
...INPUT: 3 in the example on line input-output connections. • You may be labeled Y, B-Y, and R-Y. Use these connections in place of these may be labeled Y-CBCR. FIRST TIME USE TIPS ON REAR PANEL CONNECTIONS • S-VIDEO connections are provided for high performance components, such as DVD... players and set- top-boxes. In this case, connect the components B-Y output to the TV's PB input and the components R-Y output to...
Owners Guide
Page 14
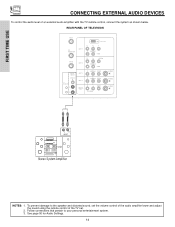
...50 for Audio Settings. 14 To prevent damage to your personal entertainment system. 3. Follow connections that pertain to the speaker and distorted sound, set the volume control of the audio amplifier lower and adjust the sound using the remote control of an external audio amplifier with the TV remote control, connect... the system as shown below. FIRST TIME USE CONNECTING EXTERNAL AUDIO DEVICES To control the audio level of the TV set. 2. REAR PANEL OF TELEVISION ANT A TO CONVERTER ANT B INPUT 1 ...
...50 for Audio Settings. 14 To prevent damage to your personal entertainment system. 3. Follow connections that pertain to the speaker and distorted sound, set the volume control of the audio amplifier lower and adjust the sound using the remote control of an external audio amplifier with the TV remote control, connect... the system as shown below. FIRST TIME USE CONNECTING EXTERNAL AUDIO DEVICES To control the audio level of the TV set. 2. REAR PANEL OF TELEVISION ANT A TO CONVERTER ANT B INPUT 1 ...
Owners Guide
Page 15
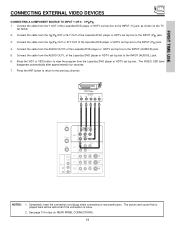
... the location of components and features. The VIDEO OSD label disappears automatically after approximately four seconds. 4. is not connected or the video device is pressed as shown on the TV set will appear to the INPUT terminal, then press the VID1~VID5 button as suggestions. Before Operating External Video ...Source The input mode is changed every time the VID1~VID5 button is OFF), the set below . Connect the cable from coaxial shielded wire. When the TV is set is dependent on the back panel of the VCR or the laserdisc player to the previous channel. Check the...
... the location of components and features. The VIDEO OSD label disappears automatically after approximately four seconds. 4. is not connected or the video device is pressed as shown on the TV set will appear to the INPUT terminal, then press the VID1~VID5 button as suggestions. Before Operating External Video ...Source The input mode is changed every time the VID1~VID5 button is OFF), the set below . Connect the cable from coaxial shielded wire. When the TV is set is dependent on the back panel of the VCR or the laserdisc player to the previous channel. Check the...
Owners Guide
Page 16
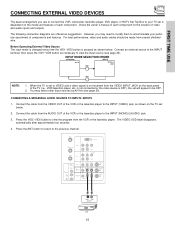
... cable from the VCR or laserdisc player. The VIDEO OSD label disappears automatically after approximately four seconds. 5. The picture and sound that is loose. 2. Connect the cable from the VIDEO OUT of the VCR or the laserdisc player to view the program from the AUDIO OUT L of the VCR or ... cannot record its own video or line output. Press the ANT button to return to rear panel jacks. A single VCR can be abnormal if the connection is played back will be used for more information on the TV set below. 2. Press the VID2~VID5 button to the INPUT (VIDEO) jack, as shown on...
... cable from the VCR or laserdisc player. The VIDEO OSD label disappears automatically after approximately four seconds. 5. The picture and sound that is loose. 2. Connect the cable from the VIDEO OUT of the VCR or the laserdisc player to view the program from the AUDIO OUT L of the VCR or ... cannot record its own video or line output. Press the ANT button to return to rear panel jacks. A single VCR can be abnormal if the connection is played back will be used for more information on the TV set below. 2. Press the VID2~VID5 button to the INPUT (VIDEO) jack, as shown on...

Owners Guide
Page 17
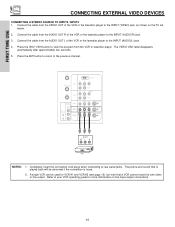
...the AUDIO OUT L of the VCR or the laserdisc player to the INPUT (AUDIO/L) jack. 4. Connect the cable from the VCR or laserdisc player. Press the ANT button to return to rear panel jacks. Press the VID3~VID5 button to view the program from the AUDIO OUT R of ...VCR cannot record its own video or line output. A single VCR can be abnormal if the connection is played back will be used for more information on the TV set below. 2. FIRST TIME USE CONNECTING EXTERNAL VIDEO DEVICES CONNECTING AN S-VIDEO SOURCE TO INPUT 3, 4 AND 5 1. The VIDEO OSD label disappears automatically after...
...the AUDIO OUT L of the VCR or the laserdisc player to the INPUT (AUDIO/L) jack. 4. Connect the cable from the VCR or laserdisc player. Press the ANT button to return to rear panel jacks. Press the VID3~VID5 button to view the program from the AUDIO OUT R of ...VCR cannot record its own video or line output. A single VCR can be abnormal if the connection is played back will be used for more information on the TV set below. 2. FIRST TIME USE CONNECTING EXTERNAL VIDEO DEVICES CONNECTING AN S-VIDEO SOURCE TO INPUT 3, 4 AND 5 1. The VIDEO OSD label disappears automatically after...
Owners Guide
Page 18
... picture and sound that encrypts video signals when using DVI connections to rear panel jacks. DVI is loose. 2. The DVI-HDTV input on the TV set top box or DVD player to the INPUT (AUDIO/R) jack. 3. The connected digital output device controls the DVI interface so proper set top box... or DVD player. DIGITAL OUTPUT CAPABILITY DIGITAL OUTPUT LR OUTPUT ANT A TO CONVERTER ANT B...
... picture and sound that encrypts video signals when using DVI connections to rear panel jacks. DVI is loose. 2. The DVI-HDTV input on the TV set top box or DVD player to the INPUT (AUDIO/R) jack. 3. The connected digital output device controls the DVI interface so proper set top box... or DVD player. DIGITAL OUTPUT CAPABILITY DIGITAL OUTPUT LR OUTPUT ANT A TO CONVERTER ANT B...
Owners Guide
Page 19
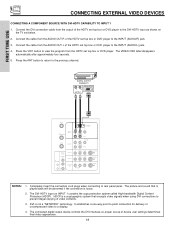
...set below. 2. Press the ANT button to return to the INPUT (Y) jack, as shown on REAR PANEL CONNECTIONS. 19 FIRST TIME USE CONNECTING EXTERNAL VIDEO DEVICES CONNECTING A COMPONENT SOURCE TO INPUT 1 OR 2: Y-PBPR. 1. Connect the cable from the Y OUT of the laserdisc/DVD player or HDTV set top box to ...the INPUT (AUDIO/L) jack. 6. The VIDEO OSD label disappears automatically after approximately four seconds. 7. Completely insert the connection cord plugs when connecting to the INPUT (PR) jack. 4. See page 13 for tips on the TV set top box to the previous channel.
...set below. 2. Press the ANT button to return to the INPUT (Y) jack, as shown on REAR PANEL CONNECTIONS. 19 FIRST TIME USE CONNECTING EXTERNAL VIDEO DEVICES CONNECTING A COMPONENT SOURCE TO INPUT 1 OR 2: Y-PBPR. 1. Connect the cable from the Y OUT of the laserdisc/DVD player or HDTV set top box to ...the INPUT (AUDIO/L) jack. 6. The VIDEO OSD label disappears automatically after approximately four seconds. 7. Completely insert the connection cord plugs when connecting to the INPUT (PR) jack. 4. See page 13 for tips on the TV set top box to the previous channel.
Owners Guide
Page 20
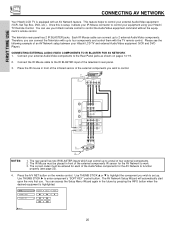
...THUMB STICK ̈ to control. You can access the Setup Menu Wizard again in front of an AV Network setup between your Hitachi LCD TV and external Audio/Video equipment (VCR and DVD Player). Each IR Mouse cable can control up to four components and control them with...Sensor IR Mouse R L V OUTPUT VCR NOTES: 1. The rear panel has two IR BLASTER inputs which can connect up . FIRST TIME USE CONNECTING AV NETWORK Your Hitachi LCD TV is setup, it allows your IR Mouse connector to control your equipment using your Hitachi TV Remote Control. Therefore, you wish to set up to 2 ...
...THUMB STICK ̈ to control. You can access the Setup Menu Wizard again in front of an AV Network setup between your Hitachi LCD TV and external Audio/Video equipment (VCR and DVD Player). Each IR Mouse cable can control up to four components and control them with...Sensor IR Mouse R L V OUTPUT VCR NOTES: 1. The rear panel has two IR BLASTER inputs which can connect up . FIRST TIME USE CONNECTING AV NETWORK Your Hitachi LCD TV is setup, it allows your IR Mouse connector to control your equipment using your Hitachi TV Remote Control. Therefore, you wish to set up to 2 ...
Owners Guide
Page 21
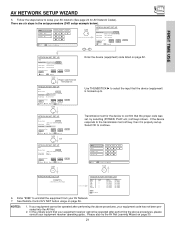
... procedures, your equipment code has not been precoded into the AV Net. 2. HITACHI AV NET SET UP DVD Device Code Video Input Audio Input 0 6 7 2 (Enter code "9999" to uninstall) Input 1 Using TV Transmission Test BACK POWER OK PLAY EXIT Move Set Input SEL Select THUMB STICK ...below ). DVD Cable Box Photo MC POWER MENU MORE Move INFO Device Setting THUMB STICK HITACHI AV NET SET UP DVD Device Code Video Input Audio Input - - - (Enter code "9999" to uninstall) No Connection No Connection Transmission Test BACK Move 0-9 POWER OK Input PLAY EXIT 0 9 CH UP FIRST ...
... procedures, your equipment code has not been precoded into the AV Net. 2. HITACHI AV NET SET UP DVD Device Code Video Input Audio Input 0 6 7 2 (Enter code "9999" to uninstall) Input 1 Using TV Transmission Test BACK POWER OK PLAY EXIT Move Set Input SEL Select THUMB STICK ...below ). DVD Cable Box Photo MC POWER MENU MORE Move INFO Device Setting THUMB STICK HITACHI AV NET SET UP DVD Device Code Video Input Audio Input - - - (Enter code "9999" to uninstall) No Connection No Connection Transmission Test BACK Move 0-9 POWER OK Input PLAY EXIT 0 9 CH UP FIRST ...

Owners Guide
Page 25
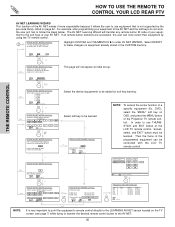
...button Press this button to quickly turn the Closed Caption feature on your TV, then enter the remaining two numbers using the number buttons. You can.... Enter "0" first for channels 1 to 9, or simply press the single digit channel you are used when the remote control is in Set-Top-Box (...THE REMOTE CONTROL HOW TO USE THE REMOTE TO CONTROL YOUR LCD REAR PTV ቨ PVR (Personal Video Recorder) button When pressed, this...Signal Format Wide Mode Sleep Timer 3:32 PM S-IN: 3 VID 3 When an S-VIDEO Input is connected to VIDEO: 3. 3:32 PM YPBPR: 1 VID: 1 When a COMPONENT VIDEO: Y-PBPR Input is ...
...button Press this button to quickly turn the Closed Caption feature on your TV, then enter the remaining two numbers using the number buttons. You can.... Enter "0" first for channels 1 to 9, or simply press the single digit channel you are used when the remote control is in Set-Top-Box (...THE REMOTE CONTROL HOW TO USE THE REMOTE TO CONTROL YOUR LCD REAR PTV ቨ PVR (Personal Video Recorder) button When pressed, this...Signal Format Wide Mode Sleep Timer 3:32 PM S-IN: 3 VID 3 When an S-VIDEO Input is connected to VIDEO: 3. 3:32 PM YPBPR: 1 VID: 1 When a COMPONENT VIDEO: Y-PBPR Input is ...
Owners Guide
Page 30
... (Learning) A device is stored in the CUSTOM memory. TV Softkeys POWER MENU Done Move Continue SEL Select SELECT EXIT No Done THUMB STICK SELECT HITACHI AV NET WIZARD (Learning) DVD2 (Custom) Video Input Audio Input No Connection No Connection Transmission Test POWER PLAY CH UP BACK Move OK SEL Select...control directly to the LEARNING AV NET sensor located on OSD, and press the MENU button of the Projection TV remote control. HOW TO USE THE REMOTE TO CONTROL YOUR LCD REAR PTV THE REMOTE CONTROL AV NET LEARNING WIZARD This function of the AV NET makes it more expandable ...
... (Learning) A device is stored in the CUSTOM memory. TV Softkeys POWER MENU Done Move Continue SEL Select SELECT EXIT No Done THUMB STICK SELECT HITACHI AV NET WIZARD (Learning) DVD2 (Custom) Video Input Audio Input No Connection No Connection Transmission Test POWER PLAY CH UP BACK Move OK SEL Select...control directly to the LEARNING AV NET sensor located on OSD, and press the MENU button of the Projection TV remote control. HOW TO USE THE REMOTE TO CONTROL YOUR LCD REAR PTV THE REMOTE CONTROL AV NET LEARNING WIZARD This function of the AV NET makes it more expandable ...
Owners Guide
Page 34
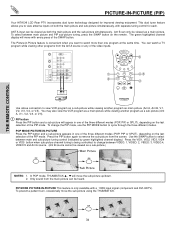
...VID4 FREEZE PIP MODE PIP ACCESS SWAP DAY/NIGHT ብ,ቦ ባ REC Audio Video OUTPUT VCR CLU-5729TSI Use above connection to watch a TV program while viewing other programs from the screen. Only sound from the main picture can be heard. To select between main ...or SPLIT), depending on both the main picture and the sub-picture simultaneously. PIP 34 THE REMOTE CONTROL PICTURE-IN-PICTURE (PIP) Your HITACHI LCD Rear PTV incorporates dual tuner technology designed for each. To prevent a pattern burn, occasionally move the sub-picture up/down. 2. You may also...
...VID4 FREEZE PIP MODE PIP ACCESS SWAP DAY/NIGHT ብ,ቦ ባ REC Audio Video OUTPUT VCR CLU-5729TSI Use above connection to watch a TV program while viewing other programs from the screen. Only sound from the main picture can be heard. To select between main ...or SPLIT), depending on both the main picture and the sub-picture simultaneously. PIP 34 THE REMOTE CONTROL PICTURE-IN-PICTURE (PIP) Your HITACHI LCD Rear PTV incorporates dual tuner technology designed for each. To prevent a pattern burn, occasionally move the sub-picture up/down. 2. You may also...


