
Owners Guide
Page 1
TABLE OF CONTENTS iHITACHI PROJECTION COLOR TV 46UX24B/25K 60SX12B/13K OPERATING GUIDE 50UX26B/27K 50SX8B 1
TABLE OF CONTENTS iHITACHI PROJECTION COLOR TV 46UX24B/25K 60SX12B/13K OPERATING GUIDE 50UX26B/27K 50SX8B 1
Owners Guide
Page 2
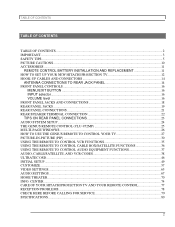
... ...2 IMPORTANT...3 SAFETY TIPS...5 PICTURE CAUTIONS ...10 ACCESSORIES ...11 REMOTE CONTROL BATTERY INSTALLATION AND REPLACEMENT 11 HOW TO SET UP YOUR NEW HITACHI PROJECTION TV 12 HOOK-UP CABLES AND CONNECTORS 14 ANTENNA CONNECTIONS TO REAR JACK PANEL 14 FRONT PANEL CONTROLS...16 MENU/EXIT BUTTON ...16 INPUT selector... ...46 INITIAL SETUP ...49 CUSTOMIZE ...57 VIDEO SETTINGS...65 AUDIO SETTINGS ...67 HOME THEATER...70 INFO. CENTER ...74 CARE OF YOUR HITACHI PROJECTION TV AND YOUR REMOTE CONTROL 77 RECEPTION PROBLEMS...78 CHECK HERE BEFORE CALLING FOR SERVICE 79 SPECIFICATIONS ...80 2
... ...2 IMPORTANT...3 SAFETY TIPS...5 PICTURE CAUTIONS ...10 ACCESSORIES ...11 REMOTE CONTROL BATTERY INSTALLATION AND REPLACEMENT 11 HOW TO SET UP YOUR NEW HITACHI PROJECTION TV 12 HOOK-UP CABLES AND CONNECTORS 14 ANTENNA CONNECTIONS TO REAR JACK PANEL 14 FRONT PANEL CONTROLS...16 MENU/EXIT BUTTON ...16 INPUT selector... ...46 INITIAL SETUP ...49 CUSTOMIZE ...57 VIDEO SETTINGS...65 AUDIO SETTINGS ...67 HOME THEATER...70 INFO. CENTER ...74 CARE OF YOUR HITACHI PROJECTION TV AND YOUR REMOTE CONTROL 77 RECEPTION PROBLEMS...78 CHECK HERE BEFORE CALLING FOR SERVICE 79 SPECIFICATIONS ...80 2
Owners Guide
Page 3
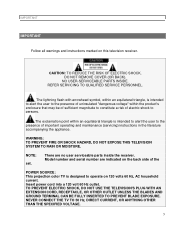
... REFER SERVICING TO QUALIFIED SERVICE PERSONNEL. NOTE: set. Model number and serial number are no user serviceable parts inside the receiver. NEVER CONNECT THE TV TO 50 Hz, DIRECT CURRENT, OR ANYTHING OTHER THAN THE SPECIFIED VOLTAGE. 3 There are indicated on the back side of the POWER SOURCE: ...This projection color TV is intended to alert the user to the presence of electric shock to operate on this television receiver. TO PREVENT ELECTRIC SHOCK, DO NOT ...
... REFER SERVICING TO QUALIFIED SERVICE PERSONNEL. NOTE: set. Model number and serial number are no user serviceable parts inside the receiver. NEVER CONNECT THE TV TO 50 Hz, DIRECT CURRENT, OR ANYTHING OTHER THAN THE SPECIFIED VOLTAGE. 3 There are indicated on the back side of the POWER SOURCE: ...This projection color TV is intended to alert the user to the presence of electric shock to operate on this television receiver. TO PREVENT ELECTRIC SHOCK, DO NOT ...

Owners Guide
Page 5
...these products properly, this section illustrates safety tips which will be discovered in the design of your HITACHI television receiver. FOR YOUR PERSONAL SAFETY 1 This television set from it to HITACHI. If you Obtain from the wall outlet and refer servicing to qualified service personnel. 3 Do not...unable to rest on or roll over the power cord, and do not place the TV where the 5 SAFETY TIPS SAFETY TIPS IMPORTANT SAFEGUARDS SAFETY POINTS YOU SHOULD KNOW ABOUT YOUR HITACHI TELEVISION RECEIVER CAUTION: * Read all warnings and instructions marked on the television receiver. ...
...these products properly, this section illustrates safety tips which will be discovered in the design of your HITACHI television receiver. FOR YOUR PERSONAL SAFETY 1 This television set from it to HITACHI. If you Obtain from the wall outlet and refer servicing to qualified service personnel. 3 Do not...unable to rest on or roll over the power cord, and do not place the TV where the 5 SAFETY TIPS SAFETY TIPS IMPORTANT SAFEGUARDS SAFETY POINTS YOU SHOULD KNOW ABOUT YOUR HITACHI TELEVISION RECEIVER CAUTION: * Read all warnings and instructions marked on the television receiver. ...
Owners Guide
Page 9
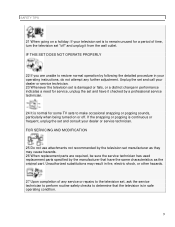
... may cause hazards. 26 When replacement parts are unable to restore normal operation by the manufacturer that the television is to remain unused for some TV sets to determine that have the same characteristics as they may result in performance indicates a need for service, unplug the set and have it from...
... may cause hazards. 26 When replacement parts are unable to restore normal operation by the manufacturer that the television is to remain unused for some TV sets to determine that have the same characteristics as they may result in performance indicates a need for service, unplug the set and have it from...
Owners Guide
Page 10
... mainly for the private viewing of time. Public viewing may develop over a long period of programs broadcast by your Hitachi Factory Warranty. Such "PATTERN BURNS" constitute misuse and are NOT COVERED by TV stations and cable companies and programs from the broadcaster or owner of the screen or a "pattern burn" may require...
... mainly for the private viewing of time. Public viewing may develop over a long period of programs broadcast by your Hitachi Factory Warranty. Such "PATTERN BURNS" constitute misuse and are NOT COVERED by TV stations and cable companies and programs from the broadcaster or owner of the screen or a "pattern burn" may require...
Owners Guide
Page 12
...separation, place the external speakers at its large viewing screen. HOW TO SET UP YOUR NEW HITACHI PROJECTION TV HOW TO SET UP YOUR NEW HITACHI PROJECTION TV ANTENNA Unless your TV is connected to a cable TV system or to the side or behind the viewing area. LOCATION Select an area where sunlight or... location selected allows free flow of air to reduce the reflection or the TV can become excessively hot. If so, drapes or screens can be located in the room to the left or right of the HITACHI Projection Television is its best, test various locations in a different section of...
...separation, place the external speakers at its large viewing screen. HOW TO SET UP YOUR NEW HITACHI PROJECTION TV HOW TO SET UP YOUR NEW HITACHI PROJECTION TV ANTENNA Unless your TV is connected to a cable TV system or to the side or behind the viewing area. LOCATION Select an area where sunlight or... location selected allows free flow of air to reduce the reflection or the TV can become excessively hot. If so, drapes or screens can be located in the room to the left or right of the HITACHI Projection Television is its best, test various locations in a different section of...
Owners Guide
Page 13
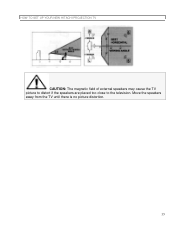
HOW TO SET UP YOUR NEW HITACHI PROJECTION TV CAUTION: The magnetic field of external speakers may cause the TV picture to distort if the speakers are placed too close to the television. Move the speakers away from the TV until there is no picture distortion. 13
HOW TO SET UP YOUR NEW HITACHI PROJECTION TV CAUTION: The magnetic field of external speakers may cause the TV picture to distort if the speakers are placed too close to the television. Move the speakers away from the TV until there is no picture distortion. 13
Owners Guide
Page 14
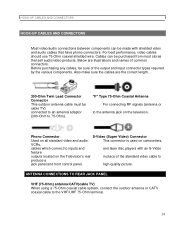
... video and audio cables that sell audio/video products. high-quality picture. ANTENNA CONNECTIONS TO REAR JACK PANEL VHF (75-Ohm) antenna/CATV(cable TV) When using a 75-Ohm coaxial cable system, connect the outdoor antenna or CATV coaxial cable to the VHF/UHF 75-Ohm terminal. 14 Below... outdoor antenna cable must be sure of the output and input connector types required by the various components. Before purchasing any cables, be cable TV) connected to an antenna adaptor (300-Ohm to 75-Ohm). HOOK-UP CABLES AND CONNECTORS HOOK-UP CABLES AND CONNECTORS Most video/audio connections...
... video and audio cables that sell audio/video products. high-quality picture. ANTENNA CONNECTIONS TO REAR JACK PANEL VHF (75-Ohm) antenna/CATV(cable TV) When using a 75-Ohm coaxial cable system, connect the outdoor antenna or CATV coaxial cable to the VHF/UHF 75-Ohm terminal. 14 Below... outdoor antenna cable must be sure of the output and input connector types required by the various components. Before purchasing any cables, be cable TV) connected to an antenna adaptor (300-Ohm to 75-Ohm). HOOK-UP CABLES AND CONNECTORS HOOK-UP CABLES AND CONNECTORS Most video/audio connections...

Owners Guide
Page 15
Consult your dealer or service store for the antenna mixer. 15 HOOK-UP CABLES AND CONNECTORS VHF (300-Ohm) antenna/UHF antenna When using a 300-Ohm twin lead from an outdoor antenna, connect the VHF or UHF antenna leads to the antenna mixer. When both VHF and UHF antennas are connected Attach an optional antenna cable mixer to the TV antenna terminal, and connect the cables to screws of the VHF or UHF adaptor. Plug the adaptor into the antenna terminal on the TV.
Consult your dealer or service store for the antenna mixer. 15 HOOK-UP CABLES AND CONNECTORS VHF (300-Ohm) antenna/UHF antenna When using a 300-Ohm twin lead from an outdoor antenna, connect the VHF or UHF antenna leads to the antenna mixer. When both VHF and UHF antennas are connected Attach an optional antenna cable mixer to the TV antenna terminal, and connect the cables to screws of the VHF or UHF adaptor. Plug the adaptor into the antenna terminal on the TV.

Owners Guide
Page 16
....) 10 ADJUSTMENT MODE button 16 These buttons also serve as the cursor down and up buttons when in the top right corner of the TV screen. NOTE: Your HITACHI TV will see front panel diagram. VOLUME level Press these buttons until the desired channel appears in MENU mode. This button also serves as...
....) 10 ADJUSTMENT MODE button 16 These buttons also serve as the cursor down and up buttons when in the top right corner of the TV screen. NOTE: Your HITACHI TV will see front panel diagram. VOLUME level Press these buttons until the desired channel appears in MENU mode. This button also serves as...

Owners Guide
Page 17
... operate normally when you have mono sound, insert the audio cable in the top right corner of the TV screen. If this button. FRONT PANEL CONTROLS This button is accidentally pressed, please turn it on again. 11 FRONT INPUT JACKS (for VIDEO:3) Use these ...
... operate normally when you have mono sound, insert the audio cable in the top right corner of the TV screen. If this button. FRONT PANEL CONTROLS This button is accidentally pressed, please turn it on again. 11 FRONT INPUT JACKS (for VIDEO:3) Use these ...
Owners Guide
Page 22
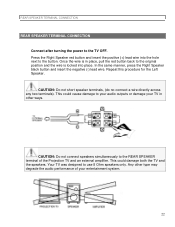
... button back to the button. CAUTION: Do not connect speakers simultaneously to your audio outputs or damage your entertainment system. 22 Your TV was designed to the TV OFF. In the same manner, press the Right Speaker black button and insert the negative (-) lead wire. Repeat this procedure for ... wire directly across any two terminals). Any other ways. Once the wire is in other type may degrade the audio performance of the Projection TV and an external amplifier. Press the Right Speaker red button and insert the positive (+) lead wire into the hole next to the original position...
... button back to the button. CAUTION: Do not connect speakers simultaneously to your audio outputs or damage your entertainment system. 22 Your TV was designed to the TV OFF. In the same manner, press the Right Speaker black button and insert the negative (-) lead wire. Repeat this procedure for ... wire directly across any two terminals). Any other ways. Once the wire is in other type may degrade the audio performance of the Projection TV and an external amplifier. Press the Right Speaker red button and insert the positive (+) lead wire into the hole next to the original position...
Owners Guide
Page 23
... has only one audio output (mono sound), connect it to the left audio jack on connecting your other electronic equipment for additional information on the TV. Refer to your device has this feature. A single VCR can be used for VCR #1 and VCR #2, but note that have this feature. Use this connection...
... has only one audio output (mono sound), connect it to the left audio jack on connecting your other electronic equipment for additional information on the TV. Refer to your device has this feature. A single VCR can be used for VCR #1 and VCR #2, but note that have this feature. Use this connection...
Owners Guide
Page 24
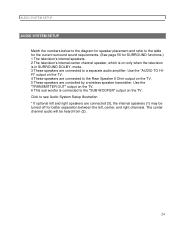
Use the "TRANSMITTER OUT" output on the TV. 6 This sub woofer is in SURROUND DOLBY- AUDIO SYSTEM SETUP AUDIO SYSTEM SETUP Match the numbers below to the diagram for speaker placement and refer ...'s internal speakers. 2 The television's internal center channel speaker, which is on only when the television is connected to the Rear Speaker 8 Ohm output on the TV. Use the "AUDIO TO HIFI" output on the TV. 4 These speakers are connected to the "SUB WOOFER" output on the...
Use the "TRANSMITTER OUT" output on the TV. 6 This sub woofer is in SURROUND DOLBY- AUDIO SYSTEM SETUP AUDIO SYSTEM SETUP Match the numbers below to the diagram for speaker placement and refer ...'s internal speakers. 2 The television's internal center channel speaker, which is on only when the television is connected to the Rear Speaker 8 Ohm output on the TV. Use the "AUDIO TO HIFI" output on the TV. 4 These speakers are connected to the "SUB WOOFER" output on the...
Owners Guide
Page 25
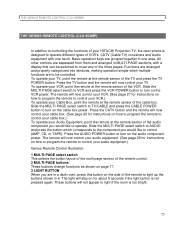
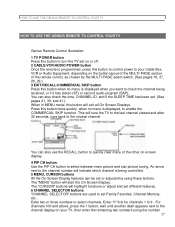
... control your cable box.) To operate your Audio Equipment, point the remote at the remote sensor of the TV and press the TV POWER button. The light will now control your TV, point the remote at the remote sensor of the audio component you would like to operate. To operate...CONTROL (CLU-952MP) THE GENIUS REMOTE CONTROL (CLU-952MP) In addition to controlling the functions of your HITACHI Projection TV, the new remote is designed to operate different types of VCR's, CATV (Cable TV) converters and Audio equipment with a display that can be controlled. To operate your VCR, point the ...
... control your cable box.) To operate your Audio Equipment, point the remote at the remote sensor of the TV and press the TV POWER button. The light will now control your TV, point the remote at the remote sensor of the audio component you would like to operate. To operate...CONTROL (CLU-952MP) THE GENIUS REMOTE CONTROL (CLU-952MP) In addition to controlling the functions of your HITACHI Projection TV, the new remote is designed to operate different types of VCR's, CATV (Cable TV) converters and Audio equipment with a display that can be controlled. To operate your VCR, point the ...
Owners Guide
Page 27
This will tune the TV to the last channel viewed and after 30 seconds, tune back to check the channel being controlled. ...program (SAP). HOW TO USE THE GENIUS REMOTE TO CONTROL YOUR TV HOW TO USE THE GENIUS REMOTE TO CONTROL YOUR TV Genius Remote Control Illustration 1 TV POWER button Press this button to turn the TV set on or off. 2 CABLE/VCR/AUDIO POWER button Once... the remote is programmed, press this button to control power to your TV, then enter the remaining two numbers using these buttons. You can also check the time, CHANNEL ID, and if...
This will tune the TV to the last channel viewed and after 30 seconds, tune back to check the channel being controlled. ...program (SAP). HOW TO USE THE GENIUS REMOTE TO CONTROL YOUR TV HOW TO USE THE GENIUS REMOTE TO CONTROL YOUR TV Genius Remote Control Illustration 1 TV POWER button Press this button to turn the TV set on or off. 2 CABLE/VCR/AUDIO POWER button Once... the remote is programmed, press this button to control power to your TV, then enter the remaining two numbers using these buttons. You can also check the time, CHANNEL ID, and if...
Owners Guide
Page 28
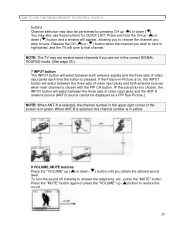
... SIGNAL SOURCE mode. (See page 35.) 7 INPUT button The INPUT button will select between both antenna sources when main channel is highlighted, and the TV will appear, allowing you to restore the sound. 28 To turn the sound off instantly to tune. Press the "MUTE" button again or press the...Sub-Picture.) NOTE: When ANT A is selected, the channel number in the upper right corner of the screen is in -Picture is pressed. NOTE: The TV may not receive some channels if you wish to answer the telephone, etc., press the "MUTE" button. Channel selection may also use these buttons for...
... SIGNAL SOURCE mode. (See page 35.) 7 INPUT button The INPUT button will select between both antenna sources when main channel is highlighted, and the TV will appear, allowing you to restore the sound. 28 To turn the sound off instantly to tune. Press the "MUTE" button again or press the...Sub-Picture.) NOTE: When ANT A is selected, the channel number in the upper right corner of the screen is in -Picture is pressed. NOTE: The TV may not receive some channels if you wish to answer the telephone, etc., press the "MUTE" button. Channel selection may also use these buttons for...
Owners Guide
Page 29
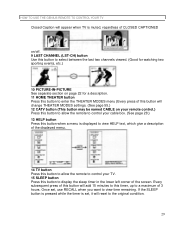
... is pressed while the timer is displayed to view HELP text, which give a description of the displayed menu. 14 TV button Press this button to allow the remote to control your TV. 15 SLEEP button Press this button to display the sleep timer in the lower left corner of the screen. Every... , it will add 15 minutes to this timer, up to a maximum of 3 hours. HOW TO USE THE GENIUS REMOTE TO CONTROL YOUR TV Closed Caption will appear when TV is muted, regardless of CLOSED CAPTIONED on/off. 9 LAST CHANNEL (LST-CH) button Use this button to select between the last two channels...
... is pressed while the timer is displayed to view HELP text, which give a description of the displayed menu. 14 TV button Press this button to allow the remote to control your TV. 15 SLEEP button Press this button to display the sleep timer in the lower left corner of the screen. Every... , it will add 15 minutes to this timer, up to a maximum of 3 hours. HOW TO USE THE GENIUS REMOTE TO CONTROL YOUR TV Closed Caption will appear when TV is muted, regardless of CLOSED CAPTIONED on/off. 9 LAST CHANNEL (LST-CH) button Use this button to select between the last two channels...
Owners Guide
Page 30
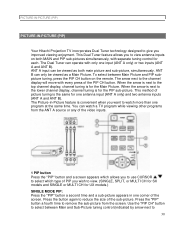
... button on both main picture and sub-picture, simultaneously. The arrow next to 30 PICTURE-IN-PICTURE (PIP) PICTURE-IN-PICTURE (PIP) Your Hitachi Projection TV incorporates Dual Tuner technology designed to the lower channel display, channel tuning is for the PIP sub-picture. To select between Main and Sub-Picture... the Main Picture. When the arrow is next to give you want to reduce the size of the screen. Press the button again to watch a TV program while viewing other programs from the ANT A source or any of the video inputs. 1 PIP button Press the "PIP" button and a screen ...
... button on both main picture and sub-picture, simultaneously. The arrow next to 30 PICTURE-IN-PICTURE (PIP) PICTURE-IN-PICTURE (PIP) Your Hitachi Projection TV incorporates Dual Tuner technology designed to the lower channel display, channel tuning is for the PIP sub-picture. To select between Main and Sub-Picture... the Main Picture. When the arrow is next to give you want to reduce the size of the screen. Press the button again to watch a TV program while viewing other programs from the ANT A source or any of the video inputs. 1 PIP button Press the "PIP" button and a screen ...


