
Owners Guide
Page 10
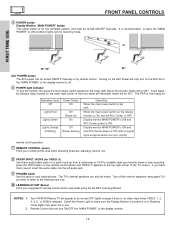
...wish to listen to ON condition (lights red) for the complete system, and must be turned ON/OFF manually or by mode (lights red) when not in use. Turn off or in the top right corner ... POWER FIRST TIME USE 32"/42" 50" AVC POWER button The AVC power can be turned ON/OFF manually. The PDP is now ready for your equipment's remote control at this area when selecting channels, adjusting volume...the remote control button and VIDEO: 5 appears in Stand-by remote control. Your HITACHI Plasma TV will illuminate (lower left audio jack. ቪ PHONES JACK Use this area while using the...
...wish to listen to ON condition (lights red) for the complete system, and must be turned ON/OFF manually or by mode (lights red) when not in use. Turn off or in the top right corner ... POWER FIRST TIME USE 32"/42" 50" AVC POWER button The AVC power can be turned ON/OFF manually. The PDP is now ready for your equipment's remote control at this area when selecting channels, adjusting volume...the remote control button and VIDEO: 5 appears in Stand-by remote control. Your HITACHI Plasma TV will illuminate (lower left audio jack. ቪ PHONES JACK Use this area while using the...
Owners Guide
Page 14
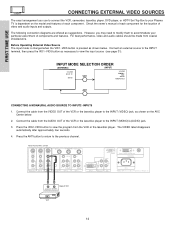
... to view the input source (see page 31). Press the ANT button to return to your particular assortment of components and features. However, you use HITACHI specified cable. TO MONITOR INPUT 1 R R AUDIO OUT RGB AC IN TruBass SRS and symbol are offered as necessary to view the program from coaxial shielded...
... to view the input source (see page 31). Press the ANT button to return to your particular assortment of components and features. However, you use HITACHI specified cable. TO MONITOR INPUT 1 R R AUDIO OUT RGB AC IN TruBass SRS and symbol are offered as necessary to view the program from coaxial shielded...
Owners Guide
Page 27
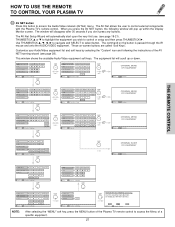
... INFO Device Setting CH ̆ 3 6 9 MENU INFO GUIDE THUMB STICK Cable Box Set Top Box Custom SETUP Move INFO Device Setting THUMB STICK HITACHI AV NET WIZARD (Learning) Use this button to access the Audio/Video network (AV Net) menu. BACK Learn Move SEL Start Wizard Modify NOTE: ...CH LAST CH GUIDE/TV VID 4 SWAPPIP ACCESS FREEZE VIDEO SCHD VID 5 REC CLU-5723TSI ቯ AV NET button Press this wizard to manually learn or modify your Audio/Video equipment list and soft keys by selecting the "Custom" icon and following window will scroll up within the Display...
... INFO Device Setting CH ̆ 3 6 9 MENU INFO GUIDE THUMB STICK Cable Box Set Top Box Custom SETUP Move INFO Device Setting THUMB STICK HITACHI AV NET WIZARD (Learning) Use this button to access the Audio/Video network (AV Net) menu. BACK Learn Move SEL Start Wizard Modify NOTE: ...CH LAST CH GUIDE/TV VID 4 SWAPPIP ACCESS FREEZE VIDEO SCHD VID 5 REC CLU-5723TSI ቯ AV NET button Press this wizard to manually learn or modify your Audio/Video equipment list and soft keys by selecting the "Custom" icon and following window will scroll up within the Display...
Owners Guide
Page 28
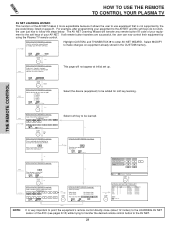
...THUMB STICK SELECT Select Softkey EXIT Select soft key to make changes on page 21. HITACHI AV NET WIZARD (Learning) Use this wizard to enter AV NET WIZARD. Highlight CUSTOM, and THUMBSTICK ̈ to manually learn or modify your equipment to the AV NET and the soft keys do you...SEL Next Step THUMB STICK Next SELECT Select the device (equipment) to learn ? BACK Move Learn Modify SEL Start Wizard THUMB STICK Learn SELECT HITACHI AV NET WIZARD (Learning) A device is not supported by using the Plasma TV remote control. BACK Move Add New Device SEL Initialize THUMB ...
...THUMB STICK SELECT Select Softkey EXIT Select soft key to make changes on page 21. HITACHI AV NET WIZARD (Learning) Use this wizard to enter AV NET WIZARD. Highlight CUSTOM, and THUMBSTICK ̈ to manually learn or modify your equipment to the AV NET and the soft keys do you...SEL Next Step THUMB STICK Next SELECT Select the device (equipment) to learn ? BACK Move Learn Modify SEL Start Wizard THUMB STICK Learn SELECT HITACHI AV NET WIZARD (Learning) A device is not supported by using the Plasma TV remote control. BACK Move Add New Device SEL Initialize THUMB ...
Owners Guide
Page 35
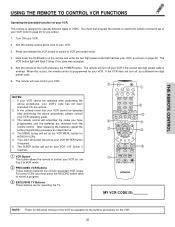
... two digit preset code that your VCR cannot be operated after performing the above procedures, please consult your VCR, as the VCR MENU button for HITACHI VCRs. 5. Aim the remote control at the VCR and press the POWER button. If your VCR cannot be operated after performing the above . 4. The MENU... 1 VID 2 PIP VID 3 SURF VID 5 VID 4 FREEZE PIP MODE PIP ACCESS SWAP DAY/NIGHT ቤ ባ REC MY VCR CODE IS: NOTE: Refer to instruction manual of the VCR for operation of VCRs. Turn ON your VCR's code has not been precoded into the remote. 2. You must press the RECORD button...
... two digit preset code that your VCR cannot be operated after performing the above procedures, please consult your VCR, as the VCR MENU button for HITACHI VCRs. 5. Aim the remote control at the VCR and press the POWER button. If your VCR cannot be operated after performing the above . 4. The MENU... 1 VID 2 PIP VID 3 SURF VID 5 VID 4 FREEZE PIP MODE PIP ACCESS SWAP DAY/NIGHT ቤ ባ REC MY VCR CODE IS: NOTE: Refer to instruction manual of the VCR for operation of VCRs. Turn ON your VCR's code has not been precoded into the remote. 2. You must press the RECORD button...
Owners Guide
Page 36
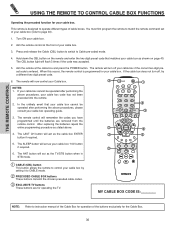
... above procedures, please consult your cable box by setting it to control your cable box operating guide. 3. Turn ON your cable box (refer to instruction manual of the Cable Box for operation of your cable box. 2. The remote will act as stated above procedures, your cable box. 3. When this occurs, the...
... above procedures, please consult your cable box by setting it to control your cable box operating guide. 3. Turn ON your cable box (refer to instruction manual of the Cable Box for operation of your cable box. 2. The remote will act as stated above procedures, your cable box. 3. When this occurs, the...
Owners Guide
Page 37
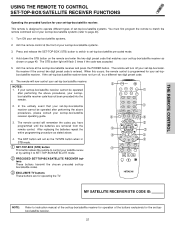
...). 1. In the unlikely event that matches your set-top-box/satellite receiver as stated above procedures, your set -top-box/satellite systems (refer to instruction manual of the set-top-box/satellite receiver for operation of your set -top-box/satellite receiver. This remote is programmed for your set -top-box...
...). 1. In the unlikely event that matches your set-top-box/satellite receiver as stated above procedures, your set -top-box/satellite systems (refer to instruction manual of the set-top-box/satellite receiver for operation of your set -top-box/satellite receiver. This remote is programmed for your set -top-box...
Owners Guide
Page 38
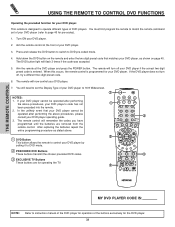
... 2 PIP VID 3 SURF VID 5 VID 4 FREEZE PIP MODE PIP ACCESS SWAP DAY/NIGHT ባ ቤ REC MY DVD PLAYER CODE IS: NOTE: Refer to instruction manual of the DVD player for operation of your DVD player. If the DVD player does not turn off , try a different two digit preset code. 6. In...
... 2 PIP VID 3 SURF VID 5 VID 4 FREEZE PIP MODE PIP ACCESS SWAP DAY/NIGHT ባ ቤ REC MY DVD PLAYER CODE IS: NOTE: Refer to instruction manual of the DVD player for operation of your DVD player. If the DVD player does not turn off , try a different two digit preset code. 6. In...
Owners Guide
Page 39
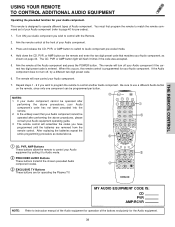
... 5 VID 4 FREEZE PIP MODE PIP ACCESS SWAP DAY/NIGHT ባ REC ቤ MY AUDIO EQUIPMENT CODE IS: CD PVR AMP/RCVR NOTE: Refer to instruction manual of the Audio equipment for operation of your Audio component (refer to use a different Audio button on page 40. In the unlikely event that matches...
... 5 VID 4 FREEZE PIP MODE PIP ACCESS SWAP DAY/NIGHT ባ REC ቤ MY AUDIO EQUIPMENT CODE IS: CD PVR AMP/RCVR NOTE: Refer to instruction manual of the Audio equipment for operation of your Audio component (refer to use a different Audio button on page 40. In the unlikely event that matches...
Owners Guide
Page 72
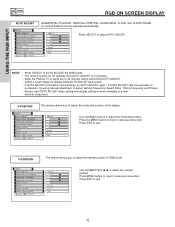
... Select HORIZONTAL POSITION, VERTICAL POSITION, HORIZONTAL CLOCK and CLOCK PHASE for display while AUTO ADJUST takes place. • If AUTO ADJUST terminates unsuccessfully, try using manual adjustment to adjust Vertical Frequency, Aspect Ratio, Timing Frequency and Picture. • Always reset AUTO ADJUST when setting new display setting or when changing to...
... Select HORIZONTAL POSITION, VERTICAL POSITION, HORIZONTAL CLOCK and CLOCK PHASE for display while AUTO ADJUST takes place. • If AUTO ADJUST terminates unsuccessfully, try using manual adjustment to adjust Vertical Frequency, Aspect Ratio, Timing Frequency and Picture. • Always reset AUTO ADJUST when setting new display setting or when changing to...


